Copying work items between repositories using CSV export and import
Introduction
IBM Rational Team Concert provides a wide range of components to support application lifecycle management. These new functionalities can be used to increase productivity and efficiency. After reading this article, you will have a basic understanding of how you can benefit from using the CSV import/export tool to migrate a set of work items or a project area from a Jazz repository to another Jazz repository.
Import authorization criteria
Most process definitions in RTC have a role set to perform all operations; if the user id associated to a role has such a permission, then that user id is a good choice for the user running the CSV import.
- JazzAdmins – repository role, for creation of users and optimal performance
- Project Admins – within the project area, for creating the necessary items during import (work items, categories, iterations and releases)
Import prerequisites
The destination environment, which in this guideline is Repository B, should have the Artifacts (Project Area, Team Area, Development Lines, Iterations, Iteration plans, categories and so on) applicable with the same names as in Repository A. Before importing the CSV file into the destination repository, you must make sure that Repository B has all the matching Artifacts with the same names as in Repository A; if not, they will be prone to errors. If you are not certain of the values, remove the work item attributes from the CSV importer so that they can be updated manually after the import.
- Project area should be created with name identical to Repository A.
- Team areas should be created and individual team members (initial, middle values, case sensitive) should be associated with appropriate process roles.
- Artifacts like Development lines, iterations, Work item categories should be created in Repository B and associated to Team areas.
- Ensure customized work items have already been imported from Repository A to Repository B.
- Users associated with the work items must exist in the destination repository
Transfering the work items from Repository A to Repository B
- Create a Query to export Work items:
- Create a query with the condition set “Team Area”.
- Choose the appropriate team area
- Save and run the query.
- Make sure all the required work items are queried.
Please refer to Figure 1 below for more details:
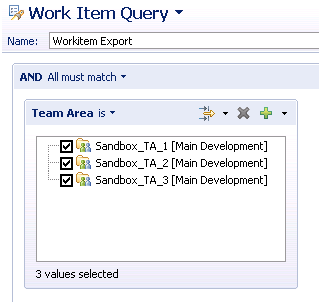
Figure 1 – Creating a Query Using RTC Eclipse Client
- Export the work items from Repository A
- There are two options for exporting:
- Right click on the above created Query and choose Export Work items
- Choose Export from Menu File > Export option
- Select the above created query; else, a query with different conditions could be created that is suited best to the individual projects.
- Select .csv format and the location to export the work items (Figure 2).
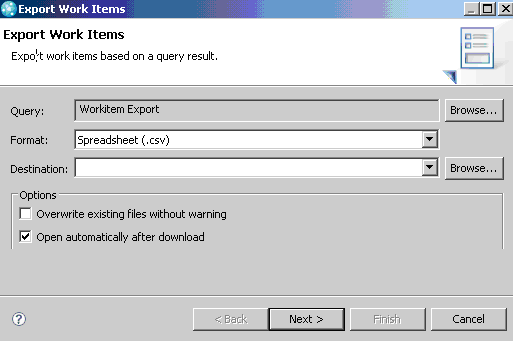
Figure 2 – Exporting Work Item Using CSV format
- In the “Export Work items” wizard, choose the Work item attributes (Build in/ custom) as applicable to individual projects. Attribute “ID” should not be retrieved and used for Import as Repository A; Repository B will have different numberings (Figure 3).
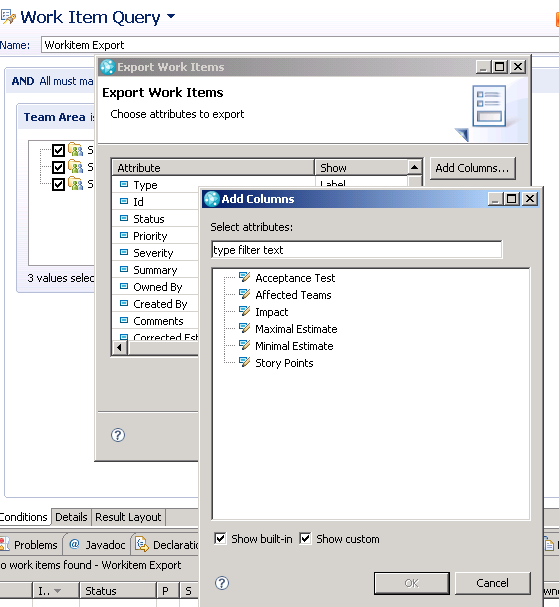
Figure 3 – Adding columns to the CSV format
- Click Finish to complete the process.
- Open the .CSV file and ensure all the work items that are associated to the Team area are exported. Compare the key artifacts/common work item attributes of Repository A and Repository B. The file is now ready for importing into the Repository B environment.
- There are two options for exporting:
- Importing the .CSV file into Repository B
- Click File > Import. In the Import window, click Team > Work Items from CSV. Click Next.
- Click Browse and navigate to the CSV file that you want to import. Select whether the values in the CSV file are separated by tabs, commas, etc. If you use a separator other than tabs or commas, click Other and enter the separator in the adjacent field.
- Select the Project area where you want to create or update the work items based on the contents of the CSV file.
- Select whether you want to create new work items or update existing work items. To enable updating of existing work items, be sure that the CSV file contains a column for the work item ID (usually Id). The Import Work Items Wizard uses the IDs to find matching work items.
- Edit the mapping file to customize Workitem attribute mapping. To have the wizard use the customized mapping file, click Use custom data mapping, then click Browse to navigate to the file.
- Click Finish to import the work items
Finally, you must verify that all the attributes of the imported work item are populated correctly.
About the authors
Viswanathan Sitaraman is a Db2 UDB Database Administrator, and has worked as a Rational Team Concert SME for IBM Global Account Rational Enablement Team. He can be contacted at vsitaram@in.ibm.com.
Amirsam Khataei is a technical support engineer on the worldwide Jazz and Rational Team concert Support team at IBM Toronto Lab. Previously, he was a support engineer on the IBM Rational Software Architect and Support team for one year. Amirsam also wrote the IBM Education Assistance modules on “Enabling custom defect types when integrating RQM with RTC”. He can be contacted at akhataei@ca.ibm.com.
© Copyright 2006 Borderline Research Institute