Rational Team Concert – Creating Custom Operation Advisors
Rational Team Concert (RTC) has a powerful built-in process engine, thanks to the underlying Jazz support. One very popular feature has been the ability to customize the behavior of built-in operations. For example, there are currently (in RTC 2.0.0.2 iFix3) seven available server-side preconditions (All Children Resolved, Required Properties, etc.) that are available to enforce (on a team/role/iteration basis) when a work item is saved.
Several customers I have worked with have had the need to create custom preconditions, also known as operation advisors. Doing so is not always a simple matter, as it requires knowledge of the Jazz SDK and the Eclipse plug-in architecture. All of the information necessary to successfully create a custom operation advisor is available, but it is spread across several websites and pages.
This article describes, from start to finish, how to create a simple operation advisor for RTC. This “Hello World” advisor will hook into the “Save Work Item” operation, so that custom actions can be performed when a given work item is attempted to be saved. Once you successfully get through this tutorial you should find it relatively easy to create other operations advisors (for example, when change sets get delivered to the SCM). You should also be able to create other types of custom code, such as operation participants and event handlers.
So – let’s begin!
Download and Installation
Note: I used C:RTC-SDK as the root installation directory ($INSTALLDIR) for the upcoming steps.
When developing extensions for Rational Team Concert 2.0.0.x, you’ll need to install a client, the Rational Team Concert SDK, and possibly the plain java client libraries.
- Go to Jazz.net and find the latest RTC 2.0.0 x downloads. Switch to the All Downloads page.
- You can download any edition. Get the zip files so that you can completely control the location of all the files.
- Download the following zip files for your platform:
- Client for Eclipse IDE.
- Plain Java Client Libraries.
- Rational Team Concert SDK (at the bottom of the downloads page). The RTC SDK includes binaries and source for client, server and JUnit tests.
- Unzip the client into
$INSTALLDIR.
- Unzip the RTC SDK zip file into
$INSTALLDIR/jazz/client/eclipse. Note: This download archive has path lengths longer than 250 characters and can cause trouble for some extractor tools on Windows. One zip extractor tool that works is 7Zip.
- Unzip the plain java client into a new directory called
$INSTALLDIR/jazz/client/plainjava.
Setup of Target Platform
We will now prepare Eclipse to target the correct type of plug-in environment. The target platform decides which plug-ins and source files are visible to the Java compiler, and makes the contents of the SDK available to your development environment.
- Start the new Eclipse client installed in step 1 above. In my case, that meant executing
C:RTC-SDKjazzclienteclipseeclipse.exe. Create a brand-new workspace when prompted. I created mine inC:workspacesHelloWorldAdvisor.
- Navigate to Plug-in Development Environment preferences by selecting Window -> Preferences -> Plug-in Development ->Target Platform. Enter
$INSTALLDIR/jazz/client/eclipse/rtc-sdk/target/eclipseinto the Location field and click Reload. Ensure every jar (1,179 at the time of this writing) is selected and click Apply, then OK.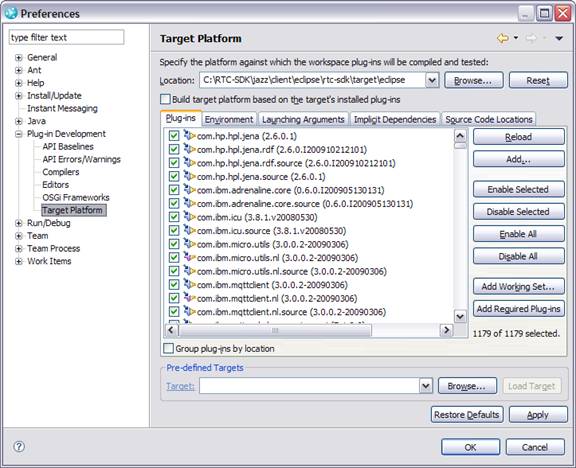
Create Plug-in
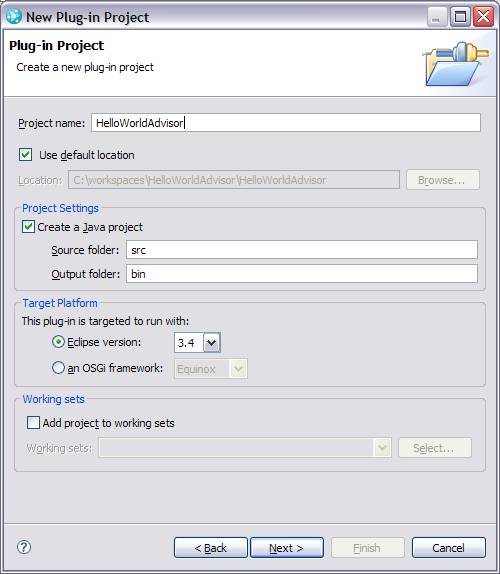
- Create a new Plug-in Development->Plug-in Project. Fill out the first page as shown below and select Next >
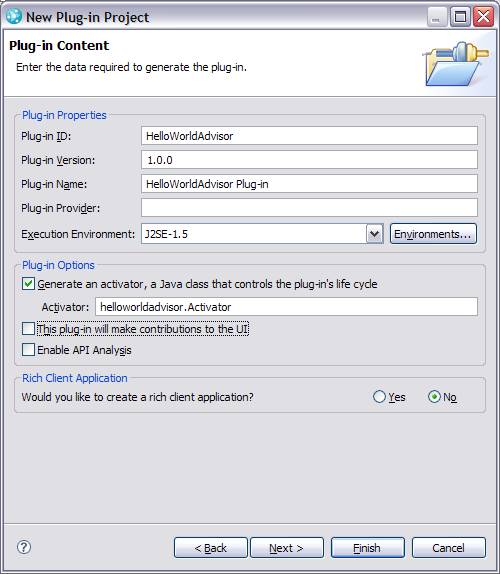
- Fill out the second dialog as follows, and select Finish. An activator is optional; it allows you to perform start-up and teardown actions if necessary.
- When prompted to change to the Plug-In Development perspective, do so.
- The MANIFEST.MF file for your project should open automatically. From the Overview tab select This plug-in is a singleton. Save this file.
- From the Dependencies tab, select the Add… button. Add the following four plug-ins to the list. After adding, save the file.
- com.ibm.team.process.common
- com.ibm.team.process.service
- com.ibm.team.workitem.common
- com.ibm.team.repository.common
- Still on the Dependencies tab, click on the Add… button in the Automated Management of Dependencies section and add all plug-ins listed. Click OK. After this operation completes (it may take a minute or two), save the MANIFEST.MF file.
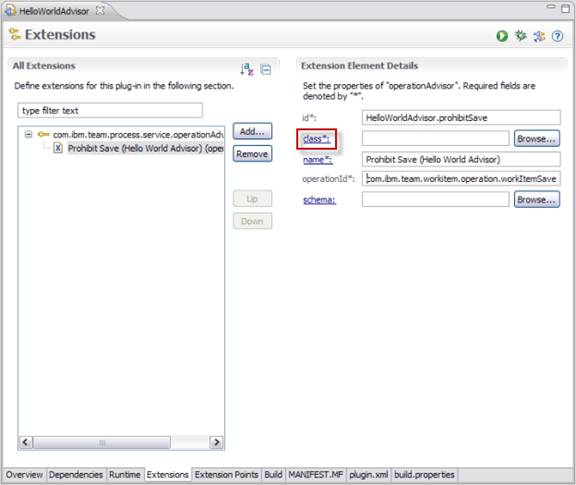
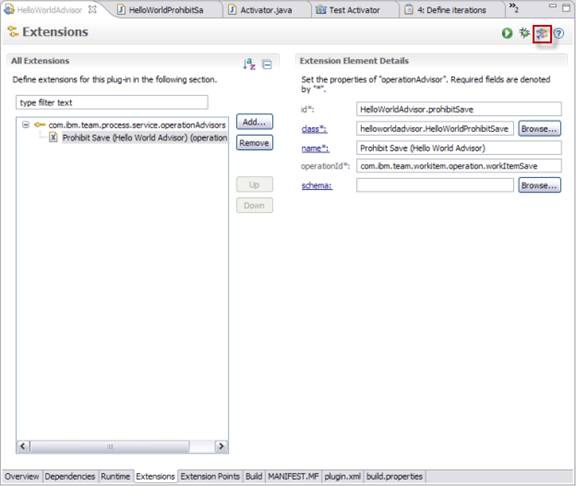
- Switch to the Extensions tab, and select Add…. Select com.ibm.team.process.service.operationAdvisors from the list and select Finish.
- Under the Extension Element Details section. The
operationIdentry indicates which RTC operation we intend this plug-in to augment. When finished, save the file.
Field
Value
id
HelloWorldAdvisor.prohibitSave
name
Prohibit Save (Hello World Advisor)
operationId
com.ibm.team.workitem.operation.workItemSave
- Click on the class link, which is boxed in red in the following dialog.
- This brings up a dialog that allows you to create your advisor implementation class. The wizard already implements the correct interface (com.ibm.team.process.common.advice.runtime.IOperationAdvisor) for you! Call your new class
HelloWorldProhibitSaveand place it in the helloworldadvisor package as shown here. Click Finish.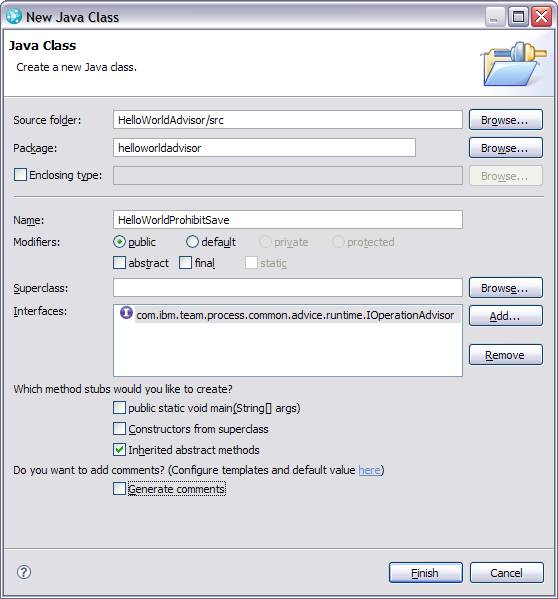
- Your new
HelloWorldProhibitSave.javafile should open automatically. Replace its contents with the following and save the file. This code snippet will cause the work item save operation to fail every time, and print the work item type in the Team Advisor view.
package helloworldadvisor; import org.eclipse.core.runtime.IProgressMonitor; import com.ibm.team.process.common.IProcessConfigurationElement; import com.ibm.team.process.common.advice.AdvisableOperation; import com.ibm.team.process.common.advice.IAdvisorInfo; import com.ibm.team.process.common.advice.IAdvisorInfoCollector; import com.ibm.team.process.common.advice.runtime.IOperationAdvisor; import com.ibm.team.repository.common.IAuditable; import com.ibm.team.repository.common.TeamRepositoryException; import com.ibm.team.workitem.common.ISaveParameter; import com.ibm.team.workitem.common.model.IWorkItem; public class HelloWorldProhibitSave implements IOperationAdvisor { public static final String PROBLEM_TYPE = " HelloWorldAdvisor.prohibitSave"; public void run(AdvisableOperation operation, IProcessConfigurationElement advisorConfiguration, IAdvisorInfoCollector collector, IProgressMonitor monitor) throws TeamRepositoryException { Object data = operation.getOperationData(); if (data instanceof ISaveParameter) { ISaveParameter param = (ISaveParameter) data; IAuditable auditable = param.getNewState(); if (auditable instanceof IWorkItem) { IWorkItem sourceworkItem = (IWorkItem) auditable; IAdvisorInfo problem = collector.createProblemInfo( "Hello World!", "This work item is of type: " + sourceworkItem.getWorkItemType(), PROBLEM_TYPE); collector.addInfo(problem); } } } } - You can optionally update the Activator.java class to add startup and termination messages. For example, in the start() method I added the line:
System.out.println("Hello Activator World!!!!!!!!!!!!!!!!!!!!");
- Make sure you have saved both your MANIFEST.MF file and your new Java file.
Build Plug-in
- Ensure that your new plug-in builds correctly by selecting the Export deployable plug-ins and fragments icon in the upper-right-hand corner of the Extensions tab window (boxed in red in the diagram below). Choose any temporary directory for the target. If an error occurs, a log file will be created inside a zip file at that directory location.
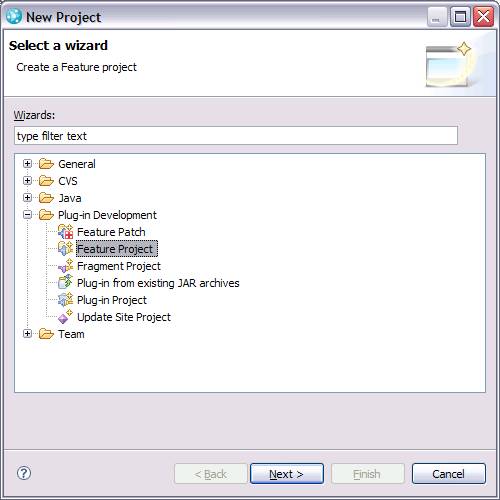
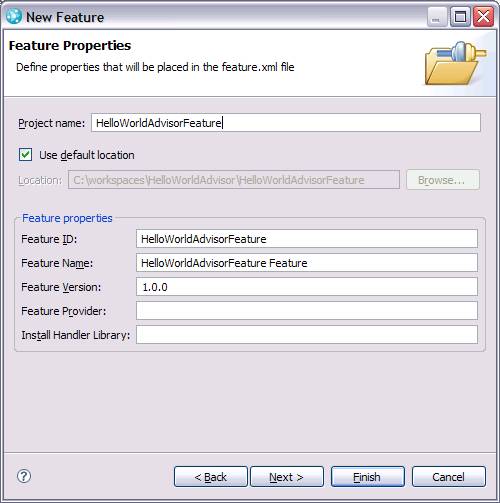
- Create a new Feature Project as shown below. A Feature allows you package your plug-in so that it can be better controlled by Eclipse’s configuration management infrastructure.
- Fill in the first screen as shown and select Next >.
- On the next screen, find and select the HelloWorldAdvisor plug-in and select Finish.

- Create a new Update Site Project as shown below. Eclipse update sites make it possible to package multiple features into a single unit, and to control their installation, upgrades and removal.
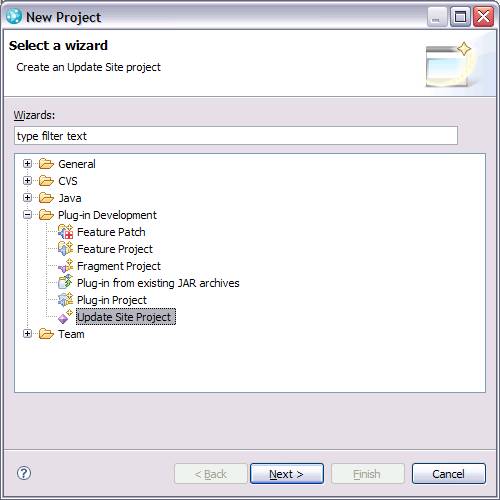
- Fill in the first screen as shown and select Finish.

- The
site.xmlfile from the HelloWorldAdvisorUpdate project should be automatically opened for you. Click the New Category button and set the Name and Label fields to Work Item Save Operations. Save this file.
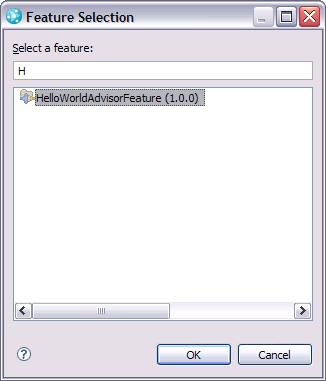
- Click the Add Feature button and type the letter H in the text box. Select HelloWorldAdvisorFeature and click OK. Save this file.
- Click the Build All icon in the upper-right-hand portion of the Site Map tab. It is boxed in red in the following dialog. This operation may take a minute or more to complete.

- If the Build All operation failed, you should see a message box indicating where a log file can be found with more information about the failure. If the operation succeeded, you will find your completed plug-in located inside your Eclipse workspace. For example, my workspace is called HelloWorldAdvisor and is located in the
C:workspacesdirectory as shown below: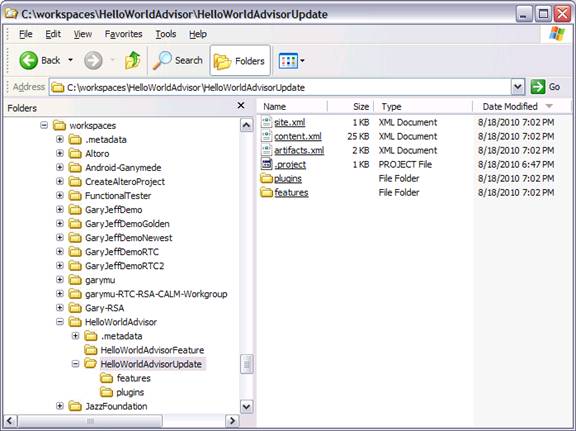
Install Plug-in
- We want to copy our update site out of our Eclipse workspace and into a more stable location.
- Create a directory called
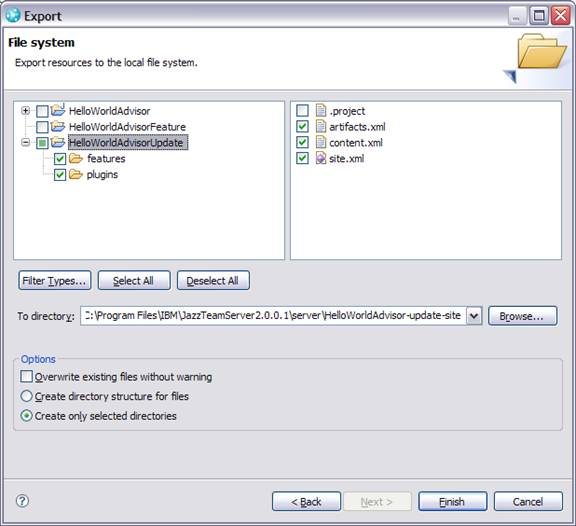
HelloWorldAdvisor-update-sitein your$JAZZ-ROOTserverdirectory, where$JAZZ-ROOTis the base directory path to your RTC server instance. - From Eclipse, export the contents of your HelloWorldAdvisorUpdate project to the directory created above. To do so, select everything within the project and right click. Then select Export. This is shown in the following dialog:

- From the Export wizard choose General -> File System. Click Next >.
- In the To directory field enter the new directory you created above in step a. When done, click Finish.
- Create a directory called
- Start your RTC server instance.
- Create a text file called
HelloWorldAdvisor.iniin the$JAZZ-ROOTserverconfjazzprovision_profilesdirectory, where$JAZZ-ROOTis the base directory path to your RTC server instance. TheHelloWorldAdvisor.inifile should contain the following:
url=file:../HelloWorldAdvisor-update-site featureid=HelloWorldAdvisorFeature
Make sure that the url value matches the path to your Update Site directory.
Note: to remove a feature simply remove the .ini file from the $JAZZ-ROOTserverconfjazzprovision_profiles directory, initiate a server reset request as shown in step 4 below, and stop and restart your RTC server.
- Invoking the following URL causes the RTC server to reset and reload any features found in the
provision_profilesdirectory. Access this website now.
https://localhost:9443/jazz/admin/cmd/requestReset
When you are presented with a sign-on screen, sign on with a user having full administrative privileges. Wait until this request returns with the message The Jazz Server has been flagged to reset and reload from the configured update-site when it is next restarted. - Stop and restart your RTC server. Attempt to access the admin homepage (https://localhost:9443/jazz/admin). You should eventually see messages similar to the following in your Tomcat standard out (ones of interest boxed in red):
The first highlighted message shows that features are being reloaded. The second shows that your new feature was successfully loaded and initialized.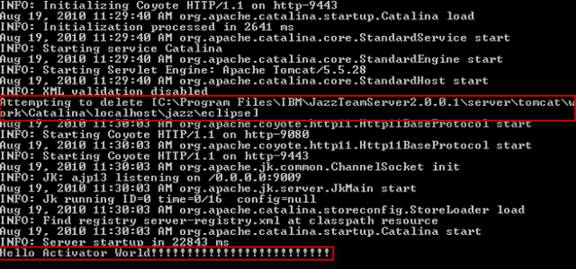
Note: Anytime you make a change to your plug-in that you want to try, you should perform the following steps to load the new plug-in:
- Invoke the reset URL shown above in step 23.
- Stop your RTC server.
- Perform a Build All operation on your HelloWorldAdvisorUpdate project as described in step 19.
- Restart your RTC server.
Enable and Test Plug-in
- Open up an RTC client (Eclipse-based) and create a new project called HelloWorldAdvisor. Choose any process template you want.
- Your new project should open automatically. Navigate to the Process Configuration tab.
- Open Team Configuration, and then select Operation Behavior. In the list of operations scroll to the bottom where you should see Save Work Item (server) listed.
- Click the column Everyone (default) in the Save Work Item (server) row. Now make sure that the Preconditions and follow-up actions are configured for this operation checkbox is enabled.
- Click the Add button next to Preconditions. You should see the following dialog:

- Select Prohibit Save (Hello World Advisor) and click OK. Now click Apply changes, and then Save.
- Open any work item (you can find existing ones by running the Recently created query found under Work Items -> Shared Queries -> Predefined in the Team Artifacts view).
- Change the Severity from Normal to Major and click Save. You should see information similar to the following:
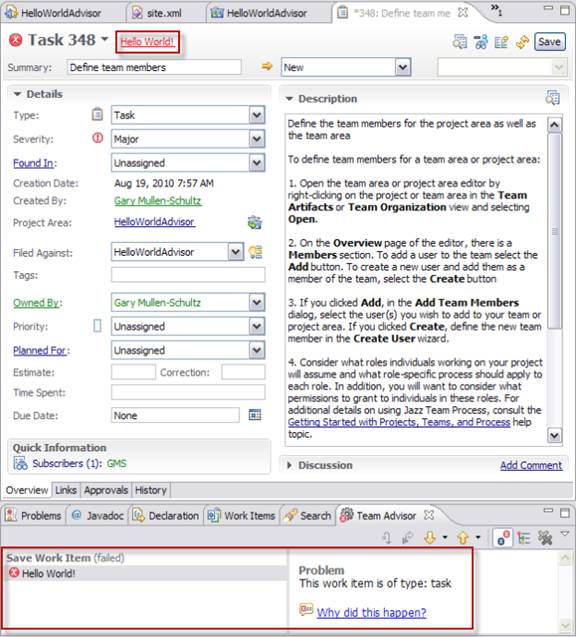
That’s it! You’ve successfully created, deployed, configured and tested a new RTC operation advisor.
For more information
- Environment Setup
- Team Process Development Guide
- Plug-in Provisioning
- Pre-condition Followup Creation
Gary L. Mullen-Schultz is a Certified IT Specialist for IBM. He has extensive experience with System i, Java, the Blue Gene and RoadRunner supercomputer projects, and most recently Rational Team Concert and the other Jazz-based solutions. Gary works for IBM in Minneapolis, Minnesota. He is the state’s biggest Twins fan. Gary can be contacted at garymu@us.ibm.com.
© Copyright 2010 IBM Corporation