Configuring SSL/TLS in Collaborative Lifecycle Management
Collaborative Lifecycle Management (CLM) administrators use Secure Socket Later/Transport Layer Security (SSL/TLS) to protect sensitive data from bad actors. This article describes server administration of SSL/TLS. The focus of the article is on SSL certificate management.
Certificate Administration
Let’s say you’re an administrator of a web site that contains sensitive data. You decide to use SSL/TLS to encrypt the data. You first need to configure your server to support SSL. Configuring SSL is all about establishing trust between the browser and the server. A wary browser must be careful to make sure that the server that it’s connecting to is legitimate.
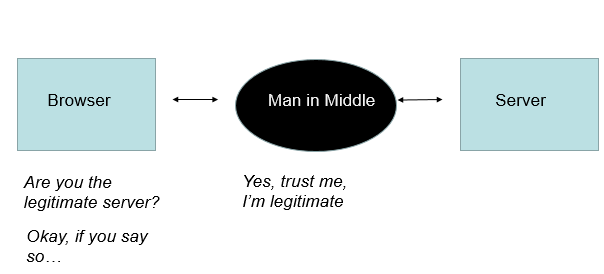
As an administrator, you need something unique about your web site that bad actors can’t forge.
To prevent the man in the middle from listening in, you need to create a certificate and store it on the web server. This certificate certifies that the server is legitimate. Browsers need to be able to get this certificate and verify its legitimacy. The certificate must be created in a way that the man in the middle can’t forge it.
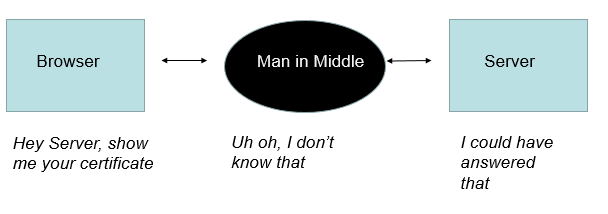
Creating the certificate
Here are the series of steps required to create a web certificate. The first step is to generate a keystore. Think of the keystore as the container for the certificate.
You create the keystore via<java install directory>/jre/bin/keytool
The command keytool, an executable provided by java. The command is below.
keytool -genkeypair -keyalg RSA -alias myalias -keysize 2048 -storepass mypassword dname <domain data> validity 7200 -keystore mykeystore.jks
The keytool -genkeypair command prompts you for details about yourself, these include:
What is your first and last name? What is the name of your organizational unit? What is the name of your organization? What is the name of your City or Locality? What is the name of your State or Province? What is the two-letter country code for this unit?
The command creates a file: mykeystore.jks. Here’s the command to see inside the keystore you just created.
keytool -list -v -keystore mykeystore.jks
In this case the keystore looks like:
Alias name: myalias Creation date: Sep 10, 2014 Entry type: keyEntry Certificate chain length: 1 Certificate[1]: Owner: CN=myfirstandlastname, OU=myorg, O=myorgname, L=mycity, ST=mystate, C=Unknown Issuer: CN=myfirstandlastname, OU=myorg, O=myorgname, L=mycity, ST=mystate, C=Unknown Serial number: 54106755 Valid from: 9/10/14 10:59 AM until: 12/9/14 9:59 AM Certificate fingerprints: MD5: 0D:43:24:21:2F:B2:E6:7C:D6:85:AC:98:F6:CB:87:71 SHA1: 20:CE:C4:8D:F7:33:04:64:0D:D6:84:06:BC:DA:42:1C:53:36:4A:86
The output of the genkeypair command is a keystore containing a self-signed certificate which wraps the public key, and a private key. But, for now, think of it is a certificate that the server is going to give the browser to prove the server is a valid.
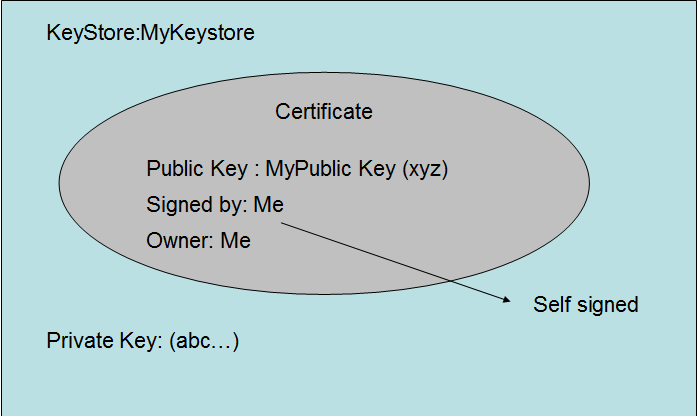
So, now, you have a keystore with a certificate in it. But all the certificate says is: Hey, this is my web site, and I say it’s my web site. The bad actor could create a certificate that said the same thing. You need some trusted agency to say, “Yes, that’s your web site, and I guarantee that.”
The next step is to build trust that this self-signed certificate which is exposed via the webserver really represents the server.
A Certificate Authority or CA is an organization that guarantees a certificate. There are many companies that do this (e.g. Verisign).
After the keystore has been created, use the following command to issue a Certificate Signing Request (CSR) for the keystore. For example,
keytool -certreq -alias myalias -keystore mykeystore.jks -file myrequest.csr Here is the certificate request in myrequest.csr -----BEGIN NEW CERTIFICATE REQUEST----- MIICuzCCAaMCAQAwdjEQMA4GA1UEBhMHVW5rbm93bjEQMA4GA1UECBMHbXlzdGF0ZTEPMA0GA1UE BxMGbXljaXR5MRIwEAYDVQQKEwlteW9yZ25hbWUxDjAMBgNVBAsTBW15b3JnMRswGQYDVQQDExJt eWZpcnN0YW5kbGFzdG5hbWUwggEiMA0GCSqGSIb3DQEBAQUAA4IBDwAwggEKAoIBAQCUy/eKZ7w3 qSaMl7/o7pnKjY/PghwNEXXjy8JtQH78KXIJ6LF6Pn7QqqOiUbZW0FMLoHZjhu/N972mA2ZIXp1f cl77QJbmlz03hwoNy/tEMZeQ5bMV7p3Jaaw/KDRaVBnxMPYghhJgGDsL6uQx7wnhJmb+INK3tm6d JBzrW4+G6Vbl+04Jnr8XHWWOzDiEoTGFaYspUbgMXnx2RQRy8wu2r9t69bGrevoOkN9N0rMTeBAF to5Mk030Hv9XHs8bBG8a3nK4jbIKMZ6JqmoWF46SXwshsgv7HdxBaPpKCAlOjOVf45qJZSOkBfAZ SVrjmIPcVrkBPaYkWRoNbNypJQK3AgMBAAGgADANBgkqhkiG9w0BAQsFAAOCAQEALn9RdoAEwjrQ CpoapWrWZxwtQHeCTCJNc9601VYylE2zvSMbz6kkVSs3IkhHEuPCBAeR530NfFgQ3zm8IWRJMsN4 XbkyfYnZYEh5b6bZSa59z76oAzHlcoffNrvPFZv5oiolj1N0S48My1YINrx7KIH3L3BU0OJZzPPO xVSkCxlo0YJjU6g9pAagPgIYgN3nN5rx7FYr7tA1KKPJq1gvMHQZoL6Yi/4fTnNEq8qbWW1AADpD iaZTuro95WiLxA9eEVyaombBdEeVuIVWQW1nPHNBC1UMq2CT5DjuQ5hPvWO+DHgER2k0j5BR1Y9n qs5+FzUAPMWvMwe96a8w04vfFg== -----END NEW CERTIFICATE REQUEST-----
A CSR is generated from your server and is your server’s unique “fingerprint”. The CSR includes your server’s public key, which enables server authentication and secure communication.
A Certification Authority takes the CSR, verifies that you are who you say you are, that is that the questions answered in the -genkeypair command are correct. At this point, the CA knows that the certificate that you created and stored in your keystore is legitimate. The CA knows you’re not the man in the middle.
The next step is to change the certificate stored in your keystore to reflect the trust that the CA has given to you.
The Certification Authority signs the server certificate, the file you sent them, with their private key. This new certificate is effectively one that you created, but now is blessed by the CA. The CA sends you this new certificate.
Public and Private Keys
Here’s some more background on how this works at a slightly lower level. SSL/TSL uses a public/private key system to establish trust. Private keys are kept private. That is when you create the keystore, part of the data that’s created is a private key, the private key is not sent to the CA, or the browser, or any user.
When you create a keystore via -genkeypair, you create a self-signed certificate. This certificate contains a public key. That certificate and public key is sent to the CA. It’s public, the man in the middle or any other user could have this public key.
The CA signs your certificate with their private key. This is effectively a lock placed on the certificate that can only be opened by the CAs public key. The man in middle doesn’t know how to create such a lock. The man in the middle doesn’t have the CAs private key.
You import the certificate that was returned by the Certificate Authority to you.
keytool -import -alias myalias -keystore mykeystore -trustcacerts -file thecacert.cer
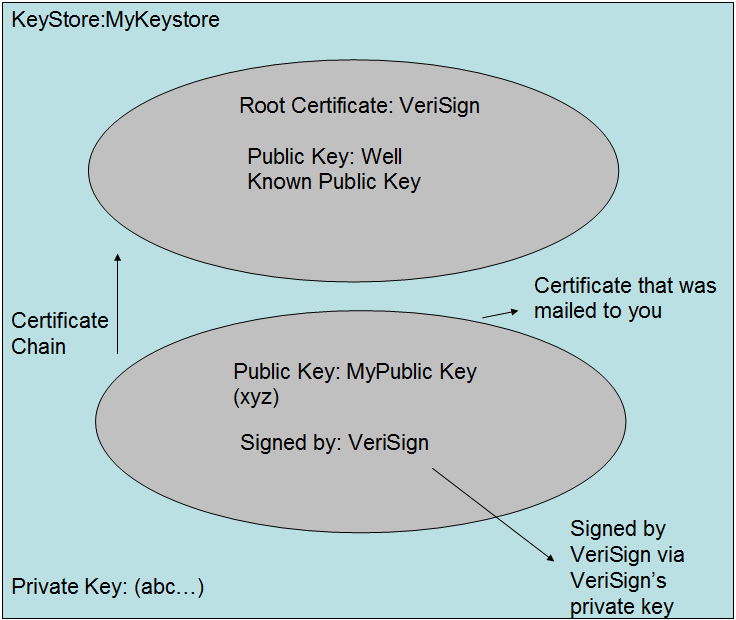
Note that the keystore -import command knows about Verisign and trusts it. The certificate for Verisign is in the trusted certificate list for java. You can issue the following command to view the trusted certificates. They are stored in cacerts.
The -trustedcerts option in the -import command says, include the trusted certs when building the certificate.
From keytool -list -v -keystore ../lib/security/cacerts (password is changeit) Alias name: verisignclass3ca Creation date: Dec 13, 2010 Entry type: trustedCertEntry Owner: OU=Class 3 Public Primary Certification Authority, O="VeriSign, Inc.", C=US Issuer: OU=Class 3 Public Primary Certification Authority, O="VeriSign, Inc.", C=US Serial number: 3c9131cb1ff6d01b0e9ab8d044bf12be Valid from: 1/28/96 7:00 PM until: 8/2/28 7:59 PM Certificate fingerprints: MD5: EF:5A:F1:33:EF:F1:CD:BB:51:02:EE:12:14:4B:96:C4 SHA1: A1:DB:63:93:91:6F:17:E4:18:55:09:40:04:15:C7:02:40:B0:AE:6B
The trusted cert is the public key that the CA provides for unlocking the signed certificate returned by CA. If the CA isn’t already trusted by keytool, then you’d have to import the certificate. This top-level certificate is called a root certificate. In this case, it’s saying. I’m Verisign, I’m trusted by Verisign. These certificates can be forged, so as a consumer, before importing them, you’d need to call the CA to establish that the fingerprints looked correct.
Browser Handshake
From the perspective of the client of CLM (in this case the browser), the flow is as follows:
The user types in the name of a CLM URL (e.g. https://myhost:9443/ccm/admin)
The website responds with the certificate registered with the web server.
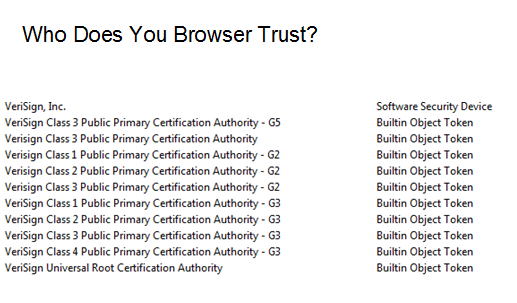
The browser opens the certificate and looks at the root. It verifies that the root is registered with the browser. The browser uses the public key to encrypt data it sends to the server. The server uses the private key to decrypt the data send from the browser, and vice-versa.
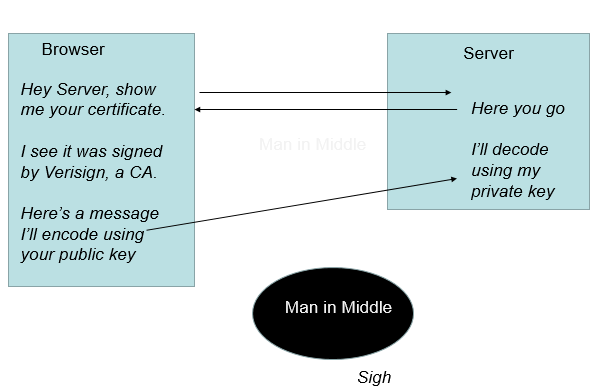
SSL/TLS doesn’t perform well when processing large amounts of data, so the browser and the server agree on a more efficient encryption scheme and share the necessary information and set up the new scheme under the protection of SSL/TLS.
The system used to actually encrypt the data is based on a common key shared by both the browser and server. This is called a symmetric session key.
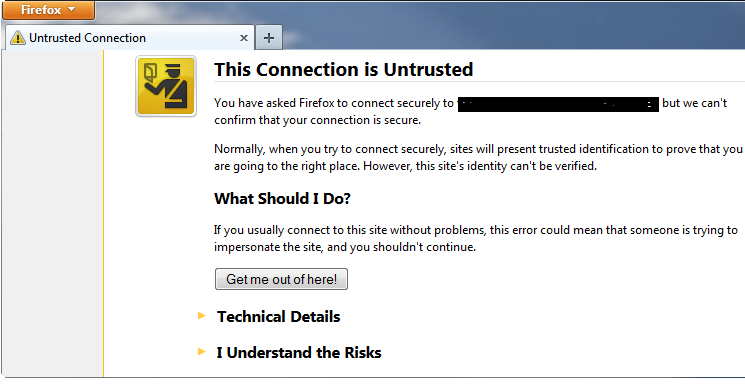
If the browser is presented with a certificate that’s self-signed, or is revoked or expired, the browser warns the user. Here is a typical warning.
Conclusion
SSL/TLS along with the certificate and certificate management provide a framework that prevents a man in the middle from listening in your internet use. Browser users must be wary of sites that aren’t properly protected. Site administrators must be careful to follow the correct protocol when setting up SSL certificates.
Copyright © 2016 IBM Corporation