Report Builder in Jazz Reporting Service 6.0: Tips and tricks
To get the most out of IBM Jazz Reporting Service version 6.0 features, here are some tips and tricks you can use.
Tips are available in the Report Builder UI
As you build your report, hover over the  icons for tips and additional information.
Using Report Builder to create report on configurations
To report on configurations that contain versioned artifacts, you must use the Lifecycle Query Engine (LQE) as the data source for Report Builder. In Report Builder 6.0, support for LQE-based reports is in technology preview. For more information, see Reporting on configurations – Technology preview LQE-based reporting in version 6.0.
Tags in Report Builder map to categories in the Report Builder widget catalog
For each tag in Report Builder, the widget catalog on Jazz dashboards shows a corresponding category. Except for ready-to-use reports, you can tag a report with as many tags as you need. In the widget catalog, the report appears in each of the same corresponding categories.
Ready-to-use and ready-to-copy reports
Ready-to-use reports
This collection includes default, hard-coded, frequently-used reports.
These reports are available in the Ready-to-use category in the Report Builder widget catalog or in Report Builder. You can either add them as widgets to your dashboard, or run them directly in Report Builder. You can only run the reports; you cannot modify or copy them, and in Report Builder, you cannot add tags to them.
Ready-to-copy reports
These reports are available in the Ready-to-copy category in the Report Builder widget catalog or in Report Builder.
Browse the collection of ready-to-copy reports to find one that is similar to what you need; then, duplicate it and modify the copy to suit your needs.
You can change some of the conditions from required to optional, or vice versa, to control whether the conditions appear in the Filters box and whether they have an asterisk to indicate they are required.
You can tag your new reports to group them with related reports so they are easier to find in the catalog.
When you make your copy public, it is available in Report Builder catalog so your teammates can add it to their dashboard.
When you build reports, use the Preview section to see what a subset of the report data will look like
When you build or modify a report in Report Builder, open the Preview section at the top of the page to see a subset of results and validate your selections. Using preview helps you get your report right the first time. Full results are shown when you run the report.
You can preview your report in either table or graph format.
When you run reports, preview the results based on the filters you select
When you run a report in Report Builder or in a dashboard widget, click Preview ( ) to show what your report looks like based on the filter values that you select.
In a dashboard widget: Click Filters, and in the overlay, click Preview. When you are satisfied with the preview results, click Save. You can save filter settings only when you run a report on a dashboard.
In Report Builder: Beside Filters, click Preview. You can see a subset of report data. When you finish adjusting the filter values, click Run. In Report Builder, your filter selections are not saved, but you can click Export to export the filtered results to Microsoft Excel.
To show or hide the Filters pane when you preview your report, click the arrow beside Filters.
In traceability reports, use relationship conditions to get different results
In the Traceability section, the link options you choose affect the results in your report. Explore the different options to see the results. Tip: This is faster if you use the Preview pane to see a subset of results as you build your report.
For example, if you want to see the test coverage of the requirements in a project (which requirements are validated by a test case), the value you select for the path type determines the results that you see:
- Required: Show only results that have the relationship that you specify in the Traceability section.
- Does not exist: Show only results where the relationship doesn’t exist. For example, use this option to see gaps in test coverage.
- Optional: Show the results even if they don’t include that relationship. For example, show all coverage, gaps, and links.
Lock or unlock conditions to determine if users select values for the condition
In the Set conditions section in Report Builder, you can specify whether team members must select values for conditions when they run the report. This feature ensures that team members get the most useful information when they run the report.

- Locked: The condition is essential to the report. Because team members cannot change it, it is not shown in the list of filters at the right when they run the report.
- Unlocked and optional: Team members can leave the condition empty or change its value when they run the report.
- Unlocked and required: Team members must select a value for the condition. The condition has a red asterisk to indicate it is required.
Add totals and calculated values for columns
You can add totals and calculations based on attribute values, as in these simple examples:
- Show the total number of artifacts. For example, show the total number of defects in a project.
- Show the total number of artifacts with a specific attribute value. For example, show the number of defects whose severity is blocker, critical, and major, and in another column show the number of defects whose severity is minor.
After you select the artifact type and projects to report on, in the Columns section, complete these steps:
- Optional: Add the column you want to calculate a value for. For example, to show the Severity attribute of a defect.
- Click Add calculated value columns.
- In the Add totals or calculated values to the report window, complete these steps:
- From the Attributes of list, select the artifact type to work with.
- Choose the calculation type (average, count, max or min value, sum of values). For this example, select Count number of artifacts.
- To count the total number of artifacts that meet the conditions you specified in the Set conditions section, in the Choose limiter values section, select All.
Note: When you select All, you cannot select an attribute value to filter on. Items are counted based on their ID. - To count all the artifacts that have a specific attribute value, select Limit. You can change the attribute in the Choose an attribute menu. For this example, select Severity. Then, in the Choose limiter values section, select the attribute values to count.
- Repeat that step to add other totals and counts; then, click Close.
Each calculated value or total that you add is shown as a condition in the Columns section. To edit these calculations later, click the pencil  beside it.
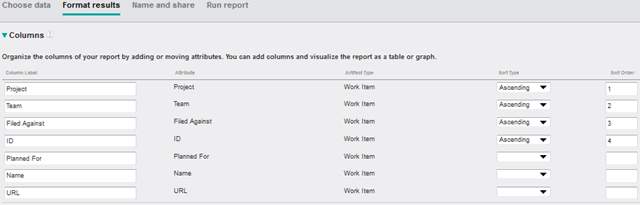
Arrange columns more quickly
When you move a column heading in the Format results > Columns section, after you click the up or down arrow once, you can then repeatedly press Enter to continue to move the column heading in that direction.
Spanning data across columns
If you want your primary grouping columns to span columns instead of repeating the same value in each row, when you format your report, arrange your columns and your sort order from top to bottom.
As you build your report, check the Preview section near the top of the page to verify that your spanning is working correctly.
For example, if you are creating a report that tracks defects at various scopes, across projects for a single team, your primary grouping columns are likely ‘Project’ and ‘Team’, ‘Filed Against’, and ‘ID’. In the Format Results > Columns section, arrange your columns in the following way so they span instead of repeating the same value in each row:
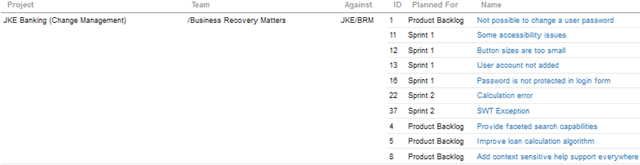
The report looks like this, with data spanned across columns:
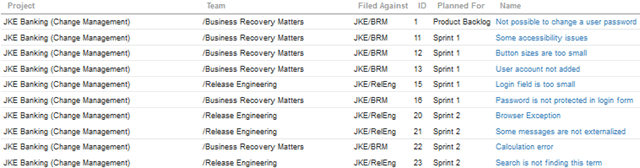
If you dont specify a sort order, the columns do not span and the report is harder to read:
© Copyright 2015 IBM Corporation