Incorporating Jazz Reporting Service Reports into Rational Publishing Engine
Prerequisites
This article discusses how to incorporate a report from IBM Rational Jazz Reporting Service into a document generated by the Rational Publishing Engine. Before you begin, you should know how to create a report in Jazz Reporting Service. You should also have basic knowledge of how to create a template in Rational Publishing Engine and how to configure a data source to generate the document.
Watch the following videos for an introduction to the Jazz Reporting Service:
Reporting across CLM projects using the Jazz Reporting Service, Part 1
Reporting across CLM projects using the Jazz Reporting Service, Part 2
Reporting across CLM projects using the Jazz Reporting Service, Part 3
You can refer to the following video link for an introduction to the Rational Publishing Engine:
Because the Jazz Reporting Service creates reports from the tools in the Rational solution for Collaborative Lifecycle Management (CLM), it is useful to have some understanding of the different capabilities of the tools and the fundamental data model they manage. CLM tools include the Change and Configuration Management application (Rational Team Concert), the Requirements Management application (DOORS Next Generation), and the Quality Management application (Rational Quality Management).
Introduction
The Jazz Reporting Service is designed for non-technical practitioners who want to find information about their software projects and socialize that information within their enterprise by using dashboards. The user interface is a Report Builder that enables reports to be easily designed and run. These Jazz Reporting Service reports can be added to a dashboard or exported to a Microsoft Excel spreadsheet for further work. Users might also want to incorporate the report into a document that is designed and generated using the Rational Publishing Engine Document Studio application.
Reports created in the Jazz Reporting Service are logically divided into two separate resources:
A resource that describes the query that is to be executed
A resource that describes how the query results are to be visualized
The Report Builder user interface does not directly expose the resource that describes the query, but it must be integrated into Rational Publishing Engine as a data source and configured before a document-style report can be generated. Fortunately, the URI for the query is available in version 5.0.1 and 5.0.2 on the page where you export the report to an Excel workbook.
Two versions of the URL for the underlying query are needed:
The query URL to obtain the XSD schema for the report
The query URL to configure the Rational Publishing Engine data source that will obtain the query results
The rest of this article assumes you have created your report in the Jazz Reporting Service, given it a name, and saved it. In this article, the report we are using is a list of open work items, their type (story, defect, task, and so on) and their status. A condition was defined for the status to show only open work items. In addition to the default columns for the Work Item ID, its name and its URL, columns were added for the status and type.
Figure I shows the report when it is run in the Jazz Reporting Service Report Builder.

Figure I: Running a report on work items in Jazz Reporting Service
Creating a report template in Rational Publishing Engine
You use the Rational Publishing Engine Document Studio (labeled RPE Studio in the toolbar) to create the report template. This template defines the layout for the report and the data sources from which data will be obtained. Document Studio uses various layout controls both to organize how the data is presented and to iterate over the data that is returned from a data source.
Import the XSD schema for the JRS report
Before you can start to design your report layout in a document template for Rational Publishing Engine, you must first include an XSD schema that describes the structure of the data from Jazz Reporting Service for that report. You need to construct the query URL to obtain the report’s XSD schema from the Report Builder. In Jazz Reporting Service, run the report and look in the results view for the Export button (as in Figure I). In the drop-down list, click Export the live query to Microsoft Excel.
You should see the page to export the report to Excel. In the browser location, the URL should look like this:
https://<host:port>/rs/query/<nnn>/export/excel
The URL may also contain additional URL parameters starting with a “?”. For your version of JRS, <host:port> will correspond to your JRS server and <nnn> will correspond to the underlying query of the report.
Take the first part of that URL up to and including the <nnn> and append “/dataservice/xsd”. Thus the URL to obtain the XSD schema for the report would be:
https://<host:port>/rs/query/<nnn>/dataservice/xsd
The next step is to import the report’s XSD schema into the Rational Publishing Engine template. Start the Document Studio application and either open an existing document template or create a new one. In the Outline view select the Data Source Schemas entry, right-click, and choose Insert > Data Source Schema to open the wizard. Click Next to go to the wizard page where you will enter the data source schema URL.
Change the Schema type to REST, enter the URL to obtain the XSD schema, and enter your report name as the data source ID. Figure II shows this page where the query number <nnn> is set to “123”, an arbitrary query number for this example. You will use the corresponding Jazz Reporting Service query number from the Excel export URL.
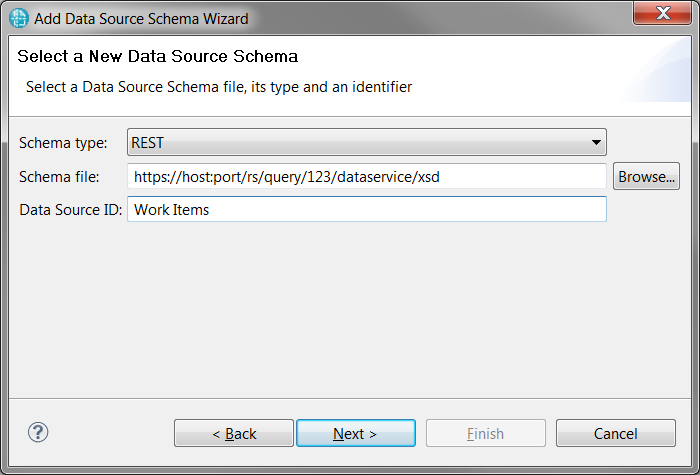
Figure II: Specifying the location of the data source schema
Click Next. You might need to authenticate with a valid Jazz Reporting Service user name and password, and change the authentication type to “OAuth”. Click OK and then Finish.
In the Data Source Schemas view you should see a tab with the Data Source ID you specified in the wizard, ”Work Items” in our example. The generated schema from Jazz Reporting Service 5.0.1 and 5.0.2 incorrectly defined top-level elements for each column in addition to the necessary three-level hierarchy: results > result > columns for a report. Figure III shows the imported schema for the Work Items report, and the correct portion of the schema to be used is highlighted by a red box. If you use any of the other top-level elements of the schema, Rational Publishing Engine will not be able to extract values from the data source results.

Figure III: The report data source schema from Jazz Reporting Service in Rational Publishing Engine Document Studio
Creating layout controls to iterate over the results
In the layout area of the template you must create several controls to iterate over all of the results that are returned from the data source. You can use various layout controls in Rational Publishing Engine to iterate over the results from a data source, but in this case we are going to create a table with headers to show the report results. In the table, the work item name and URL will be combined as a hyperlink so that clicking on this table entry in the generated report will open the actual work item.
In the Palette view select and drag the Table control into the layout area of the template. Set the number of rows to be 2 and the number of columns to be 4. You will combine the Work Item (name) and Work Item URL in a single table cell using a Hyperlink control. Add Text controls to the 4 cells in the top row and enter the column names corresponding to the report: Work Item ID, Work Item, Status, and Type. Select the row control and in the Properties view, expand the Font tab, and click the B button to set all text in the row to bold.
In the Data Source Schemas view, open the Work Items schema tab and expand the results > result hierarchy and select the “result” entry in the hierarchy. With the entry selected, drag and drop the entry into the second row control in the layout. The tag in that row control should now be “results/result”. This gesture iterates over all of the results returned from the Work Items data source during document generation.
From the Work Items schema, select the “Work Item Id” entry from the results/result hierarchy, drag it, and drop it into the first cell of the second row in the layout. In the pop-up dialog box, choose Use as value and click OK. Similarly, drag and drop Work Item Status into the third cell of the second row, and Work Item Type into the fourth cell of the second row. In both cases, choose Use as value.
At this point, the layout controls should look like Figure IV.
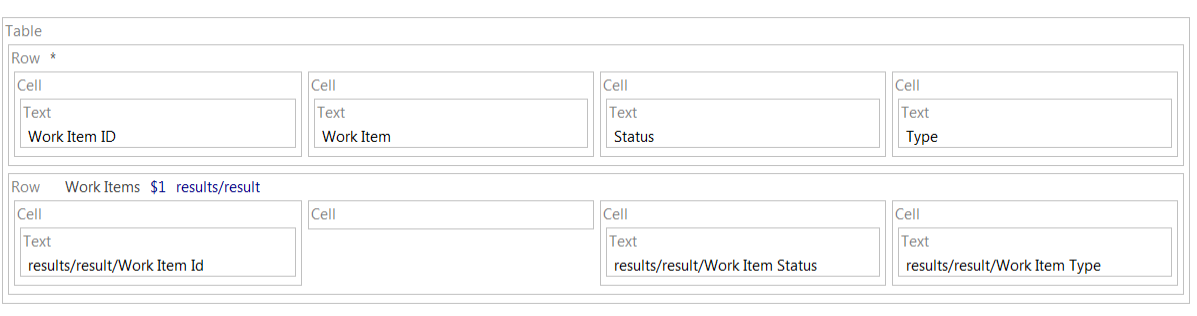
Figure IV: Rational Publishing Engine document template layout – basic table
From the Palette view, select the Hyperlink control, drag and drop it into the second cell of the second row. Double-click the hyperlink control and the “Set content” dialog box opens. Switch to the Data Expression tab and expand Attributes > results/result. Select the Work Item URL (oslc_cm_ChangeRequest1) and click OK. This action configures the link reference for the hyperlink. To configure the link name, with the hyperlink control selected, open the Properties view and expand the Specific tab. By default, the Display property should contain “link”. Click the ellipsis (…) to the right of the edit box. In the dialog box to set the display value, switch to the Data Expression tab and expand Attributes > results/result. Select the entry Work Item (oslc_cm_ChangeRequest1_title) and click OK.
Figure V shows the completed layout of the template.

Figure V: Rational Publishing Engine document template layout – table with a hyperlink
The template is complete enough for testing, so save the template to create a .dta file.
Configure the Work Items data source
To configure the data source and run a report, you have to switch to the Launcher perspective in the Rational Publishing Engine Document Studio. If this is your first time opening the Launcher perspective, click the button with the + (plus sign) to the left of “RPE Studio” perspective button. Click Other and select the Launcher.
In the Launcher, the Document Specification view should show the output formats (HTML, Microsoft Word, PDF and XSL-FO), the name of your template file, and the Work Items data source. To configure that data source, you need the URL to run the Jazz Reporting Service report.
In Jazz Reporting Service, run the report and in the results view, you should see an Export button (see Figure I). In the drop-down list, click Export the live query to Microsoft Excel, and you see a page like Figure VI.

Figure VI: Export a report to Excel in the Jazz Reporting Service
On this page, the first step in the bottom section should contain the URL to run the report. Copy this URL.
In the Rational Publishing Engine Launcher, right-click the Work Items data source and choose Configure Data Source. Paste the URL from the Jazz Reporting Service export page into the control corresponding to the data source URL. Enter your user name and password from Jazz Reporting Service and leave the authentication as Auto. Click OK.
In the main menu of the Rational Publishing Engine Launcher, click the Document Specification menu and choose Generate > Generate Document. For the HTML, Word, and PDF formats, the output should contain a table with the same list of work items that you saw when you ran the report in the Jazz Reporting Service Report Builder. If you click a work item name, it should automatically open the corresponding resource in the appropriate tool in your default web browser, but you might need to log into that application.
This simple example shows how to incorporate Jazz Reporting Service reports into a document generated by the Rational Publishing Engine.
About the author
Kevin Cornell is a member of the Rational Reporting Team within IBM in Ottawa. He can be contacted at kcornell@ca.ibm.com.
Copyright © 2014 – IBM Corporation