Add customized queries to Rational Quality Manager
This article provides step-by-step instructions on how to implement customized queries into Rational Quality Manager (RQM). A user can create the customized queries in each and every test artifacts page.
Contents:
1. Overview
2. Prerequisites
3. The need for customized queries in RQM
4. Creating a customized query in RQM
5. Conclusion
1. Overview:
RQM provides a feature to create queries which can be used to retrieve a set of test artifacts that meet specific conditions.
Organizations may have certain requirements to fetch a specific set of records with specific data. Users can create a query and specify the conditions and the test artifact properties to display in the results table. Users can create queries for their own use or for shared use among team members.
2. Prerequisites:
This topic assumes that you have installed the Rational solution for Collaborative Lifecycle Management (CLM) 2012 with RQM 4.0. It is also assumed that you know the basic concepts of test management using Rational Quality Manager. JazzAdmin Repository permissions must exist for the implementer of this solution.
3. The need for customized queries in RQM:
The following explains why we need customized queries in RQM:
- The features and functions we are looking for are not available in the existing tool.
- To meet specific customer requirements.
- To ensure customer satisfaction and meet the high expectations from customers.
- To provide value added services to the products and customers.
4. Creating a customized query in RQM:
We can create custom queries in RQM to enhance its functionality. Follow the below steps to create custom queries in RQM:
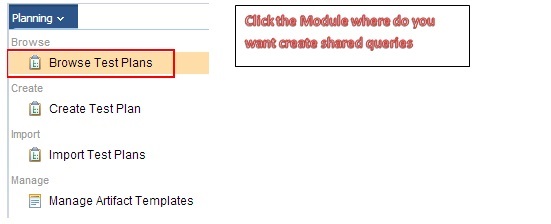
- Select the module where do you want to create queries, then select Browse option.
- Once the page has loaded, expand the top and left side panel by clicking the “”v” (a visual is provided below).

- You should now be able to see the queries location in the left side panel and the query attributes configurations in the right side pane.

- Click
 . You will get following pop-up window:
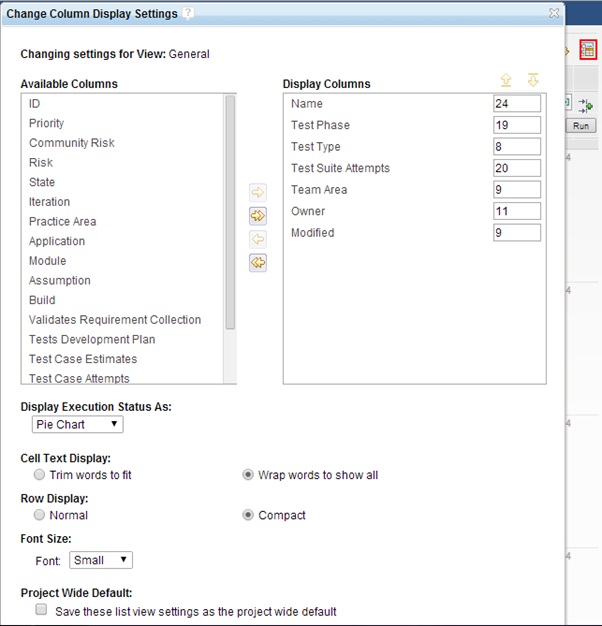
- Select required columns by clicking
 . This moves columns from the Available Columns textarea on the left, to the Display Columns textarea on the right.
- Set the output format by using the Display Execution Status As: drop down. Available formats include pie charts and progress bars. You can also change the font size to fit your liking.
- By using Project Wide Default option, you can make these the default settings for all users who are members of this project.
- Click Save.
- Set the filter which is required for your query (a visual is provided below).

- Once you set the filter, click the
 Save button. You will get the following pop-up:
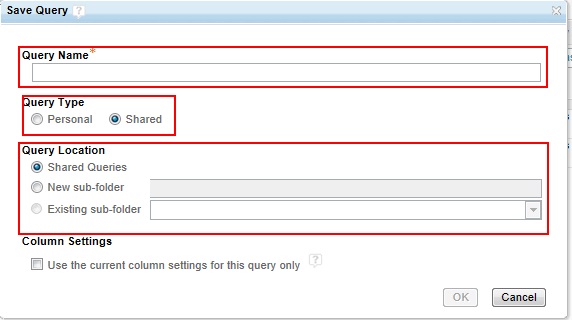
- After you have named the query and set the folder options, click Ok.
- The query will be saved to defined folder, and the output will be displayed (a visual is provided below).

- If you need to make any changed to the existing settings, you can do so by updating the query as needed and clicking the Save button. Just be sure not to change the query name so that changes will be saved to the same query.
- Right click on the query. You will be given the option for renaming the query. Please refer to the following screen shots.
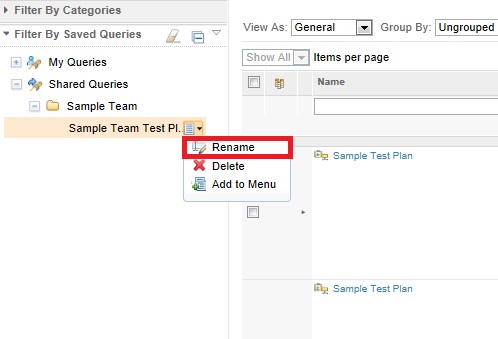
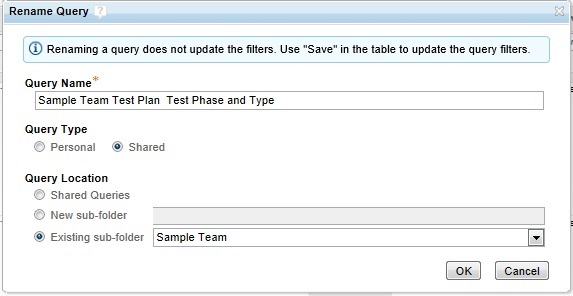
By using the rename option, a user can rename the query but they can not change the Query Location. The user needs to use the Save option in the table to change the Query Location.
About the author
Swapna Das is a member of Tata Consultancy Services IBM Rational Technology Excellence Group (TEG). She is having more than 9 years of IT experience, being using various Rational tools like RSA, RFT, RPT, RTC, RRC and RQM since from last 4 year. Currently she is working as a Rational solution architect for a multi-billion global Manufacturing organization, providing solutions on specific IBM Rational Software. She can be contacted at swapna.das@tcs.com.