Customizing IBM Rational Insight: Add requirement description for reporting
This article documents the various steps to add a new field for reporting. It describes, in detail, all the actions to customize the Extract, Transofrm, Load (ETL) in order to populate the data warehouse with the relevant values, and then to update the data model in order to make this field available for new reports in Query Studio and Report Studio. We will illustrate the steps by going through a simple example; adding Requirement Description field.
Disclaimer
The main intent is to provide understanding of the ETL and data model customization process. Although some notes are included with regards to maintenance, only limited consideration was given to have a maintainable solution. Before attempting these steps, be sure to create a good backup of the data warehouse, data model, XDC files and ETL catalog.
NOTE: XDC files, ETL catalog and Data Model will be updated during the next upgrade. This would need to be taken in consideration before upgrading.
Pre-requisite
IBM Rational Insight comes with a set of tools to view/customize the ETLs and the data model. The three tools we will be using in this document are:
- XML Data Configuration
- IBM Cognos Data Manager (refered to as Data Manager)
- IBM Cognos Framework Manager (refered to as Framework Manager)
Assumptions
The out of the box Data Manager ETLs are already configured and working.
In the out of the box ETL, the requirement data collection is performed through the job RM4.0.5Stg which is enabled by setting the variable STAGING set to TRUE. In this example, the RM_ODS5.0 has variable STAGING set to FALSE in order to call the RM4.0.5_Std Job.
We are using DB2 9.7 as a database. The commands may be different if you use a different version or vendor.
Steps Overview
- Make the data available in the data warehouse
- Expose the field in the XDC file
- Update the data warehouse to have a place to store this value
- Change the ETL to Extract, Transform and Load this new field
- Verify the field is inserted in the data warehouse
- Run a full load ETL
- Adding the field to the data model to allow the use to pick this field in report and query studio.
- Update the data model in framework manager
- Publish the new / updated data model
- Verify the field is available for reporting
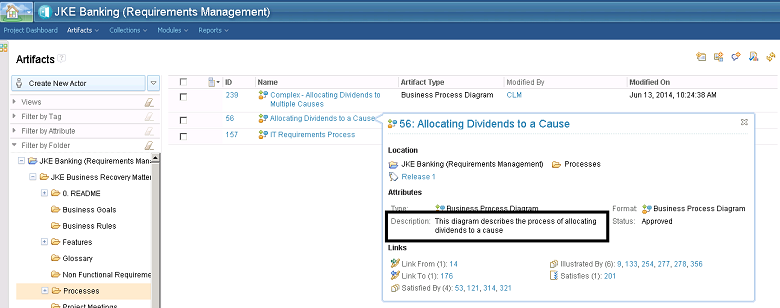
What do we want to achieve?
When defining which data would be populated from the CLM repositories to the Data Warehouse, fields that can contain more than 1000 characters have not been included for performance sake. This is the case, for example, for the requirement description. As illustrated here:
Updating the XDC file
In the ETL process, the data is fetched from the CLM applications from Data Manager through their respective REST APIs. However, since Data Manager cannot directly consume XML, the requests to the API have to be transformed into pseudo SQL and the XDC driver will transform it into REST calls.
In this example, the first thing we need to do is to open the XDC file used to fetch the IBM Rational DOORS Next Generation (RDNG) data.
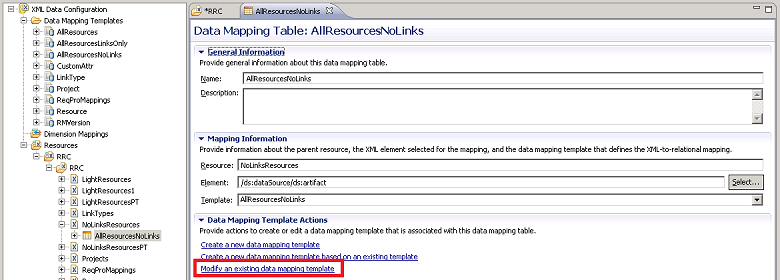
- Open the file rm50.XDC in XML Data Configuration tool.
- Navigate to the resource to modify, for instance:
XML Data Configuration > Resources > RRC > RRC > NoLinksResources > AllResourcesNoLinks
NOTE: You can find out which resource to modify based on the ETL job you want to modify in Data Manager, we will cover this in the Data Manager section below.
- Double click AllResourcesNoLinks
- Click Modify an existing data mapping template
NOTE: It is recommended that you make a copy of the XDC file before modifying it, or create a new data mapping template.
NOTE: If the XML schema is not visible (tree view is greyed out), you may need to change the RRC connection to use Generic XML, and check the box ”Add’ Accepted: application/xml’ to the request.
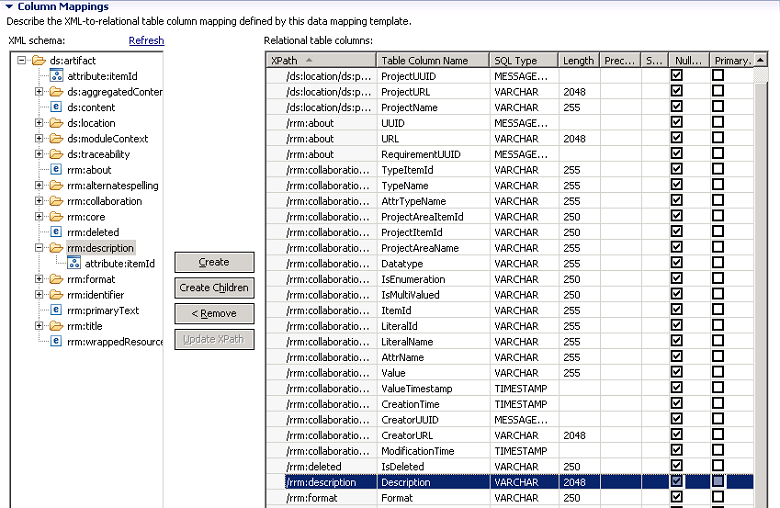
Create a new column mapping
Identify in the XML Schema the field you want to add, for instance, rrm: description. Highlight it and click Create.
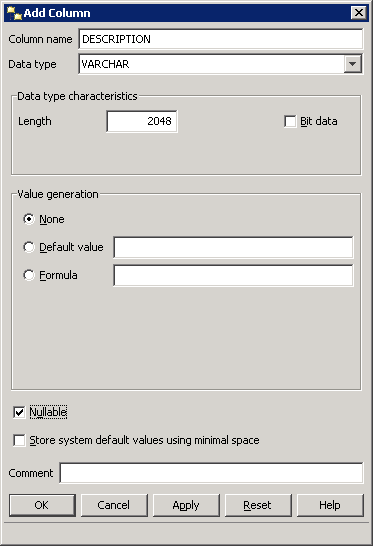
You can change the Table column name to a more user friendly name.
You can also change the length of the field to avoid truncation, the default is 255.
Enable the change to the XDC file
- Go back to the resource:
XML Data Configuration > Resources > RRC > RRC > NoLinksResources > AllResourcesNoLinks - Select the Columns tab
- You notice that the new field is greyed out, you need to load it:
- Right click on Description > Load
- Save the XDC file and close the program.
We now have the XDC file exposing the field we are interested in. We will test that the change is successful when we go to Data Manager later
Updating the Data Warehouse tables
Before we go to Data Manager, and go through all the required changes in the ETL flow, we will update the data warehouse to add a new column to insert the new data in.
We therefore assume that you have already looked at the ETL in Data Manager and understand which tables are impacted by the change.
In a default setup using DB2, the two tables to update are RIODS.REQUIREMENT and RIODS.REQUIREMENT_COLLECTION. In both of them we will add a column, of type varchar, length 2048 (same as the length we defined in the XDC file) and nullable.
Data Manager ETL change
We previously updated the XDC file for ‘Requirement’ and altered the ‘Requirement’ and ‘Requirement_Collection’ tables.
The next step will be to test that the XDC returns the expected value. Then include it in the Data Manager fact build relevant to the requirement data collection so it is inserted in the data warehouse table.
Build definition
We will now go through each node of the fact build to propagate the change through the Extract, Transform and Load parts of the build. We go to Data Manager and open the definition of the Fact Build Requirement (RM4.0.3Requirement).
NOTE: Not all builds are modified with each new release of the product, for instance RDNG 5.0 is still using RM4.0.3
In the tree view, click on RationalInsightETL > Builds and JobStreams > ODS > RationalRequirementComposer > RM4.0.3 > RM4.0.3Requirement.
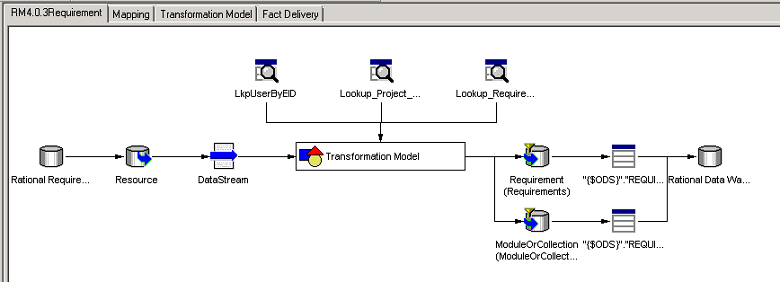
Connection Node
If you previously made a copy of the XDC, make sure that the Rational Requirement Composer connection is using the ODBC connection that uses the modified XDC.
Resource Node
To test whether the change we made previously in the XDC file is successful, in the build definition, right click on Resource icon > Properties and open the query tab
NOTE: The From part of the query gives you the corresponding resource name in the XDC file, for instance, “AllResourcesNoLinks”
Modify the query to include the Description field:
SELECT "Name", "Description", "UUID", "Identifier", "Format", "TypeName", "CreatorUUID", "CreationTime", "ModificationTime", "ProjectUUID", "URL", "IsDeleted", "DATASOURCE_ID" FROM "{$RESOURCEGROUP}"."AllResourcesNoLinks" WHERE modifiedsince='{$MODIFIED_SINCE}' You can then perform a test to ensure that the query is valid and that the expected data is fetched. You will be prompted to give values to the two variables in the query, RESOURCEGROUP and MODIFIED_SINCE
RESOURCEGROUP is the name of the resource group given in the XDC, for instance RRC
MODIFIED_SINCE is a date time format, yyyy-mm-dd HH:MM:SS for example 1899-12-31 00:00:00

Once the query has been validated and you see value (where applicable) in the Description Column, switch to the Result columns tab and click Refresh. You will be prompted to enter values for the two variables. Click OK and you should see the Description column being added to the list.
Click OK to validate the change in the Resource node.
DataStream Node
Right click on the DataStream node and select Properties. We see in the Data Source column the new Description entry, however it is not mapped to any DataStream Item.
We need to add a DataStream item and then map it to the Data Source
You can perform these actions individually and then specify the values, or double click the Description Data Source and the DataStream will be added with default values and mapped automatically. You can then select the new DataStream item and move it up to keep list in the same order as defined previously:
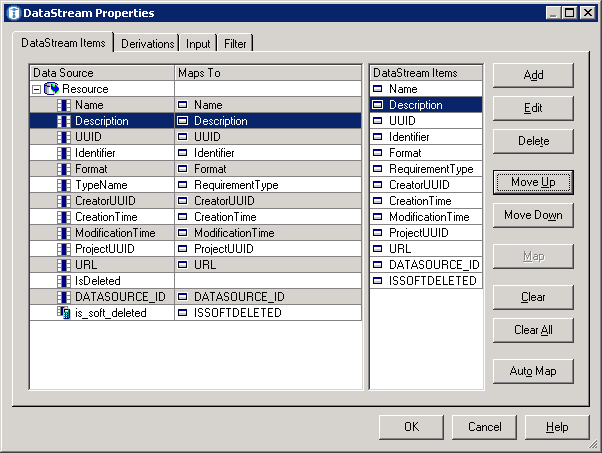
Click OK to validate the change.
Transformation Model Node
We now need to add a new ‘Transformation Model’ entry in order to have the DataStream item being delivered to the tables.
Right click on Transformation Model Node > Mapping.
As for the DataStream you can manually add, map and move the new entry up or double click the Description DataStream item to have the mapping created automatically with the default values
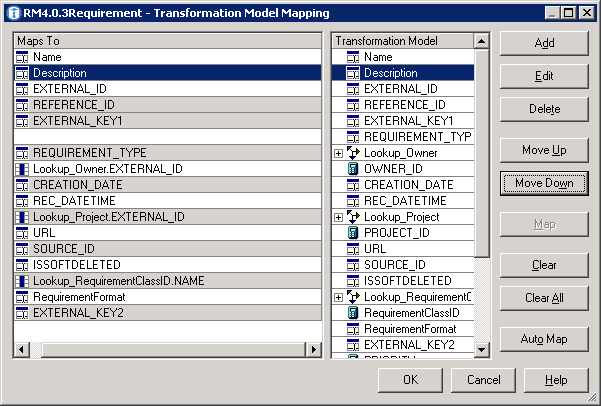
Then click OK
You will then be prompted to add the new element to the Fact Delivery, click OK:
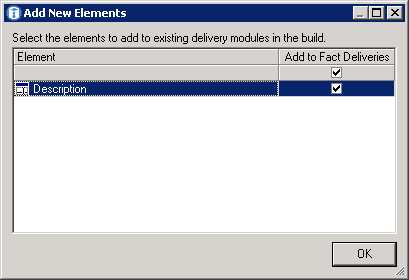
Delivery Module Node
This Fact Build has two delivery modules, one for Requirements and one for Module or Collection. The last action we performed in the transformation model node (add the New Element to the Fact Delivery), created a new entry in both delivery modules.
The entry created in the delivery modules assumes that the column name is the same as the element name. In our example we decided to keep the column name capitalized, therefore we have an inconsistency that we will fix by importing the new name:
Right click Requirement delivery module node > Properties, switch to the Table properties and click Import Target Table.
On the left, select the Description column and on the right, browse to Rational Data Warehouse > RIODS > REQUIREMENT > DESCRIPTION, select this entry and click Map.We can then change the order of the Elements to stay consistent with the order in the other lists
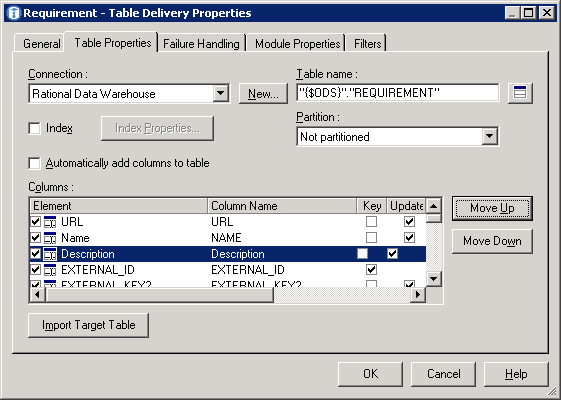
Repeat this for the other delivery module, ModuleOrCollection
Populate the Data Warehouse with the requirement descriptions
Since we have now completed the ETL customization, we will run a full load on the requirement build to populate the data warehouse with the change.
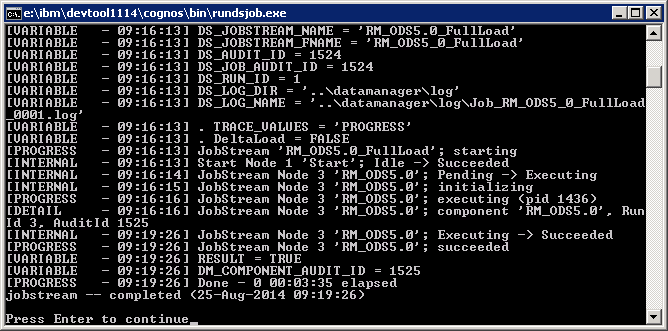
If the ETL is successful, you can run a query against the data warehouse to verify that the data has been inserted.

For example:
SELECT * FROM RIODS."REQUIREMENT" where reference_id = 56;
Updating the Data Model.
Now that we have the data warehouse populated with the requirement description, we need to change the data model to make it available in Query and Report Studio.
This is achieved in Framework Manager.
NOTE: In this example, for simplicity’s sake, we will modify the existing objects, however, you may consider to duplicate the data model and views to avoid losing those changes during an upgrade.
Updating the database
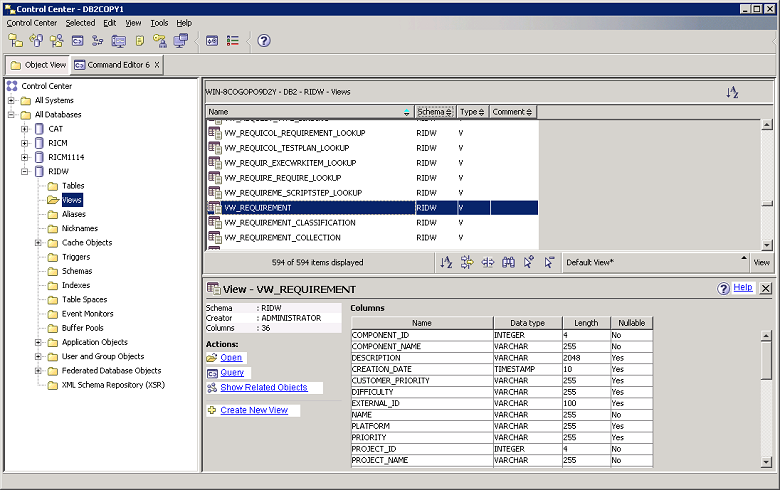
Update the data warehouse view used to get the requirement information (RIDW.VW_REQUIREMENT)
Depending on your database vendor, the procedure may vary.
In this example we use DB2 9.7, the changes are made in Control Center.
In order to update the VW_REQUIREMENT view, we will get the SQL statement used to create the view, modify it to include the Description field, drop the view and recreate it by executing the modified SQL statement.
Make sure the db user used to connect to the data warehouse has the required privileges to access the view.
In this example we will only do it for ‘Requirement’ but the same can be done for the requirement collection.
Useful reference to understand the data model structure in Framework Manager: https://jazz.net/library/presentation/850
Updating the Physical Metadata
Open the data model in Framework Manager (.cpf file) and navigate in the data model to the Physical Metadata > VW_REQUIREMENT, select the node VW_REQUIREMENT and go to Tool > Update object.
This will update the view in the datamodel with the new Field
Updating the consolidated table
- Navigate in the data model to Consolidated View > Consolidated Tables > Requirement; right click on Requirement > Edit Definition
- In the Query Subject Definition tab, click Add
Name = Description
Expression definition = [Physical Metadata].[VW_REQUIREMENT].[DESCRIPTION] - Double click in the tree view the new Description field (added in the physical Metadata)
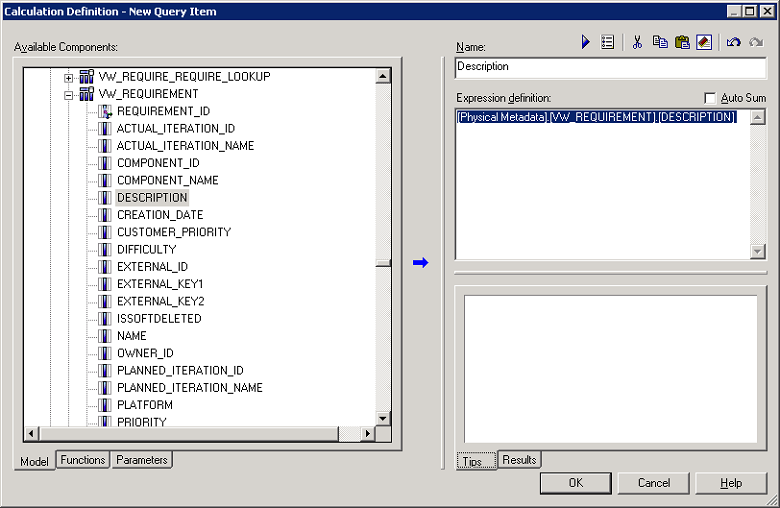
- Click OK to add the new query item
- Click OK to validate the Consolidated Table
Publishing the Data Model
- In the tree view, select Package > Reporting Data Model (DW)
- Right click: Publish Packages
NOTE: Assuming that you have the same name if you accept the default location, the model currently deployed on the report server will be overwritten
If you do not wish to overwrite the data model on the report server, you should either rename the package name and the translations that would be used, for instance the package name in Spanish if you deployed the data model in Spanish.
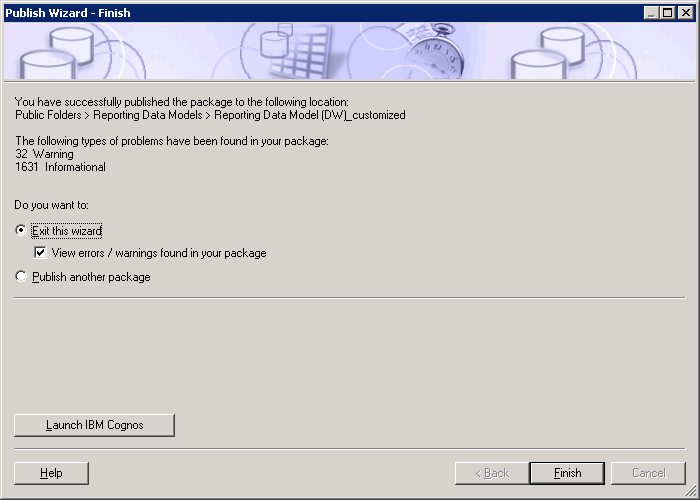
Validate all the steps in the wizard and click Publish.
Validating the publish and create a query
Open the URL to the report server in your web browser and navigate to the location where you published the package:

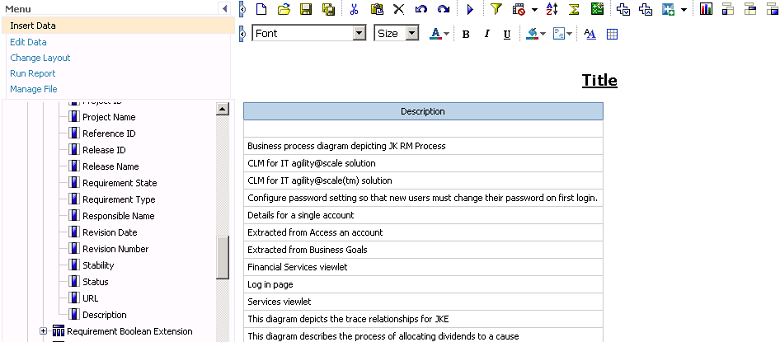
- Go to Launch > Query Studio
- Select this data model
- Create a new query with the Requirement Area > Requirement > Description
About the author
Matthieu Leroux is a member of the Software Advisory Team within IBM Rational Support in Amsterdam, The Netherlands. He can be contacted at matthieulrx@nl.ibm.com.