A (very) simple demo of (most of) the Rational solution for Collaborative Lifecycle Management 4.0.x capabilities
Using the Money That Matters Sample is one of the best ways to demonstrate the full set of the Rational solution for Collaborative Lifecycle Management (CLM) solution capabilities. However, the richness of this sample can be a bit intimidating to newcomers or to those less familiar with the Agile terminologies behind it.
In this article, we will create from scratch another CLM sample which should take less than an hour to setup and only 30 minutes to demonstrate – and this sample will still showcase the fundamental capabilities of CLM.
By following this article step-by-step, you will be guided through a full, typical CLM scenario.
While discovering the main capabilities of the CLM solution in an easy and we hope, fun manner, you will:
- INTRODUCTION Setup a full CLM Lifecycle Project
- RATIONAL REQUIREMENTS COMPOSER (RRC) DEMO Define the requirements of a simple ‘U.S. to Metric Converter’ program
- RATIONAL TEAM CONCERT (RTC) DEMO Plan the development of these requirements and actually code the Converter
- RATIONAL QUALITY MANAGER (RQM) DEMO Test the developed Converter and validate it against the original requirements
INTRODUCTION
For this demo, make sure to use a user with JazzProjectAdmins Repository Permission and with the following Client Access Licenses: RQM – Quality Professional, RRC – Analyst and RTC – Developer. The general address used for this demo is https://jazz-team-server:9443/Let’s first create our Lifecycle Project:
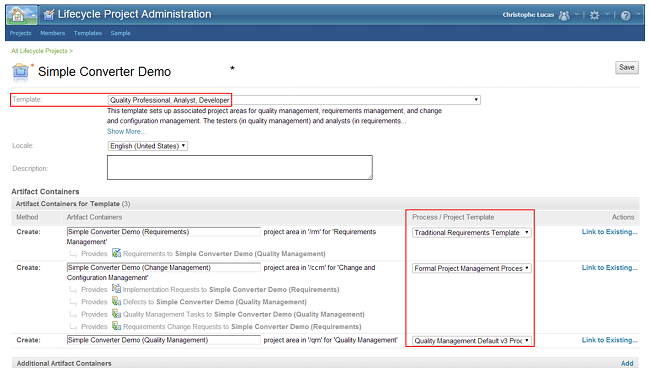
- Go to Lifecycle Project Administration at https://jazz-team-server:9443/admin, and click Create Project, name it Simple Converter Demo.
- Select Quality Professional, Analyst, Developer Template.
- In the Artifact Containers for Template box, select Traditional Requirements Template in the RM section, Formal Project Management Process in the CCM section and Quality Management Default v3 Process in the QM section.
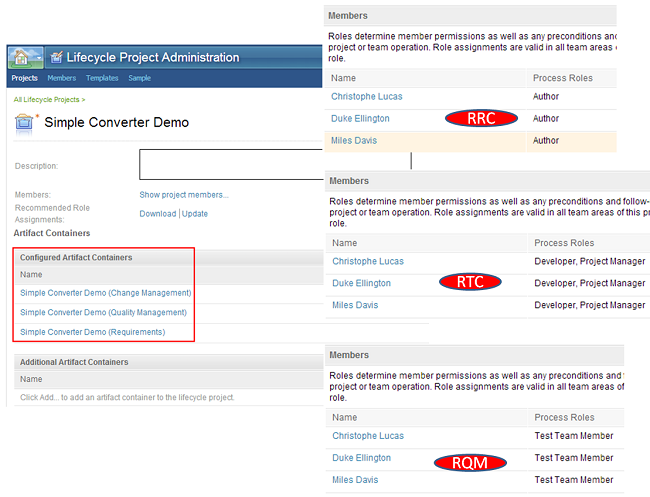
- By clicking on each of the just created Configured Artifact Containers links, get to each (CCM, RM, QM) Application’s Administration Overview page and add 3 members to each with associated roles as per picture below: Author role in RRC, Developer and Project Manager roles in RTC, and Test Team Member role in RQM.
RATIONAL REQUIREMENTS COMPOSER (RRC) DEMO
Now that we’ve setup all we need, let’s get started with the requirements, i.e. the definition of WHAT we want to develop. What we want is very straightforward and can be described with 3 requirements: (1) a simple GUI interface where users will have the ability to correctly convert: (2) Fahrenheit to Celsius, and (3) Feet to Metre.Let’s define these 3 requirements using RRC:
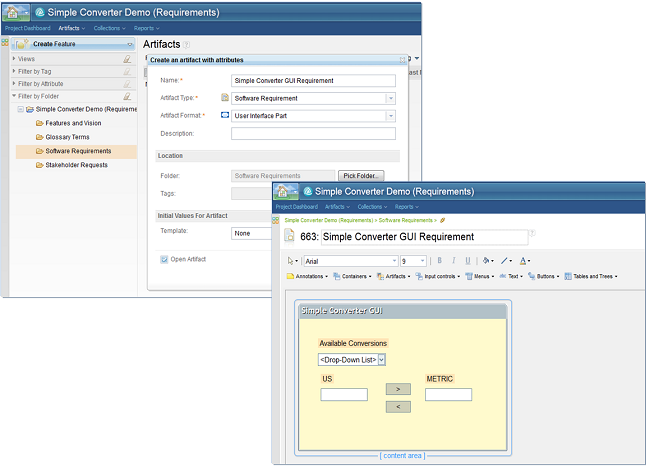
- Click on the Simple Converter Demo (Requirements) link at https://jazz-team-server:9443/rm/web. Go to the Artifacts menu and create a requirement of Software Requirement type and User Interface Part format called Simple Converter GUI Requirement.
- Click the Edit button and using the available widgets, draw a screen that looks like the picture below: (a) using the Containers menu, create a Window, (b) using the Input Controls menu, add a drop down list and two text areas, (c) using the Buttons menu, add 2 buttons between the 2 text areas, (d) using the Text menu, add labels as per picture below, and add some colors.
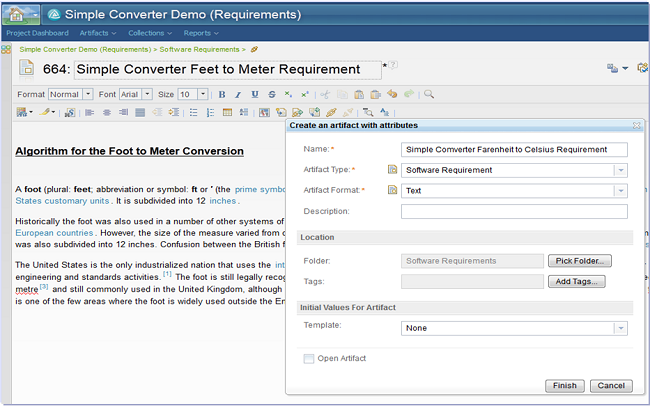
- Let’s create the two software requirements which define the calculation requirements. Go to the Artifacts menu and create two requirements of Software Requirement type and Text format respectively called Simple Converter Fahrenheit to Celsius Requirement and Simple Converter Feet to Metre Requirement (you can find the formula and text for these two requirements at a place like this).
- OPTIONAL: If you wish, feel free to (1) comment any of these requirements by clicking the Create comment for artifact button in the right-side section of the requirement, (2) play with the review features by clicking the Create Review button in the upper right-side.
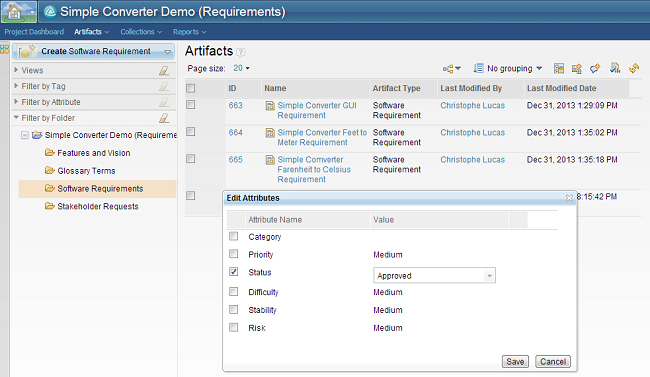
- Click Artifacts – Browse Artifacts menu, go to the Software Requirements folder on the left-side od the Filter by Folder section. Click all three requirements, select Edit the attributes for 3 Artifacts, and change their Status to Approved in one go.
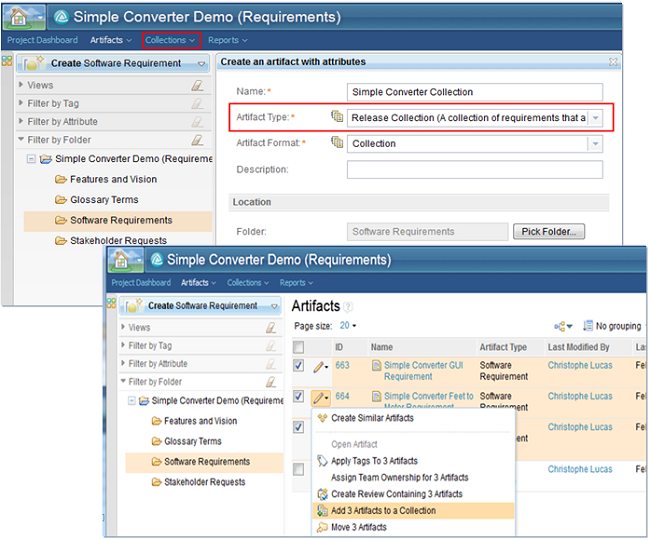
- We are going to create a requirements collection out of these 3 requirements. In this case, we will create a so-called release collection, which will allow us later on to link this collection to an implementation plan in RTC. As per picture below, first go to the Collections menu, create a new collection called Simple Converter Collection, then select the three requirements from the Software Requirements folder and add them to it by clicking Add 3 Artifacts to a Collection.
Note: A requirement collection can be used for various purposes – in this specific case, to link it to an RTC Plan and to an RQM Test Plan. For more information on the purposes of Collections, refer to this Collections help topic.
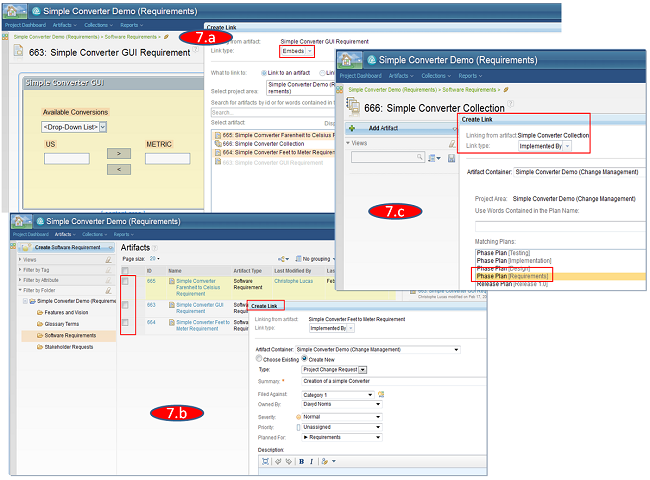
- Now we’re going to establish linkage: (a) between these three RRC requirements, (b) between these three RRC requirements and one Project Change Request work item in RTC, (c) between the collection of these three RRC requirements and the corresponding implementation plan in RTC.
(7.a) Select the Simple Converter GUI Requirement, expand the Links section on the right-side, select the Add Link To Artifact button and Embeds link type, select the two other requirements and click OK.
Note: As for the artifact types, you will notice that the links that are available are also quite different from these available in the Money That Matters JKE. This is also because we chose the Traditional Requirements Template. The available Links between artifacts can be changed using the Manage this Project Area menu (top right), Links Types section.(7.b) Click the three Requirements in the Software Requirements folder, and click Add a link to 3 Artifacts. This time we will use the Implemented By link type, and click the Create New button. Note that, thanks to OSLC, we are offered a direct link to the RTC Change Management application, and while staying within RRC, we have the ability to create a work item within RTC! Click Project Change Request, enter Creation of a Simple Converter in the Summary field and select Requirements in the Planned For field.
(7.c) Let’s also create a link between the RRC Collection and the Implementation Plan in RTC: in the Collections menu, add an Implemented By link to the earlier created Collection, and select the Phase Plan [Requirements] as the Matching Plan.
Note: The Artifact Types available in the Artifacts menu are quite different from these available in the Money That Matters JKE sample. This is because we chose the Traditional Requirements Template. The available types of Artifacts can be changed using the Manage this Project Area menu (top right), Artifact Types section.
RATIONAL TEAM CONCERT (RTC) DEMO
We now know WHAT we need to develop. Let’s see WHEN and HOW we will develop this. In this RTC demo, the 2 topics that we want to highlight are:(1) Work Item Management and Planning: in this section, we will create 2 children Tasks of the Project Change Request, 1 for developing the Simple Converter code, 1 for creating the Test Case associated to it.
(2) Source Control Management (SCM): in this section, we will show you how to put the Java code of the Simple Converter under RTC SCM.
Note that we will not touch the Build capabilities of RTC.- Work Item Management and Planning
- Work Items
- Planning
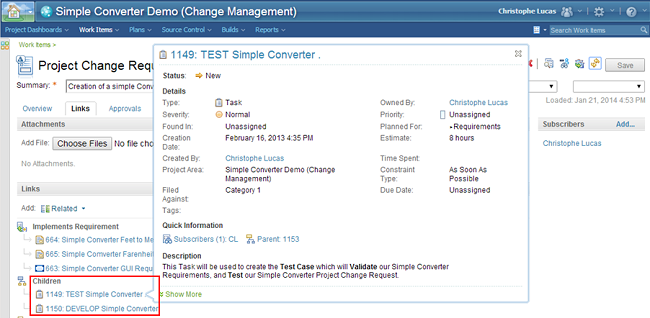
From within RRC, if you click on any of the three Requirements Links section, then click on the RTC Creation of a Simple Converter Project Change Request you created earlier, this will open RTC directly for you. Go to the Links tab, and click Add Children under the Links section.
Click Task in the Type drop-down box, and click Create Linked Task. Enter DEVELOP Simple Converter in the Summary field, select Requirements in the Planned For field, and add e.g. 8 hours in the Estimate field. Repeat these steps and create another Task called TEST Simple Converter. The Creation of a Simple Converter Project Change Request should look like this:
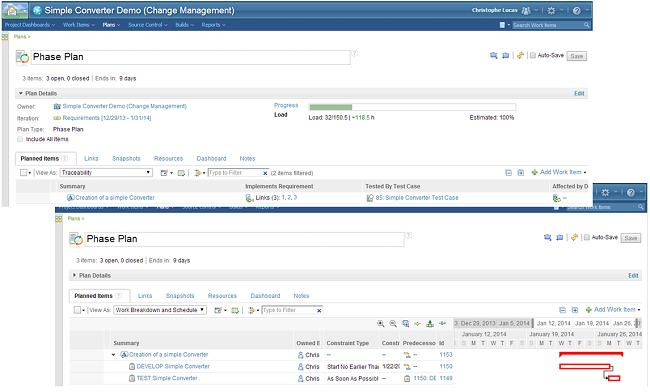
This is not the place for an extended talk on the RTC Planning component. However, let’s just have a look at a couple Plan views, keeping in mind that we actually have not done anything to create these, i.e. all this is ‘automatically’ created. In RTC, you actually do Planning without even realizing it!
Click on the Plans – All Plans menu, and open the Requirements Phase Plan. Look at the Plan’s (1) Traceability view – this Plan View is filtered to show only the high-level Project Change Request. What is interesting here is that in 1 view, we can see the linkage between the Project Change Request and the 3 Requirements that it Implements (note that the Test Case you see on picture below should only appear after our RQM demo), (2) Work Breakdown Schedule view – here, in the Predecessor column, make the DEVELOP Task a Predecessor of the TEST Task, and see what a good-looking Gantt chart was just created.
- Source Control Management
Now is time to actually code the Simple Converter, and put it under RTC Source Control. We’ll use the RTC Eclipse client here.
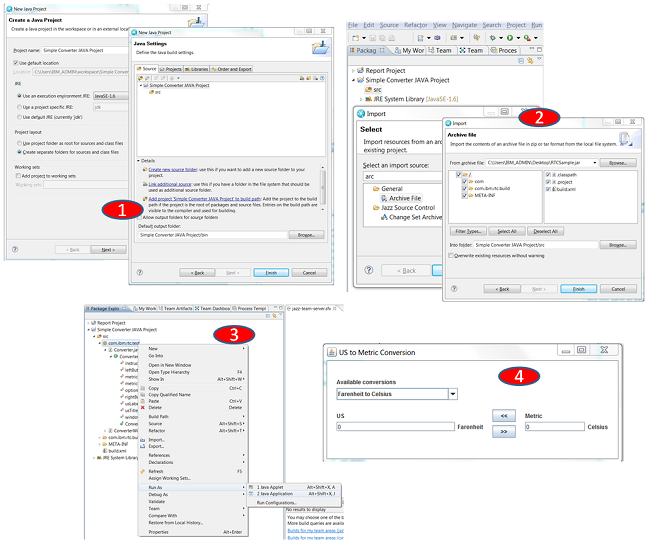
- Click File – New – Java Project, call it Simple Converter JAVA Project. Accept all defaults, click Next then Finish.
- Click Window – Open Perspective – Java, then Window – Show View – Package Explorer
- Set your mouse on the src folder, click File – Import, and select General – Archive File. Click the Browse button and select RTCSample.jar, then click Finish (download the jar file here: RTCSample.jar).
- Expand the src folder, right click on the com.ibm.rtc.test package, click Run As – Java Application, and play a bit with the Converter.
Let’s put this code under Jazz source control.
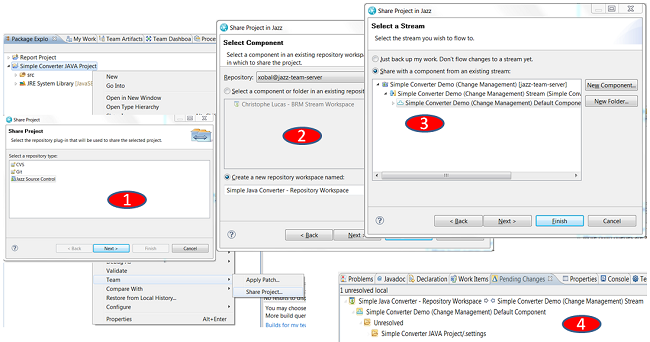
- Set your mouse on the Simple Converter JAVA Project, right click Team – Share Project, select Jazz Source Control, click Next. On the next window, select the Create a new repository workspace named, call it Simple Java Converter – Repository Workspace, click Next. Click Share with a component from an existing stream button and select the Simple Converter Demo component under the stream, click Finish. The Pending Changes view should just have opened by now, showing that there are some Unresolved changes in the Repository Workspace.
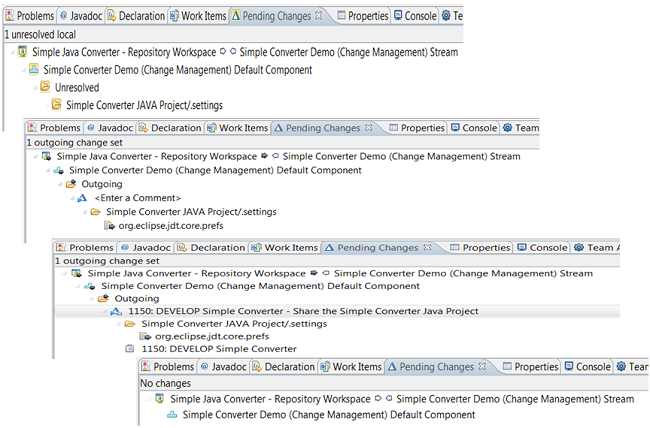
- Let’s deliver this Project to the Team stream. First right-click the Unresolved folder and click Check-in all. You will notice a change in the Pending Changes view, where an Outgoing change appeared. Enter Share the Simple Converter Java Project in the Comment, and associate this Change to the DEV Task we created earlier: right-click the comment line just created, and click Related Artifacts – Associate Work Item. In the Select Work Item window which just opened, enter *DEV* in the Search field, and click the DEVELOP Simple Converter. Finally, you can right-click the Outgoing folder and click Deliver. The picture below shows 4 screenshots of what the Pending Changes view has just gone through.
In Jazz SCM, the place where code is shared across all team members is called a Stream. A Stream is made of Components (e.g. a DB one, a C# one, a Java one etc) which contain the code artifacts.
To start working on a Team’s code, a team member will typically create a Repository Workspace on the Stream, and Load it (i.e. all the Team’s code) into his Local Workspace (i.e. on his hard drive). This is where he does his code changes. All changes that he does will appear in the Pending Changes view as Unresolved – this term indicating that there is a difference between the team member’s code and the Team’s one.
Once he is sure about his local changes, he will want to share these with the Team. To do so, he will first Check-in his changes from his Local Workspace to his Repository Workspace. At this moment, the Pending Changes view will indicate that the team member has Outgoing changes. As a last step, he can Deliver his changes to 1 Component of 1 Stream. Any other team member having a Repository Workspace connected to the Stream will see in his Pending Changes view that there are Incoming changes which he can Accept and Load into his local workspace. Note that it is good practice (which can be reinforced in the process configuration) to associate all changes to Work Items as we just did, so to ensure every code change is associated to a precise piece of work.
- OPTIONAL: If you wish to experience the full SCM picture we just described, feel free to: (1) Launch another RTC Eclipse client instance, select a distinct Local Workspace at launching, (2) Log-on with a different user than the one used so far (use one of the 2 others you created in the Introduction), (3) Go to the Project Source Control – Simple Converter Demo Stream, right-click New – Repository Workspace, click Finish, then Next (accept all defaults), then Finish. Open the Package Explorer view and observe that the Project we shared earlier is available to you. (4) Open one of the java files (e.g. src – com.ibm.rtc.test – Converter.java), add a comment in the file, save, and in the Pending Changes view, Check-In then Deliver. (5) Observe how in the first User’s Pending Changes view, an Incoming change appeared, which you can Accept.
Congratulations: you’ve just worked with Jazz SCM as a Team … on your own!
RATIONAL QUALITY MANAGER (RQM) DEMO
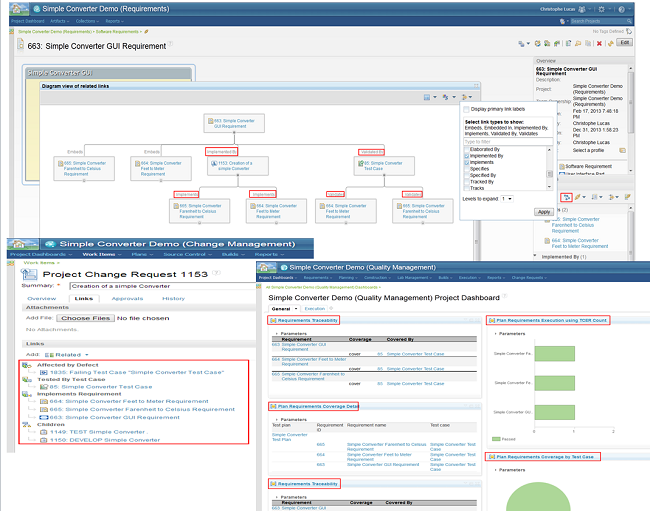
The CLM solution is all about creating a virtuous circle between all your Application Lifecycle domains, i.e. it is all about insuring a full traceability between your Requirement Management, your Configuration and Change Management, and your Quality Management activities. This virtuous circle is depicted in the picture below.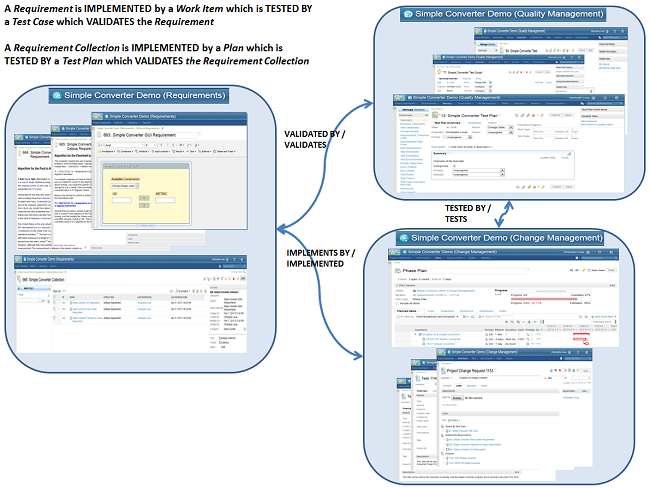
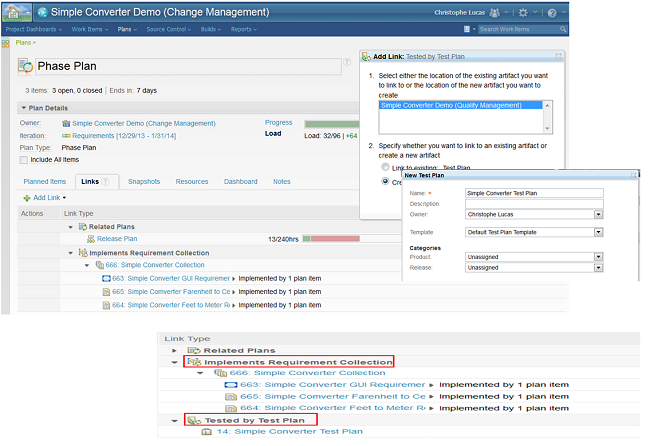
- From within your RTC application, go to the Plans – All Plans menu, open the Links tab of the Requirements Phase Plan, and click on its Links tab. Click the Add Link – Tested by Test Plan, select the defaults, and name the Test Plan Simple Converter Test Plan.
- The purpose of this article is not to detail all the features of RQM, so let’s just:
- Click on the Test Plan – this will lead you to the RQM application.
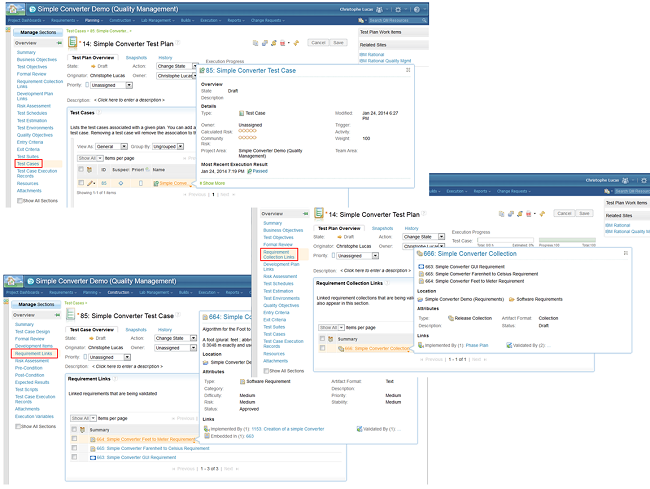
- Associate a Test Case to the Test Plan: click the Test Plan’s Test Cases menu, click the Create Test Case button, accept the defaults and name it Simple Converter Test Case.
- Make the VALIDATE link (1) between the Test Plan and the Requirements Collection: click the Test Plan’s Requirement Collection Links menu, and add the Simple Converter Collection from the Software Requirements folder, (2) between the Test Case and the 3 original Requirements: click the Test Case’s Requirement Links menu, and add the 3 Requirements from the Software Requirements folder.
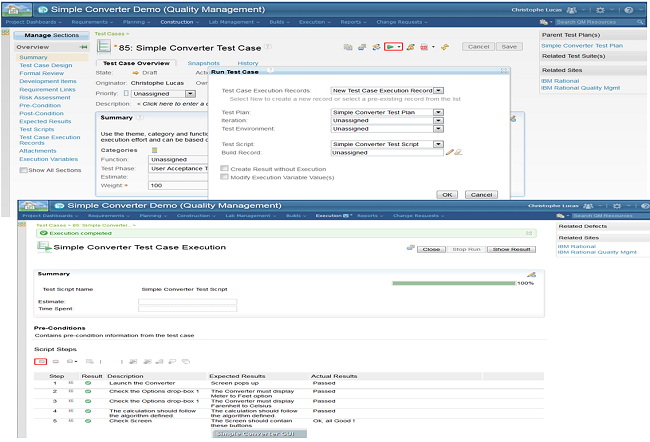
- Associate a Test Script to the Test Case: Click on the just created Test Case, go to the Test Scripts menu and click the Create Test Script button, name it Simple Converter Test Script. Edit the Test Script and add 5 Steps to it as per picture below – note the possibility to add images.
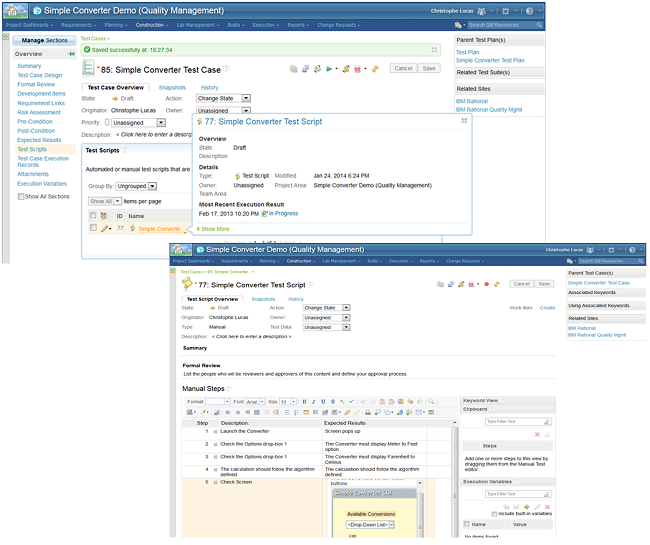
- Run the Test Case – and make it SUCCEED!: Click the Run button on the Test Case, enter the values as in picture below, click OK. This will launch a New Execution Record. Go through each of the Test’s step, and click OK for each.
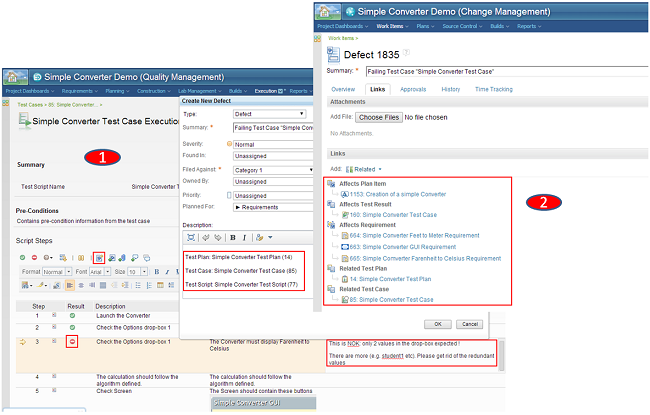
- OPTIONAL: Run the Test Case – and make it FAIL! You might have noticed that the provided RTCSample.jar code actually proposes several extra values in the Available conversions drop-box (e.g. ‘US to Metric Student1’). Well, that’s wrong according to our initial Requirements which only mentioned the need for the Converter to handle Fahrenheit to Celsius and Feet to Metre conversions. So actually, we were a bit too fast in claiming success! We need to raise a Defect.
Re-run the Test Case as done above. On the third Test Script step, click the Fail button, then the Create New Defect one, click OK. This will have created a new Defect called Failing Test Case “Simple Converter Test Case” for us, with loads of information automatically created by the system. The very interesting thing here is that the Defect is automatically linked to all the artifacts we created during this demo – as you can see on its Links tab in the screenshot below.
To definitely close the loop, you probably know by now what you need to do, but in case, here are the high-level steps: (a) back to the Java code in the Eclipse client, remove the extra unwanted lines (e.g. ‘US to Metric Student1’), (b) check-in your changes, associate them to the Defect work item, then deliver your changes to the Team Stream, (c) re-run the Test Case and ensure your corrections are fine, (d) finally, using their workflow actions, you can move all your work items to the Resolved or Closed states.
Congratulations, and Thanks for your time and clicks.
About the author
Christophe Lucas is an IBM Rational Client Technical Professional who loves Jazz in action under an Australian sky, with a special preference for CLM.Next, Duke Ellington (for his Jazz Foundation), Thelonious Monk, John Coltrane and Miles Davis (for their collaborative extension of Rational Team Concerts limits).
You can contact him at chrlucas@au1.ibm.com.
Copyright © 2014 IBM Corporation