Executing a Rational Integration Tester test remotely from Rational Quality Manager
Introduction
Rational Quality Manager (RQM) is a collaborative, web-based tool that offers comprehensive test planning, test construction, and test artifact management functions throughout the software development lifecycle. It supports managing and running tests created with Rational or third-party test tools, like Rational Performance Tester, Rational Functional Tester, Rational Integration Tester and so on.
Rational Integration Tester (RIT) is used to create and run tests for a variety of purposes using a broad range of tools for tasks such as synchronizing with WSDLs and validating messages and data. It’s also used to create and run virtualization server, for example message-based stubs and database stubs. It can be used to create and run performance testing.
This article explains how to integrate RQM and RIT, how to let the RIT Agent run as an RQM adapter, and how you can execute RIT tests and suites (this is only for test cases) in RQM’s centralized test management environment.
Prerequisite
RQM is deployed and ready to test.RIT Agent is deployed and ready to test.
RIT is deployed and ready to test.
Notes: RIT is used to create test cases here, if you have created test cases, it’s not necessary to deploy it.
Configuring the Rational Integration Tester Agent
This step introduces how to configure the RIT agent as a RQM adapter to enable remote test execution.
To configure the RIT Agent:
1. The configuration can be modified in Agent.config, found in the config directory of the RIT Agent installation (C:Program FilesIBMRIT-Agentconfig, by default). The configuration file is an xml file that contains an empty or default configuration that can be changed to match the RIT and RQM installation environment.Note: By default, the RQM adapter functionality is disabled and must be configured before it can be used.
Figure 1. RQM adapter default configuration in Agent.config

2. Modify the agent configuration file as follows:
username → The ID of an RQM user to be used by the agent/adapter when you are connecting. This user ID requires a Connector Client Access License, which are assigned within RQM, to allow access.
password → The password for the user ID entered in Username.
url → The base URL of the RQM server (for example, https://server.domain.com:9443/qm).
rqmProject → The RQM project to which the configured agent connects.
ghtProjectBaseLocation → The base location of your RIT projects (that is, the directory that contains the RIT projects that are used for running tests). For example, C:RationalIntegrationTesterProjects.
runTests → The full path or relative location of the RIT RunTests file (for example, .RunTests.exe or
C:Program FilesIBMRIT-AgentRunTests.exe).
rqmAdapterId → A unique identified for the current instance of the agent/adapter. Each running instance must supply a unique identifier. The host name of RIT agent server is a good choice.
rqmPollInterval(Optional) → The polling interval in seconds. This interval is the wait interval between queries of the RQM server. Default value is 5.
rqmAdapterName(Optional)→ The name that is used when you are registering with the RQM server.
Default value is “Rational Integration Tester”
rqmAdapterDescription(Optional) → The description that is used when you are registering with the RQM server. Default value is “Rational Integration Tester adapter”
Figure 2. Example configuration in Agent.config

3. Restart the RIT agent service with services.msc.
Checking the Rational Integration Tester Adapter status
After configured the RIT agent and restarted it, the RIT adapter should be connected to RQM server automatically. Go to the URL “https://server.domain.com:9443/qm/web”, and click “Execution > Adapter Console”, you will get all connected adapters status.
Figure 3. Checking the Rational Integration Tester Adapter status
Creating and running RIT tests in the RQM
You have two ways to create the RIT test scripts. One is to export the test cases from RIT directly. The other is to add the test scripts and cases from RQM manually.
Creating RIT test cases in RQM manually
You can create a reference to a RIT script in the same way that you create any other scripts in RQM.
- Go to the URL “https://server.domain.com:9443/qm/web”.
- Click Construction > Create > Test Script.
- Select the script type as Rational Integration Tester.
- In the Integration Tester Script Details section, specify values for these fields:
- Project: The name of the RIT project that contains the test to be executed. The project must be on the machine that is running the adapter.
- Test Path: The project path that specifies the RIT test to execute, for example, addNumbers/addition/additionCheck.
- Environment: The RIT environment that is used to execute the test.

- After you create the script, assign it to a test cases, and optionally, assign the test cases to a test suite.
To create RIT test cases in RQM via exporting from RIT
After you created the test cases in RIT, you can export the test cases to RQM directly. Steps to export the test cases from RIT as follows:
- Configuring an RQM integration in RIT.
- If not already running, launch RIT and select a new or existing project.
- Select Project Settings from the Project menu. The Project Settings dialog is displayed.
- Select the Quality Management tab.
- In the Quality Management Integrations pane, click Add.
- In the Select Provider dialog, click IBM Rational Quality Manager. A new Rational Quality Manager configuration is created.
- Configure the details of the new integration by using the available fields in the Test Management Integration Details pane, as follows:
URL → The base URL of the RQM server (for example, https://server.domain.com:9443/qm).
Project → Enter the exact name of an existing project on the RQM server. When you are exporting tests and
test suites, this name is the RQM project where they are created.
username → Enter the user ID of an RQM user who has sufficient privileges in the named project to create tests and test scripts.
password → Enter the password for the user ID entered in Username.
Figure 5. Configuring an RQM integration in RIT

- Configure the local update site(optional)
For the details please refer to the information center
- Exporting test cases from Rational Integration Tester
- Launch RIT and open the project that contains the tests or test suites you want to export.
- Open the Test Factory perspective (F10).
- Right-click the wanted test or test suite and select Export from the menu. The Quality Management dialog is displayed. The default RQM integration is selected under Integration.
- If more than one integration are configured in RIT, select the wanted integration from the Integration field.
- To manage the integrations in the RIT Project Settings dialog, click Manage next to the field.
- In the Environments pane, place a check mark next to the environments to use for the selected test or test suite. By default, the current environment of the asset is selected.
- To manage environments in RIT, click Manage next to the pane.
- When the integration and environment options are correct, click Export.

- Once finished, select Browse Test Cases or Browse Test Scripts from the Construction module in the RQM console.

Figure 8. Checking exported test scripts from RQM

To execute test cases in RQM
In the RQM console, click Browse Test Cases on the Construction module. All available RQM test cases are displayed, including the cases exported from RIT.
- Select one of the RIT test cases by checking the box to the left of its entry in the list
- Click the Run Test Case > Run, the Run Test Case dialog is displayed.

- If wanted, you can change the Test Script or Machine, then click OK, a new test case execution record will be generated, then the test case will be executed and the progress is displayed in the console.

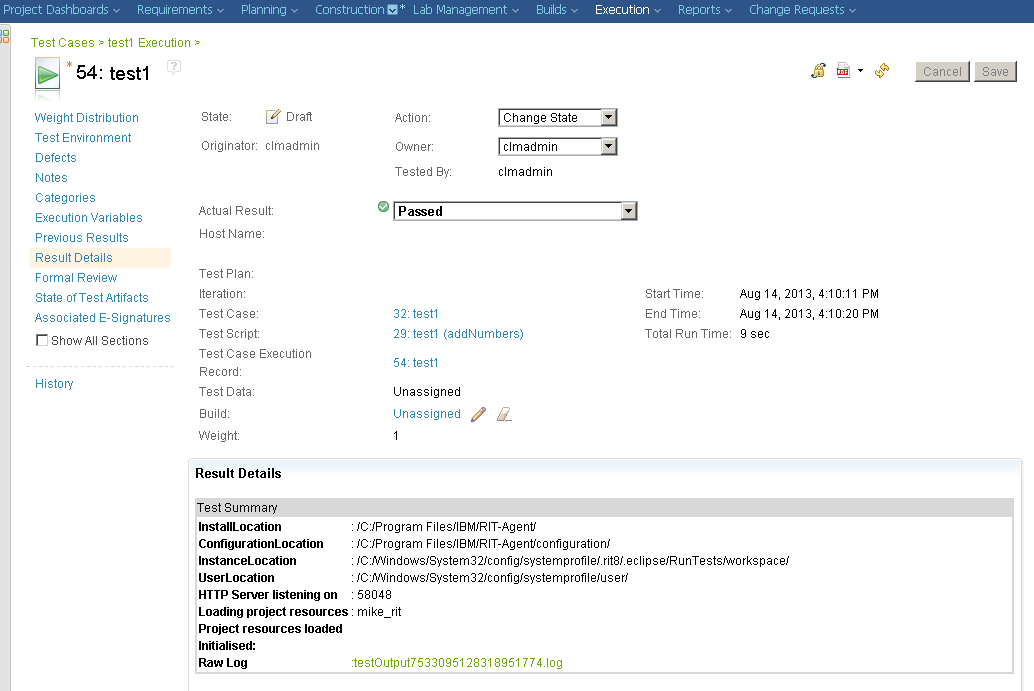
- Finally you can view the detailed results of the execution, click Show Result. The results are opened in a new tab in the RQM console, showing the detailed execution results (the same as for any RQM test case).
For more information
- Collaborative Lifecycle Management 4.0.4 (RTC, RQM, RRC) Online Help (official)
- JIBM Rational Integration Tester 8.5
About the author
Ling Wang is a Software Engineer in the System Verification Test Team of IBM Rational Software Group. He is responsible for Server Rename testing and Legacy Integration testing for the Rational solution for Collaborative Lifecycle Management. He can be contacted at wlingbj@cn.ibm.com.