Working with locks in Rational DOORS Next Generation 4.0.3 and Rational Requirements Composer 4.0.3
The purpose of this article is to provide an overview of the behaviour and capabilities of the artifact locking mechanism provided in the DOORS NG and Rational Requirements Composer 4.0.3 releases. The intended audience of this article includes both system administrators who wish to understand the locking related permissions supported in the products and end users who wish to work effectively using locks. Earlier versions of these products had a subtly different mechanism and this document does not describe how the previous mechanism behaves.The portions of this article relating to the web client and to administrative functions are also applicable to the Rational Requirements Composer 4.0.3 release, which has the same locking mechanism.
Purpose of Locking
The locking mechanism in the 4.0.3 release is intended to solve two related issues. The first is that the system provides an environment where many users can concurrently access the same data and potentially modify it. Without any controls on this concurrency users would have difficulty synchronising those changes and the risk of a user’s changes being lost or requiring a merge is heightened. Locking provides a mechanism whereby an artifact is guarded while a user is performing an edit, minimising the possibility of a concurrent modification from another user. Further, the protection afforded by locking is generally automated and users need not concern themselves with it on a day to day basis. It is important to note (as we will discover later in this article) that the guarantee offered by locking is not absolute since there are administrative functions which allow the forcible removal of a lock without the owner discovering this has happened.The second issue that is addressed by this mechanism is to support long lived editing sessions. There are two scenarios that fall into this category, both of which are supported. For working with uploaded resources such as images or office documents a user may wish to download the content and work on it for a significant period of time (a few hours or even several days) and then upload the updated form into the system. During that period, the user does not want anyone else to upload a new version of the same artifact. The system allows the user to take a long lived lock on that artifact to prevent other users from modifying it while they are working on it. The second scenario is that a user may be making extensive modifications to a single artifact or group of artifacts (for instance in a module) for which the effective edit session may last several hours or days and may span multiple saves of the changes as work progresses. During this time, the user wants to prevent other users from modifying the set of artifacts being worked on, even while the user is offline. Again, the long lived lock mechanism provides support for the user to do this.
Lock Behaviour
The behaviour of locks can be simply stated:Whenever a user Alice wishes to commit a change to an item of data the system will enforce that the change cannot be committed if a lock on that item is held by any user other than Alice.
This may initially sound like an unusual way to phrase the behaviour but it is imortant to understand that the system does not require that Alice has a lock in order to make a change, it simply requires that no other user has a lock to prevent Alice’s change from being made.
In practice, both the rich and web clients will always attempt to ensure that Alice has a lock guarding her edits, but other mechanisms for modifying data such as the RM OSLC API allow attempts to make modifications without acquiring a lock and this is perfectly valid. The system will enforce the same rules in all cases and mechanisms that do not acquire locks up front simply run the risk that their edits are rejected because another user holds the required lock.
In this article, we will refer to the relationship between an item of data and its associated lock by saying that a piece of data is guarded by a particular lock.
Locking Artifacts
The behaviour noted above is most easily understood with a simple example – the locking of individual artifacts. Consider a particular requirement R for instance. If the user Alice has a lock on R then Alice has ensured that no other user can modify any of the attributes (including the primary content) on that requirement. This works for textual artifacts as well as graphical artifacts and uploaded artifacts such as images and PDFs. There are certain modification operations which respect locks and others that do not.| Guarded by locks | Not Guarded by locks |
| Modification of Attribute Values | Move Artifact |
| Modification of Team Area association | Add/Remove Tags |
| Artifact Deletion | Add/Remove Links |
| Add Comments |
In addition to this underlying behaviour there are some special cases that warrant discussion, namely Reused Artifacts and Module Structure. These cases are interesting, not because the locking mechanism is more complex, but because the scope of the lock required is not necessarily obvious to the user. In general use this should not present a problem but if a user wishes to acquire a lock manually to prevent certain things from changing then it is important to understand which lock is required to achieve that effect.
Locking Reused Artifacts
Artifacts can appear directly in the folder hierarchy and can also appear inside modules. When an artifact appears in a module it is always the case that there is an instance of that artifact in the folder hierarchy too. The instance in the folder hierarchy is referred to as the core artifact. The instance of the artifact that appears in the module is referred to as a reused artifact. From a user’s perspective, an artifact is generally only considered to be reused if it appears in more than one module, in which case those instances share the same core artifact. However, from a system perspective, the artifacts that appear in a module are all effectively reused artifacts because every artifact has a matching core artifact which lives directly in the folder hierarchy. This is important to understand as reused artifacts are made up of two separate parts which are guarded by different locks.The first part is the shared part and it is shared between all instances of the artifact including the core artifact. This part consists of all the attributes the artifact has plus its assigned team area. The second part is specific to the artifact in one particular location in one particular module. This second part includes the child list of the artifact and configuration of whether to display the artifact as a heading or not.
Locking of the shared part is always based on the core artifact and thus has a broader scope than you might first imagine. Locking the core artifact will lock the attributes on that artifact in all places it is reused. Similarly, locking the shared part of a reused artifact locks the shared part across all uses of the artifact and the core artifact.
Consider the following example:
Artifact A exists in the folder hierarchy and has been reused in two modules as A_1 and A_2.
If Alice locks A_1 then the attribute values associated with it are guarded by that lock and any other user accessing any of A, A_1 or A_2 will see that Alice has that single lock guarding all the attributes in all those locations. However, at the same time a second user Bob could edit A_2 and change the “Display as Heading” setting since this is in location specific part of A_2 and guarded by a different lock.
This location specific part and the lock guarding it is described in the next section.
Locking Module Structure
When working in a module there are two separate locking actions available to you. The first is to lock a single row in the module and the second is to lock the module structure. The first of these locks the shared part of the reused artifact as described in the previous section. The second choice is a lock which is orthogonal to the row based ones and locks a selection of location specific aspects:- The module artifact itself is locked
- The attributes on the module artifact are locked
- The underlying tree structure of the module is locked
- The flags for controlling whether each row should be displayed as a heading are locked
If a user navigates through the folder hierarchy, locates a module artifact and locks it without opening it, this acquires a Module Structure lock as described above. The lock prevents the modification of the module artifact itself (it cannot be renamed for instance) but it does not prevent the modification of the individual artifacts within the module.
Lock Lifecycle
Lock Acquisition
Locks can either be acquired manually by the user or automatically by the system. There are a number of places in both client interfaces where you may explicitly request that a lock is acquired. Requesting a lock in such a way is referred to as Manual lock acquisition. The ability to acquire locks in this manner is controlled by a permission which must be granted by an administrator (see the lock permissions section for details). It is not expected that this will be the normal manner of operation but as described earlier, there are some scenarios where you may need to do this. Instead, you can generally ignore locking entirely and simply initiate edit actions and the system will automatically acquire locks on the your behalf. For instance, when editing a row in a module, the system will acquire a lock on the shared part of the reused artifact and when adding a new child row in a module, the system will automatically acquire a lock on the module structure to guard the change.Lock Release
In the case of automatically acquired locks, the system will automatically release the lock again once it is no longer required. Typically this means that automatically acquired locks are released as part of a subsequent save or cancel operation.If you have manually requested a lock, for instance by click on a lock icon, then that lock will never be automatically released. It will, instead, persist cross client sessions and server restarts until you manually release the lock. Careful consideration should be taken before acquiring a lock manually due to its persistent nature.
Overriding Locks
There may be occasions where a lock is preventing users from carrying out their work, for instance because a user has accidentally left a lock in place before going on vacation. To cater for such situations, there is a mechanism which allows a user with suitable permissions to override an existing lock and forcibly discard it. The lock is then absent and another user can then go ahead and acquire that lock.Note. This operation has a risk of causing data loss if the original user is still depending on that lock. If they have an active edit session they may not realise the lock has been overridden until they attempt a save at which point it will fail. Overriding locks should only be done in exceptional situations and only after careful consideration.
Lock Permissions
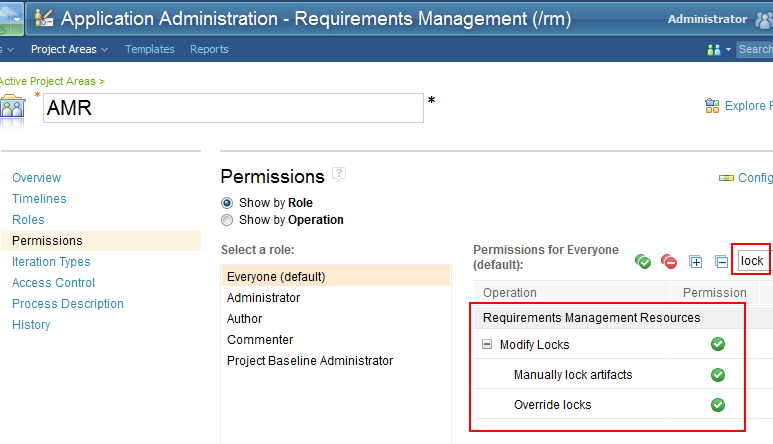
There are two permissions relating to lock management which a system administrator can assign to certain roles in a project. These two permissions are called “Manually lock artifact” and “Override locks”, and they appear within the group called “Modify Locks”. The permissions are accessed in the same manner as all the other permissions configuration in the system, via the Manage Project Areas function.A system administrator can easily control which roles are capable of manually take long lived locks (or, if desired, ensure no user has permission to do this) through this mechanism. As noted earlier the overriding of locks should not be a normal behaviour and it is strongly recommended that only a small number of administrative users are granted this permission.
The screenshot below shows permissions filtered by the phrase “lock”.
Lock Analysis
While many users will perform their day to day activities without having to perform any explicit lock management, there will be some users who may have a need to examine the set of locks in the system. To achieve this the system provides the capability to perform some simple analysis of locks. The user can define filters based upon lock status and add grid columns to the display which will show information relating to any locks, applying these to both module grid displays and the all artifacts view. These capabilities are currently only available in the web client.Locking Facilities in the clients
DOORS NG has two clients, a Rich Client and a Web Client. The locking capabilities are exposed slightly differently in the two clients and so the following sections describe each in turn.Web Client
Artifacts View
In the web client, the Artifacts view shows the same lock indicators as those we have already seen in the rich client. The example below shows that the current user has a lock on artifact 247 and another user has a lock on artifact 210.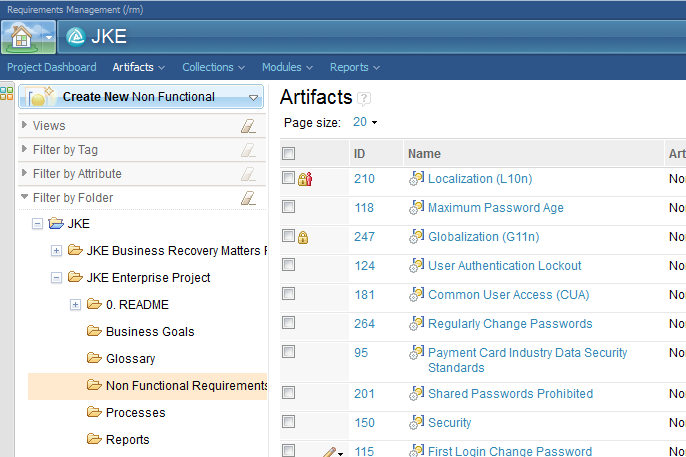
To get more information about who holds a lock, the icons can be hovered on as shown below.
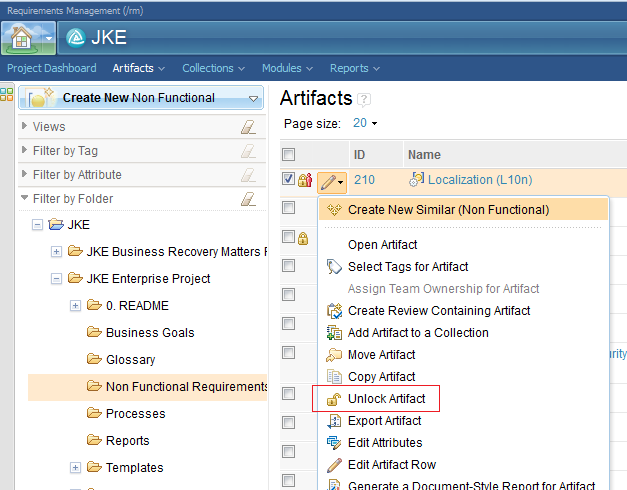
Locks can be acquired and released manually using the pencil menu within the artifact grid, either acting on a single artifact or a multi-selected set. The contents of the pencil menu will vary according to the state of the selected artifacts. If you select a mixture of locked and unlocked artifacts the menu will not offer you any actions. If you select only locked artifacts, the menu will offer the option to unlock them and if you select only unlocked artifacts then the menu will offer the option to lock the artifacts.
As with the rich client, there is a single Unlock option which covers both the normal unlocking case and the overriding of another user’s lock. If the user action involves overriding another lock, the user will receive a warning before the action is completed.
Artifact View
In the single artifact view locking information is also available via an icon near the top of the page. The icons used are the same as those already seen, indicating if the current user holds a lock or a different user holds a lock.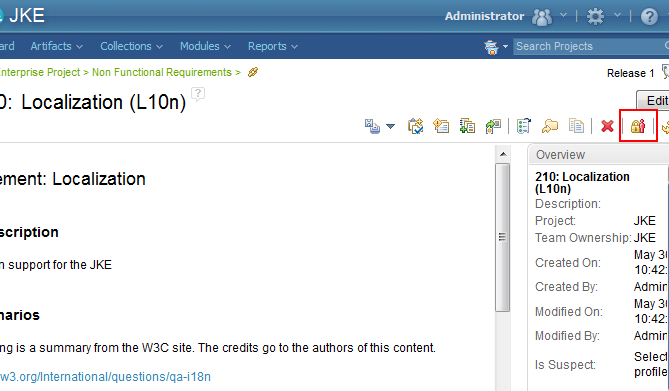
If a lock is held then the icon can be hovered on to gather more information about which user holds the lock and when it was acquired. Further, the icon also functions as a button for acquiring and releasing locks. If a lock is held then clicking the icon will attempt to release the lock and if no lock is held then clicking the icon will manually acquire a lock.
If no user holds a lock then the Unlocked icon will be shown:
Module View
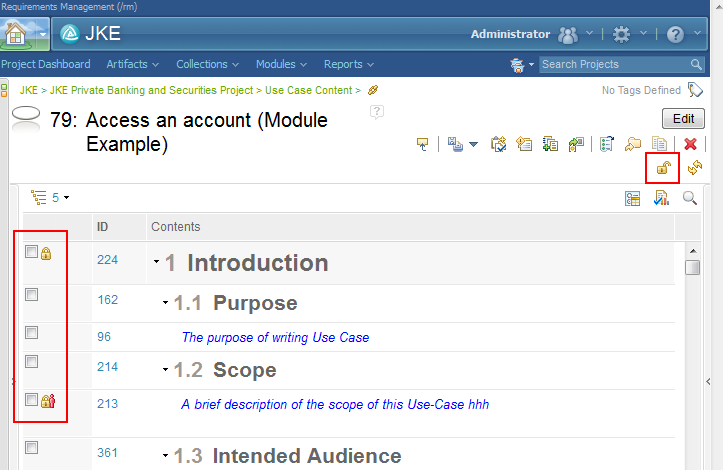
The module display in the web client has the same dual locking capabilities that we have already seen. The module structure can be locked as one gesture and individual rows within the module can be locked and unlocked separately.In the screenshot below, we can see that the current user has a lock on row 224 and another user has a lock on row 213. If we look at the top right of the page we can see the Unlocked icon showing. This icon represents the lock status of the structure of the module. Neither this user nor any other currently has a lock on the structure.
By clicking on that icon, this user could manually lock the structure of the module to support an extensive editing session. Alternatively, they can simply perform individual restructuring operations (such as moves and row creation) and rely on the system to lock the structure while each operation is performed.
Individual row locking is identical in behaviour to the capabilities already seen in the Artifacts view. The pencil menu can be used to manually acquire and release locks (including overriding other users’ locks if desired). Further, initiating edits in the module grid will take automatic locks and release them after the change is committed to the server.
If the user attempts to initiate an edit on a row where another user has a lock, the system will offer to override that lock automatically if the user has the Override Locks permission. If the user accepts this, the lock will be replaced by one owned by the current user and that lock will be an automatic lock, automatically released when the edit is committed.
Collections behave it an identical manner to modules. The collection as a whole can be locked, or individual artifacts with the collection can be locked. Locking the collection as a whole prevents other users from adding or removing entries from the collection and locking individual artifacts within the collection prevents them from being modified.
Lock columns and filters
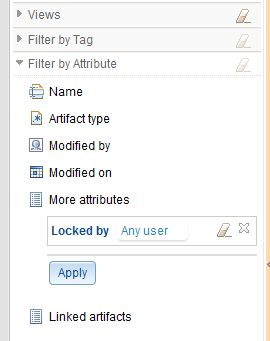
To facilitate the management of locks in the system, the lock status of artifacts can be worked with in much the same way as normal attribute values can. You can filter on lock owner and you can add columns to either a module view or the grid in the Artifacts view.Filtering can be to locate locks held by a particular user, a list of users or “any user”. The “Locked By” filter term is located in the “more attributes” section of the Filter By Attribute area.
Views can have the columns “Locked By” and “Locked On” added to them.
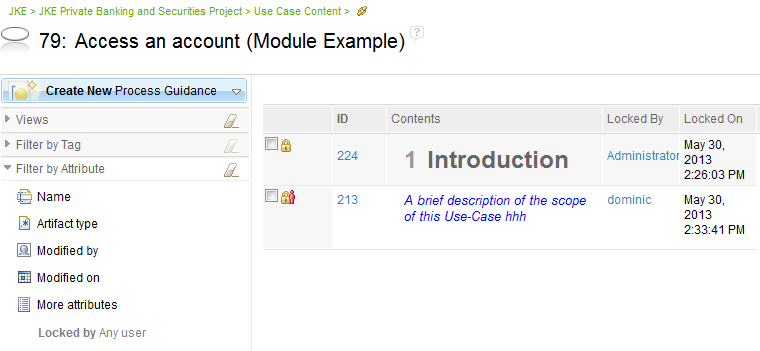
When combined with other filters such as folder filtering in the Artifacts view, this provides the capability to identify and manage locks in the system.
Rich Client
Database Explorer
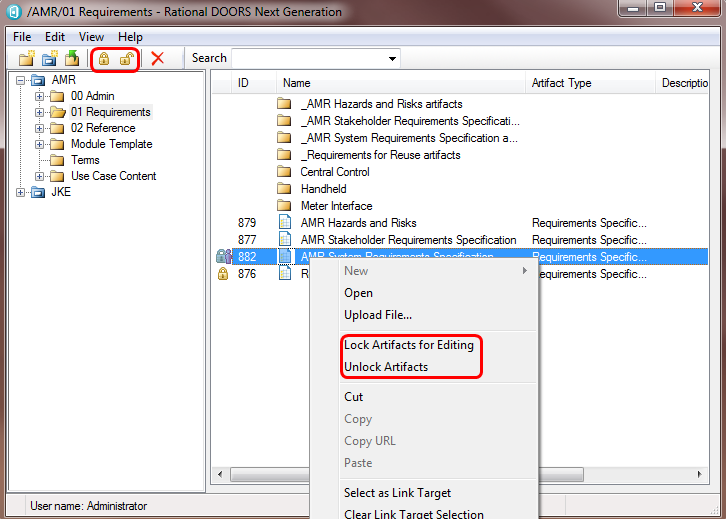
In the database explorer window the user can see an indication of the locking status of artifacts in the current folder and can also perform all the locking actions (acquire, release, override) on a particular artifact or multi selected set. In the screenshot below you can see two lock icons indicating locking state, the icon against artifact 876 shows that this user holds a lock currently and the icon against artifact 882 indicates that another user holds the lock. For the other artifacts, the absence of an icon indicates that no lock is currently held.In the next screenshot we can see the context menu raised on artifact 882. It offers both Lock and Unlock options which may at first seem odd but note that 882 is locked by another user so these two options are actually options to override the lock (either by forcibly releasing it or by forcibly releasing it and acquiring it for our own use). In both cases the user will be prompted with a warning about overriding locks before any action is taken. If either action is not permitted (lack of permissions or because a lock is not currently held for instance) then that action will be greyed out in the menu just as other options are greyed out when not available. Finally, we note that acquiring a lock through any mechanism in the database explorer is a manual lock acquisition and so the rules about manually releasing the lock apply. The system will never automatically release a lock manually acquired through this mechanism.
In addition to the context menu, locking icons can be seen on the toolbar again, in this case with both enabled but normally with one enabled and one disabled.
Contents Pane
When a user has opened the contents pane for an artifact they still have full control over the lock status of the artifact and, in addition, they can gain the benefits of automatic locking if they desire. In the following screenshot the user has just opened the contents pane, the artifact is not locked and dialog is in read only mode.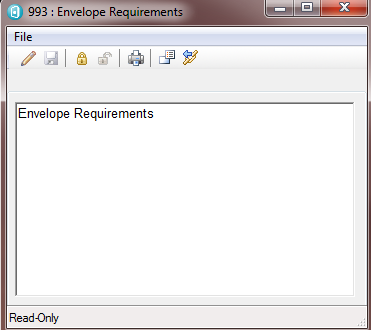
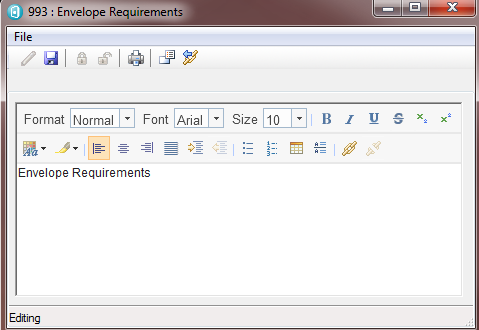
The user has two choices for proceeding with an edit at this point. They can click on the lock icon in the toolbar which will acquire a lock (this is manual lock acquisition again) and then the user can press on the edit button (the pencil icon on the left of the toolbar) to initiate an edit. Alternatively they can simple press on the edit button to enter edit mode. In both cases the user is able to modify the text in the artifact and press save but the big difference is that in the second flow, the lock was automatically acquired and when the user presses save, the dialog returns to read only mode and the lock is released again. The screenshot below shows the dialog in edit mode – note that the edit button has become disabled and the save button is enabled. In addition the locking buttons are disabled as the user is not expected to release their lock during the edit of the artifact.
Properties Pane
The properties pane for an artifact offers the same experience where, from the initial read only state of the dialog the user can either manually acquire a lock and then initiate an edit, or simply initiate an edit directly and let the system automatically manage the locks for them. Instead of a save icon, there is an Apply button at the bottom of the dialog, but the behaviour is the same as for the contents pane.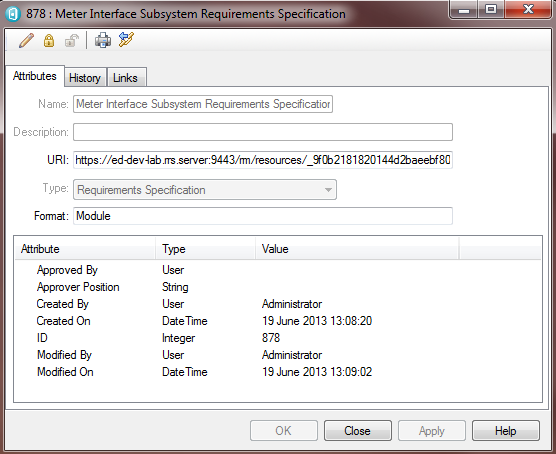
Module Grid
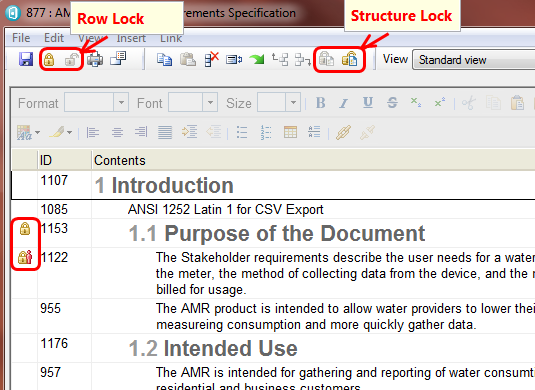
The module grid provides two sets of locking icons in the toolbar (see screenshot below). The left most set of icons apply to locking on the selected row in the module. These acquire and release the lock on the shared part of a reused artifact as discussed earlier in this article. The other two icons relate to locking the structure of the module (including the module artifact itself, again as described earlier in this article). In both cases, the user can manually acquire a lock or let the system automatically acquire and release locks as necessary. To achieve the automatic behaviour, simply initiate an edit on a row (click on the contents text for instance) and note that a lock icon appears to the left automatically. Similarly, for the module structure, just start adding/removing/moving artifacts around and see that the structure lock icons change as the system automatically acquires locks on the user’s behalf.In the following screenshot, we can see that the structure is locked (the left hand icon is disabled and the right hand one enabled). In addition, the selected row is unlocked (indicated by an absence of a lock icon in the left hand column and also reflected in the state of the row locking icons in the toolbar). Note that, just as we saw in the database explorer, lock icons appear in the module display indicating the lock status of individual artifacts. In the case of the screenshot below, artifact 1122 is locked by another user and 1153 is locked by this user.
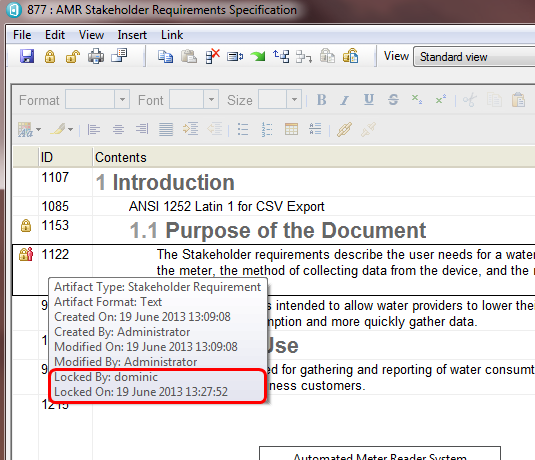
The ID column can be hovered on to get information about the row, including locking information. In the example below, the last two lines give information about who currently holds the lock and when the lock was taken.
Lock Analysis
The rich client does not currently include any lock analysis capability. If the user attempts to open a module view which includes columns or filtering that make use of lock analysis logic it will not load that view but will instead inform the user that the view cannot be loaded.About the author
Dominic Tulley is a software architect working in the Rational division of IBM Software Group.
Copyright © 2013 IBM Corporation