
Managing teams using the Team Area in Rational Quality Manager 4.0.1
This article describes implementing the team area feature in Rational Quality Manager (RQM) to better manage the test teams. Using this feature, you can divide the work between different teams and restrict unauthorized access to users working in the same project area.
Introduction
RQM is a collaborative, web-based tool that offers comprehensive test planning, test construction, and test artifact management functions throughout the software development lifecycle. It is designed to be used by test teams of all sizes and supports a variety of user roles, such as test manager, test architect, test lead, tester, and lab manager. The application also supports roles outside the test organization.
RQM is an integral part of the Rational solution for Collaborative Lifecycle Management (CLM) which provides seamless integrations for application lifecycle management, with reduced cost of ownership and administration, improved cross-product visibility and reporting, and lifecycle integrations.
Team Area
The structure of the project teams is defined by a hierarchy of team areas. Team areas are used to manage team membership, roles assignments, and team artifacts.
Complex projects can have a hierarchy of team areas. Different teams may need access to the same project area. The user access to the artifacts are given based on the team area he belongs to.
Some project members, such as the project lead, might not belong to a team area, but are defined as members at the project level.
Requirement
To demonstrate the team area concept in RQM , we will take the below requirement as an example:The project area requires three roles as below:
Role 1=SIT Tester
Role 2=UAT Tester
Role 3=Team Lead
The SIT Tester is expected to execute the SIT test cases but not UAT;i.e he needs to have read/write access to the SIT test cases and only read access to UAT test cases.
Similarly UAT tester needs to have read/write access to UAT test cases and only read access to SIT test cases.
The Team lead will have read/write access to both SIT and UAT test cases.
Implementation of Team Area in RQM 4.0.1
Enabling Team Areas
Before creating the team area, you need to enable the team area support.This can be done as follows:
a. Under the RQM Project Area, click on Admin > Manage Project Properties.
b. Click on Team Areas & Timelines and select Enable team areas and support for multiple timelines option.

Creation of team areas
To implement the above requirement, we need to have two team areas created, one for SIT team and the other for UAT team.
1. Under the RQM Project Area, click on Admin > Manage This Project Area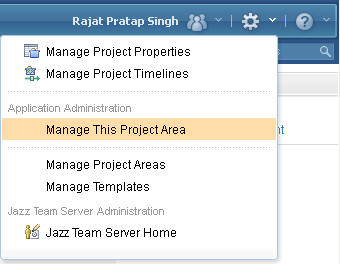
2. On the top right, click on the Create Team Area icon

3. Give a name to the team area. eg: SIT Team Area.
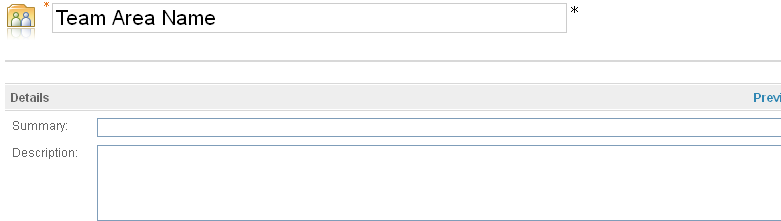
4. Save the team area.
Similarly repeat the steps for creating UAT Team Area.
You will now see two team areas under your main project area as shown below:

Creation of Roles
We will now create roles which can me mapped to the users to give them access to their respective team/project area.1. Under the RQM Project Area, click on Admin > Manage This Project Area
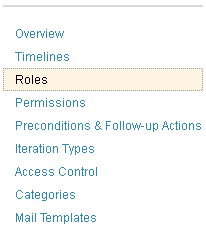
2. Click on Roles:
3. Create a new role with the name as Team Lead. This role is created at the project level to have access to the complete project.

Please avoid spaces when entering the identifier
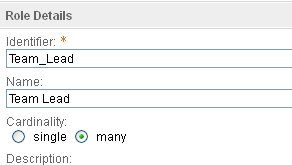
4. Save the changes.
5. Click on Overview tab on the top left and navigate to the Team Area Hierarchy section.
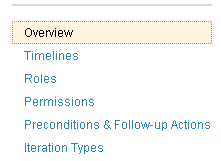
6. Select the SIT Team Area to create SIT Tester Role. Click on Roles and create a new role as SIT Tester
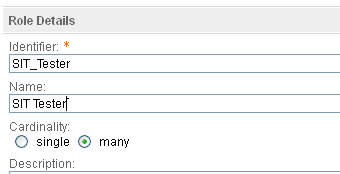
We now have created the Team Lead role at the Project Area level and SIT Tester role at the Team Area level.
Similarly, create a UAT Tester role in the UAT Team Area.
Permissions
The roles need to be assigned permissions to define their access in the project and team areas. As per the requirement we require the team lead to have complete access on the project and team areas whereas the testers should have access only in their respective team areas. To assign permissions to the team lead follow the below steps:1. Under the RQM Project Area, click on Admin > Manage This Project Area
2. On the left section, click on Permissions tab.

3. Under the Permissions Configuration, highlight Team Configuration and select Team Lead under roles.
4. Assign the following permissions to the team lead role:
a. Save Test Estimation
i. Create
ii. Edit
b. Save Test Plan
i. Create
ii. Create Section
iii. Edit
iv. Remove section
5. Since the team lead also needs to have access to the team areas, assign the below permissions under Permitted Actions of both the team areas for the Team Lead role:
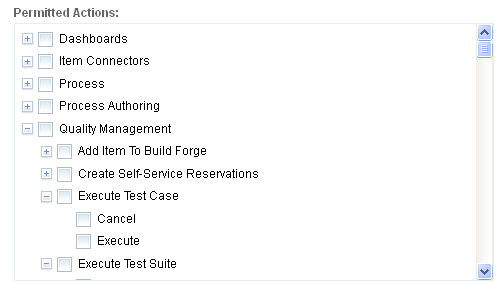
a. Execute Test Cases
i. Execute
b. Save Test Case
i.Create
ii.Edit
c. Save Test Case Execution Record
i.Create
ii.Edit
d. Save Test Case Result
i. Create
ii. Edit
iii. Edit Actual Results
e. Save Test Plan
i. Create
ii. Edit
f. Save Test Script
i. Create
ii. Edit
g. Save Test Suite
i. Create
ii. Edit
h.Save Test Suite Execution Record
i. Create
ii. Edit
i. Save Test Suite Result
i. Create
ii. Edit
The same permissions are to be assigned to the testers but only in their respective team areas.i.e The SIT Tester will have the above permissions in only SIT Team Area and the UAT Tester will have the above permissions only in UAT Team Area.
The roles are now ready can be assigned to the testers depending on the team area they need to work with.
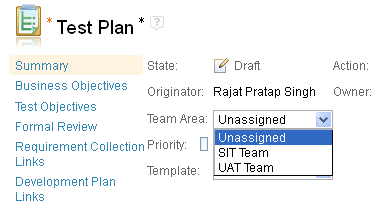
Creation of artifacts, like test plan, test cases, test scripts will now have a section named as Team Area where you can choose the desired team area under which the artifacts needs to be created.
This completes the creation and configuration of Team Areas and its process roles.
For more information
About the author
Rajat Pratap Singh has been associated with IBM Rational Quality Manager since version 1.0. Rajat is currently working with ITC Infotech as a Lead Consultant for IBM CLM Solutions. He can be contacted at rajatpsingh@gmail.com.
Copyright © 2013 ITC Infotech Pvt Ltd