Leveraging custom workflows in Rational Quality Manager
This article describes how to leverage the new functionality of customizable workflows for test artifacts in this release of Rational Quality Manager. The focus will be towards the purpose, theory and usage scenarios around customized workflows. Further details on how to use the Rational Quality Manager UI to construct a workflow can be found in the help topic Defining custom workflows for test artifacts.
What are workflows for test artifacts?
Workflow for test artifacts is the process by which a test artifact such as a test plan can transition through a number of states as part of its lifecycle. Artifacts exist in states that better facilitate the management of the artifact within the testing process. For example, a draft state may indicate that the artifact is still under construction and is not yet ready for use. An approved state may indicate that the construction of the artifact is completed and it has also been approved for use. The state of an artifact may also impose rules or restrictions that support the overall testing process. An artifact in the draft state, for example, is open for editing; however, once the artifact is approved, construction of the test artifact is complete. In this state, editing is no longer allowed and you can verify that no changes have been introduced since its approval. When we define states for artifacts, we must also have a method to move the artifact from one state to another. This is done through the use of actions that provide the linkage between states. A state may have multiple actions which in turn transition the state to one of several possible other states. An approved artifact may be required to go back into the draft state for editing, or once the approved artifact is no longer needed, it may then become a retired artifact. States and actions are the foundation of the basic concepts of our workflow.
What is the default workflow behavior?
There is a default, configurable workflow for all test artifacts when you initially set up Rational Quality Manager. This default workflow is implemented using the same states, actions and transitions that were used in previous releases of Rational Quality Manager, but were not previously configurable. Therefore, there is no change to the workflow behavior with this release until action is taken to customize the existing workflows or add new workflows.
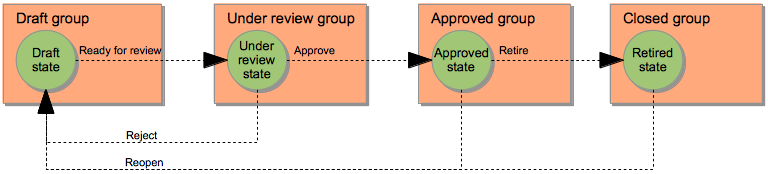
The following diagram is a representation of the default workflow. Every artifact begins in the draft state. Linking the states are actions that a user can invoke. Actions result in the artifact transitioning to the indicated state.
Should I add new workflows or customize existing?
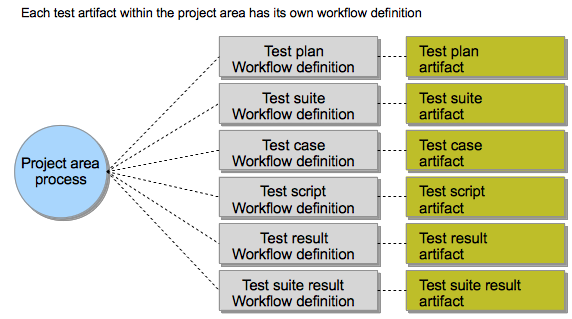
There are cases where you may wish to add a completely new workflow, and then there are cases where it may be an advantage to simply change the existing workflows. Each artifact ( test plan, test case, test suite, test script, test result, test suite result ) has its own workflow definition. If you wish to have the same workflow process for all artifacts you will need to update the workflow for each artifact. Alternatively, you can assign the same workflow definition to each type of artifact; however, if you later want to customize the workflow for a single type of artifact, it will require resetting all of the states of that artifact type. See ‘Important considerations for existing projects’.
When to customize existing workflows
It is best to customize existing workflows when you have relatively small changes that you wish to implement to the existing workflow behavior. It is also preferable to modify existing definitions vs. creating a new definition when making changes to existing project areas. There are impacts when making changes to existing project areas as noted below in ‘Important considerations for existing project areas’ ; however, the impacts will be less than assigning a completely new definition. Modifying existing workflow definitions only affects the artifact type within the project area in which the workflow is defined.
When to add a new workflow
A new workflow definition is mostly applicable when a new project is created and the workflow that you need will be significantly different than the default workflow.
Important considerations for existing projects
When changing the workflow configuration for existing projects, especially large projects, there are some very important considerations that need to be observed before you proceed. The following may result after a workflow is modified:
- Some existing artifacts are in an undefined state.
- Some reports no longer work correctly due to undefined states.
- Some automated or scheduled tasks may not execute as expected for those artifacts in an undefined state.
- Artifacts in undefined states will require manual updates.
If an existing state is removed, then all artifacts in that state will be in an undefined state. If a new workflow is assigned to an artifact, all of the existing states are then replaced and all artifacts will then be in an invalid state. It is therefore advisable to only perform additions to the workflow states, or you can rename existing states so they can be reused for a different purpose. Artifacts in an invalid state will be reset to the initial state defined in the workflow the next time that they are opened. Otherwise, the bulk update feature within the artifact list views can be used to update many artifacts at once to a valid state.
How do I plan a new workflow?
The following is a basic set of steps that are recommended when planning and implementing a new workflow definition.
Decide on the scope of the workflow.
The scope of the workflow can be applied in 3 different ways:
- Single artifact
- All project area artifacts
- Multiple project areas
Single artifact
Applying to a single artifact type is when you want to have a custom workflow process for a specific type, such as test plan. This simply involves editing the workflow definition for that type within the desired project area.
All project area artifacts
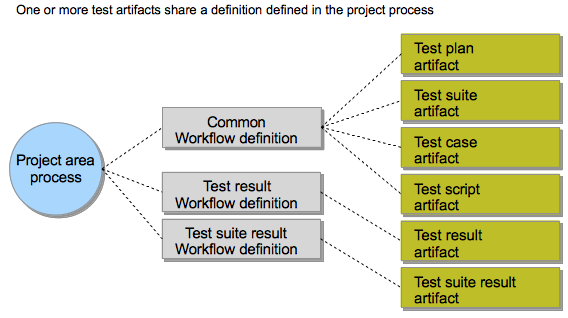
All artifacts within the same project area can share the same workflow definition. If this is desired, you simply need to assign each artifact type to the same workflow definition. This can save the effort of replicating the same changes for each artifact; however, be aware that if you wish to customize one of the artifact types separately in the future, you will need to assign a new workflow to that artifact type. This will result in all of those artifacts being in an invalid state and will require action on your part to set them back into a valid state that is available on your new workflow definition.
Multiple project areas
With an enterprise process definition you can use your defined workflow across many project areas without needing to define the workflow process in each individual project area. This is accomplished by sharing a process definition from a project area that you decide will contain the process definitions to be inherited by the other project areas. From project area administration you can enable process sharing. Within the same project area, you define the workflows that you wish to share with other project areas. Then, you can create new project areas using the unconfigured process template and within the same project area, select a process configuration from another project area. Select the project area where you defined the workflow and now this project area will utilize the defined workflows from the shared process.
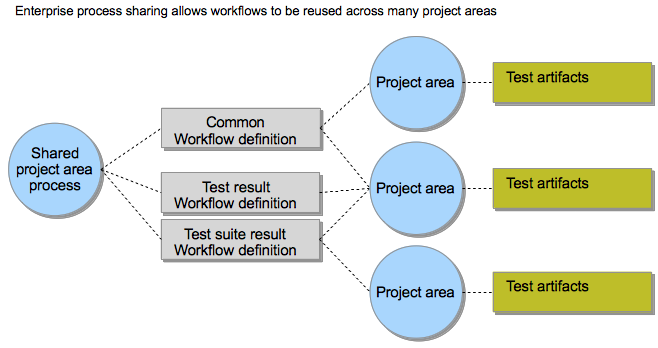
Diagram the workflow
Diagramming the workflow prior to implementing the definition in Rational Quality Manager will be helpful in ensuring your design matches your requirements.
Test the workflow
It is recommended that any workflow designs be tested in a sample project before applying to a production project. Any issues with the workflow design can then be worked out before implementing them within the production project. If the workflow design is not verified prior to production adoption, then a problem in the design could result in significant impact as it may not be possible to correct the workflow design without affecting the states of the artifacts already in use.
Undoing mistakes
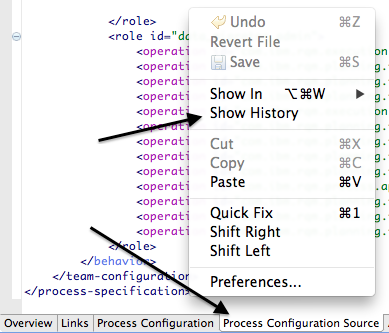
By leveraging the capabilities of the project area process, it is possible to undo potential mistakes that could impact an existing project with artifacts already in use. If a state is inadvertently deleted, resulting in artifacts being in an undefined state, it is possible to revert those changes to the process specification.- Using the rich client, open the project area.
- Click on the Process Configuration Source tab.
- Right click in the source window and select show history.
- From the history view, you can open a previous version of the process specification and copy it to the Process Configuration Source window, replacing the specification with the previous specification. Finally, then save the project area.
How do I add business rules into the workflow?
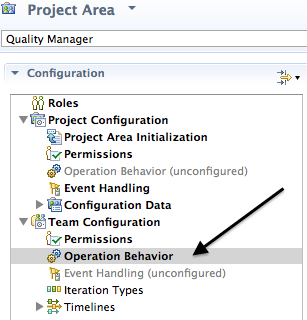
It is possible to require certain conditions to be met before a state transition is allowed. These rules or conditions are applied by setting pre-conditions on save operation behaviors in the team configuration for the project area process. This must currently be done using the rich client as the functionality is not yet available in the web client
Selecting operation behavior from the project area admin in the rich client
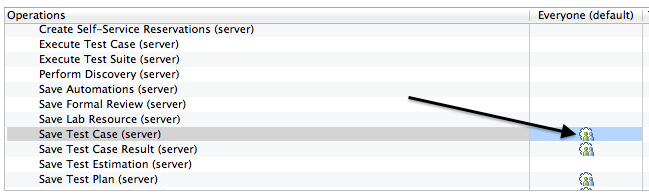
Selecting the save operation behavior and role
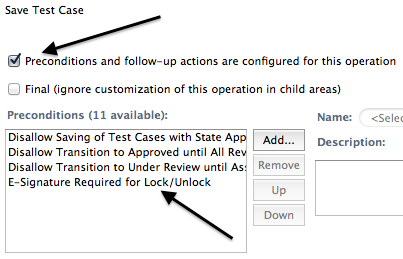
Selecting the checkbox ‘Preconditions and follow-up actions are configured for this operation’ enables adding Preconditions in the list box shown below.
Business rule constraints
The following are pre-conditions that can be applied to a test case workflow.
- Disallow saving of test cases with state approved or retired
- Disallow transition to approved until all approvers approve
- Disallow transition to approved until all reviewers/approvers approve
- Disallow transition to approved until all test scripts approved
- Disallow transition to approved until required approvers approve
- Disallow transition to reviewed until all reviewers approve
- Disallow transition to reviewed until required reviewers approve
- Disallow transition to under review until approvers defined
- Disallow transition to under review until associated work items resolved
- Disallow transition to under review until reviewers defined
State groups and pre-conditions
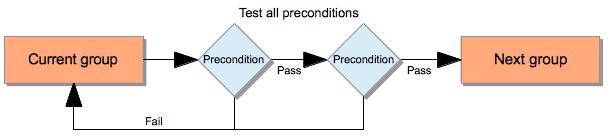
State groups are state classifications that are used by the application to understand the semantic meaning of the state for the purpose of appropriately executing business rules based on an artifact state. When you create a new custom state, the application needs to understand the context that the state is going to be used. This is how you determine the appropriate state group for your state. Therefore, you should choose the group based on the pre-conditions that you intend to impose on that state.
This diagram shows how the preconditions relate to the state groups. When a state change is initiated that results in also changing the state group, then any configured preconditions are executed to determine if the state transition should be allowed. All preconditions must pass in order for the transition to be successful.
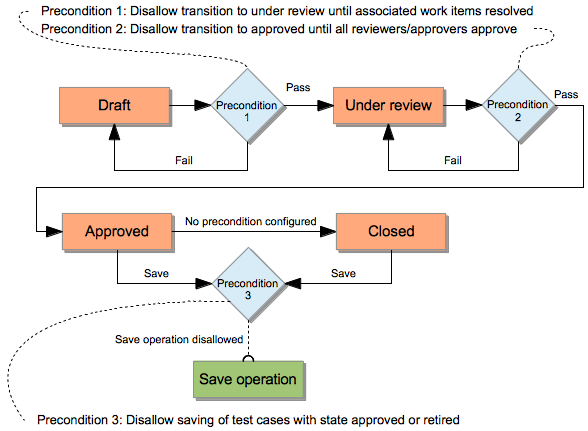
Default workflow precondition configuration
There are 3 default preconditions related to workflow. The following diagram illustrates the precondition configuration in relation to state group transitions. Note, precondition 3 operates using workflow state groups, but is not a constraint against transitioning to another state. This precondition enables constraint against saving the artifact.
How do I enable workflow based on permission roles?
All actions defined in each workflow are made available as permissions within the team configuration for the project area. This allows you to customize the authorized workflow actions that the user can invoke in the UI based on roles. For example, you could allow only certain roles to reopen an artifact. If you remove the permission for the reopen action for a particular role, then any user who attempts to do so and does not have that permission will receive an indication that they do not have permission to perform that action.
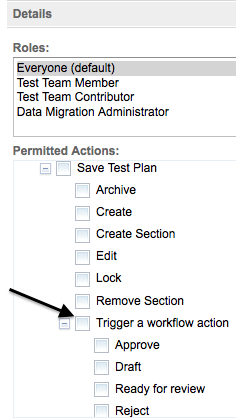
From the project area administration, you select permissions and then team configuration.

Each artifact’s save operation contains the list of workflow actions under the parent action of ‘Trigger a workflow action’. Note that the list of workflow actions only appears in the web UI. The list of workflow actions will be empty if opened from the rich client.
What are some custom scenarios?
Next, we will go over a couple of scenarios that can be customized using the workflow editor. The described processes could be potentially implemented by your own project.
How to determine what has been reopened
In this scenario, there is a need to know which artifacts have been reopened. It is possible to know this from the artifact history; however, we wish to be able to assign a state so that we can leverage filtering and reporting within the product.
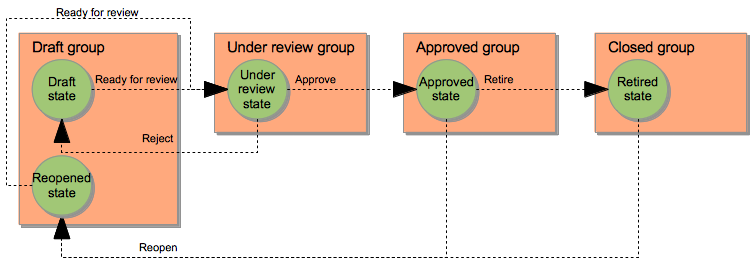
The process diagrammed below is a modification of our default workflow. A new ‘reopened’ state has been added within the draft group. The reopen action was changed to transition to the reopened state instead of the draft state. Now, when an artifact is reopened, it will exist in the reopened state. Once changes have been made, the reopened state can transition to the under review state and the default process will continue.
How can I enforce reviews to be complete before approval?
In this scenario we want to have an additional step, specifically for the review of an artifact. This will allow the review of the artifact to be certified complete before we then move to the step of artifact approval.
The process diagrammed below shows the addition of the reviewed state group as well as another precondition, #4. We now have a workflow process that adds an additional step of requiring that the reviews be completed prior to requesting approval for the artifact.
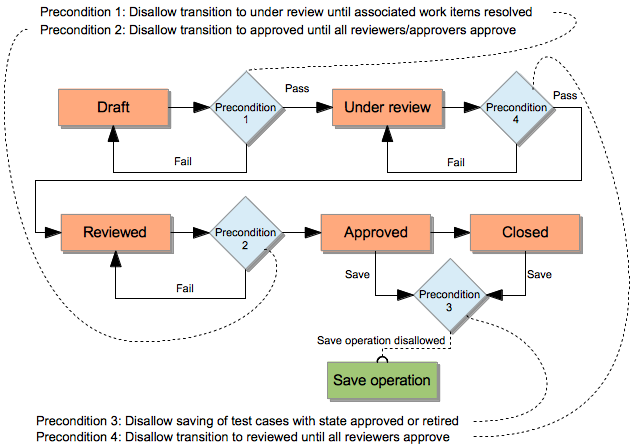
To implement this new review scenario, we will also need to create a new state. We will call the new state ‘reviewed’ in this example. When we create the new state, we will assign it to the ‘reviewed’ state group so that our precondition diagrammed above will work correctly when we attempt to transition to the new state. The workflow will then need to be modified so that the actions properly flow with the inclusion of our new state. The diagram below illustrates how our workflow states and actions will now be configured.

For more information
About the author
Chad Meadows is a developer on Rational Quality Manager in Durham, NC. He can be contacted at cmeadows@us.ibm.com.
Copyright © 2012 IBM Corporation