
Upgrading Rational Reporting for Development Intelligence from version 2.0 to version 2.0.0.1
This article includes step-by-step instructions for upgrading Rational Reporting for Development Intelligence from version 2.0 to 2.0.0.1.
Before you begin
You must have Rational Reporting for Development Intelligence 2.0 installed to complete this task.
Important: Rational Reporting for Development Intelligence 2.0 does not include WebSphere Application Server. When you uninstall Rational Reporting for Development Intelligence 1.0.2.x or earlier versions to upgrade to version 2.0, WebSphere Application Server is uninstalled with it. You must install WebSphere Application Server again separately.
For additional details about Rational Reporting for Development Intelligence version 2.0 enhancements and limitations, refer to Rational Reporting for Development Intelligence 2.0 release notes.
About this task
To update Rational Reporting for Development Intelligence from version 2.0 to version 2.0.0.1, complete the following tasks in order:
- Initializing the Rational Reporting for Development Intelligence setup server
- Starting the Rational Reporting for Development Intelligence setup wizard
- Preparing for the upgrade to Rational Reporting for Development Intelligence version 2.0.0.1
- Stopping the Rational Reporting for Development Intelligence setup wizard
- Installing Rational Reporting for Development Intelligence 2.0.0.1
- Initializing the Rational Reporting for Development Intelligence setup server to run the upgrade configuration
- Starting the Rational Reporting for Development Intelligence setup wizard to run the upgrade configuration
- Configuring Rational Reporting for Development Intelligence version 2.0.0.1
Initializing the Rational Reporting for Development Intelligence setup server
- Start the dedicated Tomcat server that will run the Setup application.
Note: If you selected Start the IBM Rational Reporting Setup Server on the last page of the Installation Manager during installation and have not stopped the Setup server since doing so, then this step is complete and you can proceed to the next step.
This can be done using one of the following methods: If Rational Reporting for Development Intelligence was installed to the default location, start the server from the Start menu: .
- Run the following script from a command prompt:
- :
<RRDIInstallDir>setuptoolJazzTeamServerserverserver.startup.bat  or
or  :
: <RRDIInstallDir>/setup/tool/JazzTeamServer/server/server.startupYou must also export the DISPLAY variable, have root privilege, and have executed umask 022.
- Verify that the Tomcat server has completed initialization. When it completes, the message INFO: Server startup in xxx ms is displayed in the following context:
- : In the Tomcat console window
- or : In the
tomcat/logs/catalina.outfile.
Important: Do not proceed until you have successfully verified that the server startup has completed.
Starting the Rational Reporting for Development Intelligence setup wizard
Enter the following URI in a browser: https://<report_server>:10443/rrdi/setup. The first time you access this page, you are required to log in. After logging in, you are prompted to allow the server to communicate. Click Yes to start the Setup wizard.
Preparing for the upgrade to Rational Reporting for Development Intelligence version 2.0.0.1
Before you upgrade Rational Reporting for Development Intelligence to version 2.0.0.1, you can backup your reporting data using the Rational Reporting Setup wizard provided by Rational Reporting for Development Intelligence version 2.0.
- On the Welcome page of the Rational Reporting Setup wizard, click Perform maintenance tasks to upgrade from this version of Rational Reporting to a later version.
- On the Backup Rational Reporting data page of the wizard, complete all of the steps in the wizard:
- Step 1: Specify backup directory
In the Backup directory field, specify the directory to which you want to save your data. - Step 2: Backup databases
Contact your database administrator to backup your Cognos content store and data warehouse databases. - Step 3: Backup Cognos configuration settings
Click Backup to backup your configuration files. - Step 4: Backup report archives
Click Backup to backup your archive files. - Step 5: Backup WebSphere configuration settings
Contact your WebSphere Application Server administrator to backup your WebSphere Application Server profile configurations. - Step 6: Backup XDC files
- If you did not customize your XDC files, select I did not customize any of the XDC files.
- If you customized your XDC files, clear I did not customize any of the XDC files, and then specify your XDC files directory.
- Click Next.
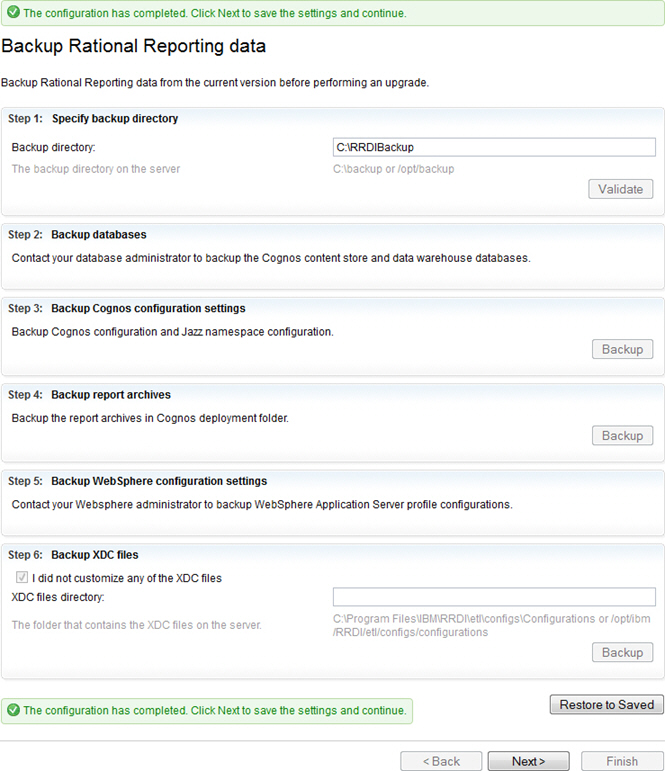
- Step 1: Specify backup directory
- Review the summary information to ensure that it displays your specifications, then click Finish.
Stopping the Rational Reporting for Development Intelligence setup wizard
- If the Rational Reporting for Development Intelligence setup wizard is open in your browser, close the browser tab or exit the browser.
- Stop the dedicated Tomcat server that will run the Setup application by performing one of the following:
- If Rational Reporting for Development Intelligence was installed to the default location, start the server from the Start menu: IBM Rational Reporting > Stop the IBM Rational Reporting Setup Server.
- Run the following script from a command prompt:
- :
<RRDIInstallDir>setuptoolJazzTeamServerserverserver.shutdown.bat - or :
<RRDIInstallDir>/setup/tool/JazzTeamServer/server/server.shutdown
Installing Rational Reporting for Development Intelligence 2.0.0.1
- Start IBM Installation Manager.
- Click File > Preferences. The Preferences dialog opens.
- Click Repositories and then click Add Repository. The Add Repository dialog opens.
- In the Repository field, enter https://jazz.net/downloads/RRDI/2.0.0.1/2.0.0.1/install-repository/rrdi-offering/offering-repo/repository.config and then click OK.
- Click OK to close the dialog.
- In IBM Installation Manager, click Update. Follow the instructions in the dialog to update your Rational Reporting for Development Intelligence packages.
Initializing the Rational Reporting for Development Intelligence setup server to run the upgrade configuration
- Start the dedicated Tomcat server that will run the Setup application.
Note: If you selected Start the IBM Rational Reporting Setup Server on the last page of the Installation Manager during installation and have not stopped the Setup server since doing so, then this step is complete and you can proceed to the next step.
This can be done using one of the following methods:- If Rational Reporting for Development Intelligence was installed to the default location, start the server from the Start menu: IBM Rational Reporting > Start the IBM Rational Reporting Setup Server.
- Run the following script from a command prompt:
- :
<RRDIInstallDir>setuptoolJazzTeamServerserverserver.startup.bat - or :
<RRDIInstallDir>/setup/tool/JazzTeamServer/server/server.startupYou must also export the DISPLAY variable, have root privilege, and have executed umask 022.
- Verify that the Tomcat server has completed initialization. When it completes, the message
INFO: Server startup in xxx msis displayed in the following context:- : In the Tomcat console window
- or : In the
tomcat/logs/catalina.outfile.
Important: Do not proceed until you have successfully verified that the server startup has completed.
Starting the Rational Reporting for Development Intelligence setup wizard to run the upgrade configuration
Enter the following URI in a browser: https://<report_server>:10443/rrdi/setup. The first time you access this page, you are required to log in. After logging in, you are prompted to allow the server to communicate. Click Yes to start the Setup wizard.
Configuring Rational Reporting for Development Intelligence version 2.0.0.1
- In the scenario list of the setup wizard, click Upgrade to this version of Rational Reporting to open the setup steps to deploy Rational Reporting for Development Intelligence.
- Complete each page of the wizard.
Remember: Ensure that you click Next after you complete each page of the wizard in order to preserve the information that you entered and to progress through the wizard configuration steps.
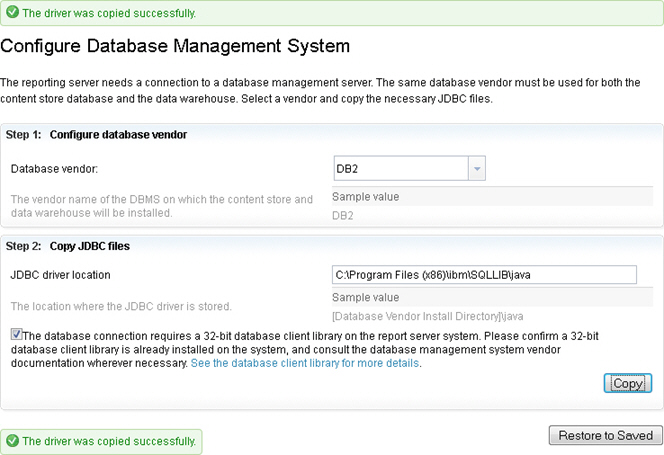
Configure Database Management System:
This page of the wizard configures the connection between the reporting server and the database management server.
Note: This wizard page displays the information that you specified during your configuration of Rational Reporting for Development Intelligence version 2.0. Ensure that the information is still correct before clicking Next.
Step 1: Configure a database vendor
Select a vendor from the list of supported vendors, to specify the name of the DBMS on which the content store and data warehouse will be installed.
Step 2: Copy JDBC files
- In the JDBC driver location field, specify the location of your JDBC files.
- Ensure that you’ve installed the 32-bit database client library and then select the confirmation checkbox.
Remember: In order for Rational Reporting for Development Intelligence to establish a connection to the Rational Reporting for Development Intelligence databases, you must install a 32-bit database client on the report server, ETL server, and your development server, regardless of whether Rational Reporting for Development Intelligence is installed as a 64-bit or 32-bit application.
- Click Copy to copy the JDBC files to the content store database and the data warehouse.
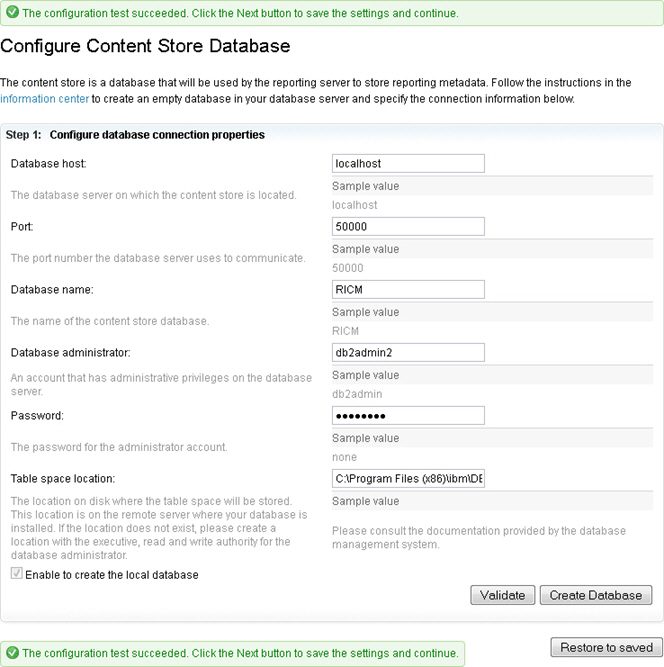
Configure Content Store Database:
The content store is the database that is used by the reporting server to store reporting metadata. This page of the wizard helps you to create an empty database in your database server and configure the connection properties.
Note: This wizard page displays the information that you specified during your configuration of Rational Reporting for Development Intelligence version 2.0. Ensure that the information is still correct before clicking Next.
Step 1: Configure database connection properties
- Specify the following information:
- Database host
- Port number
- Content store database name
- Database administrator credentials
- Table space location
- If the content store database does not already exist, select Enable to create the local database. If the content store database exists, leave the checkbox cleared.
- Click Validate to validate the information that you provided.
Note: If you did not select Enable to create the local database in order to deploy your content store to a preexisting content store, the validation function will validate the structure of your existing database.
- If you selected Enable to create the local database, click Create Database to create the content store database.
Step 2: Prepare the content store database
Note: This step displays only if you did not select Enable to create the local database.
If you did not select Enable to create the local database, you need to run the script to create the database structures required by the content store database:
- Click Run Now to run the scripts before you proceed to the next page of the wizard.
- Click Save to save the file to your system to run manually.
Important: If you have an existing content store, the contents of your content store are not overwritten when you run the script; however, the script updates database parameters to ensure that they conform to product requirements.
Configure Data Warehouse:
The data warehouse is the database that is used for reporting and analytics. This page of the wizard helps you to create a new data warehouse or configure an existing data warehouse.
Note: This wizard page displays the information that you specified during your configuration of Rational Reporting for Development Intelligence version 2.0. Ensure that the information is still correct before clicking Next.
Step 1: Configure data warehouse connection properties
- Specify the following information:
- Database host
- Port number
- Data warehouse database name
- Database administrator credentials
- Table space location
Note: This field is required for the data warehouse. It needs to be a location on the system that hosts the data warehouse database. The data warehouse table space can exist separately from the content store and sample data warehouse table spaces.
- If the data warehouse database does not already exist, select Enable to create the local database. If the database exists, leave the checkbox cleared.
Step 2: Reporting user
Specify report user credentials.
Step 3: Schema prefix
For DB2 for Z/OS: This information is only required by DB2 for Z/OS.
- Specify the prefix that you want to use for the schema names. The prefix should not be longer than two characters.
- Click Validate to validate the information that you provided.
- If you selected Enable to create the local database, click Create Database to create the content store database.
Step 4: Prepare the data warehouse database
Note: This step displays only if you did not select Enable to create the local database.
If you did not select Enable to create the local database, you need to run the script to create the database structures required by the content store database:
- Click Run Now to run the scripts before you proceed to the next page of the wizard.
- Click Save to save the file to your system to run manually.

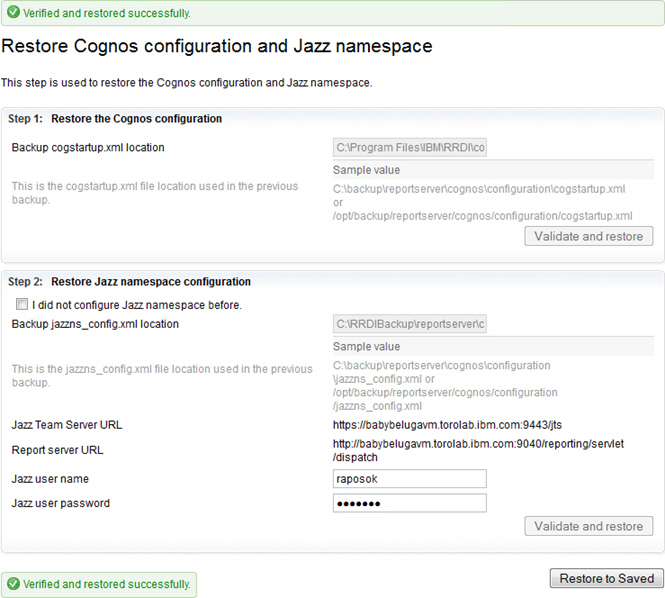
Restore Cognos configuration and Jazz namespace:
This page of the wizard helps you to restore the Cognos configuration and Jazz™ namespace files.
Step 1: Restore the Cognos Configuration
- Specify the backup location for the cogstartup.xml file. This file was backed up when you completed the steps to prepare for the upgrade. The file is located in the backup directory that you specified.
- Click Validate and Restore.
Step 2: Restore Jazz namespace configuration
- If you did not configure the namespace in your previous installation of Rational Reporting for Development Intelligence select I did not configure Jazz namespace before.
- If you previously configure the namespace, specify the backup location for the jazzns_config.xml file. This file was backed up when you completed the steps to prepare for the upgrade. The file is located in the backup directory that you specified. Click Validate and Restore.
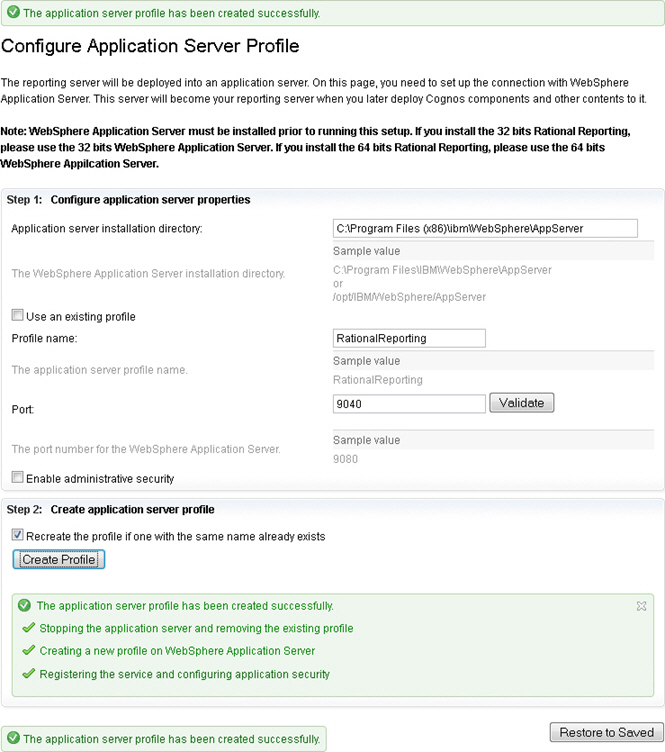
Configure Application Server Profile:
The report server is deployed to your WebSphere Application Server. This page of the wizard helps you to configure the connection between the report server and WebSphere Application Server. WebSphere Application Server must be installed before you complete this page of the wizard.
Note: This wizard page displays the information that you specified during your configuration of Rational Reporting for Development Intelligence version 2.0. Ensure that the information is still correct before clicking Next.
Step 1: Configure application server properties
-
- Specify the WebSphere Application Server installation directory.
- Specify your WebSphere Application Server profile:
- If you want to use an existing profile name, select Use an existing profile.
- Specify the name of your profile.
- Click Retrieve to populate the Clusters and servers list for your profile, and then select the server or cluster where you want to install your reporting server application.
- Specify your administrative user credentials.
- If you want to create a new profile, leave the checkbox cleared.
- Specify the name of your profile.
- Specify your WebSphere Application Server port number.
- Select Enable administrative security to enable WebSphere Application Server security features. Specify the security credentials.
- If you want to use an existing profile name, select Use an existing profile.
- Specify a port number that will be unique for your report server. Once you specify the port number, click Validate to ensure that the port number is not used by another service.
Step 2: Create application server profileNote: In Step 1, if you selected Use an existing profile, this step is disabled.
Select Recreate the profile if one with the same name already exists and then click Create Profile.
 Once you have completed configuring the Application Server profile, you must update the JVM environment properties in WebSphere administrative console:
 - Open the WebSphere administrative console. In your browser, go to http://localhost:<WASport>/ibm/console. If prompted, enter the user name and password.
- In the task list, select . The Application server page opens.
- In the Application server list, select your reporting server. The properties page opens.
- Under the Server Infrastructure section, select . The Process definition properties page opens.
- Under the Additional Properties section, click Environment Entries. The Environment Entries page opens.
- Click New to create a new configuration.
- Specify the following:
- Name – LD_LIBRARY_PATH
- Value – /home/oracle/app/oracle/product/<version>/client_1/lib
- Save your changes.
- Restart WebSphere Application Server.
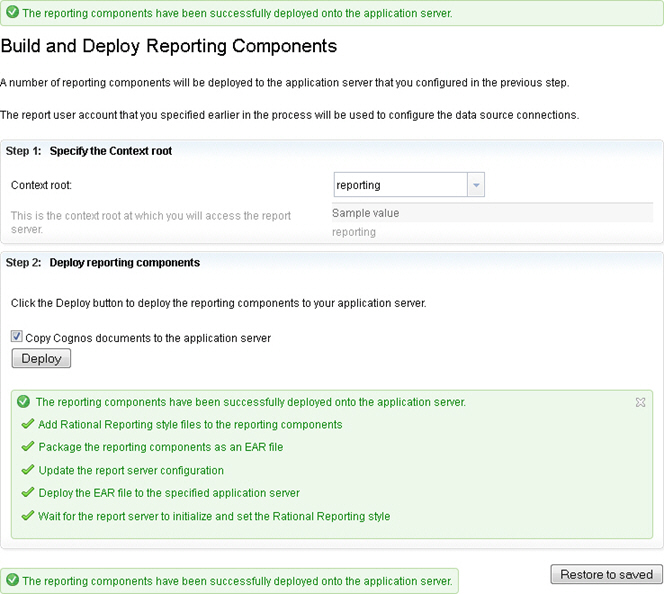
Build and Deploy Reporting Components:
This page of the wizard helps you to deploy your reporting components to your WebSphere Application Server.
Step 1: Specify the Context root
- If you are installing Rational Reporting for Development Intelligence for the first time, select reporting from the list.
- If you previously installed Rational Insight, using
insightas the context root, and you want to maintain existing URLs, select insight from the list. - If you previously installed Rational Insight, using
insightas the context root, and you want to change the existing URLs toreporting, select reporting from the list.
Step 2: Deploy reporting components
- (Optional) If you want to copy the IBM Cognos Business Intelligence documentation to the report server, select Copy Cognos documents to the application server. Copying the Cognos documentation to the report server adds a significant amount of time to your deployment.
Tip: You can find a list of the IBM Cognos Business Intelligence documentation on the IBM Support Portal for Cognos BI.
- Click Deploy to deploy the reporting components to WebSphere Application Server.
Note: It may take a significant amount of time to deploy the reporting components to WebSphere Application Server. Selecting Copy Cognos documents to the application server also adds additional time to the deployment.
Restore Configuration Settings:
Manually restore any customized settings on WebSphere Application Server and manually restore your customized XDC files.
Step 1: Restore WebSphere Application Server configuration settings
Restore your WebSphere Application Server profile configuration, including your HTTP port number, Admin security settings, and JVM settings.
Step 2: Restore XDC files for ODBC connections
Restore the XDC files that you backed up for your ODBC connections.
- Click Finish.
For more information
Rational solution for Collaborative Lifecycle Management, 4.0 ICCopyright © 2012 IBM Corporation