Integrate Rational Quality Manager with Rational DOORS using Open Services Lifecycle Collaboration
Overview
This article explains how to configure Rational Quality Mananger (RQM) and Rational DOORS so that they integrate with one another using Open Services Lifecycle Collaboration (OSLC), an open standard that IBM is developing in cooperation with business partners and customers.
You can use Rational DOORS to manage your requirements, and you can use Rational Quality Mananger to track requirements from Rational DOORS with test artifacts. The integration will create live and bi-directional association between test artifacts in RQM and requirements in DOORS, and it can provide real-time lifecycle traceability between the two products. In addition, you can use the reconciliation function in RQM to reconcile test plan coverage with the requirements in DOORS and get the latest requirement status, like changing or deleting, and it can help you update test plans and test cases quickly and accurately by responding to requirement changes.
Prerequisites
This article is based on the following assumptions:
- Rational DOORS 9.4 is installed and the server is already configured. Also that the DOORS client is installed and connected the DOORS database.
- Rational DOORS Web Access 1.5 is installed.
- The Rational Team Quality 4.0 server is already set up.
Configure Rational DOORS Web Access and Rational DOORS
This section explains how to configure components of Rational DOORS Web Access (DWA) and Rational DOORS which are needed for the OSLC integration.
Configure the Rational Redirector Service and components for communication
Enable Data Change Notifications and Redirector services
In order to configure DWA to provide OSLC services, you need to Enable Data Change Notifications which is used for the communication of DOORS and DWA. Also, you need to redirect DOORS resource url to OSLC style.
How to enable Data Change Notifications and Redirector URL
- Change directory to <DOORS install directory>bin
- Use dbadmin command to enable EDC and redirector url:
dbadmin -d 36677@ <DOORSserver> -dcnEnable -dcnBrokerUri "tcp://<DWABrokerHostname>:61616" -dcnChannelName "dcn" -dwaHost <DWAServerHostname> -dwaPort <DWAPortnumber> -dwaProtocol https - Restart the DOORS database server from Services.
Note: If you can’t successfully config DWA DCN and Redirector URL, the integration of the RQM and DOORS will meet a lot problem liking you can be able to associate DOORS requirement to RQM test artifacts succssfully, you need to double check whether the configuration is correct or not.
You can check whether the configuration is successful as follows:
Please check the redirected url related parameters set correctly
- Make a note of the DWA host . You need it when you config OSLC friends.
- Make sure the DWA port is set to the secured port(default is 8443)
- Make sure the DWA protocol is set to Https
- Make sure you have configuration the DOORS database server to communicate with DWA broker and DWA server correctly.
You should see the 6 -I- DBADMIN: Notification after Enable Data Change Notifications and Redirector URL’s cmd as Figure 2:
- The Broker URI has changed.
- The Channel Name of DCN has changed
- The DCN has been enable
- DWA Host has been set
- DWA Port has been set
- DWA protocol has been set
If you can’t see so many -I- DBADMIN, You may have some wrong type of the cmd, please don’t copy directly of the cmd as you may meet transcoding problem.
For example:

After restarting the DOORS database server, you need to check whether the DCN is enabled or not by typing cmd: dbadmin -data 36677@<DOORSserver> -dcnInfo
Identify the database uniform resource name
In order to configure DWA to provide OSLC services, make sure Rational DOORS server is installed and is up and running.
- Find the URN for the DOORS Repository
- Start the Rational DOORS client pointing to the running DOORS server.
- In both the User ID and Password fields, type Administrator.
- Click Tools > Edit DXL.
- Type print getDatabaseIdentifier() and click Run.
- The Getting database identifier for DOORS database image shows the example

Make a note of the database URN. You need it when you are modifying the Rational DOORS Web Access configuration files.
Configure FESTIVAL.XML file
- Go to the <DWA install directory>serverfestivalconfig directory
- Open the festival.xml file.
- Modify the repository URN (using the database URN that you copied earlier).
- In the Configurable system properties section, make these changes:
- Replace localhost with the IP address of the DOORS license server.
- Replace “false” with “true” in display.redirector.urls.
- Replace MYHOSTNAME with FullyQualified Hostname of the machine where Rational DOORS Web Access Server is running.
- Set “false” in ForceHttpsForAuthenticationForoauth.
- Set “false” in ForceOAuthForOslcResource.
- Replace oauth.domain value to “https://FullyQualifiedHostnameofDWAserver:PortNo/dwa”.
Here is the sample config file:
<f:property name="licence.server.location" value="19353@localhost"/> <f:property name="published.url.prefix" value="https://DOORSserver:8443/doors/redirector/"/> <f:property name="ForceOAuthForOslcResource" value="false" /> <f:property name="ForceHttpsForAuthenticationForOAuth" value="false"/> <f:property name="oauth.domain" value="https://DOORSserver:8443/dwa"/>
Configure doorsRedirector.properties file
- Go to <DWA install directory>serverfestivalconfig folder.
- Open doorsRedirector.properties file.
- Replace “MY_DWA_HOSTNAME” in the file with the fully Qualified Hostname of DWA server.
- Replace “MY_DOORS_DATABASE_HOSTNAME” in the file with the fully Qualified Hostname of DOORS database server
- Make sure to use “Https” and the Secured Port
- Save the file.
Here is the sample config file:
<properties> <comment>Configuration written: Fri Feb 17 06:58:40 GMT 2012</comment> <entry key="dwa.url.prefix">https://DOORSserver:8443/dwa</entry> <entry key="doors.enable">true</entry> <entry key="doors.url.prefix">doors://DOORSserver:36677/</entry> <entry key="dwa.enable">true</entry> </properties>
Configure Rational DOORS Web Access to enable SSL
You can refer to DOORS Install
- Create a ssl folder in your server
- Put the keystore file inside the ssl folder.
- Go to <DWA install directory>serverconf and open server.xml.
- Make the following changes to Define a SSL HTTP/1.1 Connector on the DWA port (We use 8443 for example), and then save and close the file:
<Connector port="8443" connectionTimeout="20000" maxHttpHeaderSize="8192" maxThreads="150" minSpareThreads="25" maxSpareThreads="75" enableLookups="false" disableUploadTimeout="true" acceptCount="100" scheme="https" secure="true" SSLEnabled="true" clientAuth="false" keystoreFile="<ibm-team-ssl.keystore put directory>ibm-team-ssl.keystore" keystorePass="ibm-team" sslProtocol="SSL_TLS" algorithm="IbmX509" URIEncoding="UTF-8" />
Note: Please make sure that KeystoreFile location matches with location of certificate.
Start the DWA services
- Go to <DWA install directory>
- Start the DWA broker by running
cmd: broker.start - Start the DWA server by running
cmd: server.start - Go to <DOORS install directory>bin
- Start the Interop server by typing the following command: doors.exe -interop
You can visit the DWA in a browser by entering the following URL:
- 1.Secure connection: https://FullyQUalifiedHostnameoFDWAserver:8443/dwa
- 2.Non-secure connection: http://FullyQualifiedHostnameofDWAsever:8080/dwa
If you can visit the Non-secure DWA successfully by http://FullyQualifiedHostnameofDWAsever:8080/dwa, but can’t visit the secure DWA, please check whether you have correct configuration the DWA to enable ssl.
If you can open DWA page but no any response when log in, please check whether you have started the Interop server.
Configure RQM and Rational DOORS to communicate with one another
Configure Rational DOORS Web Access to consume OSLC data
Register the consumer on RQM
- Login to RQM admin server using valid admin credentials https://FullyQualifiedHostnameofJazzAdminServer:9443/qm/admin
- Go to the Application tab and under Communication select Consumers (Inbound).
- Under Register Consumer, complete the fields and generate an authorized OAuth consumer key.
Note: You can generate a consumer of your choice by selecting Click here to pick the consumer key instead. - Take a note of the consumer key that was generated, and the OAuth Secret code.
Configure Rational DOORS to consume RQM provider
- Login to Rational DOORS as the Administrator user.
- Select the DOORS database in the left pane and click File > Properties.
- Click the Remote Services tab.
- In the Server List pane, click Add, and complete the fields using the Consumer Key and OAuth Secret generated on the RQM Server side in the previous step.
- The following screenshot shows an example:
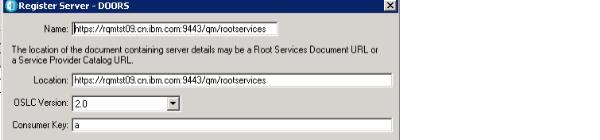
- Click Register. The QM server should be added to the list on the Server Lists window.
- In the Collaboration Links pane, click Add.
- Select the newly added server from the dropdown list, login if prompted, then browse to the target project and select the ValidateBy link.
- Click Add to complete the collaboration link.
- Click OK in the Remote Services.
Configure RQM to consume OSLC Data
Register the consumer in DOORS
- In Rational DOORS, select the DOORS Database in the left pane and click File > Properties.
- Select the Local Key tab.
- Click Add, complete the fields and register the consumer.
Configure RQM to comsume the DOORS provider
- In the RQM admin server page, add the consumer you have just created in Rational DOORS as a friend on the Friends (Outbound) page.
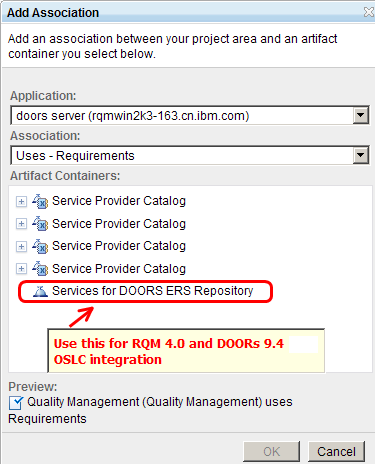
The root services is https://FullyQUalifiedHostnameoFDWAserver:8443/dwa/public/rootservices - Go to the Project Area section.
- Create a project or select any available project to link the DOORS service provider catalogue or sub-catalogue.
- Under Associations, click Add.
- From the Application list, select the registered DWA service provider.
- From the Association list, select Uses-Requirements.
- Click OK and save the project.
Note:
For DOORs 9.4.*, each DOORS server provides several Requirement Service Providers: one service provider for Services for DOORS ERS Repository and potentially several (or none) service providers for each view and module. These service providers are categorized under the entry Service Provider Catalog; the service provider name is the corresponding view or module’s name in DOORs. The following screenshot shows an example:
If you select Services for DOORS ERS Repository as the service provider, you will be able to add any module or view in the current DOORS server as requirement collection to Rational Quality Manager test plan and any requirements in the current DOORS server to Rational Quality Manager test case or test script.
If you select the service provider under Service Provider Catalog, then you will not be able to add the corresponding view or module and its child view or modules to a test plan since it is not supported by DOORS. Once you try to add a DOORS view or module to RQM test plan using the service provider under Service Provider Catalog, you will get a warning message “Not supported”. To make sure RQM and DOORS integration works well, please do not use this type of service provider in the current release.
For more information
- Instructions for installing the Rational DOORS client and server can be found in the information center
- Instructions for installing and configuring Rational DOORS Web Access
- How to config DWA can be found in the information center
About the author
Shi Lei is the RQM feature lead of RQM and DOORS integration using OSLC in China Software Development Lab. She can be contacted at shilcdl@cn.ibm.com.
Copyright © 2012 IBM Corporation