Multiple Stream Development
Summary
Jazz streams and repository workspaces replace branches found in more traditional SCM systems. Although Jazz streams are conceptually similar to branches, streams are first class citizens in Jazz – the repository is structured around them. As you will see, with rich client support for traversing history, conflict resolution and cheap repository workspace creation (e.g., cheap branching or multi-streaming), Jazz Source Control allows your team to embrace parallel development and improve your team’s rhythm as it simplifies common SCM scenarios by:
- Minimizing the impact of emergency releases on new development efforts by making it easy to split-stream and flow fixes from one release to another.
- Allowing developers or teams to perform investigation or new feature work in isolation.
- Allowing large teams to stage the integration effort by easily building multiple levels of integration.
- Maintaining a stable base for new development by supporting nightly or continuous integration builds of all product variants.
- Allowing developers to deliver emergency fixes without upfront planning or branching in advance.
- Enabling roll back to a previous production release or build.
- Allowing teams to support multiple sequential versions of products in the field.
Building on the concepts already introduced in the Source Control section of the Jazz Tutorial and the Source Control Getting Started guide, this document will walk through these common multi-stream development scenarios.
1. Going alone
The example will start with a one-person team. Markus has been developing a testing framework called JUnit. He has a couple of projects in his Eclipse workspace; the first is the core library and utilities, and the other is a set of examples. Markus does not need a stream to store his work in Jazz.
To follow along with this tutorial you will need an Eclipse workspace with a project in it named JUnit that has not been shared. If you have previously ran the JUnit Example then Markus will already have a repository workspace loaded that is collaborating with a stream. Disconnect the Eclipse workspace from the Repository workspace, but keep the files locally for reuse.
- From the Pending Changes view right-click Markus’s JUnit workspace and Unload…
- When a dialog prompts to either delete or disconnect the local content, choose Disconnect the local content from the repository workspace.
- Pretend that these files were never shared before and that you had just written them all from scratch.
To use the versioning support in Jazz SCM to backup work and track changes in the repository, all Markus needs is a repository workspace. As shown in Figure 1, you can share the projects with Jazz Source Control.
- From the Package Explorer, right-click the JUnit project and share it using Team > Share Projects…
- On the first page of the share wizard, choose Jazz Source Control and press Next.
- On the second page, choose the Create a new repository workspace named: radio button and enter a name into the text field below. Press Finish to skip the configuring the rest of the wizard. The default behaviour will create a repository workspace with one component.
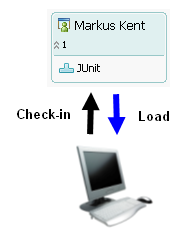
Figure 1: Using a repository workspace without a stream
Once you have a repository workspace created and loaded, the Pending Changes view will show the two projects being added in a change set. Notice in Figure 2 that since Markus’s repository workspace does not flow changes anywhere, the Deliver action is disabled and there is no Accept action even shown. In a workspace that does flow changes, the flow target would be listed to the right of the workspace node – JUnit in this example – as a hint of where changes are being flowed to and from.
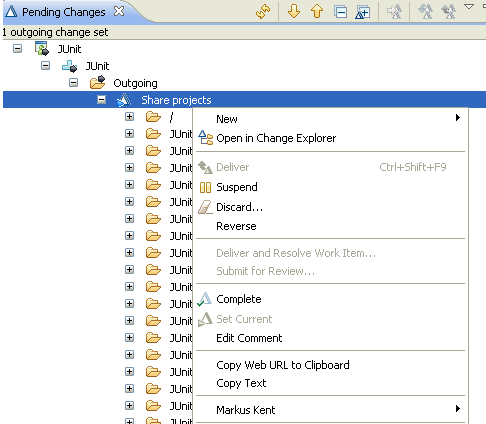
Figure 2: Project additions in a repository workspace which does not flow changes
When Markus changes files in his local Eclipse workspace, he creates unresolved changes in the Pending Changes view. When he decides that he would like these versions on the server, he can check the pending changes into the same change set which includes the project additions using the Check-in action. When he is done with a logical set of changes, he can complete the change set by clicking on it in the Pending Changes view and running the Complete action – from this point forward, all new changes will be added to a new change set. This steady accumulation of change sets in the repository workspace is very similar to what would happen in other SCM systems every time you check-in, but in Jazz you have a bit more control over what is contained in the change set. If you prefer to mimic traditional SCM system behavior, you can set a preference to auto-complete change sets after each check-in. It is really up to you to decide how to work. As you accumulate completed change sets in your repository workspace, you can use the History view and the Change Explorer to browse the changes you have made.
1.1 Baselines
After development has been underway for a while, Markus is finally happy with his code and he wants to remember the current state of all of his changes in a baseline. The baseline can be created from his repository workspace. From the Pending Changes view, select the component and run New > Baseline…. Baselines are numbered automatically; as such, specifying a name and description is optional. There is always a current baseline for a component in a repository workspace or stream, indicating the latest baseline for the component in that workspace or stream.
Baselines are tracked by repository workspaces and streams. This means that you can browse the history of the baselines by selecting a component and running Show > Baselines. In Figure 3, the History view is showing the initial baseline and the new baseline called GOOD. Double-clicking on a baseline in the History view will compare it with the previous baseline and shows the results in the Change Explorer view. Notice that the labels in the Change Explorer showing the names of the two baselines being compared.
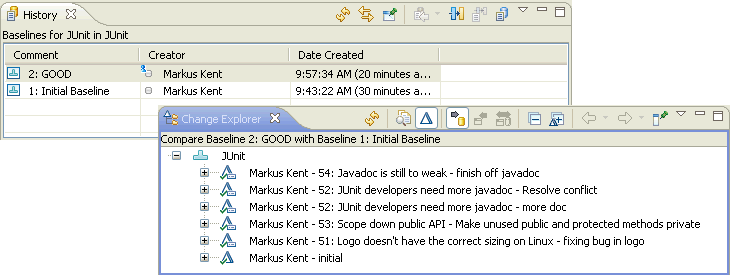
Figure 3: Browsing baseline histories
Baselines are displayed in the Pending Changes view as Incoming or Outgoing if a workspace and its collaborator have different current baselines. Accepting or delivering a baseline is akin accepting all the the change sets unique to that baseline, and annotating that the workspace is now based upon this baseline. This is useful for quickly identifying different cumulative states of a component in a workspace or stream.
1.2 Going back
Although we all like moving forward, it is often useful to go back to reproduce a build or revert to a good known state. When you decide to go back, you must first consider what you have in your repository workspace which hasn’t been delivered to a stream. If you only have a couple of change sets that you don’t immediately need, then you can suspend them using either the Pending Changes view or the History view. If you have made a lot of changes, you can instead create a new baseline called, say, BROKEN, and then from the Pending Changes view pick the component (e.g. JUnit) and run Replace With > Baseline…, specifying the GOOD baseline. The Replace operation will both update the component in your repository workspace and load your local workspace to match the contents of the component in your repository workspace, while the BROKEN baseline you created remembers the state of JUnit that you had before you did the Replace.
It is also possible to browse the files and folders you had at the time you created a baseline. From the History view, select a baseline and run Show Repository Files. This will open a repository file browser, as shown in Figure 4, that will let you browse the states of the files in the baseline. If you want to retrieve a particular state of a file you can select it and run Load which will transfer the contents of the file into your local Eclipse workspace.
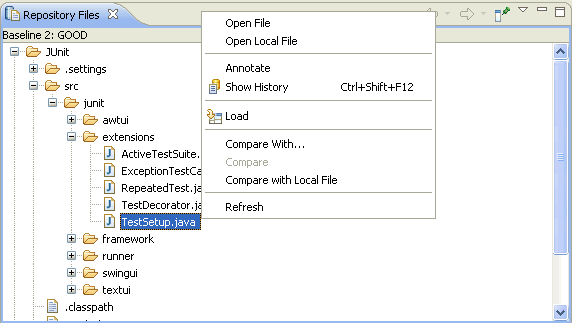
Figure 4: Browsing the files in a baseline
2. Growing Up
We’ve seen that it is possible to work alone, but Jazz is all about teams, so let us grow the JUnit team. Markus adds Jason to his team to help improve the examples. He also decides that the examples won’t ship with the main application and he expects to have a team focused on writing examples, so breaking them up into separate components would help them evolve independently. As a result, Markus evolves his flow structure as shown in Figure 5.
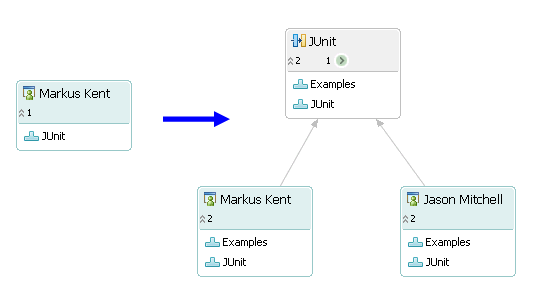
Figure 5: Adding a stream
The first thing to do to create the new structure is to create the new component and move the examples project into it. Creating a component is done in the repository workspace editor. You can open the repository workspace editor from the Pending Changes view by running Open on the repository workspace node. Once the editor is open, you can create the component by clicking New… in the components section of the editor : give the new component the name Examples and press the Save button in the top right corner of the editor.
To move the Junit Examples project into the Examples component, you should navigate to the Java Package Explorer or Navigator and perform the following steps:
- Select the JUnit Examples project and run Team > Move In Repository…
- In the dialog that comes up, select the Examples component, and select OK to complete the operation.
- In the Pending Changes view you will two change sets for the move source and target. The items in the repository actually stay the same, history is preserved, they are simply being moved to another component.
Next, we create the stream structure. It is simple to create a new stream from a repository workspace – select the workspace in the Team Artifact navigator and run New > Stream. This will create a new stream, duplicating the contents of the repository workspace. Next, Jason can create his own repository workspace as usual. From now on, Jason and Markus can Accept and Deliver to share their changes.
2.1 The First Customer
When it is time to share their code with an external customer, Markus or Jason can use a snapshot to remember the state that was shipped to the customer. To create a snapshot, pick the repository workspace node in the Pending Changes view and run New > Snapshot… and give it the name JUnit 0.1. When a snapshot is created, it may in turn create baselines for components whose latest changes have not already been captured in a baseline. Snapshots are remembered with streams and repository workspaces; by default, when a snapshot is created it is remembered with the source of the snapshot. To see the snapshots, select a stream or workspace and run Show > Snapshots. Snapshots can also be remembered with more than one stream or workspace; it is a common pattern to associate “blessed” snapshots with the stream to which they are related. This makes it easier to find them later on.
When the customer returns and needs some bugs fixed, it is an easy process to provide the fixes. As shown in Figure 6, another stream can be used to track the bug fixes and Jason can work in both at the same time. The key here is that the Pending Changes view allow you to switch between any the streams or workspace to or from which you need to flow changes. Use the Change Flow Target action to configure the flow target. This makes parallel development really easy since all flows happen in the same workspace context.
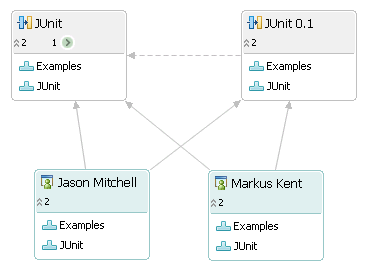
Figure 6: Bug fix stream
The first step in creating the bug fix stream is to create the new stream from the snapshot. Open the snapshot editor by double clicking a listed snapshot from the Search view. The snapshot editor looks very similar to the Repository Workspace editor except it has a links section in the upper right area of the editor. In the Links section run the Create a new stream link. This will create a stream with the exact contents as the snapshot.
2.2 Automated Builds
Now that there is a customer, it is good to get automated builds configured to automate the packaging of the binaries that are shipped, and to automatically run the unit tests. When it is time to setup automated builds, as described in Getting Started with Setting up Jazz Builds, it’s simply a matter of creating workspaces from which to run the builds, as shown in Figure 7. The flows for the build repository workspaces are configured to accept from the stream that needs to be built.
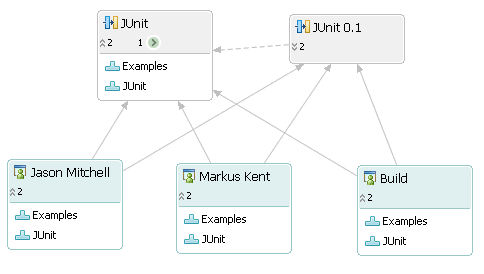
Figure 7: Adding build workspaces
Here is an example snippet from a typical Ant build script configured for Jazz. When the builds runs, it first accepts all change sets since the last build, and then creates a snapshot of the repository workspace:
    <!-- Accept any changes into the workspace. -->
    <teamAccept repositoryAddress="${repositoryAddress}"
		            userId="${userId}"
		            password="${password}"
		            workspaceName="JUnit Build"
		            buildResultUUID="${buildResultUUID}"
		            snapshotName="test"
		            verbose="true" />

    <!-- Load workspace files to the build machine filesystem -->
    <teamFetch repositoryAddress="${repositoryAddress}"
		           userId="${userId}"
		           password="${password}"
		           workspaceName="JUnit Build"
		           buildResultUUID="${buildResultUUID}"
		           destination="${java.io.tmpdir}/toolkittest"
		           verbose="true" />
The snapshot created in the build is tracked with the build result and is available from the build result editor. This means that to reproduce a build, you can simply open the build result and click on the snapshot link. You can then create a repository workspace from the snapshot editor, or you can replace any repository workspace from the Pending Changes view with the snapshot by running Replace With > Snapshot… from the repository workspace node.
2.3 Adding Integration Levels
As a team grows and there are more people and more work to do, it is often the case that some components become too volatile and the daily integration costs are too high. For example, Jason may start having a hard time keeping up with breaking changes from Markus, while Markus’s team has also grown and he needs to deliver often to his stream to share changes with Bill which will break Jason’s code. A good way to solve this growing problem is to add an extra stream hierarchy level as shown in Figure 8, to provide a way for some members of the team to share work more frequently with each other than they share with the rest of the larger team.
Markus creates the JUnit Integration stream, and each sub-team working in the other streams will deliver changes to it at some predetermined interval. In addition, the JUnit stream no longer has the Examples component – it is now up to the Examples team to adopt the breaking changes and deliver these adoptions to JUnit Integration.
Teams are free to choose how many sub-feature streams they need, if any, and they are also free to choose how often they want to deliver their changes to an integration stream. As part of this reverse-integration process, various quality gates may be put in place; for example, preventing delivery unless a set of tests, including performance tests, pass.
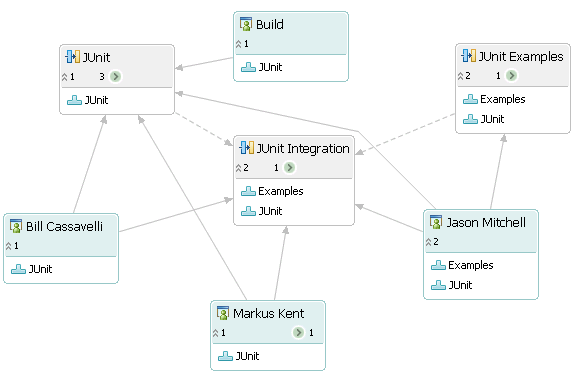
Figure 8: Splitting the teams
Adoption and delivery of changes from JUnit Integration happens directly from the Pending Changes view. Jason can change his flow target from the JUnit Examples stream to the JUnit Integration stream, inspect the changes, accept them and perform the regular adoption steps such as ensure that the examples still compile and that the tests run. What is great about this model is that Jason can adopt the new changes without affecting the rest of his team. If a problem is found while adopting, Jason can simply coordinate with the other team until things are resolved, while the rest of his team stays isolated from the problem. Once the adoption is complete, Jason simply switches his flow target in the Pending Changes view to the JUnit Examples stream and delivers the adoptions in JUnit Examples and the new changes from JUnit.
2.4 Backporting Changes
Markus uncovers a significant problem in his framework and releases a change set to the JUnit stream which contains the fix. Bill convinces Markus that this problem should be fixed as well in the JUnit 0.1 stream, so that if there is maintenance release of JUnit 0.1 Integration, this problem will be addressed there as well. To backport the change, Markus simply run Change Flow Target… to the JUnit 0.1 stream, and then runs Replace With > Latest from JUnit 0.1 He is now back in sync with the maintenance stream. To accept his fix into his current environment, he has a few choices:- if the change set was attached to a work item, Markus could accept them from there.
- if Markus had previously suspended his change set, Markus could resume it into his workspace
- Markus can collaborate with the JUnit stream and accept only the change sets he wishes to backport.
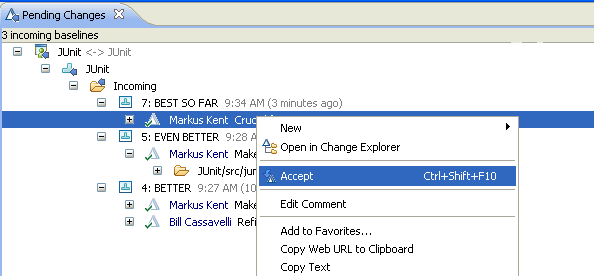
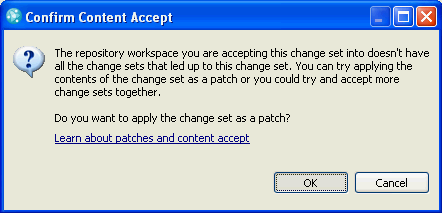
If Markus’s change set is not based upon other change sets exclusive to the JUnit stream, he may be lucky and see the change set successfully be accepted into the workspace without a problem. If JUnit and JUnit 0.1 have diverged significantly, then it is likely that Markus’s change set cannot be accepted easily on its own. Today, Markus is unlucky, and his change set cannot be accepted directly : instead, he is offered an alternative to apply the change as a patch to his workspace, as shown in Figure 10.
Markus decides to apply the change set as a patch. A new node shows up in the Pending Changes view called Pending Patches, as shown in Figure 11. Markus can use the compare merge editor to merge in the specific changes line by line that he addressed the change set that he needs to backport. When he is satisfied with his changes, he can check in his merges into a new change set, and run Remove From View on the patch nodes to remove the patch information from the Pending Changes view. Then Markus simply changes his flow target back to the JUnit 0.1 stream, and delivers the change after ensuring it meets delivery criteria.
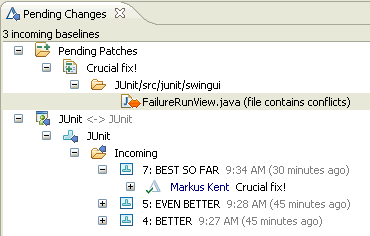
Figure 11 : Pending Patches
The same mechanism can be used to forward port a change from an maintenance release to the latest.
3 Jazz Team’s Flow Hierarchy
Figure 12 shows a subset of the Jazz team’s own flow hierarchy. The Weekly Jazz Integration stream is at the middle and is where integration occurs weekly. The Reports team is expanded and you can see their build workspaces and how each developers has both a flow relationship with his project stream for day-to-day work, and also one with Weekly Jazz Integration, to perform integration tasks.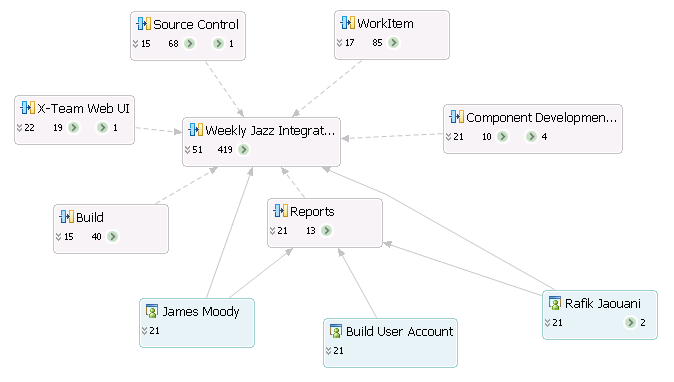
Figure 12 : Flow hierarchy