TN0007: Guide for Importing Jazz Work Items from Bugzilla and Other Systems
Summary
This Tech Tip explains how to import Bugzilla bug reports into Rational Team Concert. It also addresses a general approach for importing issue tracking reports from other systems into Jazz, including ClearQuest and CSV files.
More Information
Overview
Rational Team Concert provides the capability to import Bugzilla bug reports into Jazz Work Items. This capability is intended for teams that wish to change their issue tracking system from Bugzilla to Jazz Work Items. The Bugzilla importer can run as either a single-step process (from Bugzilla to Rational Team Concert via HTTP) or a two-step process (from Bugzilla to zip file, from zip file into Rational team Concert).
Since both Bugzilla bug reports and Jazz Work Items are customizable, the value sets and the corresponding mappings are not hard-coded into the importer. Rather, they are configurable via an XML-based mapping file. Rational Team Concert (as of release 2.0) does not yet provide a user interface for configuring these mappings, but the importer does provide a mechanism for automatically generating a mapping file from the Bugzilla data to be imported. You can then manually edit this mapping file to provide the Rational Team Concert side of the mappings.
Bear in mind that the importer will create any missing categories, contributors, deliverables and iterations that it encounters during the import. Bugzilla flags and approvals are not supported by the importer. If you are using LDAP, creation of users in Rational Team Concert during the import can be a problem, so it is recommended that you create the necessary users in Rational Team Concert before importing.
To get an idea of how long a Bugzilla import can take, tests have shown a rate of approximately 200 bugs per minute, depending on hardware and network speed.
Performing the Import from Bugzilla
The importer is preconfigured such that commonly used Bugzilla values are mapped to values in the supported process templates (as of RTC 2.0 this are Eclipse Way, Scrum and Open Up). When importing work items for testing purposes it will often be sufficient to import from a Bugzilla repository directly into a project area. On the other hand, for production use it is best to first download the bug data to a zip file, then configure how the values from Bugzilla map to those in the project area to import to and do a test run of the import before finally importing into the production repository.
We recommend the following approach:
- Download the Bugzilla bug reports to a zip file using the import wizard. This will avoid having to retrieve the data multiple times.
- Generate an initial mapping file from the Bugzilla bug reports.
- Customize the mapping file and perform test imports to verify mapping correctness. We recommend that you iteratively perform test imports into a test repository until you are confident that your mapping is correct.
- When ready to perform the import into your production Rational Team Concert environment, first back up your repository. If an unexpected problem occurs during the import, you can restore the previous state of the repository and move back to the test environment to resolve the problem.
- Perform the import and verify a representative sample of the imported work items.
The following sections describe this approach in detail.
Create a zip file with the Bugzilla data
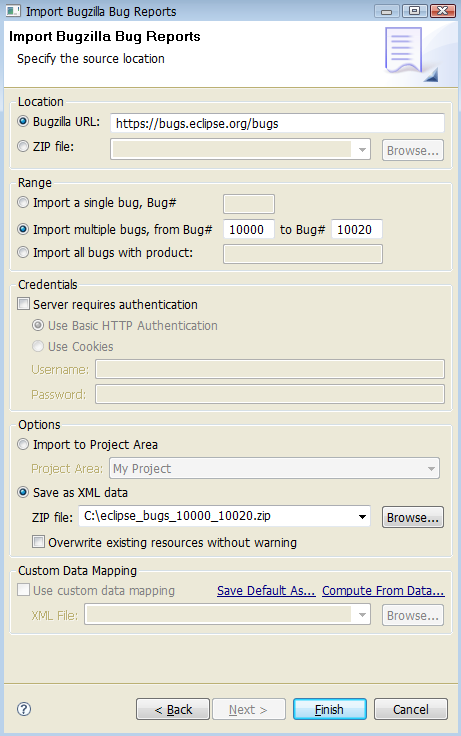
Open the Bugzilla importer from File > Import… > Team > Bugzilla Bug Reports, enter the Bugzilla URL which corresponds to the URL of a single bug without the trailing show_bug.cgi, choose the range of bugs to import and a zip file to store the data under Save as XML Data. Press Finish to start downloading the bug data.
Generate and customize the mapping file
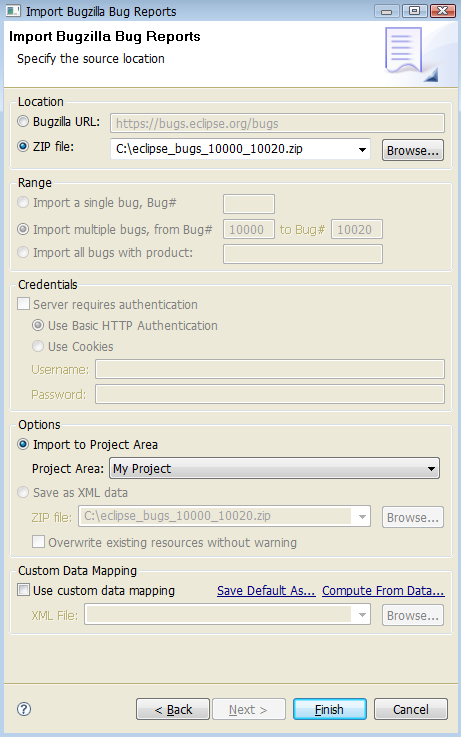
Open the Bugzilla importer, enter the previously created zip file, choose a project area to later import to, click the Compute From Data.. link and choose a file to save the mapping to.
The created mapping file contains mapping information for attributes and attribute types, the latter affects all attributes of a particular type. An attribute mapping’s sourceId refers to the element name in the Bugzilla XML, its targetId to the attribute id the values should be mapped to. Similarly each value mapping refers to the Bugzilla value in its sourceId and to the work item’s attribute value in its targetId:
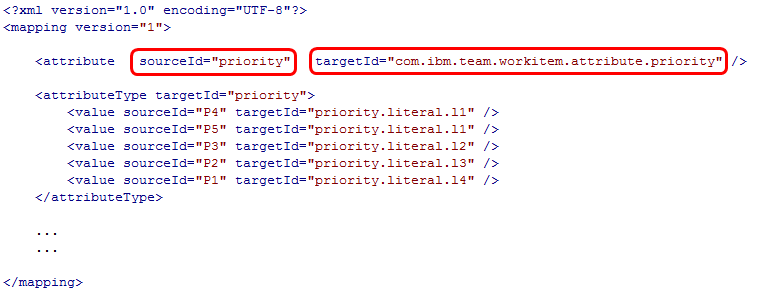
The value mappings for state, resolution, priority (see screenshot above) and severity are given for common Bugzilla values and the supported process templates, these only need to be changed if the Bugzilla data contains additional values or the project area to import to uses a different or a custom process. Value mappings that are given by default, but are not used in the Bugzilla data the mapping was computed from are indicated with an ‘Unused’ comment. If a value mapping for state, resolution, priority or severity is marked as accurate="false" the source value will be appended in a comment of the work item when importing a bug with that value.
Customize the value mappings as needed:
- State/Resolution: if the target project area uses an unsupported process, look up state and resolution ids of the workflow used for defects on the project area editor’s Process Configuration Source page (search for ‘com.ibm.team.workitem.configuration.workflow’). Note that for historical reasons state ids of the form ‘s1’ and resolution ids of the form ‘r3’ need to be added to the mapping file without their respective ‘s’ and ‘r’ prefixes.
- Category: the target id is a path of category names. If a Bugzilla product is mapped to a category all Bugzilla components of that product are mapped to subcategories of that category unless there is an explicit value mapping for such a component. Categories are created during import if necessary.
- Iteration (as of RTC 2.0.0.2): the attribute type’s id is
intervalfor historical reasons. Replace each target id with a path using slashes as separator, starting with a slash followed by the development line’s id as the first segment, followed by segments of iteration ids (e.g. /main_dev/milestone_3/stable). Look up these identifiers in the properties dialogs of development lines and iterations on the project area editor’s Overview page. Iterations are created during import if necessary. - Iteration (in RTC 2.0 and previous releases): the attribute type’s id is
intervalfor historical reasons. Replace each target id with a path using slashes as separator, starting with the development line’s id as the first segment, followed by segments of iteration ids. Look up these identifiers in the properties dialogs of development lines and iterations on the project area editor’s Overview page. Iterations are created during import if necessary. - Release: the attribute type’s id is
deliverable. A value mapping’s target id is a release’s name, these can be found on the Releases page of the project area editor. Releases are created during import if necessary. - Contributor: the target id is a Rational Team Concert user’s user id. The importer will create users during import if necessary, if importing into a repository using LDAP import the required users from LDAP before importing work items.
- Priority/Severity: if the project area to import to uses an unsupported process, look up the target ids from the priority and severity enumerations on the project area editor’s Process Configuration Source page (search for ‘com.ibm.team.workitem.configuration.enumerations’). Note: the Eclipse Way process template changed after Rational Team Concert 1.0 Beta3, when importing into a project area created from the Rational Team Concert 1.0 Beta3 Eclipse Way process template remove the
priority.literal.landseverity.literal.lprefixes from the target ids. - OS/Platform: to import these add corresponding custom attributes of enumeration types to the defect definition, see the article on Work Item Customization on how to configure custom attributes and enumerations. The target ids are the literals’ ids like for priority and severity attributes.
A value mapping can use * as the source id to match all values that are not mapped explicitly. Values without any mapping are copied to the work item as-is and repository items are created if necessary. Workflow states and resolutions and enumeration literals are not created automatically, these need to be created by customizing the project area’s process configuration. An empty target id in a value mapping will use the work item attribute’s default value when a bug has the corresponding source value.
Importing into the Jazz Repository in Rational Team Concert
We recommend to first import into a test repository to verify the values are mapped as expected before importing into a production repository. It’s usually sufficient to test a subset of bugs, but ensure that your subset provides full coverage of your attribute sets and values. A quick way to do this is to use a test environment configured to use the Derby database since Derby can be backed up and restored via a simple folder copy and paste operation.
The user running the import must meet the following authorization criteria:
- Be assigned the JazzAdmins repository role, for creation of users and optimal performance
- Be assigned a Rational Team Concert Developer Client Access License
- Be assigned adequate process permissions within the project area for creating the necessary items during import (work items, categories, iterations and releases). Most process definitions have a role who can perform all operations; if your process has such a role, this is a good choice for the user running the import.
Open the Bugzilla importer, enter the previously created zip file, choose a project area to import to and enter the previously created mapping file. Press Finish to start importing the data.
Importing from Other Issue Tracking Systems
If you are using an issue tracking system other than Bugzilla and wish to import its data into Rational Team Concert, you have three options: Either import work items from CSV (Comma Separated Values) files, import work items using the ClearQuest Import Wizard, or transform your issue tracking records into Bugzilla XML format files and create a zip file of these to import from.
Import from CSV files
As of release 2.0, RTC allows to import work items from CSV files. The importer uses the same mapping infrastructure as the Bugzilla Importer. Thus, please refer to the above description for more details of how to provide a custom mapping of attributes.
A brief overview of the configuration options:
- The File points to the CSV file to import work items from. The first row of the file must list the attribute names. They are mapped to RTC attributes using the same mapping infrastructure as the Bugzilla importer uses. You can configure the separator that is used to separate columns in the file.
- The Destination is the target project area for the import. When importing Work Items, the importer allows to either create new items for every entry in the CSV file or to update existing items. In this case we select the option to create new Work Items.
- The Custom Data Mapping allows to control how attributes are mapped from the CSV file to RTC attributes. This is identical to the way how the Bugzilla importer maps the attributes.
The following shows a spreadsheet with three Work Items which can be exported in CSV format. The first row contains the attributes and the following rows each represent a Work Item:

The importer deals with the CSV file in the following way:
- The encoding of the file is automatically detected from the content
- Values can be separated by tabs, commas or any other custom delimiter. The user is responsible to set the delimiter from the import wizard.
- All values must be surrounded with quotes if multi-row values exist (e.g. a large description)
- Timestamps are parsed with
SimpleDateFormat("yyyy-MM-dd HH:mm") - To update existing Work Items, add a column named ‘Id’ with the respective Id of the Work Item to update
- Work Item links are supported by using the numeric identifier of a work item in the CSV column. If the identifier is prefixed with
#, the work item to link to will be looked up from inside the CSV file by using the column named ‘Id’ and otherwise looked up in the target repository. - Approvals and Attachments are not supported during import
- Any number of comments will be imported as a single comment to the Work Item unless comments are exported as Internal Value
- If exported from RTC, the Planned For attribute should use the Internal Value presentation to be fully qualified
- For all attributes, the same mapping rules apply as for the Bugzilla Importer. See the above description for more details.
A fast way of creating a CSV file to import Work Items from is by using the CSV Exporter that RTC provides. You can configure the attributes that should be exported. Note that the CSV Importer uses the display name of attribute values for the mapping. Ensure that you export display names and not internal values when using the CSV exporter from RTC.
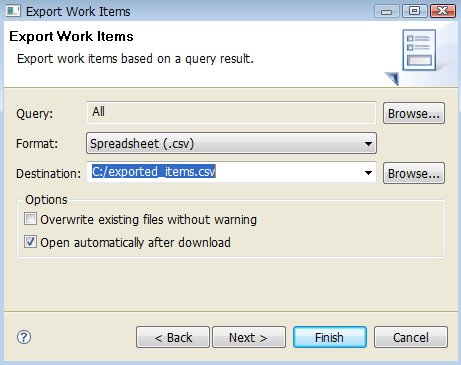
As of RTC 3.0.1 the number of supported attributes during CSV export has greatly improved.
The following new attributes can now be exported:
- Comments
- URI based links
- Subscribers
- Contributors list
- Project Area, Team Area, Process Area, Work Item and list types of each
Notes:
- The number of attributes that can be properly imported into RTC Work Item repository might be different from the exported ones.
Being able to export a given custom attribute does not necessary implies that this custom attribute will be properly imported.
For example, custom attributes of type work item and work item list can be exported into CSV but RTC 3.x does not support an import of these attribute types from CSV. - In order to use these new attributes, select Internal Value on the attributes page of the CSV exporter. This allows the CSV importer to properly resolve the values.

Import Using the ClearQuest Import Wizard
The ClearQuest Import Wizard is a new in Rational Team Concert 2.0. It allows the import of work items based on the results of executing a query. It uses both the query’s filter criteria and display fields to determine which records and which record properties to import. It leverages the Bugzilla importer as its underlying import mechanism. Thus, the ClearQuest importer uses the same mapping infrastructure as the Bugzilla Importer. Refer to the above description for more details of how to provide a custom mapping of attributes. Also, refer to the Tips on Using the ClearQuest Import Wizard wiki page for more information.
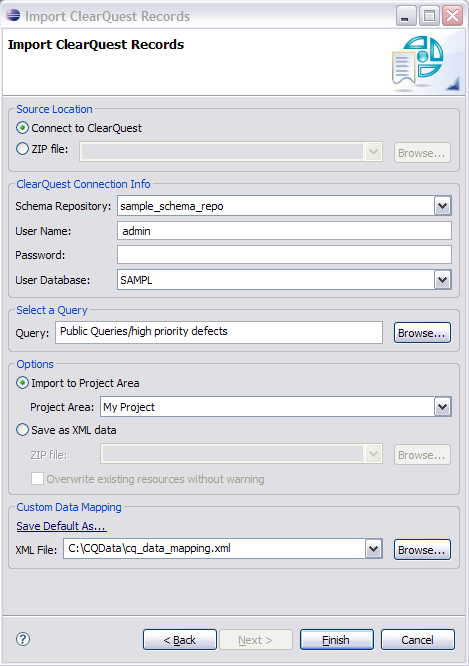
A brief overview of the configuration options:
- In the Source Location section, the user has the option to connect directly to ClearQuest or import from a specified zip file.
- In the ClearQuest Connection Information section, the user specifies the ClearQuest connection information.
- In the Select a Query section, the user specifies an existing ClearQuest query to execute.
- In the Options section, the user has the option to import the query result as Jazz work items or save the query result into a zip file to be imported at a later time.
- In the Custom Data Mapping section, the user specifies the data mapping file to use when importing the query result or zip file contents. The user can also choose to save the sample mapping file provided to some location on the file system by clicking the Save Default As… link.
Import via Bugzilla Importer
The other way of importing from an issue tracking system other than Bugzilla is to transform your issue tracking records into Bugzilla XML format files and create a zip file of these to import from.
- Each bug needs to be stored in its own XML file named
<bug-ID>.xml - For each bug with attachments:
- Create a folder with the corresponding bug ID as its name
- Copy the bug’s attachments to that folder
- The bug’s XML file should refer to each attachment by its filename
- Create a zip file containing the XML files and attachment folders
- Use the Rational Team Concert import wizard to import from the zip file
The following is an example of a bug XML:
<?xml version="1.0" standalone="yes" ?> <bugzilla urlbase="http://bugs.yourcompany.com/"> <bug> <bug_id>123</bug_id> <creation_ts>2007-03-26 14:48 -0400</creation_ts> <short_desc>Summary content</short_desc> <delta_ts>2007-10-18 14:23:52 -0400</delta_ts> <product>Product</product> <component>Component</component> <version>2.0</version> <rep_platform>PC</rep_platform> <op_sys>Windows XP</op_sys> <bug_status>RESOLVED</bug_status> <resolution>WORKSFORME</resolution> <keywords>tag1, tag2</keywords> <priority>P2</priority> <bug_severity>normal</bug_severity> <target_milestone>2.1</target_milestone> <blocked>124</blocked> <blocked>125</blocked> <dependson>121</dependson> <dependson>122</dependson> <reporter>contributor2</reporter> <assigned_to>contributor1</assigned_to> <cc>contributor3</cc> <cc>contributor4</cc> <long_desc> <who>contributor2</who> <bug_when>2007-03-26 14:48:21 -0400</bug_when> <thetext>Comment content 0</thetext> </long_desc> <long_desc> <who>contributor1</who> <bug_when>2007-10-18 14:23:52 -0400</bug_when> <thetext>Comment content 1</thetext> </long_desc> <attachment> <attachid>file1.txt</attachid> <desc>Attachment description 1</desc> </attachment> <attachment> <attachid>file2.txt</attachid> <desc>Attachment description 2</desc> </attachment> </bug> </bugzilla>
where:
- Timestamps are parsed with
SimpleDateFormat("yyyy-MM-dd HH:mm") delta_tsis the last modification timeccelements list the subscriberslong_desccontain the comments
The corresponding zip file includes the attachments refered to in the XML and can be imported. Like when importing from Bugzilla a mapping file can be used if still necessary, all other preparatory steps and precautions as described above apply.
References
See the following for additional information: