Getting Started with Rational Team Concert Source Control
Summary
The source control management (SCM) component in Rational Team Concert (RTC) manages source code and other digital assets that a team creates. By reading this document and following along in your own instance of RTC with the JUnit project installed (see Tutorial: Exploring the Rational Team Concert JUnit example project ) you will learn about the basic software configuration management features available in RTC SCM.
| Last Updated: | January 5, 2018 |
| Build basis: | RTC 6.0.5 GA |
Introduction
A software development team works with a large base of files representing the source code for the software system being developed. Each team member works with the same file base, changing one or more files in the base to add a new feature or to fix a bug. The team member verifies that the changes are correct, and then shares the changes with the rest of the team. At the same time, other team members are doing likewise. Software configuration management tools help in organizing the team’s files, tracking and sharing changes, and keeping the entire team working in concert to achieve common goals.
The purpose of this document is to help you get started using the software configuration management (SCM) component in RTC, commonly referred to as RTC SCM or Jazz SCM, the latter still commonly used today.
This document is structured as a tutorial, walking you through a set of RTC SCM scenarios using the JUnit project that was created in the Tutorial: Exploring the Rational Team Concert JUnit example project . By completing the tutorial, your will have a project and the necessary artifacts in place upon which this document relies.
Here is what we will be covering:
- Two developers (Marcus and Jason) will collaborate in the JUnit project.
- Marcus will make a code change and deliver it.
- Jason will accept Marcus’ change.
- Both Jason and Marcus will edit the same file simultaneously and attempt to deliver their changes, resulting in a conflict.
- We will show how they can resolve the conflict by performing a merge and proceed to deliver their code changes.
- We will also demonstrate how you can suspend work in progress.
Prerequisites
As with the tutorial mentioned above, this document assumes that you already have a Jazz server and an Eclipse-based Jazz client up and running and that your client has access to your server. If you do not have the client and server running please refer to the Installing Rational Team Concert help. Next, refer to the tutorial to set up the JUnit project area and team area for the JUnit team, with team members Marcus and Jason. Ensure that both users have been assigned a developer client access license and are members of the JUnit project area.
Developing with Multiple Team Members
In the tutorial, we learned that a developer checks-in his work to a private repository workspace, which tracks the sets of logically-related changes in change sets. Though the changes are stored safely in the repository, a user’s changes are not shared with the rest of the team until the user decides to do so. A team shares work in a stream. A developer decides when to deliver his work to the stream to make it available to the rest of his team; he also decides when to accept into his repository workspace the work in the stream contributed by others. In this way, he can be as isolated from, or as in-sync with the team as he chooses.
In this section, Marcus and Jason will be collaborating. Assuming you already have an Eclipse workspace for Marcus in the state where the tutorial document left off, leave that Eclipse workspace up and running. Once we create the second Eclipse workspace, we’ll be switching back and forth between them to get an understanding of what the state of the project looks like to each of the two team members.
Creating a New Eclipse Workspace
In the tutorial we created users Marcus and Jason as members of the JUnit team, and we had been working in Marcus’ Eclipse workspace. In this document we will be working with both Marcus and Jason, so we will first have to create a separate Eclipse workspace on your computer that will be used by Jason as follows:
- Leave Marcus’ Eclipse workspace running.
- Launch Eclipse again the same way you did when you started the tutorial.
- When Eclipse prompts you for a workspace, do not use the same workspace as Marcus was using. Instead if you provide a unique folder name, Eclipse will create the new folder along with a new workspace that we will use for Jason.
Connecting to the Repository and Project Area
- Once the new Eclipse workspace is started, make sure you are in the Java perspective. If this is not the current perspective, from the menu bar select Window > Open Perspective > Java.
- Open the Team Artifacts view, and connect to the project area as Jason:
- In the Team Artifacts view’s tool bar select the Manage Connected Project Areas icon
 to bring up the Manage Connected Project Areas wizard.
 - Make sure Create a new repository connection is checked in the first page of the wizard and click Next.
- Define a repository connection by entering the server location (a URL of the form:
http://<server>:<port>/ccm) and the user id=jason. Click Next. - Select JUnit Project and click Finish.
Figure 1: Connect to the JUnit project. After you’ve run the Team Concert Example Project Setup, you can connect to this project area.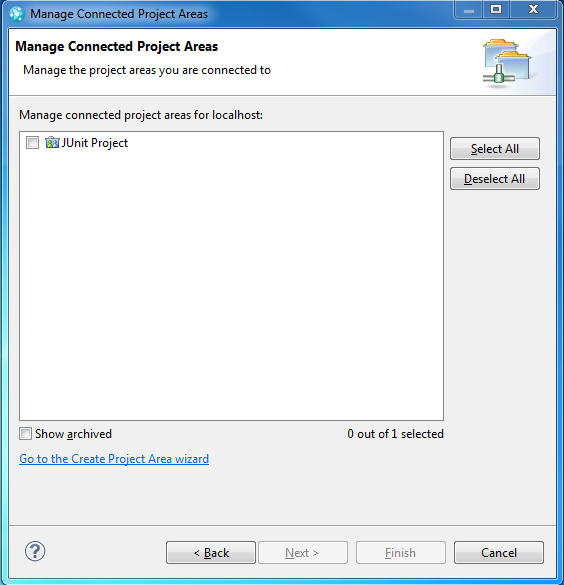
- In the Team Artifacts view’s tool bar select the Manage Connected Project Areas icon
Joining the Stream
- Jason must now join the stream for our team area. From the Team Artifacts view, expand the JUnit Project project area, and expand Source Control.
- From the context menu of the JUnit (JUnit Project) stream, select New -> Repository Workspace… as shown in Figure 2.
Figure 2: Create a new repository workspace.
- A wizard dialog appears, with several pages. Complete it as follows:
- New Repository Workspace: Enter Jason on JUnit for Repository Workspace Name. The repository workspace mirrors your local changes on the server. Later, you will deliver your changes to the rest of your team, also via the server. Click Next.
- Select Repository: You are required to select a repository where the workspace is to be created. The radio button Use current repository jason@<server> should be selected. Click Next.
- Read Access Permission: Select Private so that only Jason will have read access to his repository workspace. Click Next.
- Components to Add: Here you select which components to add to your repository workspace. Select the JUnit component and click Finish.
- At this point the repository workspace has been created and the Load Repository Workspace dialog will appear. Select Find and load Eclipse projects and click Finish. Other load options are for different scenarios that can be ignored for now.
At this point, Jazz will load all the code from the JUnit stream into the Eclipse workspace.
Delivering a Change
Now Jason is all caught up on the latest code in the JUnit stream. Next, let’s have Jason make a small code change and deliver it to the stream so it’s available to Marcus.
From the Package Explorer View, drill down to the Math.java source file and double-click it to open an editor on it.
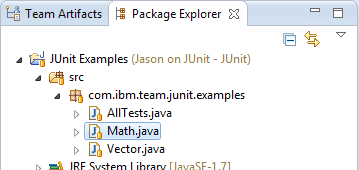
Figure 3: Locate the file to edit.
Now edit the source code. Let’s say Jason renames one of the methods. So edit the code and replace the line:
public void testAddition() {with the following line of code:
public void testSimpleAddition() {Save the file by using the keyboard shortcut Ctrl-s. After a moment, the background of the AdvancedTest.java icon in the Package Explorer should turn a golden colour. This indicates that there is a change in the local workspace that Jason can check in to the repository workspace.

Figure 4: Note the background decoration for resources that may be checked in.- To check the changes in, go to the Pending Changes view and press the
 button to expand to changes. On the Unresolved node, select Check-in All.
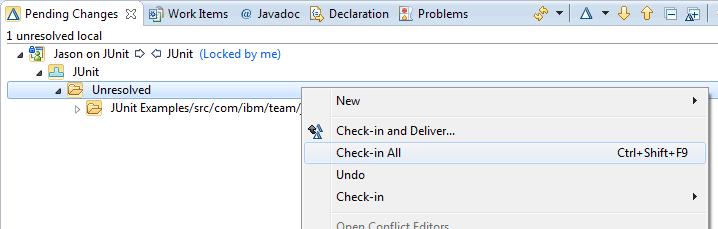
Figure 5: Check changes into Jason’s repository workspace.
- Give the new change set a comment, say Rename testAddition(), by selecting Edit Comment on the change set’s context menu.
- Jason can share his changes with the rest of the JUnit team by delivering the change set to the stream by selecting Deliver from its context menu.
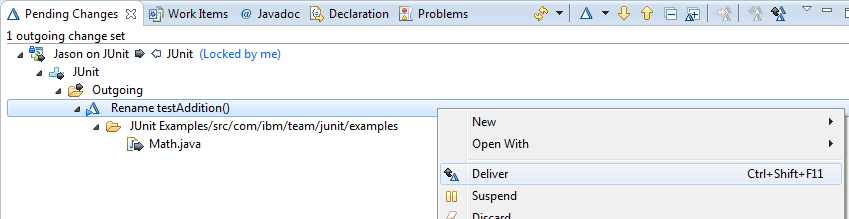
Figure 6: Deliver changes to the JUnit stream.
Auto Check-in
Notice that when you saved your code changes above, the changed file was placed in the Unresolved node of the Pending Changes view. If you have a reliable network connection, you can set Team Concert to automatically check your changes into a change set for you.
- Open Window > Preferences, and find Team > Jazz Source Control > Check-in Policies.
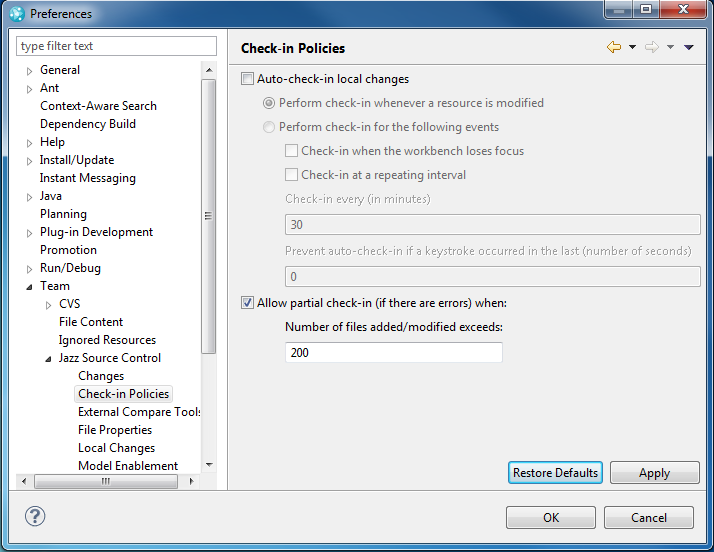
Figure 7: Preferences controlling automatic check in Check the box labelled Auto check-in local changes, and select the radio button Perform check-in whenever a resource is modified and click OK.
Now open the Pending Changes view and try modifying one of Jason’s files. After you save it, a new change set will appear in the Pending Changes view containing the file you modified. When auto check-in is on, any modification to a shared resource is automatically checked in without requiring any additional manual steps.
While working with automatic check-in is often a convenient way to work, you may choose to disable this feature by un-checking the Auto check-in local changes box on the Check-in Policies preference page. Alternatively, you can try various auto check-in settings. Note that the various check-in events are overridden by the Prevent auto check-in if a keystroke occurred in the last (number of seconds) setting.
Experiment with the auto check-in settings by:
- Try turning auto check-in back on, but this time select Perform check-in for the following events and select Check-in when the workbench loses focus. Try making another change to a shared file and notice that changes stay in the Unresolved folder instead of being checked in. If you switch focus away from Team Concert by selecting another application, the file will be committed automatically. If it is not, set Prevent auto check-in if a keystroke occurred in the last (number of seconds) to zero and try again.
- Try the other options for checking-in at a repeating interval.
Even if you enable auto check-in, it is important to understand how the Unresolved folder works if you want to work offline temporarily (in other words, without connectivity to a Jazz server). Since the server is not available to automatically create change sets and perform check-ins when you are working offline, the work you do while disconnected is accumulated in the Unresolved folder until you reconnect, at which time you can check it all in.
Undo any local changes you may have made while experimenting and make sure Auto check-in local changes is checked, and Perform check-in whenever a resource is modified is selected before continuing.
Accepting a Change
Now that Jason has delivered a change set to the stream, it is available for others to accept into their workspaces. Jazz never forces changes, so in Marcus’ case, he can see Jason’s incoming change set once it has been delivered. Let’s walk through that:
- At this point we’ll switch over to Marcus’ Eclipse workspace. Minimize Jason’s Eclipse window and locate Marcus’. It should already be open from when you finished the Tutorial: Exploring the Rational Team Concert JUnit example project.
- From the Pending Changes View, you might already notice an incoming change set. If you don’t see that indicated at the top of the view, press the
 button to refresh the view. Then press the button to Expand to Changes. You can drill down even further to see the source file that Jason changed:

Figure 8: Marcus’ incoming change.
You can double-click on the source file to compare the two versions of the file side by side if you like. Once you are satisfied with the incoming change set, accept it into your repository workspace by selecting Accept from the context menu of the change set.
You can run the code again to see the difference in the console output.
Resolving Conflicts
The simple accept and deliver gestures work without additional actions in situations where developers are working either in different files or else working one at a time. But what about when developers work on the same file at the same time? Jazz source control is designed to make conflict resolution as painless as possible. Let’s walk through a simple conflict scenario with Marcus and Jason to see the basics. In our scenario, we’ll have Marcus and Jason make changes to the same file at the same time. Then they’ll each try to deliver their change.
Delivering Two Changes to the Same File
Let’s start by having Marcus make a small change to our Math.java file.
Make sure you are using Marcus’ Eclipse workspace. Either check the repository connection in the Team Artifacts navigator view or you can look at the Repository Workspace name in the Pending Changes view. Recall that Markus’ workspace is simply named JUnit while Jason’s is named Jason on JUnit:
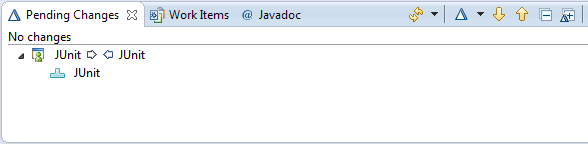
Figure 9: Marcus’ Pending Changes view.Now locate and edit the Math.java file. You should still have an editor open on it. Let’s make a trivial change. Add a comment to the
testSimpleAddition()method, so that it looks like.//a really simple test
public void testSimpleAddition() {- Save your change, go to the Pending Changes view, and check in the change into a new change set. You should be getting good at this!
Now before Marcus delivers his change, let’s have Jason make a change to that same file.
- Make sure you are using Jason’s Eclipse workspace. Again, check the Pending Changes view to be sure.
Locate and edit the Math.java file. Jason has noticed there should be a test for division, so he will add it after the method
testMultiplication():public void testDivision() {
int division = 1 / 1;
Assert.assertEquals(division, 1);
}- Save the change. Because Jason has auto check in turned on, you don’t need to check in the new change set as it will automatically be done for you.
Discovering a Conflict
For Marcus and Jason, the conflict resolution task will become the responsibility of whomever is last to deliver the change. We’ll see that principle in action now as we have Jason deliver his change first.
Make sure you are in Jason’s Eclipse workspace.
From the Pending Changes view, edit the change set comment to be add testDivision() then click the
 button to deliver all outgoing change sets to the stream.
Notice that Jason had no trouble delivering his change set to the stream. That’s because he was first to deliver. Now let’s see what happens when Marcus tries to deliver.
Make sure you are in Marcus’ Eclipse workspace.
Refresh the Pending Changes view by pressing the
button. Once the refresh is complete, Marcus can see the potential conflict of Jason’s incoming change against his own outgoing change (“potential” because he hasn’t actually accepted Jason’s change yet — so far, there is still no conflict in his workspace). The potential conflict is indicated by the orange arrows: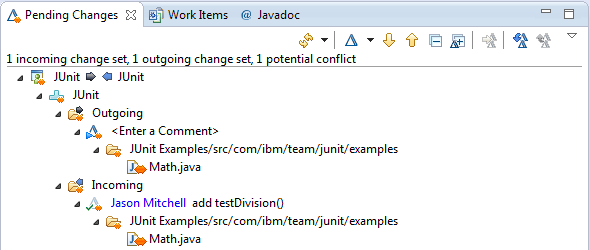
Figure 10: A potential conflict between outgoing changes and incoming changes. Notice the orange conflict decoration.- Set the comment on Marcus’ change set to add comment and try to deliver Marcus’ change by invoking Deliver from the context menu of the change set. You will get an error:
Figure 11: Dialog displayed when attempting to deliver a change set with a potential conflict.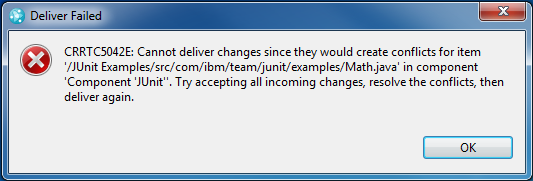
Accepting the Conflicting Change Set
Let’s follow the advice in the error message, and have Marcus accept the incoming change set, which will turn the potential conflict into a real conflict. We’ll then work through merging his outgoing change with what he accepted from the stream. Let’s work through it a step at a time.
Accept the incoming change set by selecting Accept from its context menu. Because you’re accepting a conflict, a dialog appears asking if you want the workbench to automatically resolve the conflict.
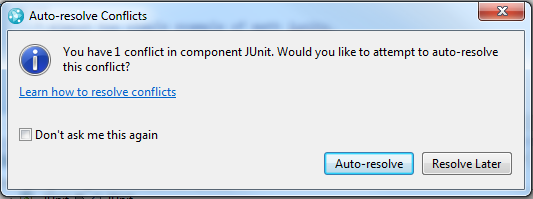
Figure 12: Dialog shown after accepting a change set that causes a conflict.Because we’re exploring how conflicts work, click Resolve Later.
Pending Changes now shows the Unresolved folder with a red conflict marker. We saw the Unresolved folder earlier when we had changes to check in. This folder holds both un-checked-in work and files with conflicts that need to be resolved. In both cases, it’s letting you know that there is something you need to do before you can deliver your changes.
- You can expand the folder to see the details of the conflict. A tooltip on the file in conflict provides more information about the nature of the conflict:
Figure 13: Tooltop explaining the nature of a file conflict.
Merging and Resolving
- Double-click the file in conflict (Math.java, in our example) to open a compare editor where you can see the conflicting versions of the file side by side:

Figure 14: Compare editor showing a conflict.As the editor notes, you can either merge these two versions manually or automatically. Let’s try an auto-merge by pressing the Auto-Merge button. Because Marcus and Jason modified different lines of the file, the merge can be done automatically.
Note that in this case, since there were no lines in conflict, the manual step of bringing up the compare editor wasn’t necessary. We could have done the Auto-Resolve from the context menu of Math.java or just clicked Resolve Now in the Auto-Resolve Conflicts dialog.
At this point, the conflict is resolved. All that remains is to deliver the outgoing changes. Go ahead and Deliver.
Suspending an Outgoing Change Set
Marcus is now adding a new big feature to the JUnit tests. In Marcus’ workspace, make a change to Math.java to represent the big feature work (for simplicity, just add a comment). Call the new change set Big Feature Work.
Marcus is working away on the new big feature, when his manager informs him that there is a critical fix needed: a test for modulus is missing. The new test, called testModulus(), is needed right away and Marcus’ manager has asked Markus to drop whatever he is working on now and implement this new method.
Marcus is right in the middle of other changes that he doesn’t want to lose, but he needs to focus on this critical fix. He could create another workspace on the stream, but it would take a bit of time to set that up, load the files again, etc. Instead, he will suspend the change set he just created to clear his workspace, deliver the new test method, and then resume his original change set to continue what he was working on before he was interrupted.
Suspending the Change Set
- First, suspend Marcus’ outgoing change set by selecting Suspend from its context menu. This causes all of Marcus’ outgoing changes to be removed from his Eclipse workspace. They are still safe in the Jazz repository, but they are temporarily removed from his file system until he resumes them later.
Notice that Math.java has reverted to the state it was in before Marcus’ edits for his big feature work.
- Now Marcus will work on the critical fix. Update Math.java with the new
testModulus()method. Check in the change and add a comment New testModulus() method. Now you can see both this new change set as well as the one that was suspended in the Pending Changes view. (You may have to expand the Suspended node to see the original change set.)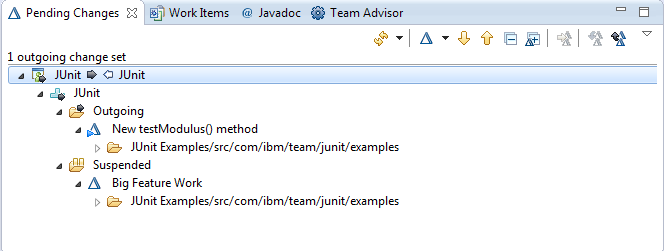
Figure 15: A suspended change set. - Deliver the new method by invoking Deliver from the context menu on the outgoing change set and switch to Jason’s session and accept Marcus’ change into his workspace.
Resuming the Suspended Change
Now that Marcus has delivered the new test method, he can bring back the changes he was working on before. From the context menu of the change set under the Suspended node in the Pending Changes view, select Resume. Marcus can now continue working.
Note that if his suspended changes conflict with the changes he made to add the new test method, he will have to merge them together. In our example, since we are only using one source file, the changes will indeed conflict. The process for resolving the conflict is the same as described earlier. In a scenario with multiple files, you can imagine that the suspended changes might not have conflicted with those necessary to address the critical fix. However, you may still want to suspend your in-progress work, so that you can test your critical fix independently of other changes.
Before continuing, deliver the outgoing change set for the big feature work from Marcus’ workspace but do not have Jason accept it yet. So ther should be no outgoing (or incoming) changes in Marcus’ workspace, and 1 incoming change in Jason’s workspace.
The History and Change Explorer Views
We have seen how to deliver, accept and suspend change sets, and how to examine and resolve conflicts. We performed most of these actions from the Pending Changes view. What if we want to see what happened in the past? That’s where the History view comes in.
The History view can be used to examine the history of a single file, or to look at the history of a component in a repository workspace or stream. In both cases, what is shown is a list of change sets, in reverse chronological order according to when each was added to the workspace or stream. When the history is for a whole component, the list contains all change sets in that workspace or stream affecting that component; when the history is for an individual file, the list contains only those change sets affecting that file.
- Switch back to Jason’s session.
- To see the history of a component in a repository workspace, select Show History from the context menu of the component in the workspace in either Team Artifacts or Pending Changes as shown in Figure 16.

Figure 16: Showing history on a component via the Pending Changes view.The History view opens:

Figure 17: Part of the JUnit component’s history in Jason’s workspace.From this view, you can see who created each change set, when it was created, and also when you added it to your repository workspace.
- Let’s compare this history of the JUnit component in Jason’s repository workspace with the history of the JUnit component in the stream. Go to Team Artifacts, find the stream again, expand it to see the JUnit component, and invoke Show History.
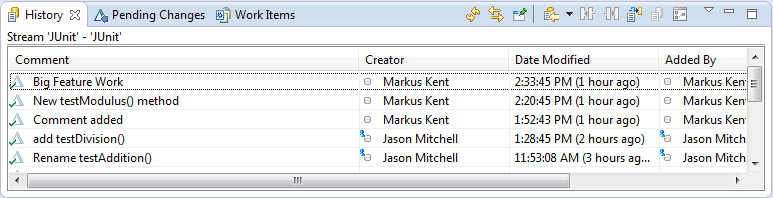
Figure 18: Part of the JUnit component’s history in the JUnit stream.Notice that the stream’s history shows a change set that Jason’s workspace history did not: namely, Marcus’ change set for his big feature work. Since Jason has not yet accepted Marcus’ change set, it is not yet in the history of his repository workspace. In fact, it is the same change set we saw above as incoming in the Pending Changes view.
- To see the history of an individual file in a repository workspace, select Show In > History from the context menu of the file in the Package Explorer, or from the context menu of an Eclipse editor open on that file. In our case, since we’ve only been working with one file, the history of the file and the history of the component will look very similar.
Now that we see all the change sets in the history, let’s take a look inside the change set associated with the work item labeled Logo doesn’t have the correct sizing on Linux to see what files were involved. It should be the third last change set in the component.
- Open it up in the Change Explorer from the context menu in the History view.

Figure 19: Open the Change Explorer from the history view. - Expand the change set. You can see the files that were modified in the change set by expanding the node labelled JUnit Examples/src/com/ibm/team/junit/examples.
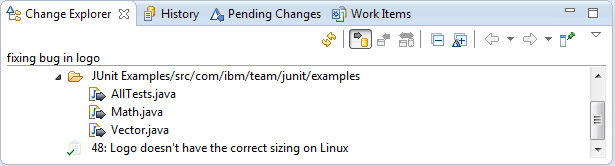
Figure 20: Change Explorer showing a change set in “Show files” mode.
Different Ways to Associate Work Items with Change Sets
The Tutorial: Exploring the Rational Team Concert JUnit example project showed how to associate an existing work item with a change set by clicking on the change set in the Pending Changes view and selecting Associate Work Item… from its context menu. RTC 3.0 users will find this action in the Related Artifacts sub-menu. This section covers some additional ways to make the association between a work item and a change set. Which method you choose will depend on what is most convenient for the context in which you’re working.
Drag-and-drop. If you have a work item open, you can associate it with a change set by dragging the work item number shown at the top of the work item to the change set in the Pending Changes view.
Create a work item on the fly. The work item to associate does not need to exist before this point. The Related Artifacts > Associate Work Item… dialog contains a Create work item… link which you can use to create a work item with the basic info filled in, as shown below:
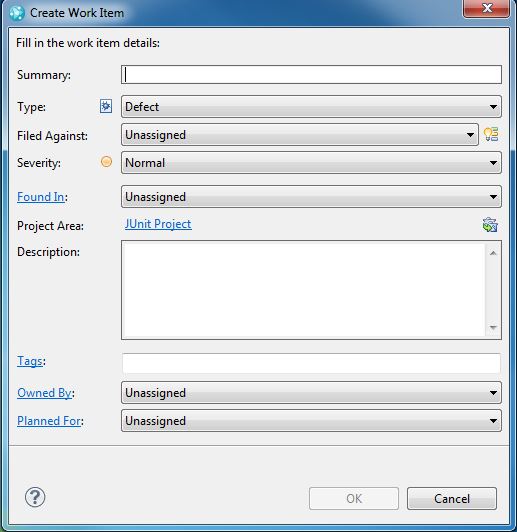
Figure 21: Work item creation dialog.Associate during Deliver. The Deliver and Resolve Work Item… operation allows you to automatically resolve the work items associated with a change set upon Deliver, but it can also be used on a change set that doesn’t have an associated work item in order to associate one right in context before the Deliver/Resolve. You can even create the work item on the fly by selecting Create a new work item from the Deliver and Resolve Work Item… dialog, allowing you to create, associate, deliver and resolve in one operation.
Associate from the Team Advisor. If your team has configured its process to check for a work item or comment before allowing Deliver operations, then any attempt you make to deliver a work item without a work item will be flagged as an error in the Team Advisor view. The view provides Quick Fix operations to help you correct the errors.
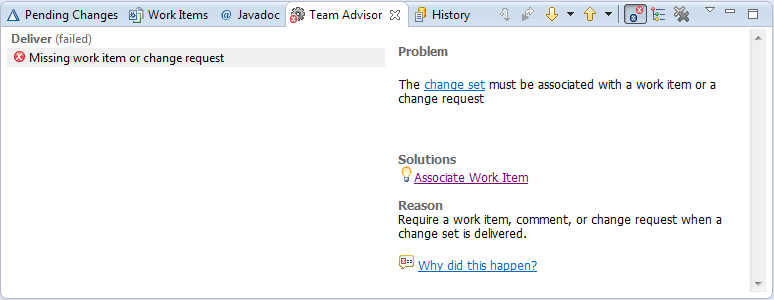
Figure 22: Team Advisor warning that a change set could not be delivered because it is missing a work item. Note the “Associate New Work Item” link.
You can remove a work item association from a change set by navigating to the work item shown under the change set node in Pending Changes, and selecting Related Artifacts > Remove… from its context menu.
Explorations in Jazz Source Control
The features demonstrated in this document barely scratches the surface of what Jazz Source Control provides. There are a number of advanced topics worthy of mentioning. We’ll touch on some of them briefly here; many are covered in more detail in Multi-Stream Development with Jazz Source Control.
Components. A repository workspace or stream can have multiple independent top-level components, each containing one or more file trees (i.e., Eclipse projects). This is used to partition a large file base, and allows each components to be worked on separately. Each component in a workspace has its own history of change sets, the accumulation of which defines a configuration of the component.
Incoming and outgoing change sets flow between workspaces and streams on a component-by-component basis, for those components that the workspace and stream have in common.
Baselines. An immutable copy of a component in a particular workspace or stream is called a baseline. A baseline represents a configuration of a component at any particular point in time. Baselines serve as fixed points of reference, and are useful both for initializing streams and workspaces that pick up from a given point of a set of components, and for sharing the changes to components at a granularity coarser than that of their individual change sets.
Baselines appear as incoming and outgoing, just like change sets do. The Pending Changes view displays the sets of change sets that comprise an incoming or outgoing baseline, and the user can also compare baselines to see the change set differences between them.
Snapshots. You can take a snapshot of your repository workspace, to give you a permanent record of what it looked like at the time. A snapshot is really just a collection of baselines, one for each component in your workspace.
Snapshots are most often used to remember important workspace configurations so that they can be recreated; for example, to reproduce an earlier build. Snapshots are remembered with the workspace or stream from which they were created.
Inter-workspace flows. A repository workspace can establish ad hoc flows with another team member and cherry pick change sets from that user’s repository workspace.
Multi-stream collaborations. A single repository workspace can collaborate with several streams, and act as intermediary that flows change sets among the streams.
Completed change sets. A user may Complete a change set to mark it as finished. Subsequent changes to the workspace must be done in a new change set. The user decides when one change set is complete, and when to start a new one. Only completed change sets may be shared with other streams and workspaces; Deliver automatically completes all change sets being delivered.
Discarding change sets. A user may Discard a change set from his workspace, either to throw away partial work that he has chosen to abandon, or to temporarily remove the change set that he accepted from a stream from his workspace; in other words, to temporarily “un-accept” it. (In this case, the change set will again show up as incoming from the stream.)