Using the Hudson build integration system with Rational Team Concert
Author: Jim D’Anjou, Jazz Jumpstart Team, IBMPublished/Updated: October 21, 2009
Build basis: Rational Team Concert 2.0/2.0.0.1
Hudson is a popular build engine. Rational Team Concert’s Build System was designed to work with most other build engines in addition to the Jazz Build Engine (JBE) included in Rational Team Concert. You can use Hudson to manage and run your builds and publish the results in Rational Team Concert with links to source control change sets and work items that were consumed by the build running on Hudson. To illustrate this the JUnit example project provided by Rational Team Concert will be built using Hudson. A working knowledge of the Rational Team Concert Eclipse IDE and its Source Control and Build System components is assumed. To learn more, see Getting Started with Setting up Jazz Builds and Building with Jazz Team Build.
Contents:
- Tour of the JUnit Project Build using Hudson
- Setting Up and Executing the Hudson JUnit Build
- How does the Hudson Rational Team Concert Build Work?
Tour of the JUnit Project build using Hudson
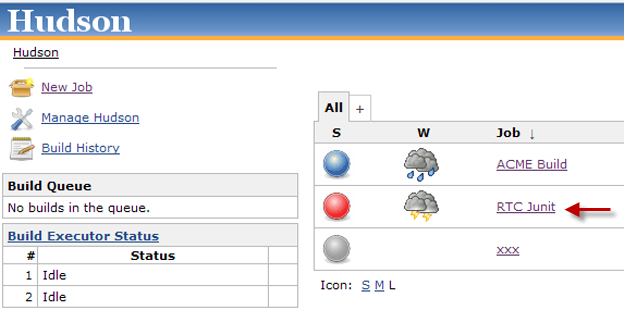
The following screen shots illustrate how this works. Lets start with the user’s perspective as a consumer of build results. A user is typically interested in the status of a running build and the published result. In this example the build will fail because of a test failure. You will see from a Rational Team Concert perspective the build result executed on Hudson looks very much like what you would expect if the build had been run using the Rational Team Concert build engine.
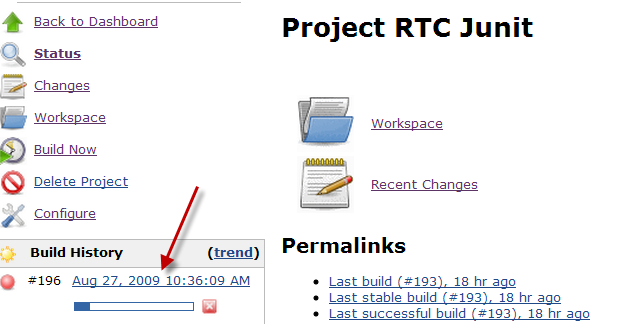
- The JUnit build is initiated from Hudson (manually or automatically) and starts running.
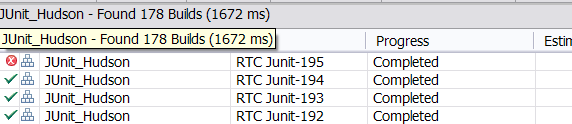
- In the meantime the status of the running build is available to Rational Team Concert users in the Builds view.

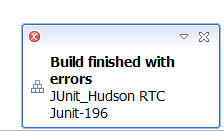
- When the build completes the view is updated and a build failure notification is available.
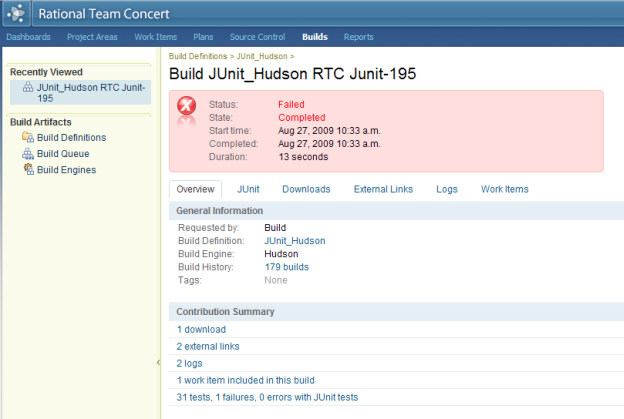
- Opening the build result in Rational Team Concert shows the following:
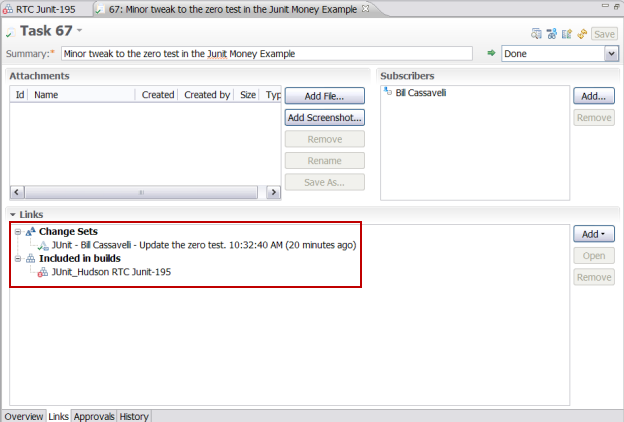
On the Overview page you can see that the build failed in the JUnit tests. The change sets and work items associated with the build are available. A separate JUnit page is available to see the details of the test failure.
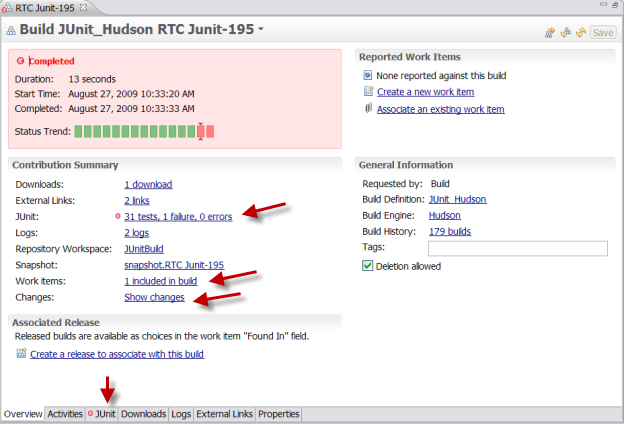
- By looking at the Links page of the work item that was included in the build you see links to the change set and build result.
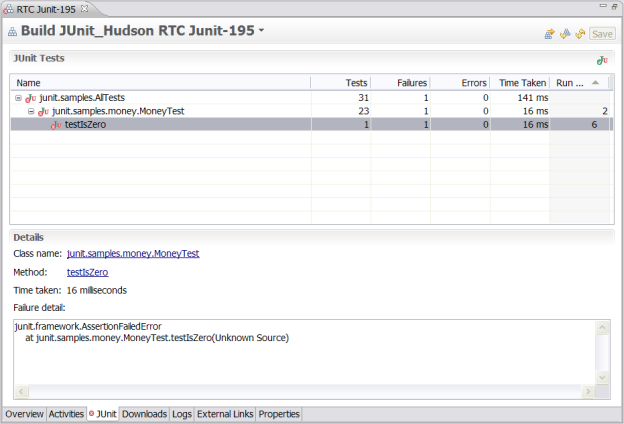
- Returning to the build result, the JUnit page reports the failing error.
- On the Downloads page the result of the build, the junit.jar, is published.

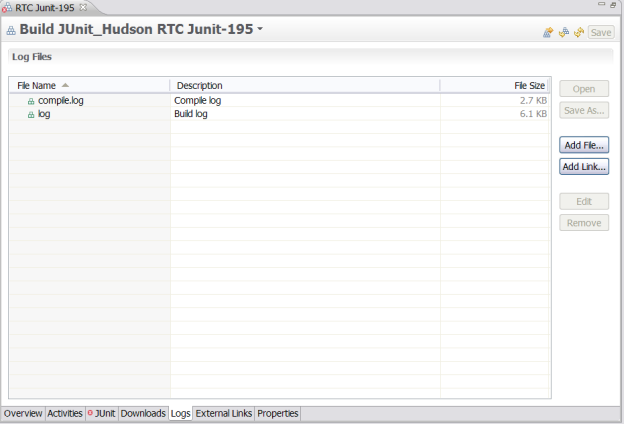
- The Logs page provides access to the build log and the compile log.
- The build result Links page provides a link to the build result produced by Hudson and a link to the build result in the Rational Team Concert web UI.
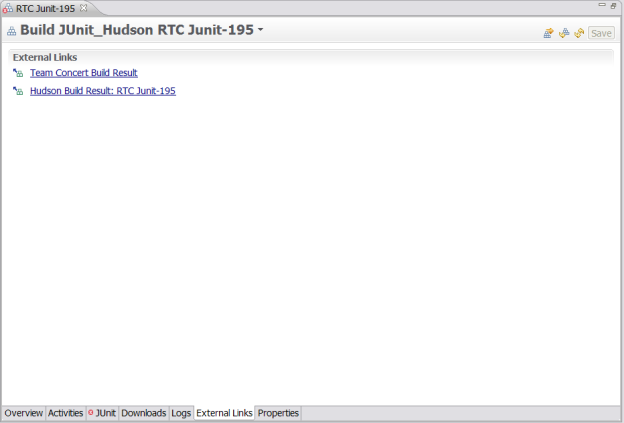
- Following the published link to Hudson shows this.
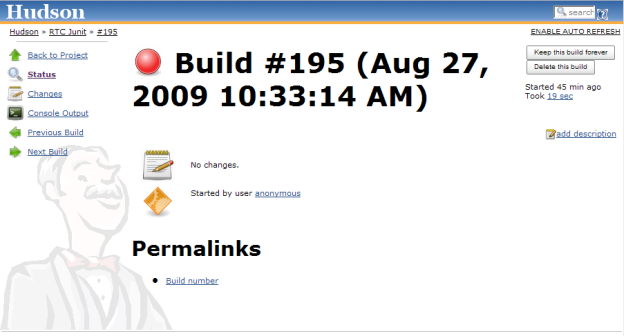
- Following the Rational Team Concert build result link shows this. Note that the Hudson build number (195) is part of the build result title.
Now you know that a build executed on Hudson can achieve the same visibility in Rational Team Concert as a build run using the Jazz Build System . This is possible because the Jazz Build toolkit, by design, provides capabilities to do everything the JBE does in your favorite build system.
Limitations
The example demonstrated in this article has the following limitations.
- Build requests cannot be requested from the Rational Team Concert build UI. All build requests must be initiated on Hudson.
- Because of the above limitation personal builds cannot be requested.
Setting up the Hudson JUnit build
To repeat what was shown in the tour, the instructions are provided here. At a high level you will do the following:
- Create the JUnit example project in Rational Team Concert.
- Download the generic Hudson build script and the JUnit application build script.
- In Rational Team Concert define a build engine for Hudson and a build definition for the Hudson JUnit build.
- Set up Hudson to run the build.
- Test the build.
The following instructions will allow you to repeat the build demonstration shown in the tour. The design is such that it is easy to adapt this to your own application builds. More on that topic is covered in How does the Hudson Rational Team Concert Build Work?.
Note that though there is no platform-specific content in the integration demonstrated, what is described in this article has been tested on Windows XP only.
Prerequisites
- A Java 1.5 or later JDK is required and the environment variable JAVA_HOME must be set to the location of the JDK.
- The build scripts are based on Ant. Ant (ant.apache.org) needs to be installed and accessible from Hudson. Your system path environment variable needs to include the Ant bin directory. You could use the version of Ant in the Rational Team Concert Build System (look for it at <Rational Team Concert install path>/jazz/buildsystem/buildengine/eclipse/plugins/org.apache.ant_<version>).
- Download Hudson and start it up. It is very easy. Open a command window. The following command will work from the directory where the hudson.war file is located. Enter: java -jar hudson.war
Create the JUnit example project in Rational Team Concert
Access to the Rational Team Concert JUnit example project is necessary. If it does not exist the project can be easily created on your Jazz Team server from the Team Concert Eclipse client using the following instructions. Make sure you have assigned user Markus a developer license and he is in the repository group JazzProjectAdmins (this is not a general requirement but in this example Markus will make modifications to the JUnit project area which requires this level of repository access). Also, add a build system license to user Build.
Download the Hudson builds scripts
There are two scripts. One is specific to Hudson and the other does the actual application build, JUnit in this case. The details will be covered later in How does the Hudson Rational Team Concert Build Work?
- Download the builds scripts zip file: RTC-hudson.zip.
- Unzip to a convenient location. They will be installed next.
Define the build to Rational Team Concert
Add the Hudson build scripts to source control
A best practice is to manage your build scripts the same way as you manage the code, in an source control system. In the JUnit Project the build scripts are in the same stream as the code (as a separate Eclipse project named releng). This also allows you to update your scripts in Rational Team Concert and have them deployed along with the code as input to the build. Let’s add the two Hudson scripts to the JUnit stream.
You should have your Jazz Team Server running, a Rational Team Concert Eclipse client running, and connected to the JUnit Project as described in the last step under Prerequisites.
In the following instructions assume you are logged in user as Markus (user/password: markus/markus).
- Switch to the Java Perspective.
- If a repository workspace for the JUnit stream does not exist, create it now.
- Load the repository workspace if not already loaded.
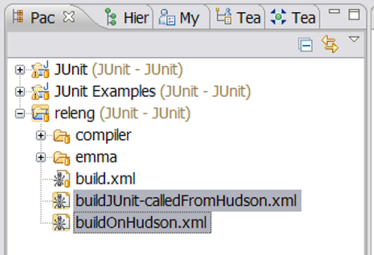
- In the Package Explorer view expand the releng project where the build script (build.xml) resides.
- Locate the two JUnit Hudson build scripts that you downloaded earlier. Copy them to the releng project so they reside adjacent the existing build.xml file (Note that script buildOnHudson.xml is not required to be here. It will be installed on the Hudson build engine later. It is suggested that you place it here to get it under source control should you make changes).
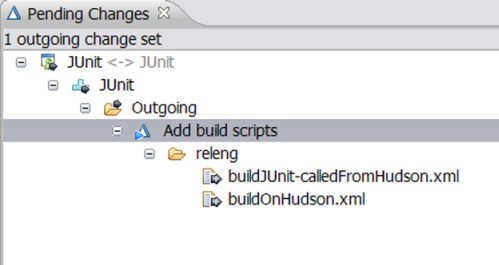
- Open the Pending Changes view and deliver your changes.
Define the Hudson JUnit build definition
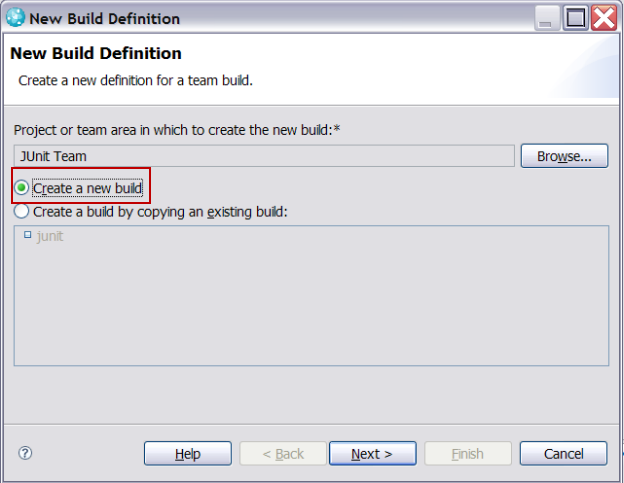
- From the Team Central view select the JUnit Project, expand the Builds, and while selecting Builds open the context menu and select New Build Definition. The New Build Definition wizard will open.
- On the New Build Definition page select Create New Build and press Next.
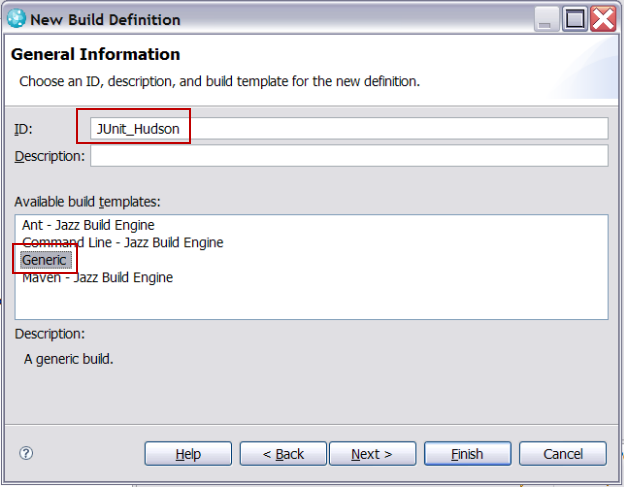
- On the General Information page select the Generic build template and press Next.
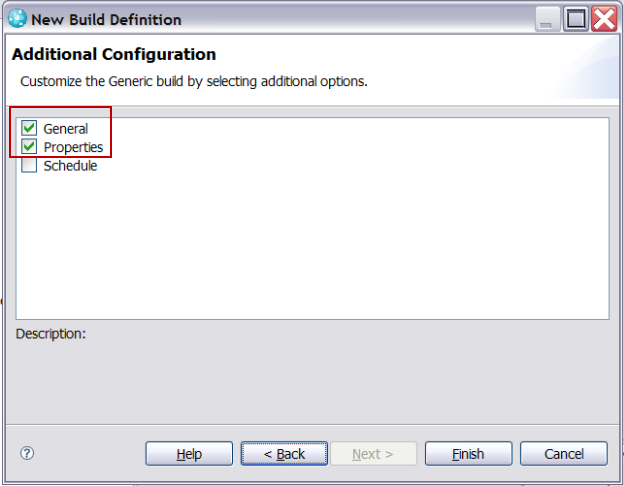
- On the Additional Configuration page select General and Properties. Press Finish.
- The Build Definition editor opens. Select the Properties tab. You will create the properties shown here. Instructions are provided below:
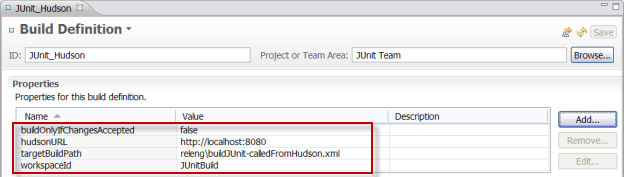
Property Descriptions:
hudsonURL: URL to support publishing of a link to build result on Hudson. (as this would be a common property for all builds run under Hudson, in Rational Team Concert 2.0.0.1 or later this property can be defined in the build engine).
targetBuildPath: path to the application build script. It is assumed to be a relative path in the Hudson job’s workspace. In this example the application build script is comes from the repository workspace of the build user so it can be managed under source control with the rest of the application. Enter the value: relengbuildJUnit-calledFromHudson.xml
workspaceID: UUID of the repository workspace used by the build (specific instructions provided below).
buildOnlyIfChangesAccepted: When set to true then an the application build is not called unless there are changes in the application stream since the previous build.
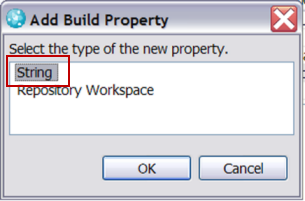
- With the exception of property workspaceId, to create these properties select the Add button and choose the String option. Set the name and value as shown above.
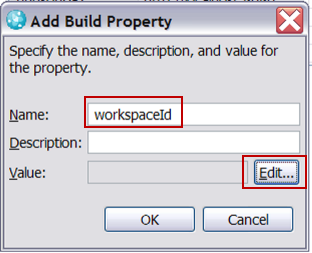
- For property workspaceId chose Repository Workspace in the Add Build Property dialog shown above. In the dialog enter the name as shown below and select Edit to choose the repository workspace defined for the build (this workspace may have been automatically created for you when the JUnit Project was created along with an anonymous user named Build. Normally, you would define the build user and it repository workspace yourself).
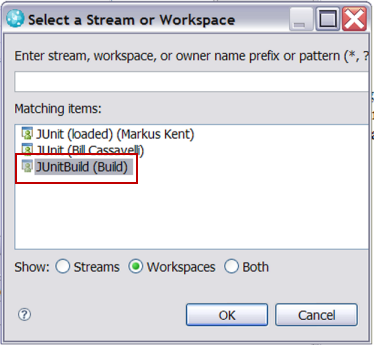
- After clicking the Edit button, select repository workspace JUnitBuild(Build). Click OK. This will associate the unique id (UUID) of the repository workspace. Click OK to close the dialog.
- With the exception of property workspaceId, to create these properties select the Add button and choose the String option. Set the name and value as shown above.
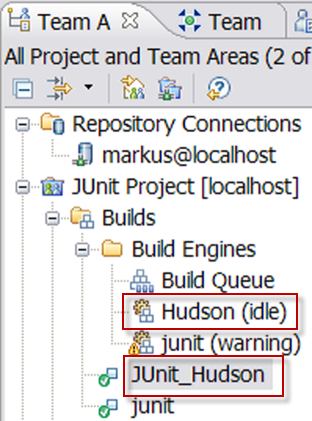
- Create a Rational Team Concert build engine to support this build. Even though Hudson is the real build engine, a Rational Team Concert build engine definition is required. It is easy to do.
- Return to the Overview tab of the build definition.
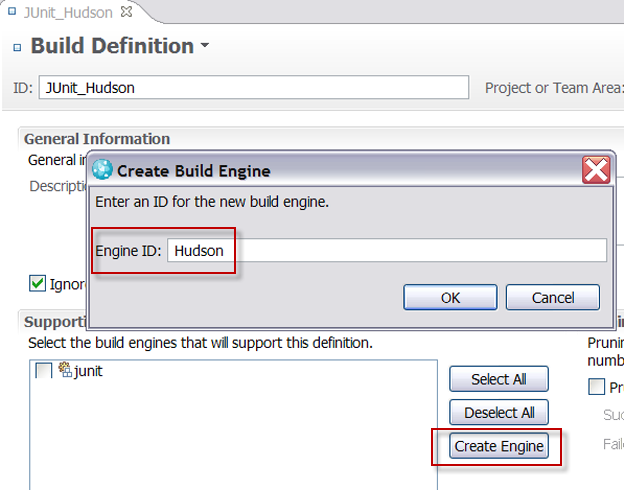
- In the panel labeled Supporting Build Engines click the Create Engine button.
- In the dialog enter Hudson and click OK.
If you are running on Rational Team Concert 2.0.0.1 or later the property hudsonURL can be defined in the build engine instead of the build definition.
- Save the build definition using the Save button. In the Team Artifacts view the build definition and supporting engine should be visible.
- In this example the predefined user Build will make build requests to Rational Team Concert from Hudson. In the JUnit Project the build user does not have permission to make requests. You will need to provide that permission by updating the project area for the JUnit Project.
- From the Team Artifacts view, select the JUnit Project, right-click, and select context menu Open. The project area editor will open.
- Select the Process Configuration page.
- In the Configuration panel on the left, expand Team Configuration, and select Permissions.
- In the Roles box of the Permissions panel select role Everyone(default).
- In the Permitted actions box scroll down so that the operation Request Build (server) is visible. Check it.

- Save the project area.
What has been described here is a simple circumvention. If you require a more precise way to give permission to the user assigned to Hudson builds you might create a unique role for this operation, and add the build user to the project area with this role. See this article to learn more about process configuration: Getting Started with Project Areas and Process in Rational Team Concert 2.0
Everything on the Rational Team Concert side is now complete.
Define the build to Hudson
- Hudson should be installed and running. Open up the Hudson web UI (if running locally use this URL http://localhost:8080 in a web browser).
- From the Hudson web console select New Job, enter the a job name RTC JUnit, and select the job type: Build a free-style software project.
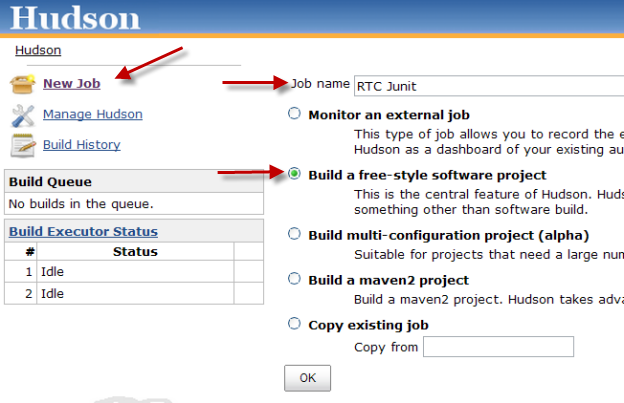
- Press OK. The job configuration page will be displayed.

- In the Build section select the button Add build step and from the drop down select Invoke Ant.
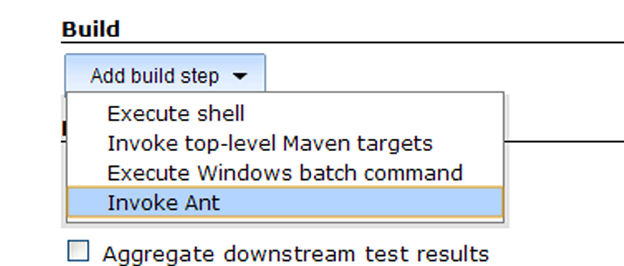
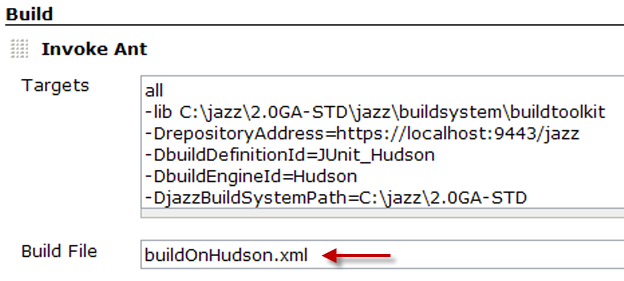
- Expand the Targets field and insert the following information:
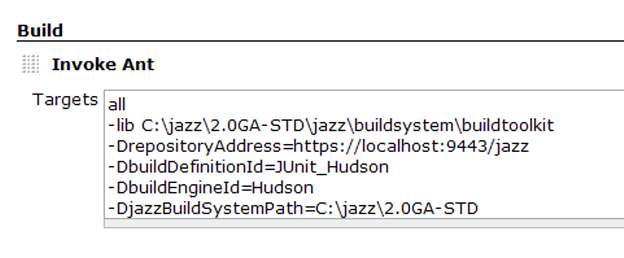
Information Definitions:
- Target name: all
- Path to Jazz Build System toolkit: -lib <installpath>/jazz/buildsystem/buildtoolkit
- Properties used by the build script:
- Repository address: -DrepositoryAddress=https://<Jazz team server>:9443/jazz
- Rational Team Concert build definition: -DbuildDefinitionId=JUnit_Hudson
- Rational Team Concert build engine: -DbuildEngineId=Hudson
- Rational Team Concert client install path for the Jazz Build System: -DjazzBuildSystemPath=<RTC install path i.e. C:jazz>
- Select the Advanced button below the Targets field. It will expand. Enter the name of the build script.
- Scroll to the bottom of the page and click on Save. You will see the build job status page for this new job.

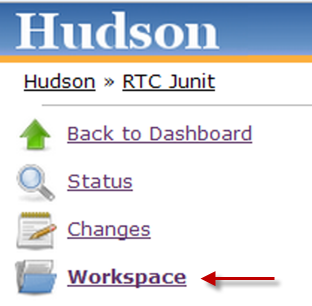
- Click Workspace.
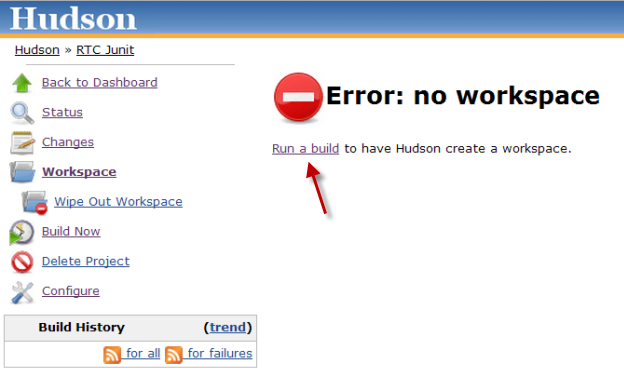
Since no workspace exists it will fail. Select Run a build to create the workspace.
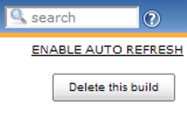
- This build will fail but will initialize the workspace. Open the failed build where you delete this build result. See the Delete button in the upper right corner.
- Add the build script (buildOnHudson.xml) to the Hudson workspace for the Rational Team Concert JUnit job using the file system.
On Windows the workspace path is: C:Documents and Settings<user id>.hudsonjobsRTC JUnitworkspace
- This completes the setup.
Testing the build
- Go to the Hudson build console and select the RTC JUnit build.
- On the build job page select Build Now.

- If all as gone well you the build should be successful. You can explore the results using the Tour of the JUnit Project Build using Hudson as a reference.
How does the Hudson Rational Team Concert build work?
As stated earlier the approach is to use two build scripts. One (buildOnHudson.xml) performs all the common activities applicable to all builds (initiate a build request to Rational Team Concert to establish communication, accept any changes to the application code stream since the last build, retrieve the application build content, and publish links to the completed build). It calls the application build (buildJUnit-calledFromHudson.xml in this example) to build the application. Both scripts are making calls to Rational Team Concert’s build system to retrieve or publish information.
Let’s cover this in some detail. We’ll start with the buildOnHudson.xml. Only selected portions of the script will be discussed.
- When a Hudson build is initiated this Ant script is started.
- The first important task is to contact the Rational Team Concert Jazz Team Server and communicate that a build is starting. The startTeamBuild task does this. In return it gets back build a result id (as a UUID) that will be referenced in all future communications until the build completes. This build result id becomes the root of everything that is published about the build by Rational Team Concert and is referenced as property buildResultUUID.
<startTeamBuild buildDefinitionId="${buildDefinitionId}"
	engineId="${buildEngineId}"
	label="${buildDefinitionId} ${hudsonBuildLabel}"
	autoComplete="false"
resultUUIDProperty="buildResultUUID" repositoryAddress="${repositoryAddress}" userId="${userId}" password="${password}"/> - The next key activity is to make the build user’s repository workspace current with the application code stream using the teamAccept task. The key information here is the id of the build workspace that was communicated using the property workspaceId in the Rational Team Concert build definition.
<teamAccept repositoryAddress="${repositoryAddress}"
	userId="${userId}"
	password="${password}"
	workspaceUUID="${workspaceId}"
	changeSetFile="changeSets.txt"
	snapshotName="snapshot.${hudsonBuildLabel}"
	buildResultUUID="${buildResultUUID}"
	changesAcceptedProperty="changesAccepted"
verbose="true" /> - Now the application code can be transferred to Hudson from the repository workspace in Rational Team Concert. The teamFetch task does this for us. The key information is the destination attribute in the task. In this implementation this translates to the relative path <Hudson Job workspace path>/working-dir.
<teamFetch repositoryAddress="${repositoryAddress}"
	userId="${userId}"
	password="${password}"
	workspaceUUID="${workspaceId}"
destination="${workingDir}" buildResultUUID="${buildResultUUID}" verbose="true" /> - If any of the change sets that are new to this build have work items associated with them they can be acquired using the workItemPublisher task. The results are published in a working file named in attribute filepath. This working file is used by Rational Team Concert.
<workItemPublisher buildResultUUID="${buildResultUUID}"
	repositoryAddress="${repositoryAddress}"
	userId="${userId}"
	password="${password}"
	verbose="true"
filePath="changeSets.txt" /> - Everything is now ready to run the build. A call to the application build script can now be done. The targetBuildPath property defined in the Rational Team Concert build definition communicates this. In our JUnit example the value of this property is releng/buildJUnit-calledFromHudson.xml which was transferred to Hudson from Rational Team Concert in the prior teamFetch task. Note that the build script has a dependency on the application build script to communicate if the build was successful or not. There are different ways to do this. In this implementation the application build creates a zero length file (using the Ant touch task) named appBuildErrors if there were build problems.
<target name="callRequestedBuild" depends="fetchCode" if="fetchActivityId"
	<echo message="Transferring to target build script: ${workingDir}/${targetBuildPath}" />
<ant antfile="${workingDir}/${targetBuildPath}" /> </target> - The build is complete. The URL links to the Hudson build result and the Rational Team Concert version of that result are published using the linkPublisher task. What is notable here is that the link to the Hudson build result is a combination of the Hudson URL passed in as a Rational Team Concert build property and the env.JOB_NAME and env.BUILD_NUMBER properties provided by Hudson.
<linkPublisher buildResultUUID="${buildResultUUID}"
verbose="true"
label="Rational Team Concert Build Result"
url="${repositoryAddress}/web/projects/JUnit%20Project#action=com.ibm.team.build.viewResult&id=${buildResultUUID}"
repositoryAddress="${repositoryAddress}"
userId="${userId}"
password="${password}" />
<linkPublisher buildResultUUID="${buildResultUUID}"
verbose="true"
label="Hudson Build Result: ${hudsonBuildLabel}"
url="${hudsonURL}/job/${env.JOB_NAME}/${env.BUILD_NUMBER}"
repositoryAddress="${repositoryAddress}"
userId="${userId}"
password="${password}" /> - The Hudson build log is published to Rational Team Concert using the logPublisher task.
<logPublisher filePath="../builds/${env.BUILD_ID}/log"
	label="Build log"
	buildResultUUID="${buildResultUUID}"
	repositoryAddress="${repositoryAddress}"
	userId="${userId}"
password="${password}"/> - The build is finished and is communicated to Rational Team Concert using the completeTeamBuild task. This notifies Rational Team Concert that the build is done and the build result is complete. The status attribute is either OK or ERROR depending on the success or failure of the build.
<completeTeamBuild status="${status}" buildResultUUID="${buildResultUUID}" repositoryAddress="${repositoryAddress}" userId="${userId}" password="${password}" verbose="true" />
<target name="checkCompile" if="compileError">
	<touch file="appBuildErrors" />
	<echo message="JUnit compilation error." />
</target>
Screenshots of Hudson are Copyright (c) 2004-2009 Kohsuke Kawaguchi, Sun Microsystems, Inc., and a number of other of contributors.