Effective Planning with Rational Team Concert 2.0
Summary
The plan editor assists you in planning and executing product releases as well as development sprints. By default, the plan editor has two pages: an Overview page and a Planned Items page. While the former allows capturing unstructured information using wiki-style text, the latter allows creating and managing work items. This article focuses on the Planned Items page and best practices when working with it.
Terminology
This document assumes that a Scrum based project exists. Therefore some concepts and terms described in this document are specific to Scrum and might not be available in projects based on process templates other than Scrum.
General Information
In the plan editor‘s header you can find the team area and iteration the plan is configured for. Further, the number of open and closed work items is shown. On the right side, a progress bar shows the plan’s current overall progress. Add a new work item or change an existing one to see it update in response.

Working with the Planned Items
By creating a plan for a specific team area and iteration, a set of work items -depending on the Plan Type– is implicitly selected from the repository. These work items are loaded and displayed in the Planned Items page when opening a plan. Every work item is represented as a row showing a concise summary which allows for a quick overview and in-place editing.

The Planned Items page provides different views -so-called plan modes. The active plan mode can be selected in the View As section in the side bar on the right side. Depending on the active plan mode, selected attributes of each work item are shown, work items are automatically integrated into logical groups, the parent-child relations are outlined, sorting is applied, and work items deserving special attention are highlighted.
Furthermore, some plan modes define filters, therefore not all work items might be shown on the plan. This typically applies to plan modes that focus on the work ahead, such as the Backlog, and resolved work items.
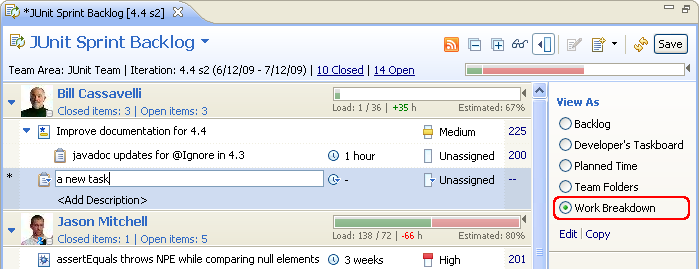
However, sometimes the opposite is true as well: Work items integrated into logical groups are shown more than once on a plan if a parent work item does not belong to the same logical group as one of its children. Each work item is assigned to exactly one group, its primary group, where it is normally shown. All other occurrences of that work item are shown grayed out and decorated with an arrow icon in the leftmost column in order to indicate that this is not the work items primary group. Hover over the icon to see why this is the case.
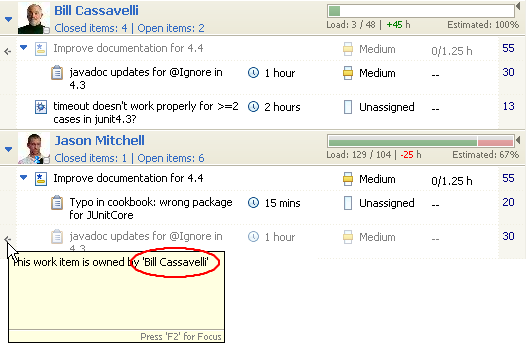
In the example above, the work items with the IDs 30 and 55 (visible in the rightmost column) are shown twice. This is because work item 30 is a child of work item 55 and – due to different owners – both belong to a different primary group.
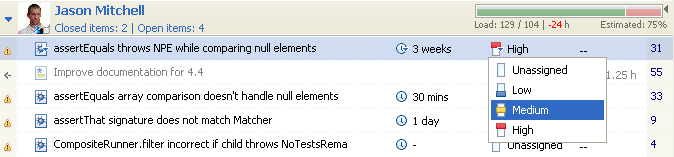
The plan editor also allows modifying most attributes in-place, e.g. select on the priority icon to see a menu allowing you to choose a new value.
Tip: The work items summary can be edited by selecting Edit Summary in the context menu or by pressing Alt-Enter.
Tip: Use the context menu to change additional properties, such as the category, tags or the iteration the work item is planned for.
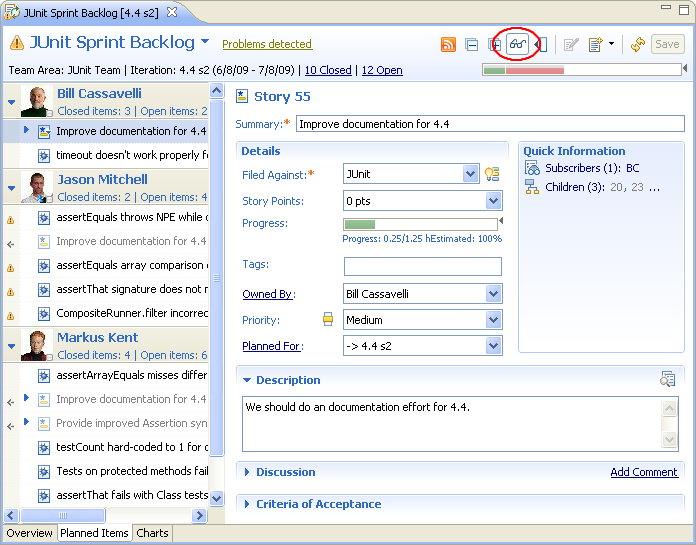
Properties of a work item not shown in-line, such as the description, can be viewed and edited by enabling the Preview Mode. It splits the editor horizontally and shows the contents of the currently selected work item in the right pane.
Alternatively, you can open the work item in the Work Item editor at any time. To do so use your system’s default open gesture, such as double-click, pressing Enter while the work item is selected, or selecting the work item id.
Work items modified within the plan editor are decorated with an asterisk. When saving a plan, all modified work items will be saved. Changes to a single work item can be made undone using the Revert Work Item action in the context menu.

Tip: To review the changes before saving, enable the Unchanged Items filter.
Note: While modifications to work items can be made at any time, you can only save the changes the process specification allows you to.
By using drag & drop or the respective actions available in the Edit menu, work items can be moved within the plan. Depending on the active plan mode, this modifies the respective work item’s attributes, changes the parent children relationship and so on. For example, moving work items in a Sprint Backlog plan’s Work Breakdown to a different owner group changes the Owned By attribute of the work item. Likewise, when moving a work item up or down while the Backlog plan mode is active, changes are applied to the work item's Priority attribute.
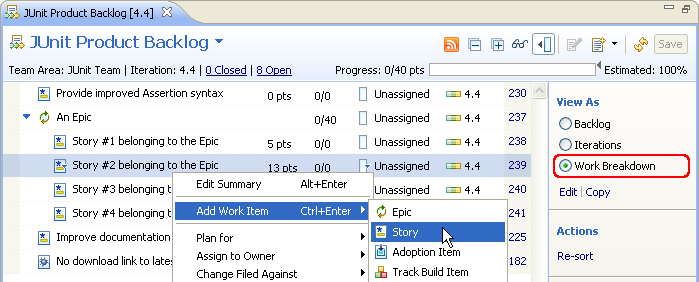
The Planned Items page is the perfect place to create a lot of work items at a time. To write down individual tasks, select a suitable work item type from the Add Work Item context menu, or press Ctrl-Enter.
Note: Newly created work items will, at least, inherit the team area and iteration from the plan.
Tip: The Add Work Item menu is also available via the Edit menu. When using this menu, you’ll note a Set Default… entry. This allows you to specify the work item type used when creating entries with Ctrl-Enter.
Potential Plan Problems
While working with plans, potential problems are detected and annotated. These problems include, but are not limited to, missing attribute values, missed deadlines and work items that probably won’t be completed in a sprint.

Release Planning
When planning a product release, product owners execute a top-down approach by writing down epics and stories, then assigning the stories to the individual sprints to be implemented.
The complexity of these plan items is measured using an abstract size, pre-configured as Story Points. Among other things, this complexity information is used to roll up the complexity of higher level plan items and to calculate the overall progress information during the executing of a product release iteration.
Note: The Product Backlog and the Team Backlog only differ by the fact that the former includes the plan items of all child teams, while the latter includes the plan items of the selected team only.
A product owner creates a Product Backlog plan per release, targeted on the release iteration and the project area or the parent team area of all participating teams.
The Planned Items page of Product Backlog and Team Backlog plans offer three predefined plan modes, each designed to assist in common release planning tasks:
Work Breakdown
The Work Breakdown plan mode is the perfect place to sketch and write down epics and stories planned for the product release, as well as to define the plan item's complexity.
The parent-child links between work items are outlined as the plan's tree structure, therefore allowing easily changing this relationship by promoting and demoting work items. Additionally, the complexity values of child work items are automatically rolled up to the parent.
The work items are sorted by their respective rank, which allows defining the relative priority of the work items while writing down the plan items. More information about the rank can be found in the Backlog section below.
Note: Whenever work items are sorted by their rank, the relative sort order applies to all other plan modes and even plans. For example, whenever a work item is ranked higher than another, it will always be shown before the other work item – provided that the two work items are shown as siblings – regardless of the plan or plan mode you are looking at.
Tip: Use Ctrl-Enter to quickly create work items, Alt-Up and Alt-Down to change the rank of a work item among its siblings and Tab respectively Shift-Tab to demote respectively promote them.
Tip: Mouse users can use the context menu to create work items, drag and drop them between existing items to rank. In order to demote and promote work items using the mouse, drag and drop work items on the new parent work item.
Backlog
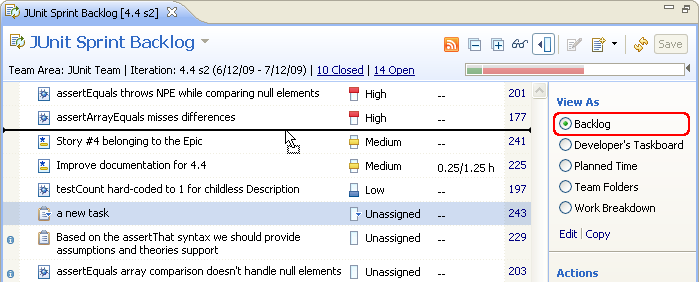
The Backlog plan mode facilities the ranking of all unresolved work items, that is to define an order describing the relative priority among the work items shown. While the ranking information is the same as in the Work Breakdown plan mode, the Backlog displays all work items as a flat list, omitting the parent-child links. This allows defining a ranking among all items on the plan, not only the ones with the same direct parent work item.
Similar to the Work Breakdown, each plan item’s complexity and rolled up progress are shown.

Tip: Use the same mouse and keyboard gestures to edit the plan as in the Work Breakdown mode. Note that in this mode, the parent-child links cannot be changed.
Note: The Priority attribute is used as a coarse grained ranking value only. Each work item can be assigned to a relative position among the visible sibling work items of the same priority.
Note: Work items that were assigned a new priority outside of the plan editor are shown at the end of the respective priority group. In this case, the leftmost column is decorated with an information icon in order to indicate that the work item’s rank was is not yet set.
Iterations
After the plan items are created, estimated and ranked, the Iterations plan mode helps to distribute and plan the stories for the sprints.
While the plan items are shown – similar to the Backlog – as a flat list sorted by the work item’s rank, they are now integrated in logical groups, depending on each plan item’s Planned For attribute. Additionally, all execution items are excluded from the view by default.

Tip: Use drag & drop to easily reassign one or more plan item to a sprint. Drop the plan items on the iteration group to preserve the previously defined rank or drop it to a specific position if the rank needs to be re-adjusted.
Sprint Planning
Prior to the execution of every sprint, each team creates its own Sprint Backlog plan.
Plans of this type contain all execution items and stories planned for the sprint. In contrast to release plan types, sprint plans require the work items to be estimated in working hours. Based on the estimates, progress and work load information is calculated.
Tip: If your plans track similar information for each sprint using attached pages, you can always duplicate a previous plan rather than creating a new one from scratch. The attached pages copied can be used as a template.
When opened for the first time, only work items with the Planned For attribute set to the respective sprint and owned by the team are shown. Normally, these work items include the stories previously assigned to the sprint using the Product Backlog plan.
Tip: Use the Show Backlog link in the sidebar of the plan editor to query the repository for not yet planned work items of your team. Drag & drop work items to be included to the current sprint plan.
Work Breakdown
The Sprint Backlog's Work Breakdown plan mode is similar to the one found in the release plans, except that work items are integrated in groups by their respective owners and sorted by priority rather than by rank.
Exactly as for release plans, the Work Breakdown plan mode is the perfect place to create and estimate the task work items implementing the stories.
Note: Each team member's work load is shown on the right side of the respective group element. For more information read Progress Bars, Load Bars, and the importance of estimating your work.
Note: This plan mode is sorted by Priority rather than by Rank, therefore neither the priority nor the rank is updated when moving work items. In fact, you can restore the original sort order at any time by pressing the Re-sort link in the sidebar of the plan editor.
Backlog
The Backlog plan mode of Sprint Backlog plans allows prioritizing all work items planned for the sprint exactly as it is possible in the release plans.
Developer's Taskboard
The Developer's Taskboard plan mode is the best place for the daily scrum. A taskboard is shown per team member, where each row represents a story the developer is working on. The story itself is shown in the first column, while the subsequent columns represent the work item states of the implementing tasks, namely Todo, In Progress and Done. Additionally, the work items shown in the taskboard are colored accordingly to the work item's type.
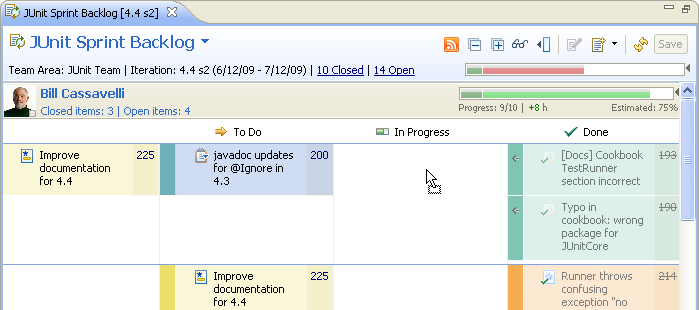
Tip: To change the state of a work item, simply drag it to another column in the same row.
Note: Each team member's work progress is shown on the right side of the respective group element. For more information read Progress Bars, Load Bars, and the importance of estimating your work.
Planned Time
The Planned Time plan mode offers a view on each developer's personal plan, as managed in the My Work view. Each team members work items are shown in the same sequence as defined in the My Work view and grouped by the projected work start.
Additionally, the absences of all team members are shown in-line with the plan.

Note: Not only is the plan updated with changes made in the My Work view, but changing the sequence of the work items updates the My Work view of the work item owner as well.
Note: Read Using the My Work view to learn more about scheduling work items.
Team Folders
The Team Folders plan mode allows creating arbitrary folders and assigning work items to them. Initially, each new plan contains two folders: Top Items and Defects & Enhancements. Work items will be automatically assigned to one of these folders, unless the assignment is manually changed. Work items whose type is defined to be a Top-Level Work Item Type show up in the Top Items folder, all others reside in the Defects & Enhancements folder.

Note: This plan mode corresponds to the Folder group mode and User Defined Order sort mode of Rational Team Concert 1.0. If you used to manage your work items this way, the folders, work item assignments and the sort order are accessible using this plan mode.
Note: The folders, the sort order and folder assignment of the work items are private to the plan. Consequently, on different plans work items can be assigned to different folders.
To create custom folders, open the context menu on an existing group and select Add… from the Folders menu. Folders can be rearranged, using the Edit > Move Up (Alt-Arrow Up) and Edit > Move Down (Alt-Arrow Down) actions, as well as, demoted and promoted to create a hierarchical structure. Additionally, custom folders can be deleted again.
Note: The two default folders can not be deleted but only renamed. Work items added to the plan but not explicitly assigned to a folder are assigned to the Defects & Enhancements folder.
Tip: To use the same folders in a different plan, duplicate the plan rather than creating a new one.
Validate a Sprint Backlog Plan
Throughout the plan editor, work load and progress bars indicate the current state of the plan. They are based on many different aspects of a plan, as described in Progress Bars, Load Bars, and the importance of estimating your work. However, each work item must be estimate using a simple duration, leaving no place for uncertainty.
The Standard and Enterprise editions of Rational Team Concert can simulate the probability of completion for each work item on a plan, considering additional minimal and maximal estimates rather than just the already existing nominal estimate.
While individual developers can access the simulation via the My Work view, teams can assess the schedule risk for a sprint backlog by creating a Schedule Risk Assessed Sprint Backlog plan.
The plan includes exactly the same work items as a Sprint Backlog plan offers only one plan mode, labeled Schedule Risk. It is similar to the Planned Time plan mode of Sprint Backlog plans but allows modifying the minimal and maximal estimates as well.
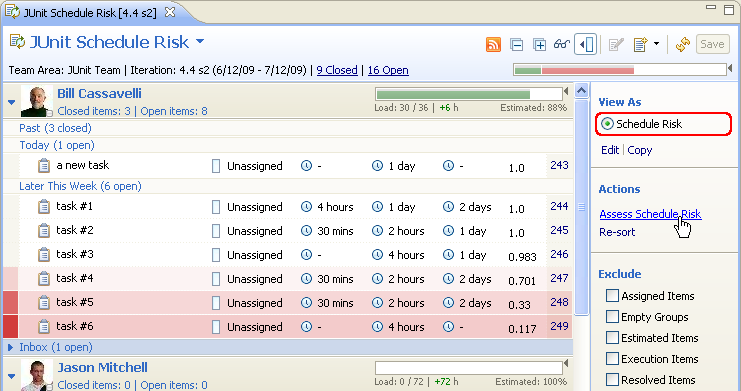
As soon as the plan is loaded, the simulation is started. Depending on the number of work items included in the plan, this could take a few minutes. Once the simulation is completed, work items are colored accordingly to the calculated probability of completion: a color gradient from white to red indicates very probable to won't happen.
Note: The computed, numerical result of the simulation is shown as the last column. Subsequent simulation runs might produce slightly different results, this is expected.
Tip: To re-run the simulation in the Eclipse client, select the Assess Schedule Risk link in the sidebar of the plan editor. To re-run the simulation in the Web client, select the Refresh button in the header of the plan editor.
Advanced Operations
Quick-Find, -Filter and -Colorize Work Items
The Planned Items page also offers three different ways to quickly find work items within the Planned Items page. Select Find/Replace from the Edit menu, or press Ctrl+F to activate filters.

Find: The first work item matching the expression relative to the current selection will be selected. Navigate all matching work items using the Next/Previous actions. This option is best used when looking for a specific work item.
Filter: Only work items matching the expression will be shown. Use this option to only display a set of work items which match the expression.
Colorize: Work items matching the expression will be highlighted with the selected color. This option allows you to spot multiple matching work items while non-matches are still visible.
The expression used to match the work items must be entered in the text field. It consists of one or multiple words, separated by white space. Work items which contain the words in their summary or description will match.
To refine the expressions, you can specify values of attributes by using the syntax:
attribute operator valueFor example,
type:Defectmatches defects only,
estimate>8matches work items with an estimate set to more than eight hours. Type
creator:"Jason Mitchell" priority:High assertto match high priority work items created by Jason which contain the word "assert" in either the summary or the description.
Tip: Use the content assist (Ctrl+Space) to display all available attributes.
Managing Plan Modes
Rational Team Concert comes with predefined plan modes for each process template. This supports the best planning practices depending on the development process you are using. However, to support your very specify needs, you can always modify the predefined plan modes or create additional ones.
Plan modes are made out of a series of settings that define their layout and behavior. Editing these settings instantly changes the active plan mode, allowing to instantly previewing them.
Simply select the Edit or Copy link in the View As section of the side bar to open the plan mode editor.

Note: Newly created plan modes are private to the team and specific to the plan type. For information on how to promote a plan mode for the use by other teams, read Customizing Planning.

Style
The Style options define the structure of the plan:
- Flat: The work items are shown as a flat list, regardless of parent-child links between work items.
- Tree: The parent-child links between work items are outlined as the plan's tree structure, therefore allowing changing this relationship by promoting and demoting work items.
- Taskboard: Work items are shown in a table, where each row represents a parent work item. The respective parent work item is shown in the first column, while the subsequent columns show the child work items, depending on their workflow state, either in the Todo, In Progress or Done column.
Note: The Rank style exists for legacy purposes only; it behaves the same as the Flat style.
Grouping
Change the Grouping option to integrate work items, based on a specific attribute, into logical groups.
- None: Work items are not grouped together.
- Category: Work items are grouped accordingly to their Filed Against attribute.
- Iteration: Work items are grouped based on their respective Planned For attribute.
Tip: This grouping is best used with plans of the type Product Backlog or Team Backlog, as these include work items of multiple iterations only.
- Owner: All team members are represented by a group; the work items are assigned to them accordingly to their Owned by attribute. Groups for contributors not belonging to the team are shown as necessary
- Priority: The work items are grouped based on their Priority attribute.
- Tags: Work items are grouped based on their Tags attribute. Work items with no tags set are assigned to the No tags specified group.
Note: This grouping considers the first tag of each work item only.
- Teams: Work items are grouped by the team owning them. The team membership is determined by considering the Planned For and Filed Against attribute of each work item.
Tip: This grouping is best used with plans of the type Product Backlog or Scrum of Scrums, as these include work items of multiple teams only.
- Planned Time: Work items are grouped by team members and the projected start work time, as seen in the My Work view.
- Folder: Use this grouping to create custom folders; Work items can be assigned manually to them.
More information about this grouping can be found in the Folder plan mode description.Note: This grouping corresponds to the Folder group mode of Rational Team Concert 1.0.
Tip: You can define multiple plan modes using this grouping; the folders as well as the assignment of the work items to them are private to each plan and plan mode.
Sorting
The ordering of the work items is based on the Sorting selection. The available sorting options can be divided in two categories: firstly, sort options applied when switching the plan mode or manually by clicking the Re-sort only. Changes to the sort order, by moving work items either using drag and drop or the respective actions in the Edit menu, are not persisted. Thus the original order is restored every time the plan is re-opened. The Creation Date, Estimate, Priority as well as all custom sort options belong to this category.
Note: For information on custom sort options, read Customizing Planning.
Secondly, the changes to the work item ordering are persisted when using the following sort options:
- The Ranking sorting allows specifying a complete ordering among the visible work items. Usually, this functionality is used to prioritize the outstanding work while planning. While the exact ordering is not visible but relative to other work items only, a coarse-grained value is reflected on each work item using an enumeration attribute, by default each work item’s Priority.
More information about this sorting can be found in the Backlog plan mode description.Note: Each work item’s relative sort order information is stored together with the respective work item, therefore is applied in all plans and plan modes where the work item is visible.
Tip: To learn how to change the attribute used as a coarse grained ranking value, read Customizing Planning.
- The User Defined sorting can be used to store the work item’s order private to the plan and the active plan mode only.
Note: This sort option corresponds to the User Defined Order sort mode of Rational Team Concert 1.0.
Tip: You can define multiple plan modes using this sorting; the sorting is private to each plan and plan mode.
- Using the Planned Time sorting applies the same ordering as found in each contributor’s My Work view. Moving work items re-schedules them.
Filters
By activating Filters, work items matching the respective criteria won’t be shown in the plan. However, aggregated information such as each group’s work item counts and the progress information are not affected by active filters.
- Assigned Items: Excludes work items with the Owned by value set to a contributor rather than Unassigned.
- Empty Groups: Hides default groups on a plan if no work items belonging to them are visible.
- Estimated Items: Excludes work items with an estimate specified.
- Execution Items: Excludes work items of a type other than the Top-Level Work Item Types.
- Resolved Items: Work items whose workflow state is Resolved are excluded
- Unchanged Items: Work items with no unsaved changes are excluded from the view.
Tip: Use this filter temporarily only by activating it in the sidebar. This allows reviewing all changes before saving a plan easily.
Bars
When Grouping by Owner or Planned Time is active, this section allows defining whether Progress or Load bars should be shown for each team member. For groupings other than the ones mentioned above, Progress bars are shown.
View Layout
This tab allows defining the work item attributes visible on the plan.

Colorize
The Colorize tab allows adding multiple colorize configurations, similar to the Quick Colorize functionality introduced above. The colors are applied to the work items matching the expression whenever the plan mode is active.
Read the Quick Colorize section for information about the expression syntax.
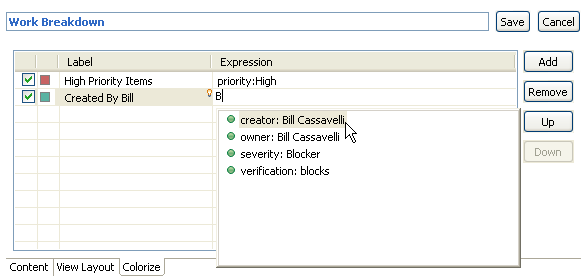
Note: Colorize configurations higher up in the list take precedence over the ones further down. Use the Up and Down buttons to change the colorize rule priority.
Tip: To disable a colorize rule without deleting it, uncheck the checkbox in the first column.
Customizing the Agile Planning Tools
While Rational Team Concert comes with pre-configured support for many processes, most aspects of the Agile Planning Tools can be configured. Read the Customizing Planning article to learn more.