Importing ClearCase/ClearQuest Unified Change Management into Rational Team Concert 3.x
IBM Rational ClearCase (CC) and ClearQuest (CQ) can be tightly integrated to provide an environment that supports activity-based Software Configuration Management, otherwise known as Unified Change Management (UCM). When Rational Team Team Concert (RTC) is introduced into such an environment, it is sometimes desirable for a subset of the teams or projects to import their CC and CQ artifacts into RTC to enhance their SCM experience and take advantage of RTCs other features such as build management and planning. For a more detailed explanation of how CC and CQ concepts relate to RTC concepts see “Comparing concepts between ClearCase UCM and RTC” and “Comparing concepts between ClearQuest and RTC“.
This article provides guidance on how to configure the ClearQuest Synchronizer Import tool and ClearCase Importer such that existing CQ UCM activities can be brought into RTC, together with the ClearCase component baselines and change sets for those activities. To illustrate the process we will use a ClearQuest database using the out of the box “UCM” schema, and a ClearCase UCM multi-stream project connected to the CQ database. We will import the artifacts into an RTC project area that uses the out of the box Simple Team process Template, such that:
- CQ Defects are imported as RTC Defect Work Items
- CQ BaseCMActivities are imported as RTC Task Work Items
- CC components as RTC components
- CC baselines are imported as RTC baselines
- The change set for each CQ UCM activity is imported as a change set to the corresponding RTC Work Item
A summary of the process to be followed is:
- Install the required software
- Create and populate the CC/CQ repositories
- Create and configure the RTC Project Area
- Configure the CQ Synchronizer for import
- Configure the CC Importer
- Import the CQ Activities
- Import the ClearCase UCM baselines
Note that if you wish to use this process in a pre-existing environment you may skip steps 1, 2 and 3 but be sure to skim through them to make sure that your environment is configured properly.
1. Install the required software
For the purposes of this article the following software components were installed in a Microsoft Windows 2003 Standard R2 virtual machine:
ClearCase 7.1.1
ClearQuest 7.1.1
RTC Server 3.0
RTC Eclipse Client 3.0
RTC CQ Synchronizer 3.0
RTC CC Synchronizer 3.0
Note: You can find the latest version of the RTC Software (Server, Client and Synchronizers) on the RTC downloads page.
We assume the host name to be “myhost.example.com”.
We assume that all the various components are installed into C:IBM as the installation root directory.
The server also has Windows group called “ccusers“, and a Windows user account with login name “cccqsynch“, which has “ccusers” group as its Primary Group. For simplicity, this account will be used as Windows account under which all steps will be performed.
2. Create and populate the CC/CQ repositories
Login to the server as “cccqsynch“.
For ClearQuest:
Using the ClearQuest Maintenance Tool create a new schema repository with a connection name (dbset name) such as “7.0.0“.
Create a user database that uses the “UCM” schema with logical name “UCM“.
Using the ClearQuest User Administration tool create a new user with the following properties:
Login: cccqsync
Password: cccqsync
Name: cccqsync
E-Mail: cccqsync@example.com
Assign Active User, All Users/Groups Visible, Public Folder Administrator and SQL Editor privileges to the “cccqsync” user and subscribe the user to the “UCM” user database, remembering to upgrade the user database to propagate this new user to it.
For ClearCase:
Use the ClearCase Server Storage Wizard to create a View Storage Location , for example::
View Storage Location Name: myhost_ccstg_c_views Location: myhostccstg_cviews
Create an UCM Process VOB with tag “rtcpvob“.
Create an UCM Component VOB with tag “mycomponent” as a single-component VOB.
Using the ClearCase Project Explorer create a multi-stream UCM Project called “myproj“, add “mycomponent“as a modifiable component and connect the project to the “UCM” user database.
Next populate the component with some artifacts and baselines. Create a view on the “myproj” integration stream and import some files/folders into the view creating a BaseCMActivity in the “UCM” CQ database to check in the elements against. Once all the initial elements are checked in create a baseline, for example. “baseline1” to capture the activity.
Make a number of modifications to files/folders in the view, associating each change with a different BaseCMActivity or Defect record. Make sure that a new baseline is created after every change has been checked-in.
You should finish up with a UCM setup that has a CQ-enabled ClearCase UCM project, with a number of activities on the integration stream, each containing a change set:

The project’s single component has a number of baselines: 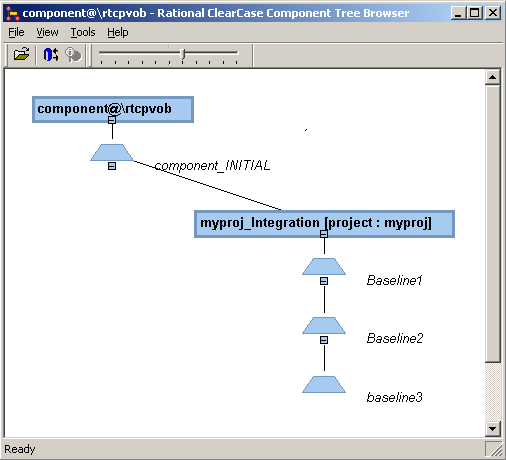
In the next step we will create an RTC project area into which we will import the CQ Activities and ClearCase Baselines, maintaining the links between them.
3. Create and configure the RTC Project Area
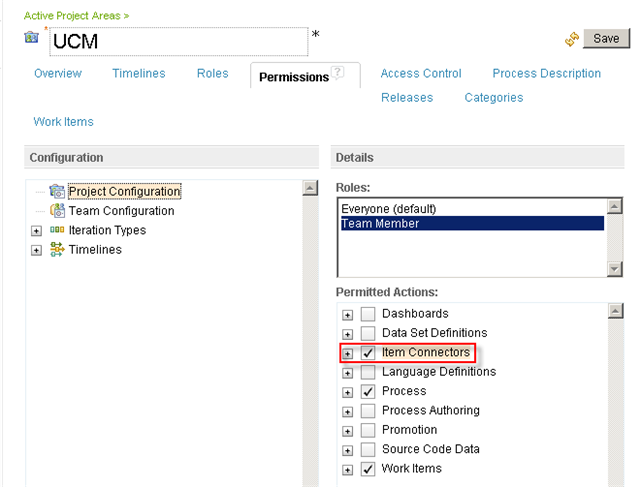
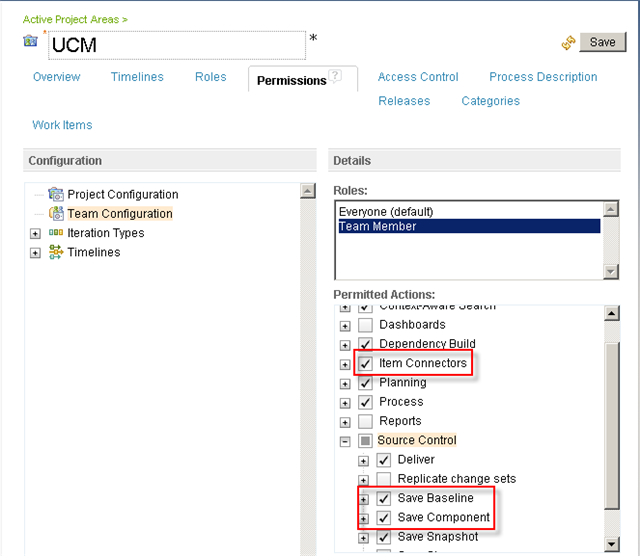
Login to the Jazz Change and Configuration Administration page at https://myhost.example.com:9443/ccm/admin. Navigate to the Project Areas page and create a new Project Area named “UCM” using the “Simple Team Process” Process Template.
Edit the Project Area’s permissions to grant “Item Connectors”, “Process”, “Work Items”, “Save Baselines” and “Save Component” permissions to the Team Member role.
Create a new user with the following properties:
Name: cccqsync
User ID: cccqsync
Email address: cccqsync@example.com
Repository groups: JazzUsers
Licenses: ClearQuest Synchronizer Client Access License and ClearCase Synchronizer Client Access License
Add the new “cccqsync” Jazz User as a Team Member of the “UCM” Project Area.
We now have our ClearCase, ClearQuest and RTC repositories and the required users ready. The next step is to configure the ClearQuest RTC Synchronizer and ClearCase RTC Synchronizer.
4. Configure the CQ Synchronizer for import
We first need to create a set of queries that will filter only the CQ records that are related to the “myproj” UCM project.
Login to the “UCM” ClearQuest database as “cccqsync” and create a folder named “JazzConnector” in “Public Queries”. Create a new folder under the “JazzConnector” folder named “UCM“.
In the “UCM” folder, create a query on Defect with a filter on the “ucm_project” field with a value of “myproj“
In the “UCM” folder, create a query on BaseCMActivity with a filter on the “ucm_project” field with a value of “myproj“.
Navigate to “C:IBMClearQuestSynchronizergateway” and use a text editor to edit the cqconnector.properties, modifying the following values:
cq.dbSetDbName=7.0.0/UCM
cq.userid=cccqsync
cq.password=cccqsync
com.ibm.team.uris=https://cccqsync:cccqsync@myhost.example.com:9443/ccm
Next we import a set of pre-configured synchronization rules. The rules provided here have been specifically created to map the Defect and BaseCMActivity record types from the out of the box ClearQuest UCM schema to the Defect and Task Work Item types in the out of the box RTC Simple Team process template.
Right-click and save the contents of each of the following files:
com.ibm.rational.clearquest.Defect.cccq.xml
com.ibm.rational.clearquest.attachments.cccq.xml
com.ibm.rational.clearquest.BaseCMActivity.cccq.xml
com.ibm.rational.clearquest.UCM_Project.cccq.xml
com.ibm.rational.clearquest.users.cccq.xml
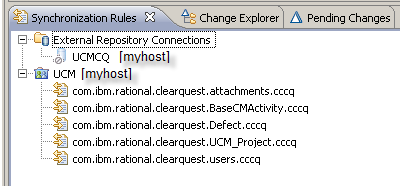
Start the RTC Eclipse client and login using, “cccqsync” for the username and password, to the “myproj” Project Area with the Repository Connection URL “https://myhost.example.com:9443/ccm”. Once successfully connected, right-click the Repository Connection node in the Team Artifacts view and select Administer > Synchronization Rules. In the Synchronization Rules view, right-click the “UCM” project node and select Import Synchronization Rules. In the Synchronization Rules wizard, create a new External Repository connection with the following properties:
Name: UCMCQ
Connection Info: http://myhost.example.com:8081/cqconnector/gateway
Leave User ID/Password blank
Project Area: UCM
Ensure that “Disable automatic outgoing synchronization” is selected.
In the next step in the wizard, browse to the location where the synchronization rules were saved, select all the files and import them.
5. Configure the CC Importer
The next step is to use the ClearCase Import function to setup a ClearCase synchronization stream in RTC and a synchronization engine process. In the RTC Eclipse client select File> Import > Jazz Source Control > ClearCase Stream or Branch. In the import wizard select “Import from an existing UCM stream” and set the ClearCase stream selector to “myproj_Integration@rtcpvob“.
Ensure “Import with history from ClearCase” is selected.
Set the “UNC Path to a local share” as “myhostccstg_cviews“.
Select the “UCM” project area.
In the Work Item template section click Browse, and in the ensuing dialog use the “Create Work Item” link to create a new Work Item of type Task. For further information on the Work Item Synchronization template see “Creating a work item initializer“.
In the “Jazz Synchronization Engine options” section set the following values:
User ID: cccqsync
Password: cccqsync
Install location: C:IBMClearCaseSynchronizerccctools
Deselect Start a Jazz Synchronization engine as we will start the Synchronization engine after the ClearQuest records have been imported.
Select “Start the Select Files wizard after this wizard finishes“
Click Browse > Select component and select the “component“.
When the Wizard completes, right-click the “myproj_Integration” Synchronized Stream and select Properties from the context menu. In the Properties dialog, select the ClearCase Provider Properties node and change the following properties, being sure to click the “Change Value” button after the changes:
CLEARQUEST_DBSET_NAME: 7.0.0
CLEARQUEST_LOGIN_NAME: cccqsync
CLEARQUEST_USERDB_NAME: UCM

In the same dialog make careful note of the value of the STREAM_SCRIPT_DIR property, for example:
STREAM-SCRIPT_DIR: C:Documents and SettingscccqsyncClearCaseConnector_bBLWkemfEd-xy8GaWRAPqQ.synchronizer
This is a directory unique to each Synchronized stream. Navigate to this directory and create a text file named “cccqsync.cq_password“, noting that name portion of the file name (“cccqsynch“) exactly matches the value of the CLEARQUEST_LOGIN_NAME property. Edit the file with and add a single line to it:
-password=cccqsync
At this point we have all the components configured and ready for the import. We will proceed to first import the CQ Defect and BaseCMActivity records, creating corresponding RTC Defect and Task work items. Finally we will launch the Jazz ClearCase Synchronization Engine process which will import the related ClearCase baselines and elements, linking them to the corresponding work items.
6. Import the CQ Activities
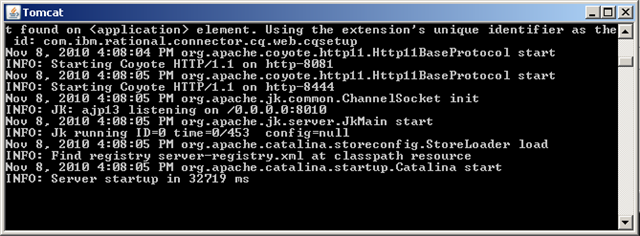
In order to use the ClearQuest Synchronizer to import the CQ records using the rules defined in the Synchronization Rules, we must first launch the CQ Synchronizer Gateway. Open a Command Prompt, navigate to “C:IBMClearQuestSynchronizergateway” and run “server.startup.bat“. This will launch a separate window showing the status of the Tomcat engine which acts as the container for the CQ Synchronizer Gateway application:
Minimize this window and in a new Web browser tab or window navigate to the url http://myhost.example.com:8081/cqconnector/gateway. This provides some useful information on the status of the gateway in addition to listing the queries we previously created:

Switching back to the Command Prompt that was used to launch the CQ Synchronizer Gateway process, run the following command to import the BaseCMActivity records:
synctool.bat recordtype=BaseCMActivity projectArea=UCM jazzServer=https://cccqsync:cccqsync@myhost.example.com:9443/ccm query="Public Queries/JazzConnector/UCM/UCM BaseCMActivities"
In addition to other status messages, a message similar to the following should be displayed:
Syncing BaseCMActivity UCM00000001 ... synchronization status is pending blocked.
The status is pending blocked because there is a dependent record that needs to be synced. For the BaseCMActivity, it could be that there is a dependent user record or dependent UCM_Project record that has not been synced yet. The Jazz server will communicate with the CQ gateway to sync in the dependent records at a later point in time.
One way to avoid the pending blocked status is to sync the independent records first – users, UCM_Project, and then the records that reference them such as BaseCMActivity or Defect.
To import the Defect records run the following command:
synctool.bat recordtype=Defect projectArea=UCM jazzServer=https://cccqsync:cccqsync@myhost.example.com:9443/ccm query="Public Queries/JazzConnector/UCM/UCM Defects"
In addition to other status messages, a message similar to the following should be displayed:
Syncing Defect UCM00000002 ... synchronization status is OK
Syncing Defect UCM00000003 ... synchronization status is OK
Now that we have the UCM CQ records in RTC we can import the related change sets, component and baselines.
7. Import the ClearCase UCM baselines
Switch back to the RTC Eclipse client and in the ClearCase Synchronized Streams view, right-click the “myproj_Integration” synchronized stream and from the context menu select Start Synchronization engine. This will launch a Command Prompt window that shows the status of the ClearCase Synchronization engine, which uses the Jazz Build Engine technology.
The status of the import will also be updated at regular intervals in the ClearCase Synchronized Streams view:

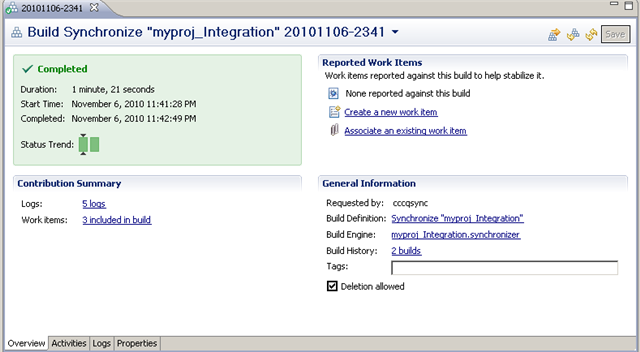
Once the import has completed double click the Status to open the log which will show what was synchronized, the duration, which work items were created to track the baselines imported (“Included in build“) and links to detailed logs for troubleshooting if required.
Verifying the import
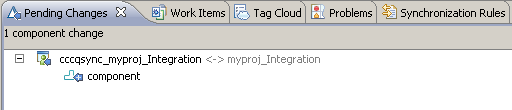
To verify that the import succeeded, first open the Pending Changes view. This should show a new incoming component named “component“:
Accept all the incoming changes and baselines. Then right-click the component and select “Show history” from the context menu:
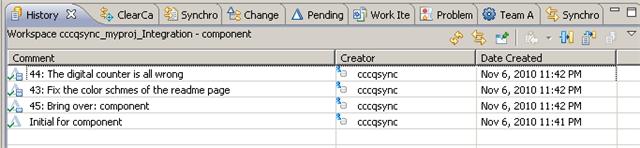
From the History view open and check the contents of the work items, including attachments, Status and other attributes.

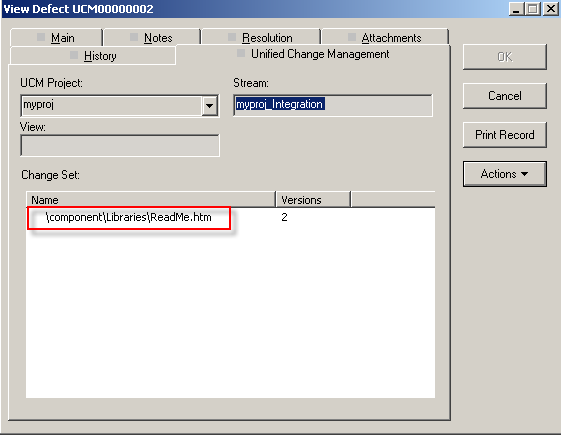
Navigate to the Links tab and double-click the link under the Change Sets node to show the files/folders changed for this Work Item.These should match the change set in the corresponding CQ record. The Defect in RTC:
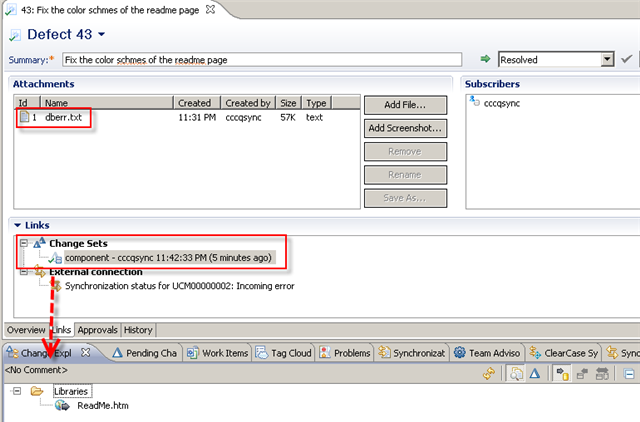
and the corresponding Defect in in CQ:
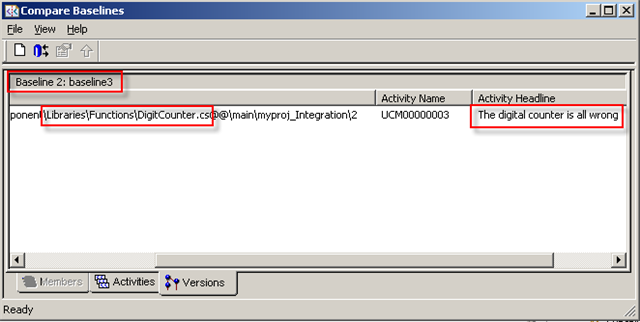
Switch to the Pending Changes view, right-click the component and select “Show baselines “from the context menu. In the History view that is displayed, click the “Show all in Repository” icon to display all the imported baselines. Right-click the baseline listed first and from the context menu select “Compare with Previous“. The result should match the corresponding comparison in ClearCase. The baseline comparison in RTC:
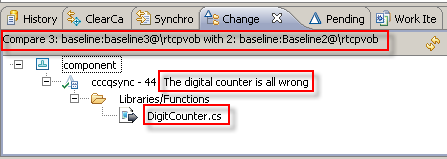
and the corresponding comparison in ClearCase:
Conclusion
This article has shown you how to import ClearQuest records and ClearCase artifacts in a UCM environment where ClearQuest is used to manage the UCM activities. While the example has used the out of the box ClearQuest UCM schema and the out of the box RTC “Simple Team” process template, it is easy enough to extend the example to more complex scenarios. Using Synchronization Rules to map CQ record information to RTC Work Items is a powerful mechanism that can be used in an iterative fashion, with GUI support for field-attribute mapping and the ability to support complex record type relationships. Used in concert with the RTC ClearCase Import tool, this provides a relatively simple way to import a complete CQ-enabled UCM setup into RTC.
For more information
- IBM Rational Collaborative LifeCycle Management Infocentre
- Jazz.net Library (search filters: ClearCase, ClearQuest)
- IBM Rational ClearQuest 7.1.1 Infocenter
- IBM Rational ClearCase 7.1.1 Infocenter
- Jazz.net Wiki Page : Writing Sync Rules
- Jazz.net Wiki Page: CQ Synchronizer Frequently Asked Questions
- Rational Team Concert – Rational ClearCaseSynchronizer Knowledge Collection
- TN0006: Deploying Rational Team Concert into a ClearCase/ClearQuest Environment
- Using the ClearCase Importer to Import ClearCase History
© Copyright 2012 IBM Corporation