Flow changes cross repositories with Rational Team Concert
Rational Team Concert 3.0 supports flowing changes between different Rational Team Concert servers. Before 3.0, teams could work with different repositories in isolation or by applying patches. Change sets can now be accepted from or delivered to different repositories. This article describes how to enable the distributed capability and how developers collaborate with each other on different repositories. Finally, it includes a checklist of things to do to replicate a stream with a large change set history.
Table of Contents
- Introduction
- Getting started
- Create a workspace from a stream in a different repository
- Create a change set and deliver to a stream in a different repository
- Checklist – How to replicate a stream with a large change set history
- Conclusion
- Appendix: Backwards Compatibility and Distributed SCM
1. Introduction
The following example is used to illustrate how to collaborate between different RTC servers. An RTC server called Satchmo hosts a stream named ‘Development’. Mike is a consultant who develops experimental features in his repository workspace hosted on a different RTC server called Miles-Lab. Zoe is an administrator on both servers. She is also a team lead responsible for integrating Mike’s work into her ‘Development’ stream.

In the next section, Zoe prepares the two servers for cross repository collaboration.
2. Getting started
a. Turn on Enable Distributed SCM property on both servers
By default, the distributed SCM capability is disabled. Zoe opens up a web browser. She logs in as an administrator to Satchmo to the Application Administration page. Zoe looks up the property Enable Distributed SCM under Configuration and Advanced Properties. She sets it to true.
Zoe repeats that step on the other server Miles-Lab.
Next, Zoe sets the two servers as friends. Friend servers can use oAuth to authenticate users on different servers and link resources such as change sets and change requests (work items) cross repository.
b. Add each server as a friend
Zoe returns to the web browser where she is logged in as administrator in Satchmo. She navigates to the Application Administration > Communication > Friends section. She adds Miles-Lab as a friend. In that case, the full services URI is https://miles-lab.ottawa.ibm.com:9443/jazz/rootservices. This creates a provisional key which must be authorized on Miles-Lab. If the administrator account on Satchmo is also an administrator on Miles-Lab, then Zoe can grant access to the provisional key immediately. Otherwise, in the browser where Zoe is logged into Miles-Lab, she must navigate to the Communication > Consumers section and authorize the pending provisional key.
Zoe repeats that step on the other server. She returns to the web browser where she is logged in as administrator in Miles-Lab. She adds Satchmo as a friend and authorizes the provisional key on Miles-Lab. The two servers are now friends with each other. Next, Zoe decides which project area(s) and team member role(s) are allowed to flow and link resources between the two servers.
c. Configure project areas
i. Add Change Management (Change Set) association
Zoe’s stream is owned by the project area ‘Business Intelligence’. Mike is a member of the project area ‘Research’. These two project areas are on different RTC servers. For traceability, Mike needs the capability to link his change sets to change requests (work items) opened by Zoe. i.e. a change set hosted in Miles-Lab can link to a work item in Satchmo. Zoe controls this capability by setting associations between the two project areas.
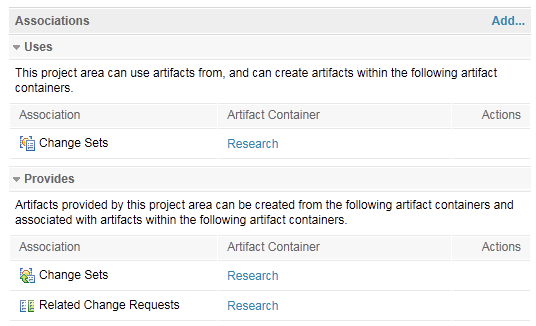
Zoe brings up the project area editor for ‘Business Intelligence’ in the web browser. In the Associations section of the Overview tab, Zoe selects Add… and picks up Miles-Lab as Application, Provides – Change Request for the association and ‘Research’ as the artifact container. She saves the project area editor. Mike can now associate a change set from Miles Lab to a work item on Satchmo.
Note: The service provider dialog lists Miles-Lab as application because Satchmo and Miles-Lab were setup as friends earlier.
Note: Associations provide a very fine grained control over which resources can be linked to other resources. For common distributed workflows, it is recommended to add the following three associations:
- Provides – Change Requests
- Provides – Related Change Requests
- Uses – Change Requests
| Add association | role |
|---|---|
| Uses – Change Sets | User can link a change set in source project area to a change request in target project area |
| Provides – Change Sets | User can link a change set in target project area to a change set in source project area |
| Provides – Related Change Requests | User can link a change request in source project to a change request in target project area (and vice-versa) |
The above names are for 3.0.1 or later. In 3.0 the names were different. The following table shows the 3.0 names with their corresponding 3.0.1 names
| 3.0.1 Name | 3.0 Name |
|---|---|
| Uses – Change Sets | Uses Change Management (Change Set) |
| Provides – Change Sets | Provides Change Management (Change Set) |
| Provides – Related Change Requests | Provides Change Management |
Zoe adds these three associations through the project area editor for ‘Business Intelligence’.
Mike and Zoe can link change sets from either server to change requests from the other server. They can also link change requests from one server to change requests on the other server – e.g. Mike can open up separate work items on Miles-Lab to break up a feature request opened by Zoe on Satchmo.
ii. Set role(s) allowed to replicate change sets between repositories
Zoe then switches to the Permissions tab in the project area editor. Under Team Configuration, Zoe can pick up the roles that are allowed to replicate change sets. For the project area ‘Business Intelligence’, Zoe selects the process role Team Member. Then she enables the property Source Control > Replicate change sets > replicate. That option is disabled by default.
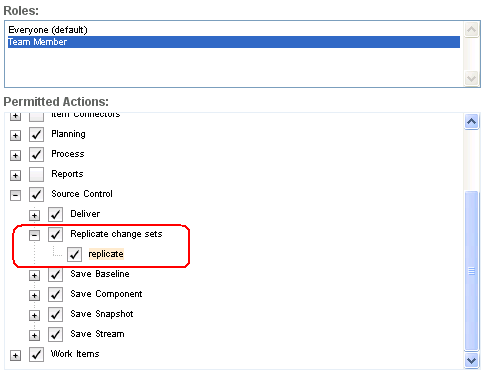
Mike and Zoe are both team members on ‘Business Intelligence’ and ‘Research’ project areas. Zoe repeats the same steps for the project area ‘Research’. They can now flow changes between the two repositories.
3. Create a workspace from a stream in a different repository
Zoe has completed all the necessary administrative preliminaries. Zoe can start her collaboration with Mike.
Zoe creates a work item on the server Satchmo with the summary ‘Integrate experimental trading engine into our product’. She assigns that task to Mike. In the work item, Zoe tells Mike to integrate and deliver his changes into the stream ‘Development’.
Mike receives an email notification about his new task. He starts his Eclipse RTC Client, logs in to the server Satchmo and connects to the ‘Business Intelligence’ project area. He finds the stream ‘Development’ in the Team Artifacts view.
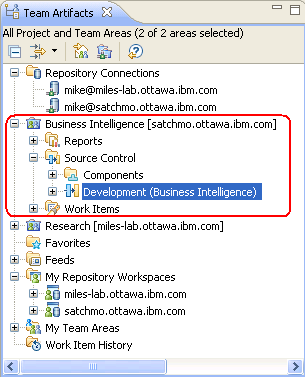
Mike selects that stream and picks New > Repository Workspace. He can create a repository workspace from the selected stream in either Satchmo or Miles-Lab repository. He picks the latter.

Note. Replicating a stream with a large history to a different repository can take a significant time the first time it is performed. Subsequently RTC Source Control only replicates change sets not yet brought over.
The pending changes view now shows Mike’s new workspace ready to deliver changes to its flow target, the stream ‘Production’ on a different server Satchmo.

4. Create a change set and deliver to a stream in a different repository
Mike’s research work is available in a component named ‘Business Engine’. He adds it to his repository workspace. He also creates a change set in the component ‘Server’ that ties in the existing production code to his own research work. Mike knows traceability is important, so he always associates a work item with his change sets. But how can he associate a change set to a work item from a different repository?
a. Associate a work item or a change request?
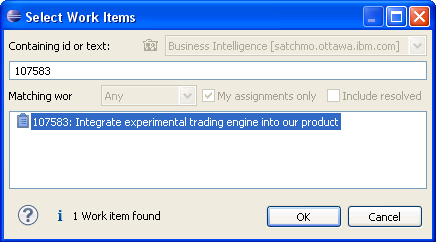
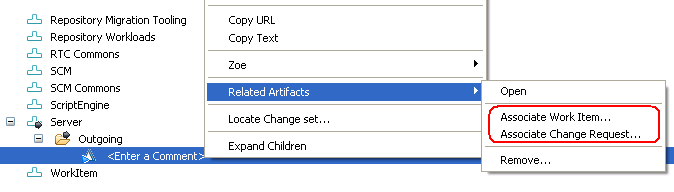
Zoe assigned a task to Mike earlier. That task is an RTC work item, hosted in the repository Satchmo. Mike’s change sets are currently available in the repository Miles-Lab. Mike selects these change sets in the Pending Changes view, goes to Related Artifacts > Associate Change Request. A service provider picker comes up.
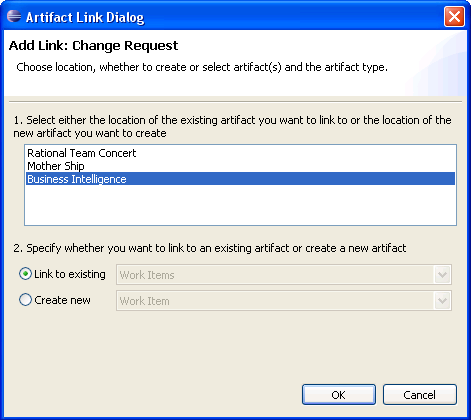
Mike selects the service provider ‘Business Intelligence’, which is the RTC project area that owns the task. Then Mike finds his task in the change request picker.
The change set is now associated to this change request on a different server, as shown in the Pending Changes view.
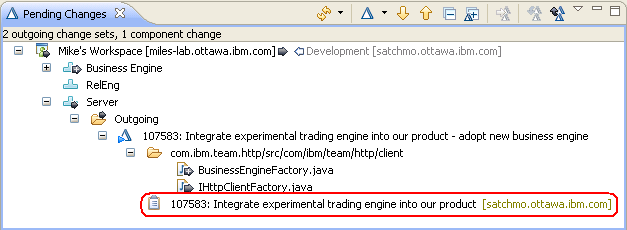
The task also has a link back to Mike’s change sets. Traceability between change sets and change requests works both ways even cross repositories.

Note. In this scenario, the change request is actually an RTC work item because we are connected to an RTC server. A service provider is an RTC project area.
Note. If the work item and the change set belong to the same repository, use Related Artifacts > Associate Work Item. If they belong to different repositories, use Related Artifacts > Associate Change Request.
Note. Team advisors such as Require work item approval only work if the change set and associated work items belong to the same repository.
b. History, change set and work item links – it all works!
Mike’s change sets now look good. He delivers them from the Pending Changes view. He closes the task Zoe assigned to him. His job is complete.

Zoe gets an email notifying her the task is completed. Mike’s change sets show up as incoming in her Pending Changes view.
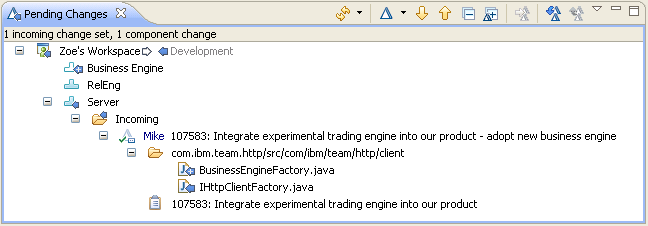
The change sets are associated to the task she opened against Mike. Everything works as expected. Zoe can look up the history of Mike’s new component, just like she can for any other component in her repository. Change sets replicated from Miles-Lab into Satchmo are just like regular change sets. Links to work items are replicated as well (but not the work items themselves). Screenshot below shows two replicated change sets in Satchmo. They are linked to the work item 217 in Miles-Lab. Zoe can see why Mike did these changes.

Zoe verifies her continuous build is green and is pleased with Mike’s work.
Note: Familiar Source Control workflows were extended to support multiple repositories.
- Change Flow Target – Pending Changes view shows incoming and outgoing changes between user’s workspace and a target. The target can be any workspace or stream from the same repository or any repository the user is logged into.
- Duplicate… – Duplicate on a stream creates a clone of that stream. That new stream can now be located in a different repository. This is a convenient gesture to replicate a stream to a different location.
- Flow Targets (Workspace Editor) – the workspace editor now also keeps track of flow targets that belong to different repositories
- Compare With – workspaces, streams and snapshots on different repositories can be compared with each other
- CLI extended syntax – the URI or the nickname of a resource’s repository can be appended to the resource identifier (e.g. its name) such as
resource_identifier@repo_uri. The following snippet shows how to create a workspace from a stream on a different repository.
scm login -r https://miles-lab.ottawa.ibm.com:9443/jazz/ -u userName -P userPassword -n miles scm login -r https://satchmo.ottawa.ibm.com:19443/jazz/ -u userName -P userPassword -n satchmo scm create workspace "Mike's Workspace@miles" -s "Development@satchmo" Workspace (1033) "Mike's Workspace" successfully created
c. Flowing baselines
Baselines are not automatically flowed between servers; when delivering a component, only the current baseline will be migrated to the target. Other baselines must be explicitly accepted or delivered.
In order to bring selected older baselines across to the target server, do the following:
- Using a workspace on the target server that contains the components you are interested in, set the flow target to the stream or workspace on the remote server.
- In the pending changes view, select the component and do “Replace With > Baseline…” and select the initial baseline.
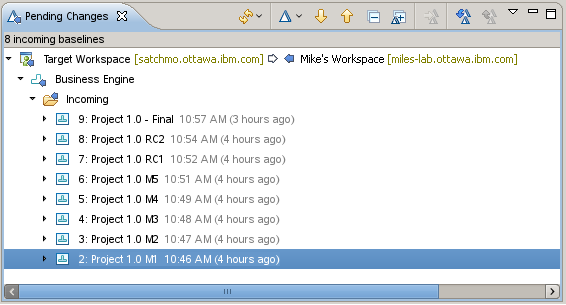
- You should now see a number of incoming baselines. Select baselines individually and accept them one at a time, starting with the earliest baselines first.
5. Checklist – How to replicate a stream with a large change set history
In the previous example, Zoe and Mike replicated three small components between two repositories. In such scenario, replication can be very fast. Zoe is so pleased about Mike’s contribution, she decided to bring over components that Mike and his team have been working on for years. The replication of a large number of components with many years of history can take a significant time – a few hours. The following is a checklist to replicate a large stream.
a. Login to both servers
Replication involves the creation of components and contributors on the target repository. It is strongly advised that a single user perform the replication at a given time. This ensures the same contributors don’t get created concurrently and possibly causing one replication to fail. Which user account should be used to perform the replication? The answer depends on how the two servers are setup.
i. The two servers share a JTS (same users exist on both servers)
Replicated contributors simply match existing users and no additional setup is needed. Contributors can login to either server. Contributor doing the replication simply needs to have the appropriate process roles required to replicate change sets by each process area that owns the components to be replicated.
ii. The two servers share an LDAP registry but different JTS’s (users already have accounts on both servers)
Replicated contributors already have an active user account, no additional setup is needed. Contributors can also login to either server. As in the previous case, contributor doing the replication simply needs to have the appropriate process roles required to replicate change sets by each process area that owns the components to be replicated.
iii. The new server doesn’t share the LDAP registry nor the JTS of the first server
The new server may be a server with no users and just an administrator account. Users are intended to be added manually (without LDAP) as needed. In such case, login as the administrator of the new server to perform the initial replication of the stream. Login to the source server as a contributor who has the appropriate process roles required to replicate change sets by each process area that owns the components to be replicated. Users who created change sets will be replicated along with the change sets. These replicated accounts will not be active by default. Their activation will be explained after we have performed the replication.
We now have determined which user to login as on each server. Follow these steps to get started.
- Start the Eclipse RTC Client
- Connect to both repositories – the source repository that contains the changes to replicate, and the target repository where the changes will get replicated into
- Connect to the project area that owns the stream to replicate
- Connect to the project area that will own the replicated stream
b. Increase connection time out
Open each team repository connection in the Team Artifacts view and increase the connection time out to the largest value allowed: 9999 seconds.

3.0.1 and beyond only: In most cases, setting the client timeout as shown above is enough. However, in some configurations, you may still get timeouts after 12 minutes. If this occurs, there are two SCM server settings you can adjust to allow the distributed operation to proceed. The settings to adjust are available in the SCM section of the Advanced Properties tab of the server administration panel. If you still get timeouts after setting the client timeout of both repositories involved to 9999, set the authentication token expiration to a value less than 600000 milliseconds and the authentication token grace time to a value less than the expiration (e.g. 300000 milliseconds).

c. Create an empty workspace
Create an empty workspace in the target repo. The idea is to replicate the components from the source repository one by one to break up a lengthy replication into smaller units.
d. Accept components one by one from the stream to replicate
- Select the newly created workspace and pick Load > Do not load anything. Workspace will be tracked in Pending Changes view.
- In the Pending Changes view, select the workspace and pick Change Flow Target. Select the source stream from the source repository.
- All the components from the source stream show up as incoming additions. Select one component and accept.
- Repeat step 3 for each component.
Below, Zoe is ready to accept one by one each incoming component addition from the stream ‘Stream to replicate’ on Miles-Lab into her currently empty workspace on Satchmo.

If a server goes down or network connectivity is broken, simply accept the component again. The operation will only accept the change sets it hasn’t replicated previously.
Note. The accept operation may fail with Permission denied on some components. The Team Advisor details which permission is missing. Component is owned by a process area which governs who is allowed to replicate. User doing the replication must have the role that is allowed to replicate changes. In the example below, Zoe needs to be given the role ‘team member’ in the process area ‘Test Project Area’.

e. Set component permissions in the target repository
The workspace now contains all the replicated code base, components and change set history from the source stream. Select the workspace and pick New > Stream… to create a stream (in the same repository – i.e. Satchmo, in Zoe’s case). That operation is fast since all the change sets have been replicated earlier in the target repo.
The components from the source stream are typically owned by process areas hosted on the source repository. The replicated components are initially owned by the user who performed the replication – i.e. the user who performed step d. We now assign the correct owner of these components in their new server.
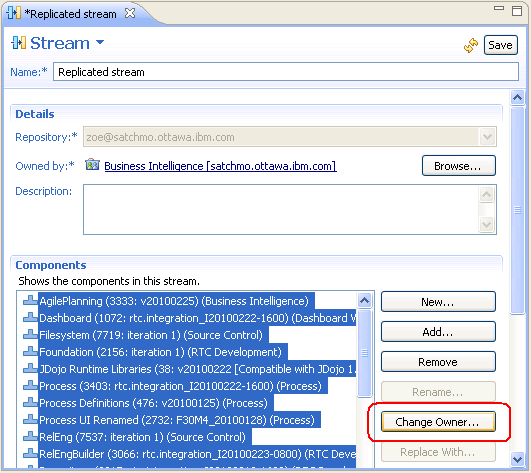
- Open the target stream in the stream editor
- Set the owner of the stream to the appropriate process area. E.g. Zoe picks ‘Business Intelligence’
- Select all its components and pick Change Owner. E.g. Zoe also picks the process area ‘Business Intelligence’ but different components could be owned by different process areas if desired.
f. Activate replicated contributors
Zoe accepted change sets from Miles-Lab to Satchmo. These change sets were initially created in Miles-Lab, by Mike or his collaborator named John Diego. During the replication, change sets are created on Satchmo that point to user accounts on Satchmo as well. Replication created a new contributor account for John Diego on Satchmo. E.g. one can examine the history of changes in Satchmo and see that John Diego did these changes, not Zoe who just performed the initial replication.
Contributor accounts created during the replication are not active. I.e. John Diego cannot login to Satchmo with its credentials from Miles-Lab. In many cases, this is the right behavior. Often we don’t want all past contributors from one server to have access to the new server with the replicated changes. We just want traceability of who did what. As explained earlier, if the two servers share a JTS or share an LDAP registry, users have access to both servers. They continue to use the same account they were using before the replication.
Skip to the next section if your servers share JTS or LDAP registry. Follow the steps below only if you need to activate a replicated contributor account to give that contributor access to the new server.
Finding and activating such user accounts is done with the SCM command line interface. In the example below, Zoe had replicated change sets created initially by Mike and his partner John Diego. John Diego did not have an active contributor account on Satchmo before the replication. The replication created an inactive contributor account (with no userId). Zoe wants John Diego to have access to Satchmo. Here is how she activates his replicated contributor account.
1. Zoe logs in to the Satchmo repository (where she replicated a stream from the Miles-Lab repository)
$ scm login -u zoe -P zoe -r https://satchmo.ottawa.ibm.com:19443/jazz Logged in to https://satchmo.ottawa.ibm.com:19443/jazz
2. Zoe gets all the users that were replicated but are not active (aka, they don’t have a userId assigned)
$ scm list users --noUserIds -r https://satchmo.ottawa.ibm.com:19443/jazz (1000) "Alexandre Brian" alexandre@ca.example.com (1001) "Peter Larry" peter@us.example.com (1002) "Eric Lavin" eric_jodet@fr.example.com (1003) "John-Diego" john_diego@example.com
3. Zoe activates the user account for the user name “John-Diego” (1003) by setting a userId ‘john_diego’
$ scm users set -r https://satchmo.ottawa.ibm.com:19443/jazz 1003 john_diego User id was set successfully.
John Diego can now login to the satchmo repository. Zoe gives him the role ‘team member’ in the project area ‘Business Intelligence’ on Satchmo. John Diego can now work on both Satchmo and Miles-Lab repositories.
g. Setup your continuous build on target repository
Mike has a continuous build running on the server Miles-Lab. This ensures his experimental work compiles and runs junits without regression. That experimental work was part of the components that were replicated over to the server Satchmo. Zoe wants to ensure these components also compile and run the same junits. The junits and any necessary build script – such as custom shell scripts, ant tasks – are included in the replicated components. Zoe needs to do the following.
- Create a new build definition in Satchmo repository
- Edit the build definition so that it loads the source code from the replicated stream in Satchmo (the one with the replicated components)
- Invoke the build scripts and Junits contained in these replicated components
Note: It is recommended that you replicate a code base from one server to a target server along with its build scripts and tests. This allows you to run a build and tests on the target server.
6. Conclusion
Rational Team Concert 3.0 lets you replicate workspaces and streams between different servers. You can easily move your change sets to a different repository. Teams can work on different servers and still efficiently collaborate with each other by flowing changes and linking to work items cross repositories. This gives you the ability to organize and grow your business in the way you choose.
Appendix: Backwards Compatibility and Distributed SCM
When replicating a stream or workspace, distributed SCM makes identical copies of changes histories, change sets and changes being copied. Any modification to how these are modeled or stored on the server will make it impossible to replicate changes to an older server. However, in rare circumstances, changes to the model are required to support high priority enhancements. The following RTC versions have model changes that prevent backwards compatibility with previous versions:
- RTC 4.0.5 is not compatible with RTC 4.0.4 or before.
- RTC 4.0 is not compatible with RTC 3.x or before.
- RTC 5.0 is not compatible with RTC 4.x or before.
There is also no guarantee that future releases will support backwards compatibility with respect to distributed SCM if there are comprehensive changes to how SCM manages its data.
Copyright © 2017 IBM Corporation