Advanced Gestures and Workflows
Summary
Are you familiar with Jazz Source Control? Find out about cool new gestures that will simplify your daily routine and learn how to resolve uncommon but important situations. If you are just getting started with Jazz Source Control, make sure you visit our FAQ first.
Initial Release 1.0
- 1. History Merge Graph
- 2. Sharing a project with drag and drop
- 3. Creating a change set from a work item with drag and drop
- 4. Associating a work item to a change set with drag and drop
- 5. Moving a change to another change set with drag and drop
- 6. Checking-in a local change into a change set with drag and drop
- 7. Adopting the latest changes from another stream
- 8. Adopting the latest changes from multiple streams
- 9. Leave me alone! Private workspace, private collaboration
- 10. Quick and dirty versioning with auto check-in and auto complete
- 11. All the possibles pending changes…
- 12. Discard a catastrophic change set from a stream
1. History Merge Graph
What can Figure 1.1 possibly represent?

Figure 1.1 – Mysterious graph
This represents merges on a very popular file in the Jazz Source Control stream. Figure 1.2 shows that graph in its original context in the History View.
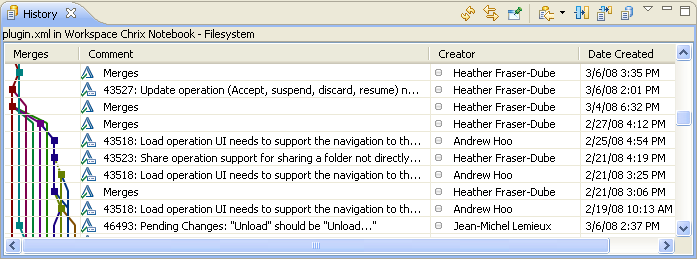
Figure 1.2 – Merge Graph in History View
Thank you Heather for continuously merging your big refactoring changes into the never-ending flow of small changes delivered by the other team members…
2. Sharing a project with drag and drop
Figure 2.1 shows how an unshared project can be dragged from the Package Explorer and dropped to a component in the Pending Changes view.

Figure 2.1 – Share a project with drag and drop gesture
Figure 2.2 shows the project was shared into a new change set.
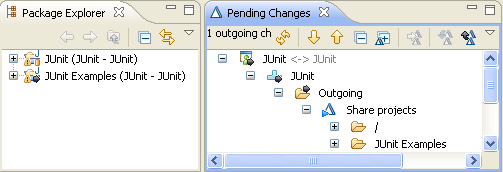
Figure 2.2 – Project is now shared
The change set adds the JUnit Examples project to the component JUnit in the user’s repository workspace. It can now be delivered to the JUnit stream to allow others to contribute to that new project.
3. Creating a change set from a work item with drag and drop
Markus has been looking at Defect 18 in the work item editor. A fix is urgently needed. Markus hovers over the top left part of the work item editor and drags it to the component JUnit in his workspace (Figure 3.1).
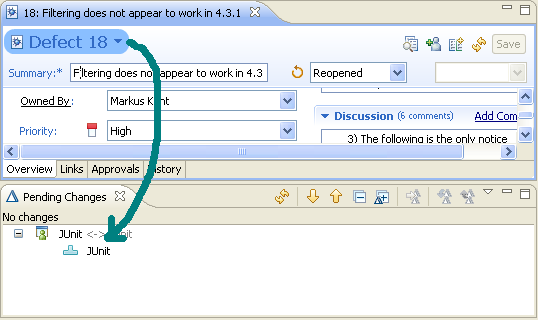
Figure 3.1 – Creating a change set from a work item
This gesture creates a new change set associated with that particular defect (Figure 3.2).

Figure 3.2 – New change set is associated to the work item
Markus quickly edits the files in the JUnit component as needed to correct the problem. He checks in the change set, runs his tests, delivers the change set and closes the work item.
4. Associating a work item to a change set with drag and drop
Markus has been looking at Defect 18 in the work item editor. A fix is urgently needed. What a coincidence! Markus had been cleaning up some code and incidentally resolved that problem. Markus hovers over the top left part of the work item editor and drags it to his change set in the Pending Changes view (Figure 4.1).
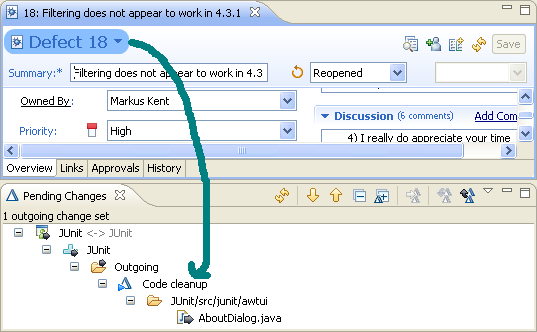
Figure 4.1 – Associating a work item to a change set
This gesture associates the work item to that particular change set (Figure 4.2).

Figure 4.2 – Change set is associated to the work item
Markus delivers his change set and closes the work item.
Note. Markus can drag a work item to a change set in the Pending Changes view from a variety of places – e.g. the Work Items view, Favorites folder under the Team Artifacts view and even from a work item showing under another change set.
5. Moving a change to another change set with drag and drop
Markus was cleaning up some code. A critical bug ‘Defect 18’ is calling for his immediate attention. What a coincidence! He happened to have fixed this issue while performing his routine code clean up. Markus decides to split up his Code cleanup change set. He creates a new change set for Defect 18. Figure 5.2 shows how Markus drags changes from one change set to another .
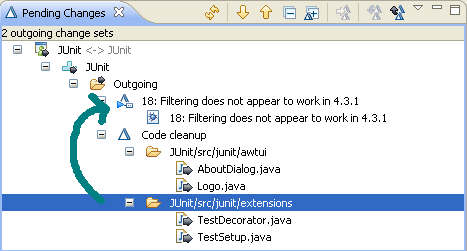
Figure 5.1 – Moving changes to another change set
This gesture moves some changes to the change set for Defect 18 (Figure 5.2).
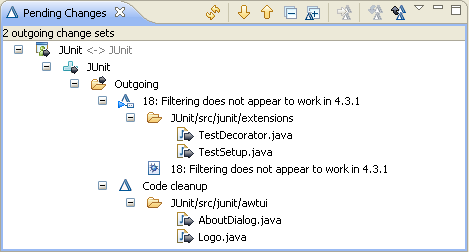
Figure 5.2 – Changes moved to change set associated to Defect 18
Markus delivers the change set associated to Defect 18 and closes the work item. He returns to cleaning up the rest of the code in his change set named ‘Code cleanup’.
Note. Changes can only be moved from one active change set to another active change set. Completed change sets are immutable.
6. Check-in a local change into a change set with drag and drop
Markus fixed two bugs during his flight after visiting a customer. He reconnects to the Jazz server from the airport. Now he wants to check-in his local changes and deliver the fixes to his team. Markus uses the Pending Changes view to drag his local changes AboutDialog.java and Logo.java to the outgoing change set associated to Defect 18. Then he drags the local changes ActiveTestSuite.java and ExceptionTestCase.java to the other outgoing change set (Figure 6.1).
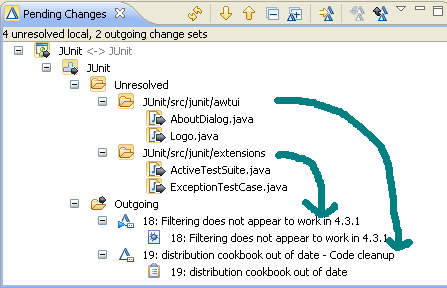
Figure 6.1 – Dragging local changes to outgoing change sets
This gesture checks-in his local changes to their respective change sets (Figure 6.2).
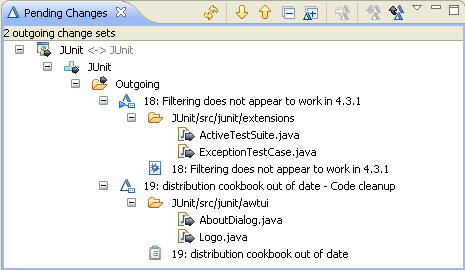
Figure 6.2 – Local changes checked-in into two different change sets
Markus can now deliver the two change sets and close the associated work items.
Note. Local changes can only be checked-in into active change sets. Completed change sets are immutable.
7. Adopting the latest changes from another team
Dima is on the Source Control team. As such he delivers his work to the Source Control stream. Figure 7.1 shows what his workspace typically looks like. His workspace named ‘Source Control Workspace’ is caught up with the latest from his team’s stream ‘Source Control’. I.e. there are no incoming change sets to accept.
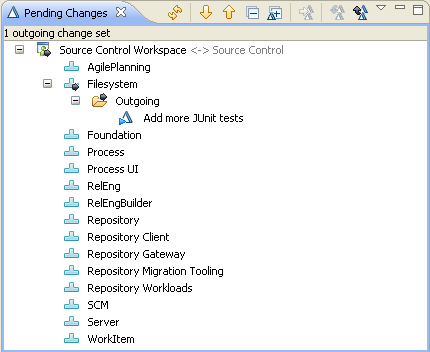
Figure 7.1 – Dima’s workspace collaborating with the Source Control stream
Dima was busy adding more JUnit tests to his team’s component named ‘Filesystem’. He is interrupted in that task by the Process team lead. He is asked to immediately adopt the latest changes from the Process stream to workaround a serious usability issue. The first step is to select the Process component and change its flow target to the Process stream (Figure 7.2).
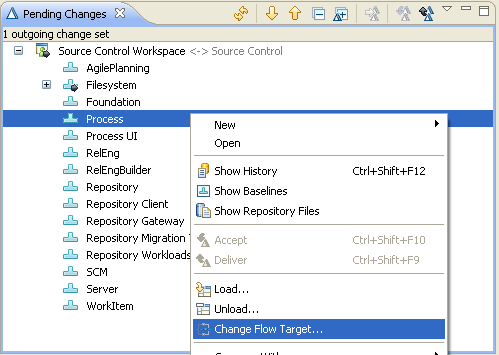
Figure 7.2 – Changing the flow target of the selected component ‘Process’
This brings up a dialog to pick up the flow target. Dima enters the name of the Process stream (Figure 7.3). This stream contains the latest change sets he needs to adopt.
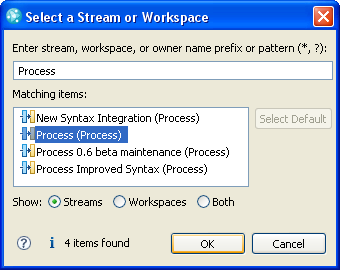
Figure 7.3 – Selecting the stream named Process
Now Dima sees three incoming baselines in the component Process from the Process stream. These baselines contain the change sets he had been asked to adopt into his team’s stream. Note the other components in Dima’s workspace are still flowing with the Source Control stream. He only changed the flow target of the component Process (Figure 7.4).
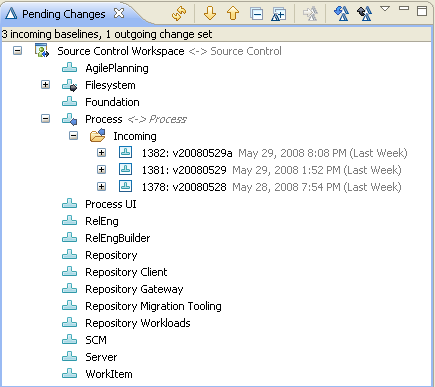
Figure 7.4 – Process component flows with the Process stream
8. Adopting the latest changes from multiple teams
Adopting the latest changes from another team can easily be generalized. What do you think Figure 8.1 represents?
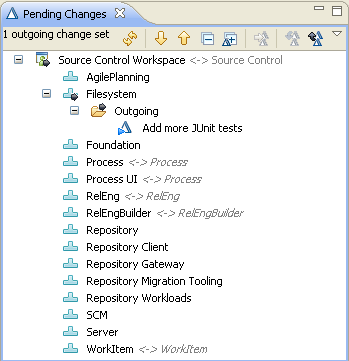
Figure 8.1 – Workspace and multiple component flow targets
In other words Dima is working on tasks that require the latest from certain component’s stream owners. The version of the components Process, ProcessUI, Releng, RelengBuilder, WorkItem currently available in his stream ‘Source Control’ are too old. He does not want to wait until the Releng person in his team adopt these changes.
When Dima is done working his task he can reset all the custom component flow targets in one simple gesture. Figure 8.2 shows how to select the workspace node and reset the flow target for all its components to the ‘Source Control’ stream.
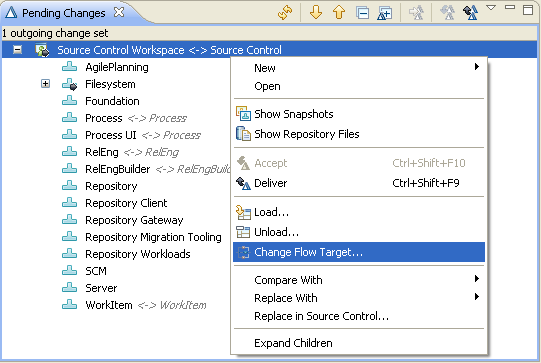
Figure 8.2 – Select workspace node and change flow target resets the flow target for all components

Figure 8.3 – All components from the Source Control workspace flow to the ‘Source Control’ stream
Note. It is common and easy to flip back and forth between flow targets – to accept and deliver new change sets between two streams for example. The target selection dialog remembers the flow targets previously used.
9. Leave me alone! Private workspace, private collaboration
There are times a developer just wants to develop a self-contained algorithm or feature. In such scenario it isn’t necessary to flow with streams, at least not until the feature is ready to be consumed by others. Jazz Source Control allows you to use your workspace privately, i.e. you can set the flow target to be your very own workspace.
In Figure 9.1 Developer Christophe selects the node representing his ‘Source Control Workspace’ and change the flow target from the Source Control stream to his own workspace ‘Source Control Workspace’.
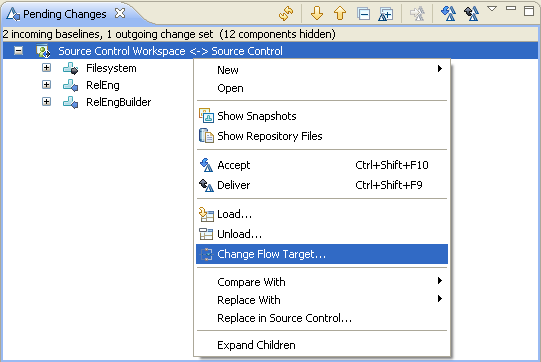
Figure 9.1 – Changing the workspace’s flow target
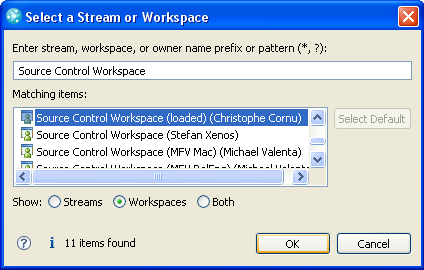
Figure 9.3 – Select the user’s own workspace to set private collaboration
Now Christophe can work on his feature without being disturbed by what others are doing. He sees all his active change sets. He can suspend, resume them at will (Figure 9.4). If he completes a change set the Pending Changes view no longer shows it but he can access it with the History View.
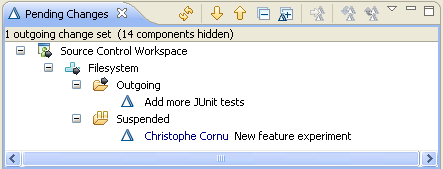
Figure 9.4 – Private workspace showing active and suspended change sets
Eventually Christophe can decide to flow his change sets to his team’s stream. He simply needs to change the flow target to the appropriate stream. All his change sets will show up as outgoing.
Note. Private workspace is most often used when quick starting a project or prototyping some isolated feature. E.g. a developer can decide to have two workspaces. One workspace that he uses to collaborate with his stream as part of his regular team development. And a private workspace to keep special tools and code not relevant to his team.
Note. The term private only refers to the absence of flow with another workspace or stream. Other developers can flow with someone else’s workspace and accept change sets from a ‘private’ workspace.
10. Quick and dirty versionning with auto check-in and auto complete
Jazz Source Control provides all the tooling necessary to nicely organize your changes into change sets and associate them with comments and work items. All of that is helping every developer understand and trace what is happening in a big project. Such good practices can be enforced by your team process.
However, imagine you are just using Jazz Source Control to backup your personal work as you go. All you want is the tool to transparently backup all the modification to your Eclipse workspace so that if your local hard drive fails or if you accidentally erase some data you have some means to get it back. You don’t care about comments, don’t want to attach work items to your changes. Just mirror my Eclipse workspace with the server.
Easy! Use your private workspace and check the following preference (Figure 10.1).
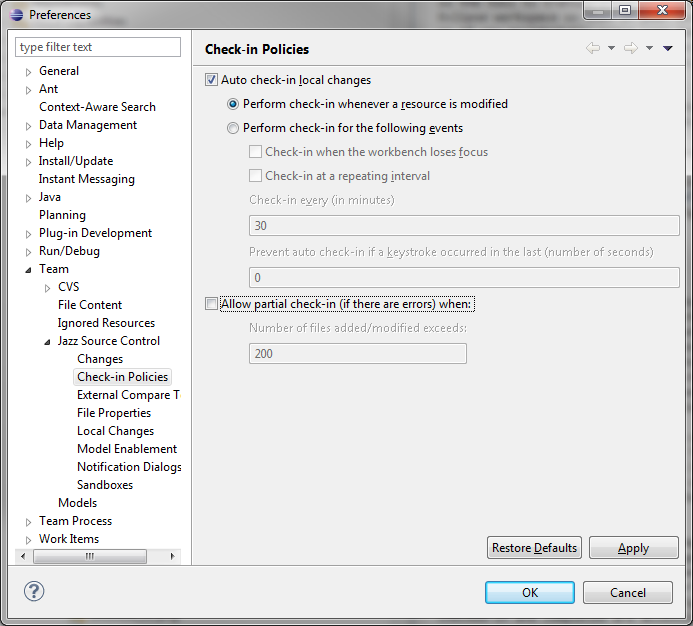
Figure 10.1 – Auto check-in preference
Auto check-in checks-in your local changes to your repository workspace every time you save a resource. It creates a new change set or uses the existing current change set to contain the changes.
In this configuration Jazz backs up your changes automatically as you go. If you ever need to roll back a change you use the History View for your component or for a particular resource (Figure 10.2).
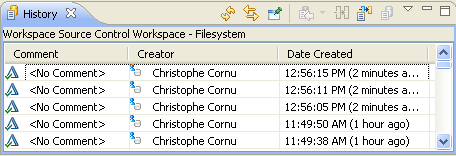
Figure 10.2 – Changes automatically checked-in are accessible from the History View
11. All the possible pending changes…
Figure 11.1 shows all the combinations of changes you may eventually see in the Pending Changes view. Fortunately many of these cases are rare and the view is usually much less cluttered…Figure 11.1 – All the possible pending changes
(1) Pending Patches node contains all patches that need to be reviewed by the user and manually merged or removed
(2) Workspace node decorated as (offline). This workspace belongs to a repository that is currently not accessible. User should login. The component nodes are decorated with a little gray round circle as a reminder that they are offline – i.e. the synchronization information is out of date and no changes can be flowed.
(3) Workspace node representing the workspace named ‘Source Control Workspace’ collaborating with the stream named ‘Source Control’. It is online – Jazz Source Control supports working with workspaces from different repositories – unlike the previous workspace shown in (2). The component nodes are shown right under the workspace node.
(4) Component node named ‘Filesystem’ in workspace ‘Source Control Workspace’ is pretty busy. It has pending conflicts (red cross decoration), pending local changes (yellow underlay) and outgoing change sets (left to right arrow). More details are available under this node.
(5) Unresolved folder contains local changes and conflicts for its parent component. It is good practice to resolve all unresolved items in this folder before accepting or delivering change sets. This means checking in local changes and resolving conflicts.
(6) Local change that represents a content change to the resource AbstractAdrenalineOptimization.java in the Eclipse workspace. The user can undo this local change or check it in one of their outgoing active change sets.
(7) Conflicted item representing a content conflict on the resource AbstractAdrenalineOptimization.java. The user has to decide between two versions of that modified file. User can also decide to auto merge or manually merge the content of these two conflicting versions.
(8) Outgoing current change set. This node represents a change set. It is outgoing because it is under the Outgoing folder, which means this change set does not exist yet in the target flow of this workspace, the stream Source Control. It has a little triangle decoration which means it is the current change set – the change set the developer is currently working on. It is not completed which means the developer can continue to check-in more changes into it.
(9) Outgoing file change. This node represents a content change for the resource AbstractAdrenalineOptimization.java. The developer can double click on this node to see that chance in a compare editor. User can undo that change.
(10) Outgoing completed change set. This change set contains a bug fix for defect 50000. It can no longer be edited and is ready to be delivered.
(11) Outgoing completed file change. This describes the actual fix for defect 50000.
(12) Work item associated to an outgoing change set. This work item describes the purpose of the change set.
(13) Suspended change set – it is an outgoing change set that was suspended e.g. to work on something else. Can be resumed to become outgoing again. Can also be discarded if it is no longer needed.
(14) Outgoing baseline. A baseline that can be delivered. The node can be expanded to reveal its outgoing change sets which will be delivered with that baseline to the flow target.
(15) An incoming baseline which contains one change set not in the workspace named Source Control Workspace. It can be accepted to be up to date with the flow target Source Control.
(17) Component node with a custom flow target to the stream named ‘Repository 0.6 RC5’. The other components in the workspace use the workspace’s flow target set to stream ‘Source Control’. Flow targets can be set at the workspace level and overridden at the component level.
(18) Unloaded component. The component ‘Repository Client’ from workspace ‘Source Control Workspace’ is not loaded into the Eclipse workspace. I.e. non of the projects it contains are shared. The component icon is shallow for non loaded
components and full for loaded ones. Any component can be individually loaded or unloaded as needed.
(19) Outgoing component deletion and incoming component addition. It is possible to flow entire components between workspaces and streams. In this case the developer removed the Server component from their workspace ‘Source Control Workspace’. Developer can deliver that component deletion to their stream, i.e. remove that component from the stream ‘Source Control’ as well. Someone added a new component named Work Item to the stream and our developer can accept it into their workspace ‘Source Control Workspace’. This will also load its content into the eclipse workspace.
(20) A component pending gap resolution, which results from accepting a change set with a gap and merging it into the repository workspace instead of accepting all of the change sets that fill the gap. Merge the changes from the source change set (the change set that you are attempting to accept) into a resulting change set in the Gap editor. You can open the editor by selecting the “Open Gap editor” context menu item on the component node.
(21) The resulting change set of the Gap workflow. A resulting change set has not been completed and has a delta overlay at the top right of the icon (representing a link to a source change set; see #23 or #24 below).
(22) This outgoing change set was a resulting change set in the Gap editor but is now completed. The delta overlay at the top right of the icon indicates that it is linked to a source change set. In this case, the source change set is also displayed in the incoming folder, so a label decorator of “Linked to an Incoming Change Set” indicates that these two change sets are semantically equivalent.
(23) This is a change set that has a link to one or more work items as well as a link to another change set (since it was the source change set in the Gap editor). This is indicated by a combination of a delta overlay (see #24) and a work item overlay (see #10) at the bottom right of the icon. In the Gap workflow, you can accept a source change set with a gap and merge it into your repository workspace by applying similar changes into a new resulting change set. After the merge is complete, you can create a link between the original change set and resulting change set.
(24) This is a change set that has a link to another change set and was the source change set in the Gap editor. This is indicated by a delta overlay at the bottom right of the icon. In the Gap workflow, you can accept an original or source change set with a gap and merge it into your repository workspace by applying similar changes into a new resulting change set. After the merge is complete, you can create a link between the original change set and resulting change set.
12. Discard a catastrophic change set from a stream
Bill returned from a long week-end. He finds out the build is broken. He sees two incoming change sets from his teammate Markus (Figure 12.1). They seem really wrong. What to do?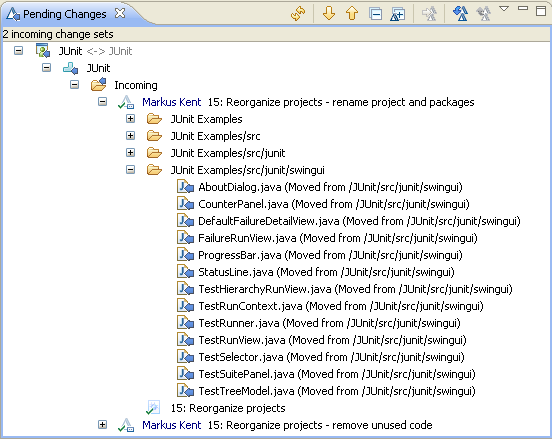
Figure 12.1 – Two very bogus change sets were delivered to the stream
Markus is off for the day. Bill wants the build to be green as soon as possible and he needs to fix the stream ‘JUnit’. The tests are green for his repository workspace, a very good indication Markus’s change sets are the source of the breakage. If Markus’ changes had been small Bill would have tried to reverse them – i.e. deliver a change set that returns the stream to the state it was in before Markus’s changes. But the change sets look really absurd. Bill decides to replace the component JUnit in the stream with the version from his own workspace (Figure 12.2).
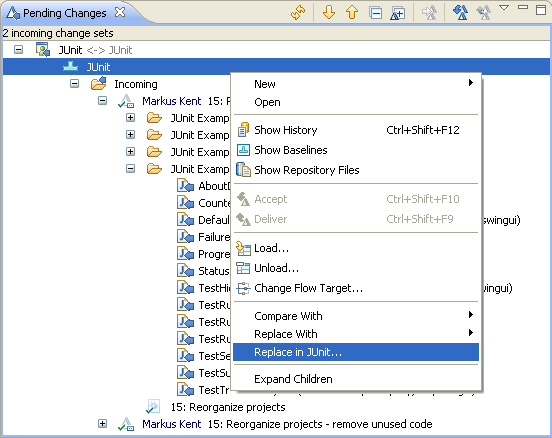
Figure 12.2 – Replacing the component JUnit in the flow target JUnit stream with the one in the workspace
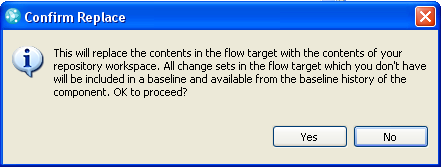
Figure 12.3 – Replacing a component requires a confirmation
After Bill says ‘yes’ the two incoming change sets from Markus are removed from the stream and Bill is in sync with the stream as expected – rather Bill forced the stream to be in sync with his workspace (Figure 12.4).

Figure 12.4 – component JUnit has been replaced in the stream
Bill is satisfied to see the following build is green. Well done! But what is he going to say to Markus the next day? Figure 12.5 shows what Markus sees the next time he connects to the server.
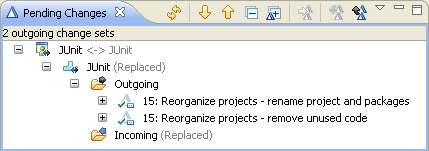
Figure 12.5 – Markus sees the component JUnit has been replaced in the stream
Markus notices two things. First, someone replaced the component in the stream, which is unusual. Second, the two change sets he had delivered earlier are showing as outgoing. He is thinking about re-delivering them, and he could, but the unusual component replacement prompts him to re-examine his orignal changes. He discovers that he had accidentally deleted more code than he meant to. His changes were really unusable. Bill saved the day. Markus accepts the incoming replaced component to abandon his changes. His Pending Changes view would now look like in Figure 12.4.
Note. ‘Replace in…’ is meant to be used in exceptional circumstances by team leaders when the stream is unstable and needs to be returned to a safe point. A particular version found in a workspace or from a particular baseline. Most commonly a developer would deliver a new change set that fixes the problem. That change set could be associated with a work item explaining why the changes were reversed – thus providing better traceability than the ‘Replace in’ solution.
Copyright © 2012 IBM Corporation