Install CLM on WebSphere Application Server single server and IBM HTTP Server with IBM UrbanCode Deploy 
Authors: LaraZiosi, TWikiUser Build basis: IBM Collaborative Lifecycle Management 5.0.0, IBM UrbanCode Deploy 6.1.0.3, IBM WebSphere Application Server 8.5.5.2
This article shows an examplar IBM UrbanCode Deploy process that can be used to automate the installation and setup of IBM Collaborative Lifecycle Management on a single server. The process also automates the installation of IBM WebSphere Application Server, and of a reverse proxy based on IBM HTTP Server.
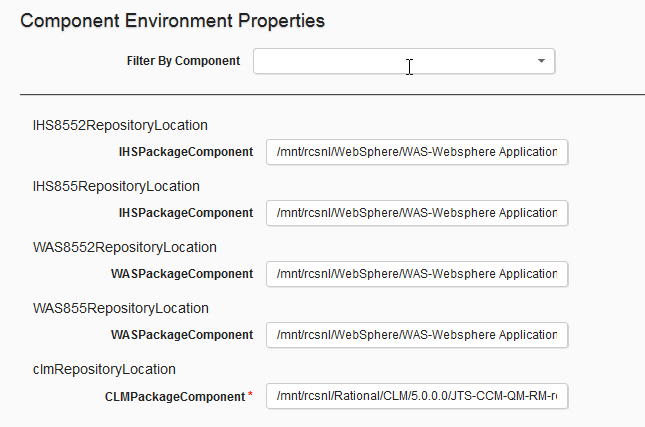
and the following Component Environment properties, that refer to the Installation Manager Repositories from which to install CLM, WebSphere Application Server and IBM HTTPS Server.
Introduction
Topology
There are three machines in this topology:- VM1: contains the installation of IBM UrbanCode Depoy server and one agent used for version imports
- VM2: contains the installation of IBM WebSphere Application Server, IBM Collaborative Lifecycle Management and one agent
- VM3: contains the installation of IBM HTTP Server and one agent
Prerequisites
IBM UrbanCode Deploy processes can only be imported on exactly the same server version and plug-ins. The attached Application process was developed on this configuration:- IBM UrbanCode Deploy 6.1.0.3
- Installation Manager Plug-in 2
- IBM WebSphere - Application Deployment Plug-in 73
- IBM Installation Manager 1.8.0
- IBM WebSphere Application Server 8.5.5.2
- IBM CLM 5.0.0
- Oracle 11g
How to use this process
To use this process, proceed as follows:- Make sure that you have installed the exact versions of the plugins named above
- From the Application page in UrbanCode Deploy, import the Application JSON file
- Add two agents to the Application Environment
- Add the following components to the agent on VM2:
- InstallationManagerComponent
- CLMPackageComponent
- WASPackageComponent
- OracleDriver
- WASProfile
- WASCompleteConfigForCLM
- JTSSetup
- Add the following components to the agent on VM3:
- InstallationManagerComponent
- IHSPackageComponent
- Unzip the attached workspace.zip so to create the directory
/workspace
. If you want to change this path, you will have to adjust it in the Configuration tab of each component. - Download the IBM Installation Manager 1.8.0 installer and copy it to:
/workspace/InstallationManager/1.8.0/agent.installer.linux.gtk.x86_1.8.0.20140902_1503.zip
- Import versions of all the components
- Set up the following Environment variables:
| LDAP.password | |
| LDAPJazzAdmins | |
| LDAPJazzDWAdmins | |
| LDAPJazzGuests | |
| LDAPJazzProjectAdmins | |
| LDAPJazzUsers | |
| OraclePassword | |
| WASNodeName | WASNode01 |
| WASPassword | |
| WASUser | wasadmin |
| WASProfileName | AppSrv01 |
| WASServerName | server1 |
and the following Component Environment properties, that refer to the Installation Manager Repositories from which to install CLM, WebSphere Application Server and IBM HTTPS Server.
Process design principles
Detailed process design
Sub-Section text Sub-Section text Sub-Section text Sub-Section text Sub-Section text Sub-Section text Sub-Section text Sub-Section text Sub-Section text Sub-Section text Sub-Section text Sub-Section text Sub-Section text Sub-Section text Sub-Section text Sub-Section text Sub-Section text Sub-Section text Sub-Section text Sub-Section text Sub-Section text Sub-Section text Sub-Section text Sub-Section text Sub-Section textHeading 1
Related topics: Deployment web home, Deployment web home
External links:
Additional contributors: TWikiUser, TWikiUser
Contributions are governed by our Terms of Use. Please read the following disclaimer.
Dashboards and work items are no longer publicly available, so some links may be invalid. We now provide similar information through other means. Learn more here.