| Description | |
|---|---|
| Artifact Editor |
In the artifact editor, only the members of the selected team area are now populated in the Owner list
In the artifact editor, only the members of the selected team area are now populated in the Owner list. If the selected member is not a member of the team area, an icon is shown next to the Owner list. When you hover over the icon, the following hover help is shown: |
|
The artifact editor message window is now placed inline next to the artifact title
Until now, when a message was displayed in the artifact editor message window, the message window occupied the top line above the artifact title. When the message was shown or when the message window was closed, the contents below the message in the artifact editor page were shifted down or up. Now, when a message is displayed in the artifact editor message window, the message window is placed inline, next to the artifact title. It does not occupy the top line above the artifact title. Also, when the message is shown or when the message window is closed, the contents below the message in the artifact editor page are not shifted down or up. |
|
| Browser Support |
IBM Engineering Test Management now officially supports the Chromium-based Microsoft Edge browser
IBM Engineering Test Management (ETM) now officially supports the Chromium-based Microsoft Edge browser for Windows. Also, the Microsoft Internet Explorer browser is no longer supported by ETM. |
| ETM Excel/Word Importer Utility |
Engineering Test Management Excel/Word Importer Utility now supports linking test cases to the module requirements
By using the Engineering Test Management (ETM) Excel/Word Importer Utility, you can now link the test cases to the module requirements. |
|
ETM Excel/Word Importer Utility logs now include the input parameter values and more detailed information
The Engineering Test Management (ETM) Excel/Word Importer Utility logs now include the input parameter values, such as the values that are provided and modified by the user. In addition, the debug log file contains detailed information about the import (Import for Offline - ETM Excel Importer only) and export (Export to File or Export to Repository) operations.
|
|
|
ETM Excel/Word Importer Utility now prompts only once to authenticate with ETM and DOORS Next
During the import operation, the Engineering Test Management (ETM) Excel/Word Importer Utility now prompts only once to authenticate with ETM and Engineering Requirements Management DOORS Next (DOORS Next). If the authentication details that you entered to access ETM are not accepted to access DOORS Next, you will be prompted to authenticate with DOORS Next. You can choose to enter different authentication details for DOORS Next. The authentication details that are entered to access ETM and DOORS Next are used for all the operations. |
|
|
ETM Excel/Word Importer Utility now supports configurable logging level for the log file
The ETM Excel/Word Importer Utility now supports multiple logging levels to control the amount of information that is written to the log file. C:\Program Files\IBM\ETMWordImporterX64ForDotNET45\settings.txt. |
|
|
ETM Excel/Word Importer Utility now supports saving user credentials
You can now avoid entering the authentication details every time you access the Engineering Test Management (ETM) Excel/Word Importer Utility. To do so, select the Remember me checkbox in the Export to ETM dialog box that results in saving your authentication details to the application-specific local configuration file. |
|
|
ETM Excel/Word Importer Utility progress indicator now includes the error code and a message
The Engineering Test Management (ETM) Excel/Word Importer Utility progress indicator now includes the error code and message if an export operation fails. |
|
|
Kerberos authentication support is provided for the ETM Excel/Word Importer Utility
Kerberos is now added as an authentication type in the Export to Repository user interface for the ETM Excel/Word Importer Utility. As a result, you can now import the test artifacts and requirements to servers that are configured with Kerberos authentication.
For more information on the available authentication types, see ETM Excel/Word Importer Utility. |
|
| Execution |
A new project property is added to disable the pre-population of the Summary and Description fields when you create a defect
Until now, when you created a defect, the Summary and Description fields were populated with information from the related test script. This information was sometimes too general and not useful, oftentimes manually deleted from the defect. As an alternative, a new project property, Disable pre-populating the summary and description of a new defect with the related test script information is added under the Execution Preferences section in the Manage Project Properties > Properties page. The new project property is deselected by default. When you create a defect with the new project property deselected, the Summary and Description fields are populated with information from the related test script. When you create a defect with the new project property selected, the Summary and Description fields remain blank. |
|
A new project property is added to select the Modify execution variable values checkbox by default
A new project property, Select the Modify execution variable values checkbox by default in the Run Test Case and Run Test Suite dialog boxes, is added under the Execution Preferences section in the Manage Project Properties > Properties page. When you select this project property, the Modify execution variable values checkbox is selected by default in the Run Test Case and Run Test Suite dialog boxes. As a result, the Next button is enabled and the Finish button is disabled in the Run Test Case and Run Test Suite dialog boxes. With this change, it is now mandatory to review or modify the execution variable values before you start the test. |
|
|
New preconditions are added to prevent the execution of test case execution records and test suite execution records if the associated test plan is not approved
A new precondition, Disallow execution of Test Suite Execution Record until the associated Test Plan is approved is added for the Execute Test Case operation. When this precondition is enabled for a user role, the user with that role cannot run the test case execution record that is associated with a test plan that is not approved. |
|
|
New preconditions are added to prevent the execution of test case execution records and test suite execution records that are not associated with a current iteration
A new precondition, Disallow execution of Test Case Execution Record without current iteration association is added for the Execute Test Case operation. When this precondition is enabled for a user role, the user with that role cannot run the test case execution record that is not associated with the current iteration. |
|
|
Support mapping of test case result categories and test case result custom attributes to the target project area while duplicating a test case or test plan
You can now map the artifact categories and custom attributes for the test case results when you copy a test case or test plan from one project area to another project area. |
|
| Export/Print |
Improved usability of the Manage Export Jobs Queue table view
You can now use the filtering option for most of the columns in the Manage Export Job Queue table view. A new column, Completion Time, is added to the table view. Also, you can drill down the export jobs in the queue to view related jobs. |
|
New project property is added to restrict the Export PDF menu options
A new project property, Artifact Export Preferences, is added under the Execution Record Preferences section in the Manage Project Properties > Properties page. This project property is added to restrict the Export PDF menu options in the test artifact editors that support PDF reporting. This project property includes the following preferences:
By default, all preferences are selected. You can view the options in the Export PDF menu of the test artifact editors that support PDF reporting. |
|
|
PDF and CSV Exports are registered as resource-intensive scenarios in ETM
From the 7.0.1 release, the PDF and CSV Exports are registered as resource-intensive scenarios. Following are the scenario names:
When the verbose logging is enabled for these resource-intensive scenarios, the following additional information is captured in the ETM logs:
For more information about description and best practices of these resource-intensive scenarios, see Known Resource-intensive Scenarios. |
|
| Process Template |
Configuration Lead user role is created when you create a project area
The Configuration Lead user role is now created by default, when you create a project area by using the following process templates:
A user with the Configuration Lead role is provided with all the permissions that are required to work in the configuration management enabled project area. A user with the Configuration Lead role is also provided with all the permissions that are provided to the Test Team Member role. |
|
New SAFe 5.0 process templates
You can now use the following new Scaled Agile Framework (SAFe) process templates to create a project area:
The process templates can also be used to create a lifecycle project area.
|
|
| Reporting |
Ignore or unignore skipped resources in the Manage Skipped Resources table view
You can now use the new actions and the improvements to the Manage Skipped Resources table view to manage skipped resources. The following new actions are added to the Manage Skipped Resources table view:
The following improvements are made to the Manage Skipped Resources table view:
|
|
Manage Skipped Resources improvements
By using Manage Skipped Resources, you can see the list of the Engineering Test Management (ETM) skipped resources (TRS 2.0 data source) in Lifecycle Query Engine (LQE) or Link Index Provider (LDX). The ETM application evaluates and determines the possible skipped resources to track them in its own repository. You can use the page actions, sort, group, or filter options in the skipped resource list.
|
|
|
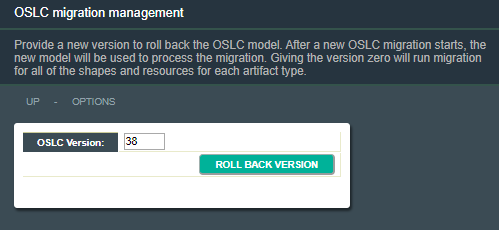
OSLC Migration now supports model version rollback
System administrators can now roll back the model version of OSLC Migration. They can perform OSLC Migration from any model version that is provided. |
|
| Tools |
Copy Project Properties Utility is upgraded to copy additional project properties
Copy Project Properties Utility is now updated to copy most of the project properties. By using this Utility, you can copy the following project properties from the source project area to the target project area:
The following project properties cannot be copied from the source project area to the target project area by using this Utility:
Note: If the Team Areas & Timelines project property is enabled for a project area, then a user cannot disable it. This project property is intentionally not copied from the source project area to the target project area. |
| Usability Enhancements |
A new project property is added to enable the suspect result status for test case execution records
A new project property, Enable the Suspect Result status for test case execution records, is added under the Execution Record Preferences section in the Manage Project Properties > Properties page. When you select the new property, a test case execution record is displayed with the Suspect Result status for the following conditions:
The Suspect Result status is available in all the list views of the test case execution records. It is also displayed in the test case execution record editor and in the test case execution record dashboard viewlet. The Suspect Result status change might also be reported by the email notification system, if configured. Image of the Suspect Result status message: 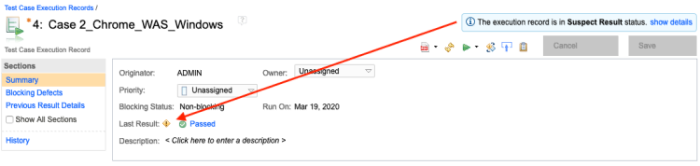
|
|
A new row level menu action is added in the test artifact list views to perform bulk updates to multiple columns simultaneously
Until now, it was possible to perform bulk updates to a single column by clicking the action icon in the column header, but it was not possible to perform bulk updates to multiple columns simultaneously. A new row level menu action, Bulk update is now added in the test artifact list views to perform bulk updates to multiple columns simultaneously. The Bulk update dialog box contains all the columns that are displayed in the test artifact list view and support the bulk update option. The columns that are not displayed in the test artifact list view or do not support the bulk update option are not included in the Bulk update dialog box. Image of Bulk update dialog box:  You can now perform bulk updates to multiple columns simultaneously in the following test artifact list views:
|
|
|
Associate a test script to several test cases in a single operation
You can now associate a test script to multiple parent test cases in a single operation. The association can be configured from the Parent Test Cases related information panel in the test script editor. Image of the Associate Test Script with Test Case: |
|
|
ETM improvements to decrease ELM server shutdown time
Until the 7.0.1 release, sometimes, the ELM server shutdown was blocked because of the running ETM asynchronous tasks and the resource-intensive scenarios. During this time, the ELM server was unusable. |
|
|
Link multiple test cases to the same set of remote artifacts in bulk
You can now link multiple test cases to the same set of remote artifacts. For example, you can link test cases to requirements, development items, and architecture elements from Requirements Management, Change Management, and Architecture Management applications, respectively.
|
|
|
Non-admin users can now access the Manage Project Properties page
Until now, the Manage Project Properties menu was available to JazzAdmins, JazzProjectAdmins, or the project area administrator only. Other users were unable to access the Manage Project Properties page. For this reason, non-administrator users who are members of the project area were unable to modify or create test environment types and attributes.
|
|
|
Test cases generated during reconciliation are added to a test plan in the same sequence as the corresponding requirements
Until now, test cases that were generated in the Reconcile Requirements dialog box in a test plan editor were added to the test plan, but not in the same sequence as the corresponding requirements were added to the requirement collection or module. Now, test cases that are generated in the Reconcile Requirements dialog box in a test plan editor are added to the test plan in the same sequence as the corresponding requirements were added to the requirement collection or module. |
|
| Web UI |
New style for UI components: Buttons, links, breadcrumbs, modal dialog boxes, and tabs
Select user interface components (buttons, links, breadcrumbs, modal dialog boxes, and tabs) are restyled in IBM Engineering Lifecycle Management (ELM) products as part of the ongoing task to align with IBM's open source Carbon Design System. Image of buttons (before and after): 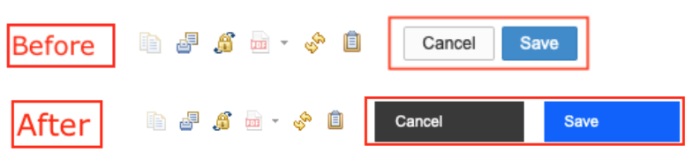 Image of links in list view (before and after):  Image of breadcrumbs in ETM editor (before and after):  Image of Create Test Case dialog box (before and after): 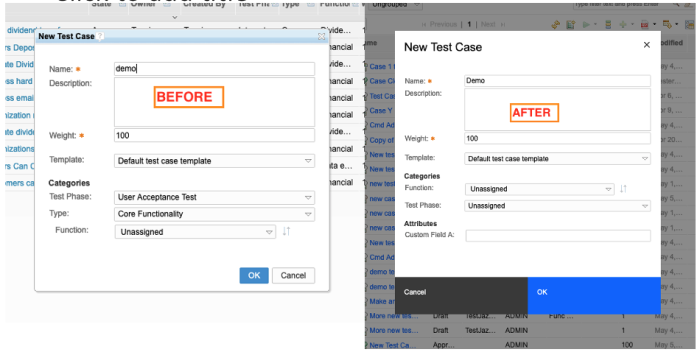 Image of ETM work space tabs (before and after): 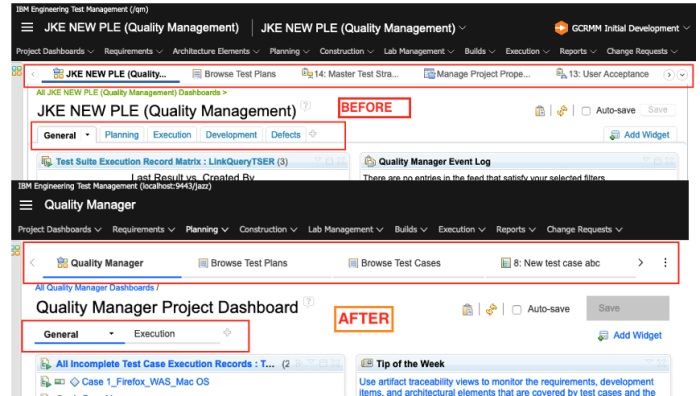 |
| Dashboards and work items are no longer publicly available, so some links may be invalid. We now provide similar information through other means. Learn more here. |