The Jazz Tutorial
Summary
This tutorial offers you the opportunity to take a tour of some of the major Jazz components. You may read it or, better yet, take the tour yourself with this tutorial as your guide.
Introduction
Welcome. This tutorial will take you on a tour of some of the major Jazz components. The tutorial is hands-on (although you can also enjoy it from the comfort of your armchair). You should already have a Jazz server and an Eclipse-based Jazz client up and running. If you do not have the client and server running please refer to the Installation Overview. The intention of this tutorial is to become familiar with Rational Team Concert, not to setup a production environment. You should plan on taking a few hours to complete this tutorial.
Tutorial Road Map
During this tutorial you will learn how to do the following things.
- Set up a Project: Create a Jazz repository connection and set up your project and your team (even if it’s just you).
- Join a Team: Join a team or connect to a project area
- Explore Work Items.
- Use Iteration Plans: Create an iteration plan and dispatch work items to your team.
- Check out Team work: See what’s going on within your team and the work you have to do.
- Save and share code: Check-in some code to the Jazz repository and deliver it to your team. Also, make and deliver changes to that code.
- Use the Jazz Web UI: Connect to the Jazz repository from a web browser and browse your project area.
- Examine Jazz build.: You will set up a local jazz build server, runs some builds, and learn how build is integrated with the rest of Jazz.
Administrative Setup of a Project and a Team
You are understandably eager to try Jazz out, so let’s jumpstart your adventure and complete the Jazz setup. This should only take a few minutes. The first step is to perform some basic administrative tasks. Using a Jazz wizard you will connect to the server and create a project area, which defines your project to Jazz. You will also create a team area which identifies the team members in your project and everything else you need to use Jazz. Team members in Jazz are known as users. You will define a process for your project area using a predefined process template supplied by Jazz. The process you choose will initialize your Jazz configuration with everything you need to try out other Jazz components like work items and Jazz source control.
Connecting to the Repository the First Time
If you are not already there, open the Work Items perspective (this perspective has the following identifier  immediately to the right of the tool bar). If this is not the current perspective, from the menu bar select Window > Open Perspective > Others… > Work Items.
- Open the Team Artifacts view.
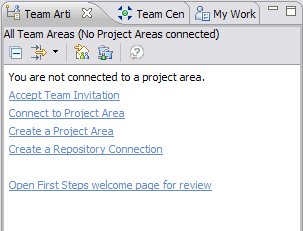
- Click on the Create Repository Connection hyperlink in the Team Artifacts view. In the resulting dialog enter the server location (a URL of the form:
http://<server>:<port>/jazz) and the user name and password you created when you set up the server. If you are running the server on your own computer the drop down list under the URI field will provide a usable value. Press Finish. Note that if you followed the steps in the “Connect to the Jazz Server” section of the Jazz Client Setup Guide and you are using the same Eclipse workspace, you have already performed this step.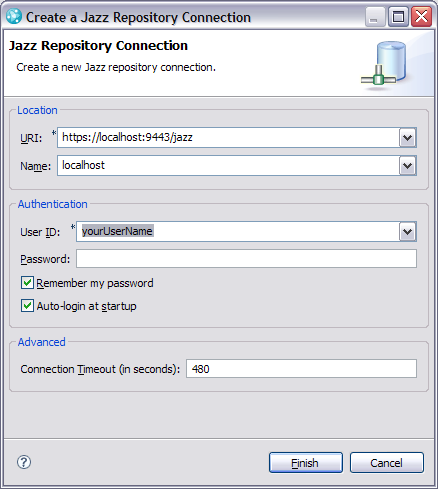
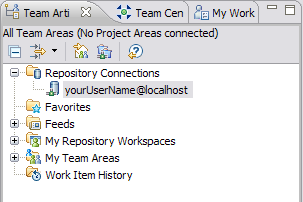
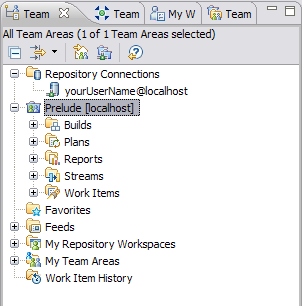
- Your repository connection will appear in the Team Artifacts view.
Creating a Project Area and Team Area
- In the Team Artifacts view, expand the Repository Connections item and select your repository connection as shown above. Then select the Connect to Project Areas… icon (
 ) from the view’s tool bar.
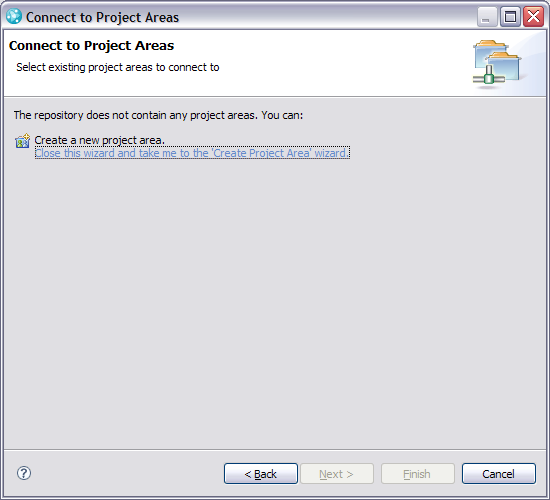
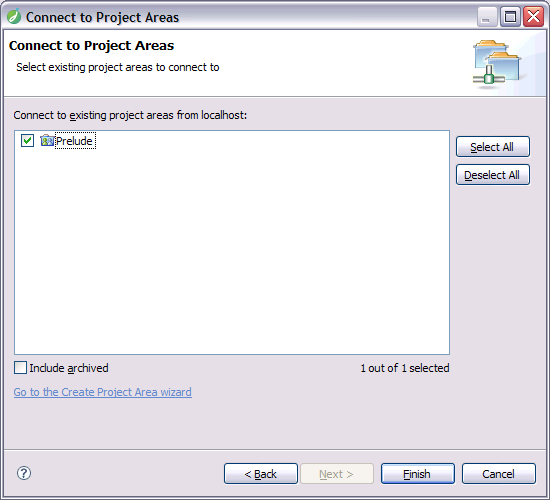
 - On the Connect to Project Areas wizard dialog, click on the Close this wizard and take me to the ‘Create Project Area’ wizard. link.
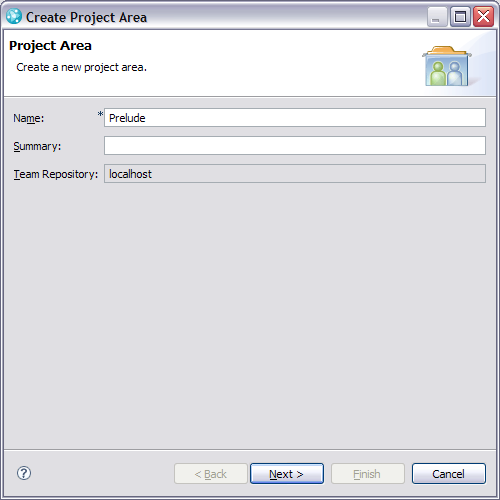
- The Create Project Area wizard will appear. Since this project and tutorial serves as a short introductory work to the larger Jazz opus, it is appropriate to use the project name Prelude. You may use a name of your choosing and adjust the rest of the tutorial accordingly. Enter the name of your project area and press Next.
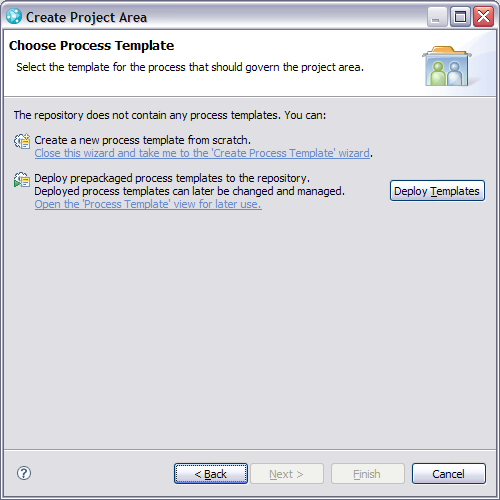
- If you are working with an empty repository, there are not any process templates defined yet in the repository and this page will appear. If you see this, click on the Deploy Templates button.
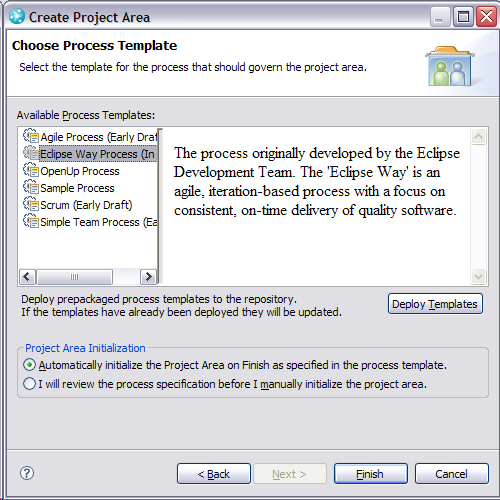
- The next page lists Jazz process templates with descriptions. Examine the various choices. Select the Eclipse Way Process, check that the Automatically initialize the Project Area… radio button is selected and press Finish.
This process template will create everything you need to continue using Jazz (a project area, a team area and a stream to share project content among your team). You will take a look at the project area and team area in the next several steps. You will look at using the stream a bit later.
After initialization completes a set of work items are created that you can use to track remaining setup activities. The Work Items view was automatically opened in the lower right pane of the Jazz IDE. (The id numbers assigned to the work items might differ from what is shown.) Work items will be discussed in the next section of the tutorial.
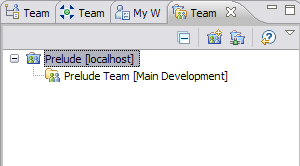
- Also notice that the Team Artifacts view shows the created project area.
- A view named Team Organization opened next to the Team Artifacts view. If you expand your project area you will see that a default team area has been created named Prelude Team.
Sidebar: Creating Users and Process Areas
In the previous section of this tutorial, we guided you through the process of creating a project area and team area. The typical steps are outlined in the Team/Jazz cheat sheet Setup a Jazz Repository available from the Help>Cheat Sheets… menu.
Adding Team Members to Your Team Area
A team area has several functions. For now the tutorial will focus on defining team members (Jazz users) to your new team area. As part of this tutorial you will add three users
- Name=Chris, username=chris, email=chris@example.com, license=Developer
- Name=Jamie, username=jamie, email=jamie@example.com, license=Developer
- Name=Build, username=build, email=build@example.com, license=Build System
You may add others if you wish.
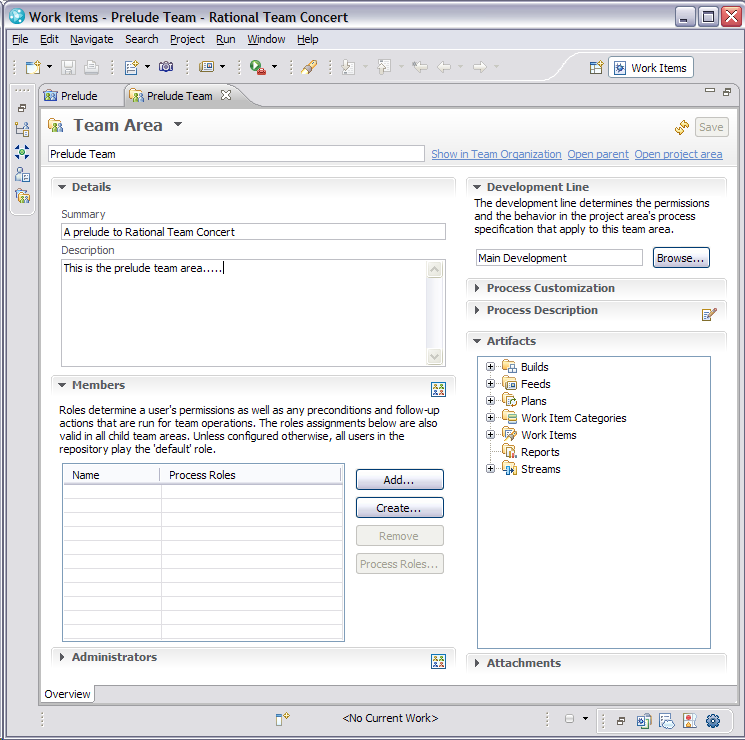
- From the Team Organization view select your team area and select Open in the context menu. The Team Area editor will open. Do not edit the Project Area during this task. Edit the team area. You may close the Project Area editor if you wish. Fill in the Summary and Description if you wish.
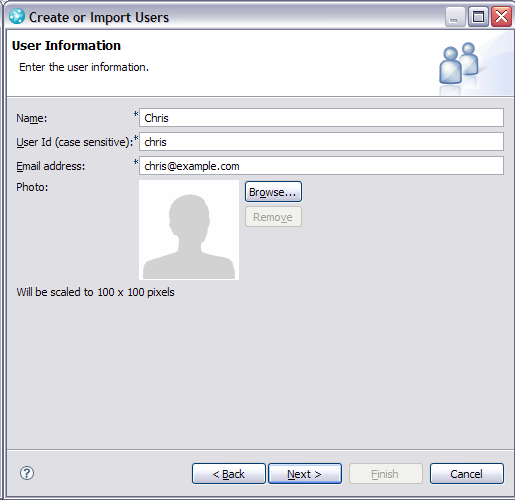
- Press the Create… button and choose Create a new user in wizard dialog. On the User Information page and enter the name, user ID, and email address. The tutorial will be using a fictitious developer named Chris. You can use a different name if you wish. Make careful note of the user ID, since you will need to know this later on. Press Next.
Note: The default password is the same as the user name. For example, the username is chris and the password is chris.
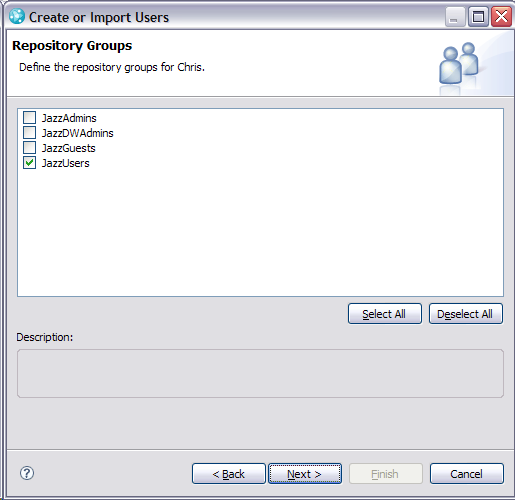
- On the Repository Permissions page, check the JazzUsers permission. We will leave the admin permission (JazzAdmins) to the ADMIN id for now. Press Next.
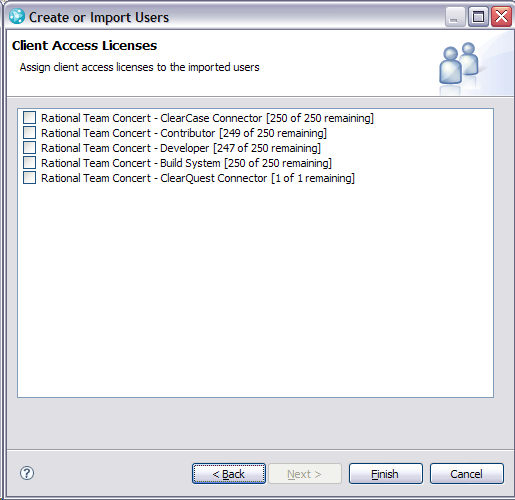
- Choose the Rational Team Concert – Developer Client Access License for Chris. Press Finish. This new user should now appear in the Members section of the Team Area editor.
- Repeat steps 2 through 4 to add:
- A user named Jamie for use in Getting Started With Jazz Source Control.
- A user named Build for use in Using Jazz Build.
- (Optional:) Yourself and any other members of your team.
- From the Members section select the first user you created (in our case: Chris). Press the Process Roles… button.
- On the Process Roles page, select contributor from the Available Roles list and press the Add button. The contributor role will appear in the Assigned Roles list. Press Finish.

- Repeat the steps 7 and 8 for each member of your team, including yourself.
- Save the editor (keys Ctrl-s or menu action File > Save). A dialog will appear asking you to select the users who should receive a team invitation email.

Note: The Team invitation feature can be fully tested only if the SMTP server properties for email notification are correctly set. If it is not the case, don’t worry, we will give you at least a taste on this feature. - Select only ONE of the users (your username is a good choice) and press OK. This will launch the Invite to Join Team dialog. When you select only one user you will see the invitation properties. If you select more than one user, you will only see the e-mail subject and the first few paragraphs of the invitation.
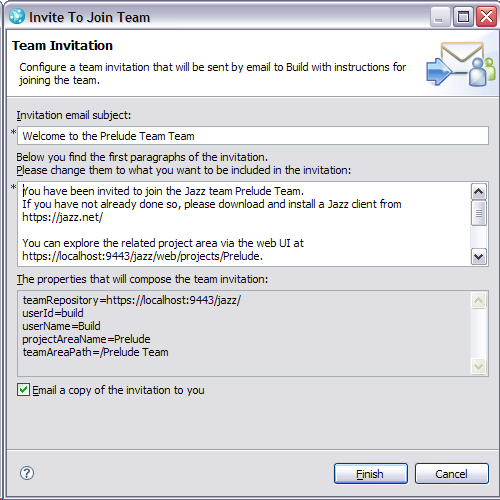
- Personalize the invitation subject, the associated message and uncheck the Email a copy of the invitation to you check-box.
- As mentioned previously, unless the Jazz server properties are set to enable email notification, an email invitation will not be sent. In this example Chris, Jamie and Build are not really a member of your organization so do not press Finish. Instead, copy the values under The properties that will compose the team invitation and paste them into your favorite text editor then Cancel the dialog. If your server is correctly setup for email notification you may send an invitation to your colleagues (or yourself).
- So far, you have performed all this setup as member of jazzAdmin Repository Group. At this point, it is necessary to exit this Eclipse workspace and start another Jazz in another Eclipse workspace, this time logged in as an actual user in the team area. So close down your Jazz client completely. You’ll create a new Eclipse workspace in the next section.
The setup is complete. You now have a project area and a team area seeded with a couple users. A stream where you can share code with team members is ready. You will learn more about using this in the next section.
During these setup steps you have been using the Jazz Team Process component. You have hardly scratched the surface on how your development process can be taught to Jazz. Hold that thought for a future Jazz adventure.
Joining a Team
The previous section stepped you through some administrative tasks. This was done as a user with jazzAdmin Repository Permissions. The remainder of this tutorial is aimed at an individual developer. The tutorial will use a fictitious developer named Chris, the team member that was added earlier in the tutorial. Use your own id wherever the tutorial refers to Chris if you decided to add someone other than Chris in the administrative tasks.
The first thing you need to do is to start up Jazz and create a new Eclipse workspace. It’s best that you not use the Eclipse workspace you created during the first section of the tutorial.
Once your Eclipse workspace is started, make sure you are in the Work Items perspective. If this is not the current perspective, from the menu bar select Window > Open Perspective > Others… > Work Items then open the Team Artifacts view:
Connect to a Project Area by accepting a Team Invitation
At this point the invited member should have received a mail from the jazzAdmin with text similar to the following (or you have a copy of the invitation properties):
teamRepository=https://localhost:9443/jazz/ userId=chris userName=Chris projectAreaName=Prelude teamAreaPath=/Prelude Team
Note: If you are not using the username chris, change the userId and userName info to match your user information.
Note: The default password for a user is the same as the username. Chris’s username is chris and the password is chris.
- From the Team Artifacts view click on the hyperlink labeled Accept Team Invitation to launch the corresponding dialog.
- Paste in the text field the properties sent in the invitation mail (or copied in the previous chapter).

- Press Finish.
- At this point you should be logged in and connected to the correct project area.
If you were able to connect to the project area using the data sent in the Team invitation you should skip the next section and proceed to Using Jazz Work Items.
If you were not able to connect using the Team Invitation, use the following steps to connect manually.
Creating a Repository Connection and Connecting to a Project Area
- In the Team Artifacts view tool bar select the Connect to Project Areas icon ().
- The Jazz Repository Connection wizard dialog will appear. Make sure Create a new repository connection is checked and press Next.

- The next page of the wizard allows you to define a repository connection. Enter the server location (a URL of the form:
http://<server>:<port>/jazz) and the user ID chris. Press Next.
- The final page of the wizard allows you to select the project areas to which to connect. Make sure the Prelude project area is selected and press Finish.
Using Jazz Work Items
In Jazz, a work item is a generalized notion of a development task. Typical types of work items are defects, enhancements, and tasks. Work items are used as key indicators of project quality and project health along with build status and other indicators. Work items help the team track and coordinate their work. As in a bug tracking system, work items are used for the following purposes:
- To identify and describe activities:
- a bug report
- a feature improvement
- a feature extension
- a simple task like cleaning the code, checking the dependences
- a customer requirement
- To track a work item’s discussion history
- To attach documents and to link it to other artifacts as part of the discussion
But Jazz work items go a step farther. Work items are also used for the following purposes:
- To transfer tasks between the team members
- To link them with then code changes so that you can navigate from code to work item or vice versa,
- To plan these tasks within a development milestone or iteration
- To inform the rest of the team what each user is working on
- To justify your code changes, providing reasons why you are changing code
- To list the content of a new delivery, not just the code changes
- To provide metrics pertaining to the health of the project
When the Prelude project area was first created, several work items were automatically added as reminders to perform certain tasks to complete the setup of your project. This section will take you through finding and editing some of these automatically created work items.
Finding Work Items
The first step is to find some interesting work items, like the ones that were created during the administration section. Jazz provides a query mechanism to find work items within in a project area. The tutorial will help you create a simple query to get you going.
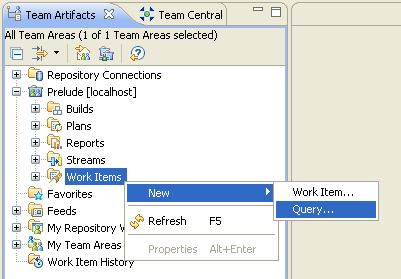
- From the Team Artifacts view, expand the Prelude project area and select Work Items in the list.
- From the context menu, select the New > Query… menu item to open the Work Item Query editor.
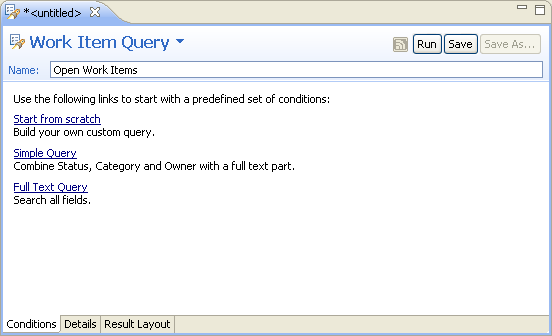
- Give the query the name Open Work Items and click on the Simple Query link.
- In the Status condition, select the Unresolved check box.
- Remove each of the other conditions by clicking on the Remove Condition buttons (
 ). The query should look like the following screenshot:
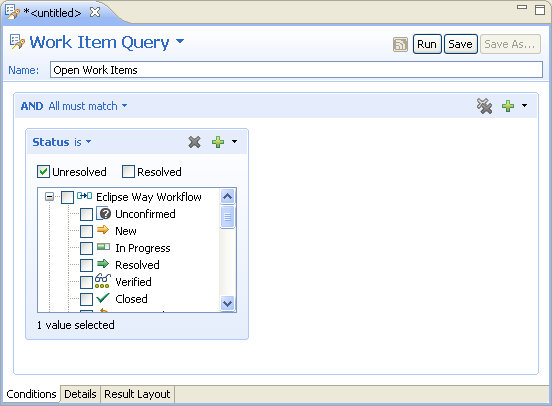
- Click the Save button.
- Click the Run button.
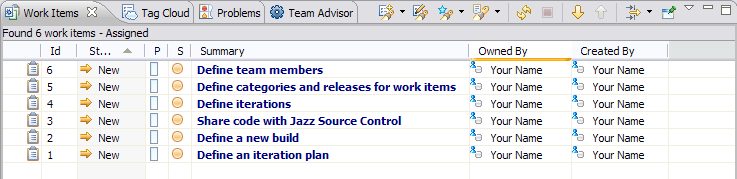
- The query results will appear in the Work Items view showing several work items.
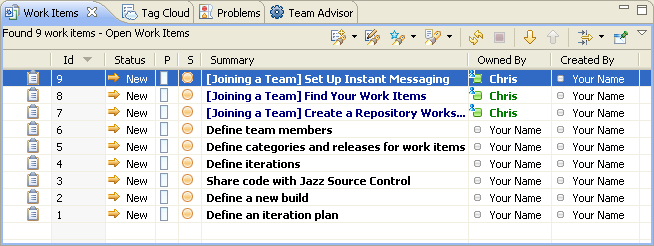
Some of these work items might be missing if you were not able to go through the Accept a Team invitation process. More generally, some of the following screen shots might be different from yours because of these three extra work items.
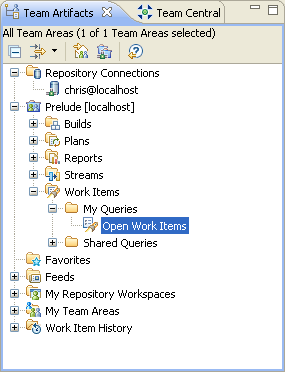
- Notice that the saved query is stored in the project area and will appear in the Team Artifacts view under Prelude / Work Items / My Queries.
Editing Work Items
Now that you have located some interesting work items, notice that you already completed one of the work items in the list: Define team members. You did this when you were logged in as yourself and created the project area and added the users.
Now you can edit this task and mark it as Resolved.
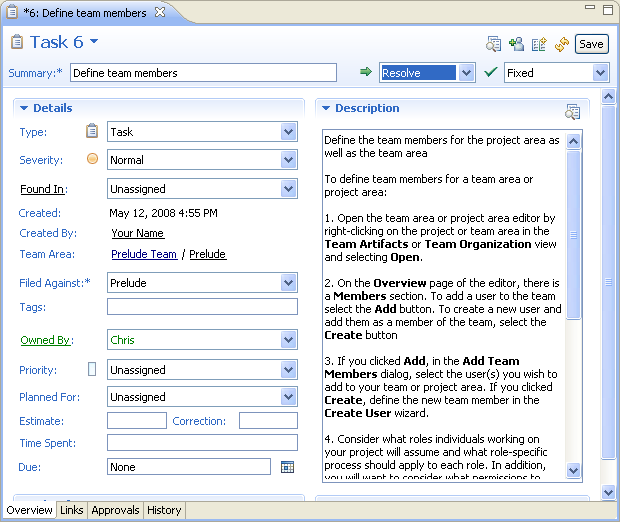
- Double-click the work item titled Define team members. The work item opens in the Work Item editor.
- Because you are currently logged in as Chris, change the owner of this work item to be “Chris”.
- Mark this task as resolved by selecting Resolve in the status drop-down box located along the top of the editor. Notice that the setting to the right is automatically set to Fixed.
- Click Save.
- Double-click the query Open Work Items to run it again. Notice that the work item you just updated is not included in the query results because it is resolved.
Using Jazz Iteration Planning
Teams that follow agile methods typically divide their release schedule into a series of fixed-length development iterations, with fixed end dates. Planning for these iterations involves scheduling the work to be done during an iteration and assigning elements of that work to members of the team. To be effective, plans need to be accessible to everyone on the team and they need to change dynamically over the course of the iteration to reflect the team’s position and direction.
In Jazz, the iteration planning component provides tools to assist with the planning and execution of development iterations. The approach is simple: plans are composed of work items that match certain criteria. Treating plans as a set of work items has the following useful characteristics:
- Plans are live:
- Changing work items changes the plan. For example closing a work item marks the work item as done on the plan, without need for further explicit actions.
- Changing the plan directly changes the work items, or creates new work items if necessary.
- Plans can be viewed in many ways. A plan can easily be regrouped by owner, functional category, duration, or any other criteria that is available on work items. You can view your personal plan (all plan items assigned to you).
- Plans are available to everybody on the team.
In this section you will learn:
- How to create an iteration plan,
- How to edit the plan overview,
- How to balance the workload across team members
Because this tutorial doesn’t contain many work items, it’s hard to show all the interesting aspects of the iteration plans here. But we will cover enough of them to help you understand the basics of planning in Jazz.
Creating a New Iteration Plan
- In the Team Artifacts view, expand the current project area and select the Plans item.
- Select New > Iteration Plan from the context menu to open the New Iteration Plan wizard.

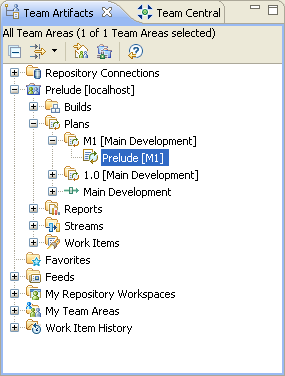
- Give the plan a name like Prelude and set the Iteration field to M1 as shown below. Select the default Team area named Prelude Team created by Jazz during the project area creation.

- Click Finish. The Iteration Plan editor opens on the new plan. You can also see the plan in the Team Artifacts view:
You have now created a new iteration plan that will include all the work items assigned to the Prelude Team that target the milestone M1. For now, none of the work items are assigned to that milestone and team yet. We’ll fix that in the following sections.
Editing the Iteration Plan Overview
The first step is to provide a textual overview of the goals of this iteration plan with some important info that you want to share with your team and with others interested in your team’s work.
- Start editing the plan: Click the Edit Overview button (
 ) on the Iteration Plan editor toolbar, or click start editing.
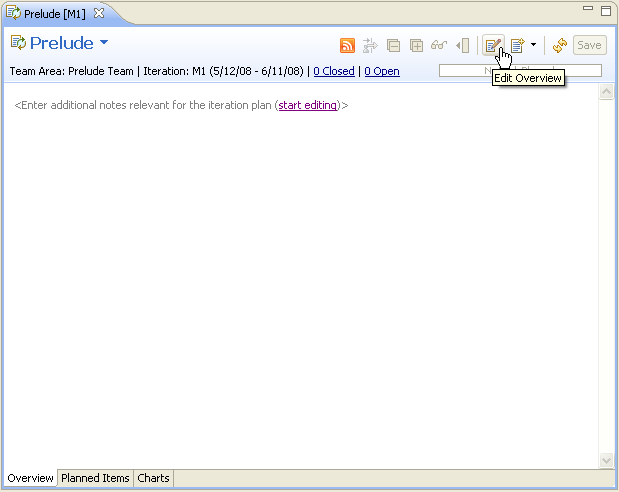
- Type the following text in the overview page:
Goals This plan covers the first iteration of the Prelude project. It lists all the work items that the current Prelude team is in charge of. Team Guidelines Please close your work items immediately after the relevant code is delivered. Please provide a test case for all application interfaces.
- Format the text with headings and lists:
- Place your cursor on the first line of the text with the word “Goals”
- Enter Ctrl+Space to open the content assist tools
- Select Heading 1 (=) from the content assist menu to emphasize this title. Apply the same text style to the “Team Guidlines” line.
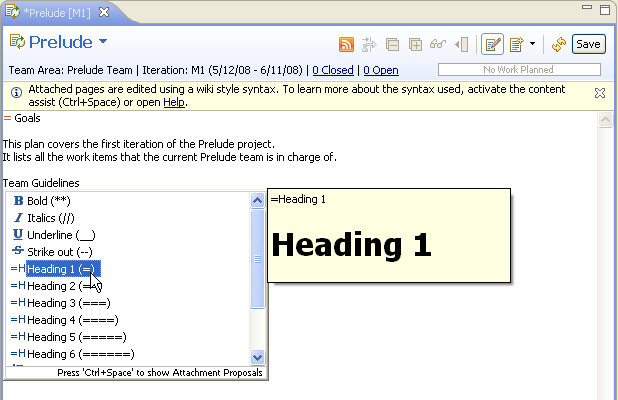
- Use the content assist to apply a bulleted list to the two lines under “Team Guidelines”.
At the end of this step, your overview should look something like this:
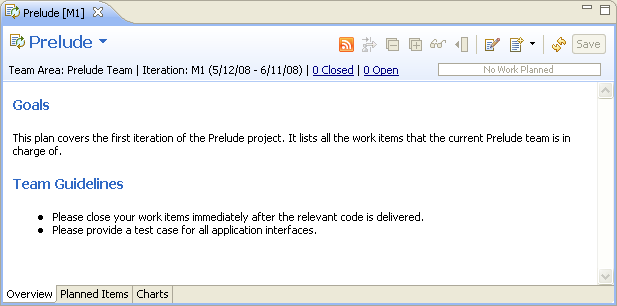
- Click Save.
- Click the Edit Overview button () in the toolbar to exit edit mode.
Editing the Planned Items
Now that our plan has an overview, let’s do some work item triage by dispatching work items to your team members:
- If the open work items are no longer visible in the Work Items view, re-run the Open Work Items query.
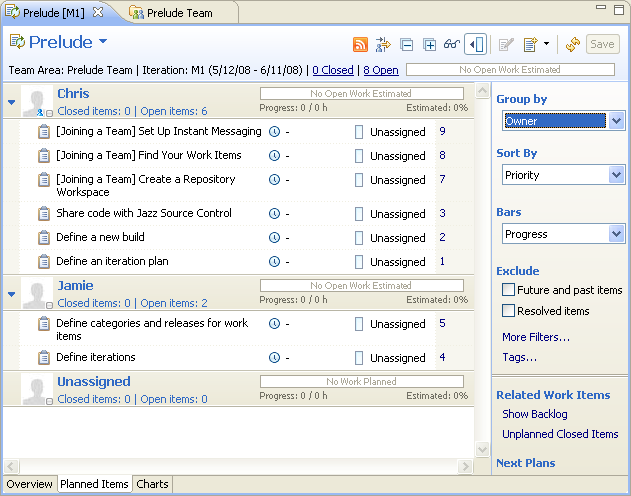
- Switch to the Planned Items tab of the Iteration Plan editor, and change the Group by to “Owner”.
- Drag each work item to the appropriate owner on the iteration plan. This assigns the work item to the Prelude Team and to milestone M1.
- At the end of your work item triage, your plan should look something like this:
- To complete your plan, set the priority and the work estimate for each work item:
- Click the priority icon (
 ) to set the work item priority.
 - Click the estimate icon (
 ) to set the work item estimate.
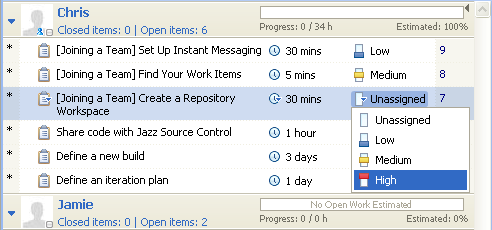
- Click the priority icon (
- Click Save to save the resulting plan.
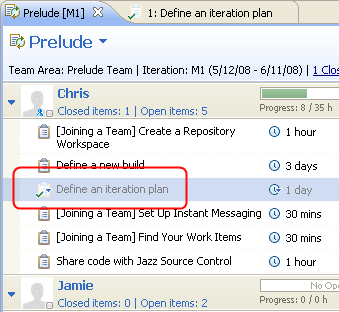
- Now that you have finished your iteration plan, you can resolve the work item that assigned this task to you. From the Iteration Plan editor, double-click the Define an iteration plan work item. This opens the work item in the Work Item editor.
- Mark the work item as resolved, then click Save.

- If you switch back to the iteration plan, you should see that the Define an iteration plan work item has been marked with a check:
Using the Team Central view
The Team Central view is the user-customizable collaboration hub of the Jazz Platform which allows team members to see what’s going on within their team. Team Central is an Eclipse view with multiple sections. A typical section shows a concise summary and connects to another view or editor that presents the information in more detail. The user can configure which sections are visible at any time.
The project’s work items are dispatched to the team members and each user can follow what is happening on the project by opening and configuring their Team Central view.
Built-in sections in the Team Central view
- Open the Team Central view. It should be located next to the Team Artifacts view. If not, from the menu bar, select Window > Show View > Team Central.
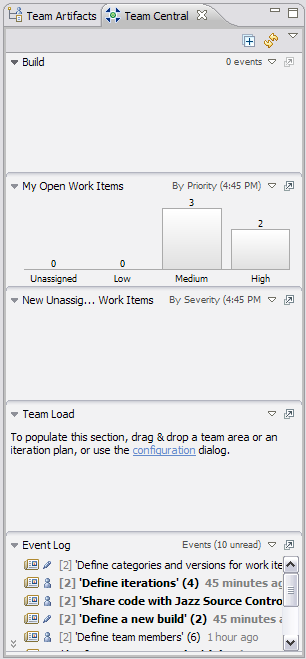
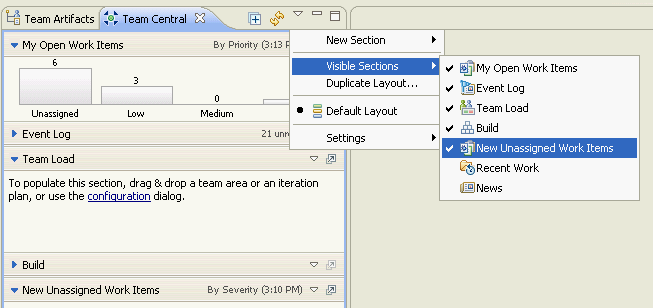
- You can show or hide a built-in section by checking or unchecking its name from the Team Central view main menu. For example, to hide the section titled “New Unassigned Work Items“, uncheck it from the menu:
Configuring a Built-in section
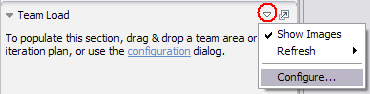
Each section has its own menu that you can use to configure its content. In the following steps, you will configure the Team Load section. The Team Load section is used to display a team workload on a specific iteration.
- Select in the menu attached to the Team Load section the Configure… menu item.
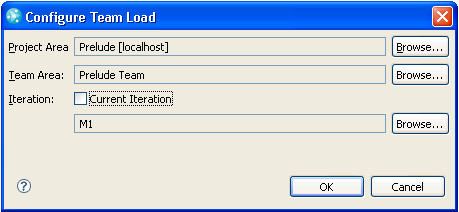
- On the Configure Team Load dialog, set the Iteration field to M1 and press OK.
- The Team Load section should display the workload of each member of the Prelude Team for the M1 iteration. If you move the mouse pointer over a team member, a hover widget will display more details about their workload:

Creating a Query section
You can add your own sections based on a work item query. This kind of section is called a Query section.
- From the Team Central main menu, select the menu item New Section > Queries.
- In your new Query section, click on the configuration wizard hyperlink.

- From the Configure Query Section wizard, click on the button labeled Add Query…
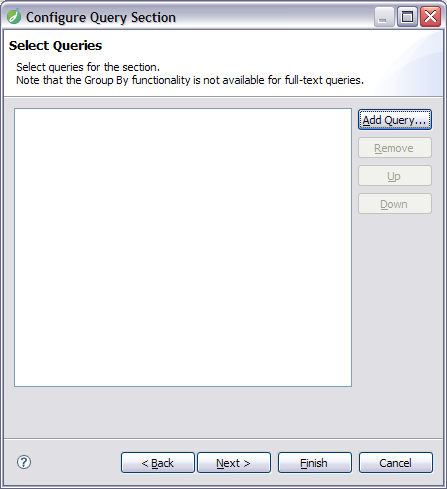
- In the Select Queries dialog, select the query previously created: Prelude / My Queries / Open Work Items and press OK.

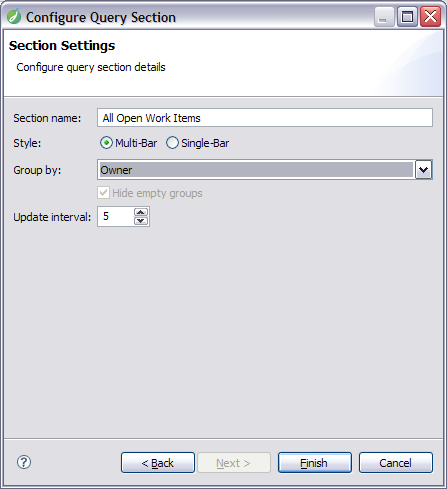
- Press Next on the Configure Query Section wizard to display the Section Settings page.
- On the Section Settings page, name the section All Open Work Items, set the Style to Multi-Bar, set the Group By to Owner and keep the Update interval at 5 minutes.
- Press Finish. The Query Section will reflect these settings:
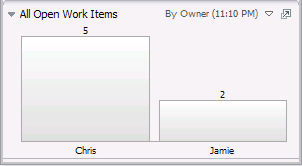
- Click on the Jamie bar to list in the Work Items view the list of open work items assigned to Jamie.
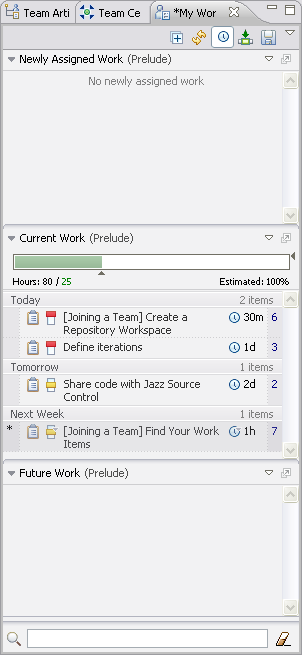
Using the My Work view
The My Work view is the user-customizable view which allows team members to manage their own work. My Work, like Team Central is an Eclipse view with multiple sections. Also like Team Central, a typical section shows a concise summary and connects to another view or editor that presents the information in more detail and the user can configure which sections are visible at any time.
You will notice as you work with the My Work view, that it gets marked dirty like an editor (an ‘*’ in the title of the view). The My Work view has a save function like an editor. Like the rest of Jazz, the My Work view is well integrated with the rest of the system. Changes you make while managing your work in the My Work view can directly impact work items and your teams’ plans. If you have an editor open on an affected work item or plan you will notice that it is also marked dirty until you save your My Work view.
To open the My Work view, select the Window > Show View > My Work action from the menubar. It will look similar to this.
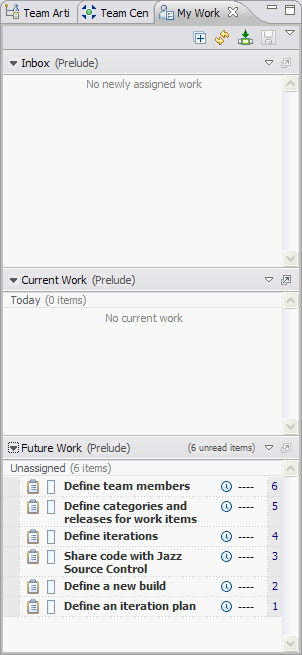
Note that your assigned work items are not listed in the Current Work section. You will move them in to the current work section in a little bit. First lets look at a few of the My Work view configuration settings.
Basic My Work view configuration
Take a look at the view’s main menu (access using the triangle in the upper right corner of the view).
If you had more than one project area, the first thing to do would be to select one via the Select Project Area… action. As you can see, the Prelude project area has already been selected for you.
The Edit Work Environment… action takes you to the Work Environment tab of your User definition. Setting this information, in addition to the information on the Scheduled Absences tab, will help make the management of your and your teams’ workloads more accurate.
The Preferences… action takes you to a dialog where you can select how work items in your Work sections are grouped. Stay with the default for the tutorial but please feel free to experiment on your own.
In the menu for the Current Work section (access using the triangle in the upper right corner of the Current Work section), select the My Work Load > Main Development action as shown here. Note that the menu item “Main Development” is the name of the single development line defined in the Prelude project area’s iteration structure. If you had other development lines defined, there would be other choices. For more information on what development lines are, see Getting Started with Jazz Project Areas and Process; however, you should complete the tutorial first.
The Current Work section will now look similar to this.
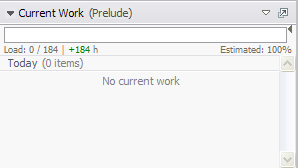
Note the bar in the Current Work section. This bar is the same as the bars in the Team Load section of the Team Central view except that it just shows your load for what you have added to your Current Work section for a particular development line. Right now you do not have any work items in our Current Work section so the bar is empty. Lets start organizing your work. You will see how the load changes among other interesting things.
Manipulating work items in the My Work view
You can drag and drop work items around the My Work view. Drag a few of the work items on to the Today subsection of the Current Work section. Your My Work view will now look something like this.
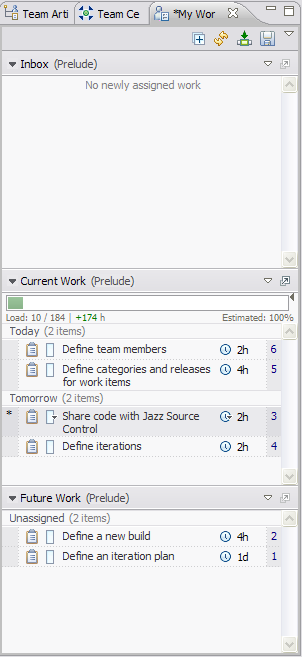
In this example I moved more items than could fit in Today (according to their estimates) so a Tomorrow subsection was added. You may not see this if you estimates were small, or you may see a Next Week subsection if today is the last day or your work week (as defined on the Work Environment tab of your User definition as noted earlier) or if you moved enough items with big enough estimates to fill the rest of this week. In that last case, you could see all three subsections. Note how the Current Work load bar has been updated.
Also note that the view may be marked dirty (it has been edited). If you were to open one of the work items you moved, you would see that it is marked dirty as well. Make sure the My Work view has the focus and press Ctrl-S to save. The view and any affected work items are saved.
Before saving your changes you can revert a work item back to where it was. Select the work item and its pop-up menu will appear. From the pop-up menu, select the Revert Work Item action.
Changing plans in the My Work view
If you select a Current work item and from its context menu select the Plan for > No Target Iteration action, the work item moves to the Future Work section of the view. Note that items targeted to future iterations can show up there as well. Also note that the work item has been changed (its Planned For field is now unassigned) and both the My Work view and the work item are dirty. Saving the My Work view (Ctrl+S) will save both. Of course, this change of iteration target will also be reflected in you plan(s).
Of course, that work item should be part of the M1 iteration so lets move it back. Select the work item in the Future Work section and from its popup menu, select the Plan for > Next Week action. The My Work view will now look something like this.
Press Ctrl+S to save the change.
Adding sections to the My Work view
Just like the Team Central view, you can add sections to your My Work view. Take a look at the Sections submenu under the view’s main menu (access using the triangle in the upper right corner of the view).
This submenu looks very much like the same submenu in the Team Central view except that there are a few My Work view specific sections listed. The common sections all behave the same way. For example, selecting the My Open Work Items and the New Unassigned work items action would make the view look something like this.

Those are the basics of the My Work view. There is much that can be done with this view and the Team Central view. Please experiment and share your experiences on the jazz.net newsgroups and elsewhere.
Using Jazz Source Control
The source control component handles the storing, retrieving and sharing of source code and other artifacts in your project. Jazz’s source control (SCM) support is easy to use for a variety of development scenarios but it’s a bit different than regular file based SCM systems. So let’s start with a quick overview of the usage model.
In Jazz, we want users to benefit from SCM’s ability to track and version your changes, whether or not you are ready to share those changes with your team. Accordingly, as a user you have your own private repository workspace which stores the changes you’ve made, regardless of when you decide to make them available to your team. Sometimes it will be only a couple of hours before you decide to share your changes; sometimes it will be a day, or longer. The key is that your changes are in the repository and you decide when to make them available to your team. When you load your repository workspace, the files and folders in it are transferred to your Eclipse workspace on your computer. To push a change from your Eclipse workspace to the repository workspace you check-in the change.
A stream is used to store the team’s work. When you want to make your changes available to your team, you deliver them from a repository workspace to a stream. When you wish to incorporate other team members’ changes, you accept them from the stream. Note that you can also accept changes directly from another repository workspace, allowing for fine-grained sharing of changes between team members. For example, two team members might collaborate on a small bug fix; or, if someone starts a change and has to go on vacation, another team member could continue the work and then deliver it later.

All changes you make in your repository workspace are tracked within change-sets. Each change-set is composed of a collection of explicit, primitive changes to one or more files or folders. A change-set can also carry a comment and the reason the changes were made, typically by referencing the relevant work item. The source file base is built up from nothing but the steady accretion of change-sets, each one building on everything that has come before it. Each repository workspace or stream is based on a sequence of change-sets.
Let’s start making changes and learn how these concepts can be used in day to day work.
Creating a Repository Workspace
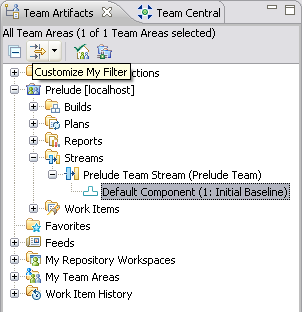
- The first step is to find the stream for your team area. The stream is where you share your code with your team. From the Team Artifacts view, expand the Prelude project area, and expand Streams then expand the Prelude Team Stream to see the component. Note that if no entries appear under Streams, take a look at the Customize My Filter dropdown noted on the screen shot. Open the dropdown and make sure All Team Areas is selected. Note that in the future when you are a member of multiple teams, you may find customized filters very useful.
Streams and repository workspaces can be partitioned into separate components. Because each component has its own history, breaking a product into components is useful for teams that build layered software in which the pieces evolve semi-independently and are deployed separately. Simple repository workspaces and streams consist of a single component. In our example, the Prelude Team Stream has just one component (called Default Component) which will contain our files and folders.
- Select the stream for your team area labeled Prelude Team Stream (Prelude Team).
- From the context menu, select the New Repository Workspace… action.
- A wizard appears, allowing you to name the repository workspace that will be created from the stream. Name your repository workspace Chris on Prelude and press Finish. This will create and then load your new repository workspace into your Eclipse workspace. The load should complete quickly, since there is no code in the stream yet.
- When a repository workspace is loaded, it appears in the Pending Changes view. If the Pending Changes view is not visible, from the menu bar select Window > Show View > Pending Changes.

- If you were able to complete the team invitation steps, then you completed one of the work items created when your project area was initialized. Run your Open Work Items query again and note the [Joining a Team] Create a Repository Workspace work item. You can now open that work item and resolve it just like you resolved the Define team members work item earlier.
Loaded repository workspaces are special in that whenever you change a loaded file or folder in your Eclipse workspace, the changes are tracked and shown in the Pending Changes view. Here, you can manage your changes and perform common tasks such as:
- Check-in changes to your repository workspace.
- Organize changes into change-sets.
- Undo changes you’ve made.
- Associate change-sets with work items.
Authoring Some Code
Once you have joined a stream, you can get down to the business of writing code and producing the artifacts that make up your project. At this point, if you have some Java packages from a small project you would like to try with Jazz, you can import those projects into your Eclipse workspace now from the Package Explorer view by selecting the Import… option from the context menu. But if you don’t have any interesting code to start from, you can create a simple Java application or create a simple project containing a single text file.For help creating a simple Java application in the Jazz client, select the Help > Cheat Sheets… action from the menu bar. In the Cheat Sheet Selection dialog, expand Java Development category, select the Create a Hello World application cheat sheet then press OK. The cheat sheet will appear in your Jazz client window and will guide you through creating a simple Java application. For more advanced help see the Eclipse Java Development User Guide.
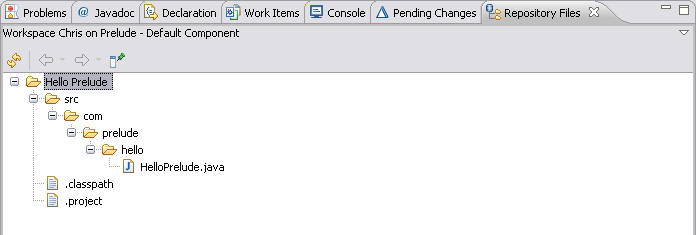
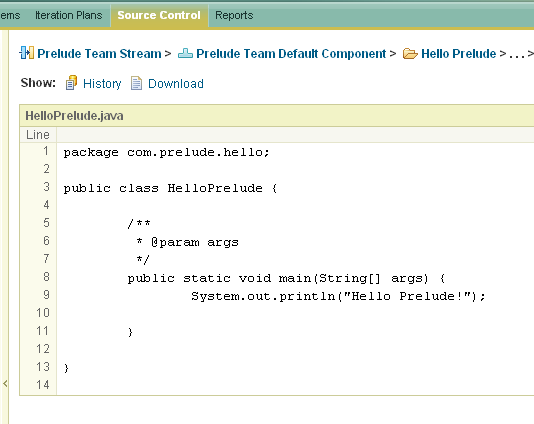
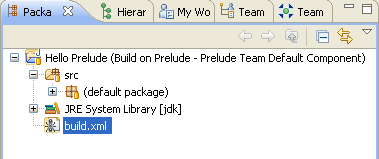
The authors of this tutorial created a simple Java project called Hello Prelude which you will be seeing in the screen shots for the remainder of this tutorial.
Putting Your Code under Jazz Source Control
Once you have either imported or manually authored some code in your Eclipse workspace, you can check-in your code to your repository workspace on the server. Check-in is the process of moving code from your Eclipse workspace into your repository workspace. The term for moving code from your repository workspace into the stream to be shared with your team is deliver. Note that you can change your Jazz Source Control preferences to specify automatic check in. You can also work disconnected and check-in later when reconnected.
- If you are not already there, open the Java perspective (
 ). If this is not the current perspective, from the menu bar select Window > Open Perspective > Java.
 - From the Package Explorer view, select the Hello Prelude project.
- From its context menu, select Team > Share Project…
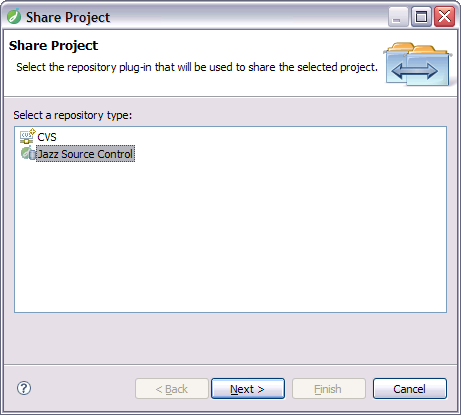
- The Share Project wizard appears. Select Jazz Source Control and then press Next.
- On the Select Component page of the wizard, make sure that the chris@localhost repository connection is selected from the dropdown list at the top of the page. Also, make sure Select a component in an existing workspace is selected, expand Chris on Prelude and select the Default Component. Press Next.

- On the Review Ignored Resources page of the wizard, verify or complete the resources to ignore for sharing (you will probably not need to change anything on this page). Then press Finish.

Your code has now been checked into your repository workspace, but has not been delivered to the stream.
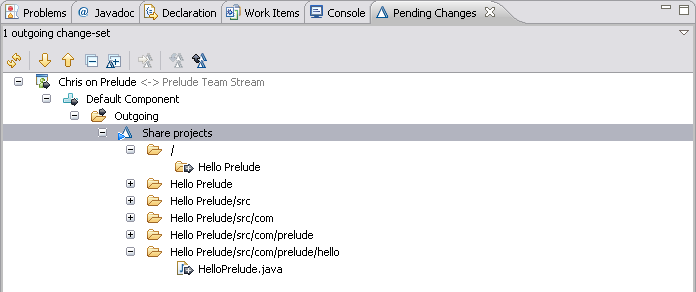
Go ahead and switch to the Pending Changes view (Window > Show View > Pending Changes from the Java perspective). It should have been open already when you loaded and shared. If you expand the Default Component, you’ll notice a change-set for the project you just shared. Notice that we’ve tracked the share operation, and the corresponding changes have automatically been checked-in to the repository workspace. Notice that the change-set already has the comment “Share projects” associated with it (see the screen shot below). You can change the comment if you wish (or add comments to future change-sets that do not automatically get a comment) by selecting the change-set and from its pop-up menu, select the Edit Comment action. Then type into the in-place edit box. When you are done, press the enter key to apply the comment.
Let’s look at two other ways to browse the files that you’ve added to your repository workspace. The first is to navigate the directory structure of the component. To do this, click on the Default Component in the Pending Changes view and from its pop-up menu select the Show > Repository Files action. In the Repository Files view you’ll see the project you’ve just shared.
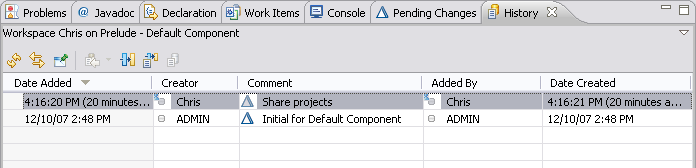
Another thing you can examine is the history of your repository workspace. Again, select the Default Component from the Pending Changes view and run the Show > History action. The history view will open and you’ll see two change-sets listed. The first is the initial change-set from when the component was created. The second is the change-set you’ve just created. Double click on the change-set and the Change Explorer view will open and allow you to explore the contents of the change-set.
Delivering Your Changes to Your Team
All of the changes you’ve made so far are safely stored in your repository workspace in the repository. Now you want to make the changes available to the rest of the team by delivering them.
In this section, you will see the change-set representing the code you authored. Then you will associate your change-set with an existing work item. Finally, you will deliver your code to the stream.
- The first thing to do is to open the Pending Changes view if it is not already open.
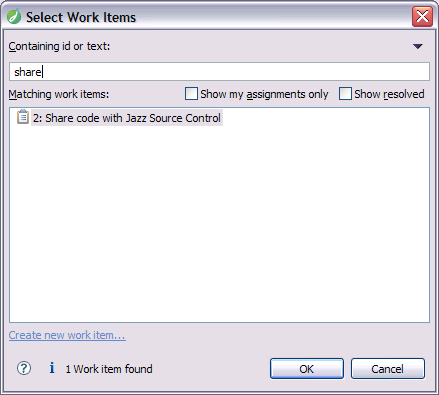
- Select the change-set and from the context menu select Associate Work Item…
- A dialog appears. Uncheck Show my assignments only box.
- In the top text field, type share; it will select the work items containing in their summary or description the word share.
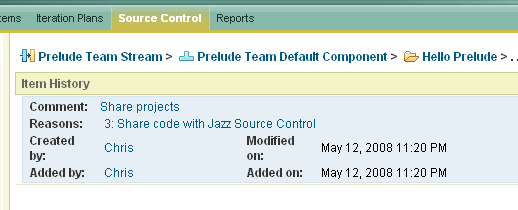
- Select the work item labeled Share code with Jazz Source Control and press OK. This makes the connection between the code you authored and the work item that you resolved in doing so.
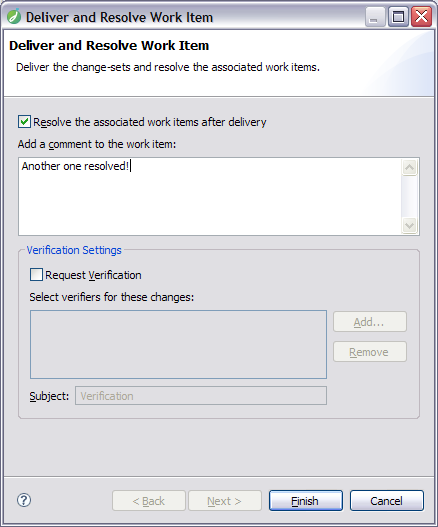
- From the same context menu, select the Deliver and Resolve Work Item… action. Make sure the Resolve the associated work items after delivery checkbox is checked. Then enter a comment, which will be added to the work item, and press Finish. When this completes, your code has been delivered from your repository workspace on the server to the team area’s stream where it is now accessible to the rest of the team and the work item has been resolved.
- Refresh the History view and you’ll notice that it shows that the change-set has been associated with the work item. In addition, go back to the Team Artifacts view and click on the Default Component in the Prelude Team Stream and run the Show History action. You will notice in the History view that the stream also has your change-set.

If you open the work item associated with change (in the History view, select the change-set as shown above and from its pop-up menu select the Open Work Items action), you’ll see that the work item has correctly been resolved and it has a link to the change-set you created for this work.
Using Jazz Web UI
In addition to high quality integration of Jazz into an Eclipse IDE client, Jazz also allows you to directly access a Jazz server through a web browser. This is known as the Jazz Web UI. The Jazz Web UI is better suited for casual or occasional users than the IDE because it does not require installation of an Eclipse Jazz client; all that’s needed is a Web browser.
Presently, the Jazz Web UI supports Mozilla Firefox 1.5 and 2.0 and Internet Explorer 6 and 7.
In this section you will learn:
- How to connect to a repository from your Web browser
- How to create a work item query
- How to browse a work item
- How to browse an existing iteration plan
- How to visualize files stored in the Jazz source control
- How to access and define a Web UI dashboard to monitor your project
Connecting to the Repository from a Web browser
- Open your Web browser and go to the URL for your Jazz Team Server Web interface. The URL will be like the following:
- Log in as the user Chris (userID: chris; password: chris) whom you created in a previous lesson and click Prelude from the list of projects.

You are now able to browse the Prelude project area using the various pages of the Web UI.
Finding work items
The first area you can explore is the Work Items page. As in Jazz on Eclipse, you can query work items from the Web UI. In the following steps, you define a query that finds work items that are assigned to Chris and are resolved.
- Click the Work Items tab in the horizontal menu.
- On the left side of the page, click the Create Query button:
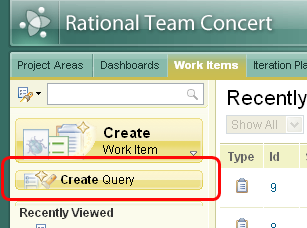
The Work Item Query editor opens.
- Click the
 button to add a condition for the query.
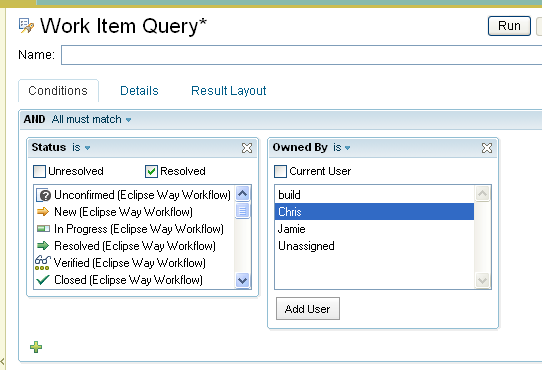
 - Select the attribute Status then click the Add attribute condition button.
- For the second condition, select the attribute Owned by and click Add attribute condition.
- In the Status condition box, select the value Resolved.
- In the Owned by condition box, select the user Chris.
- At this point your query should look like this:
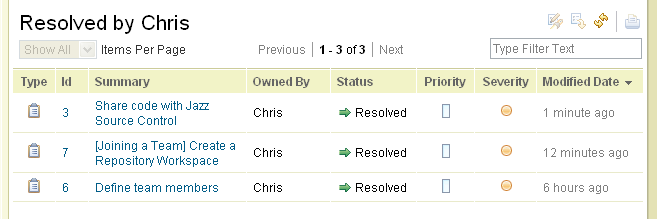
- In the Name field, enter “Resolved by Chris”.
- Click the Run button to execute the query. The results of the query will display below the query editor. You should see a list of resolved work items owned by Chris.
Browsing work items
You can use the Web UI to view work item details:
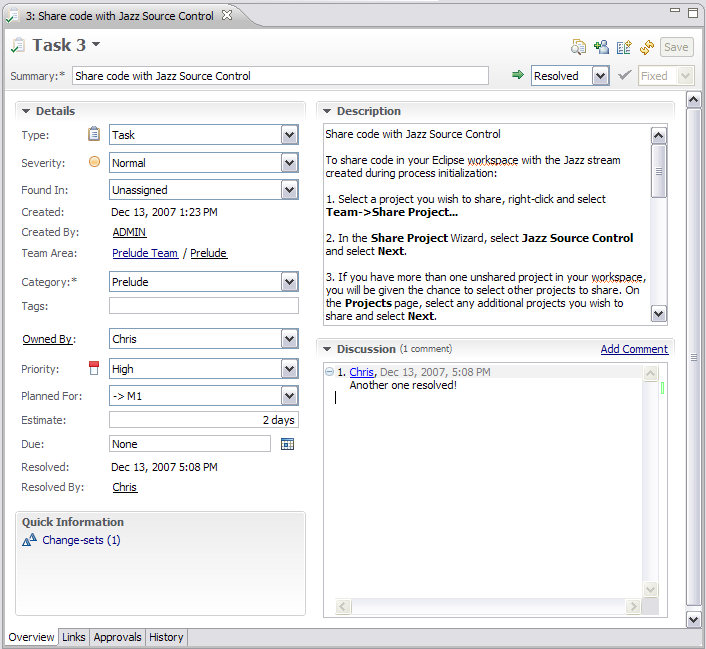
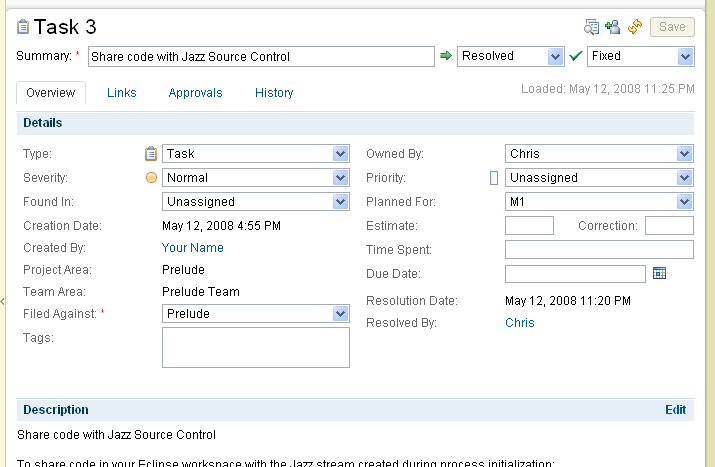
- From the results of the previous query, click the work item title Share code with Jazz Source Control. The work item opens in the work item editor. On the Overview section, notice the Details, Description, and Discussion sections:
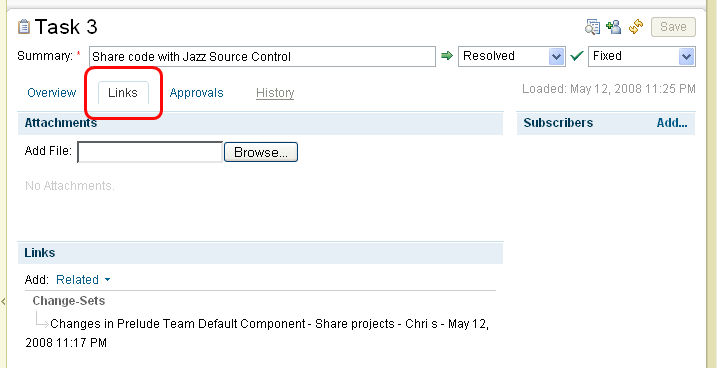
- Click Links tab of the work item editor to see the team artifacts that are associated with this work item. You can see that Chris delivered a change set that he associated with this work item:
Iteration Plans perspective
The Iteration Plans section displays the current project area’s iteration plans.- Click the Iteration Plans link in the main menu.
- Because we have only defined one iteration plan, the Web UI immediately displays the overview page of the Prelude plan for M1:

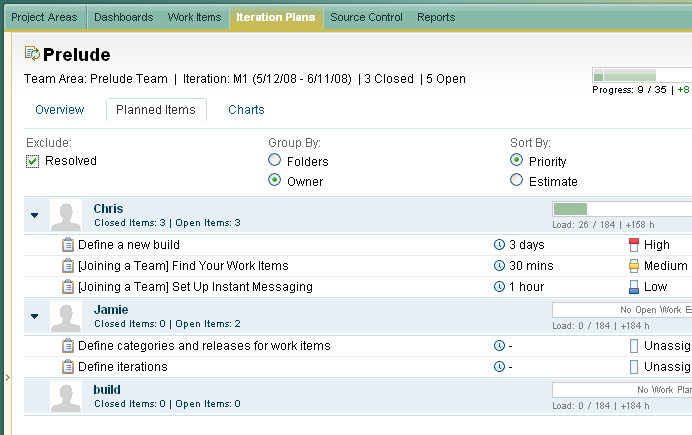
- On the Overview page, click Planned Items to display the work items planned for this iteration. Group by owner and expand each team member to see the planned items.
Source Control perspective
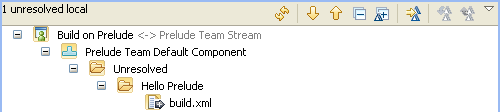
The Source Control perspective provides a read-only access to files stored in the Jazz repository.- Click the Source Control tab in the main menu.
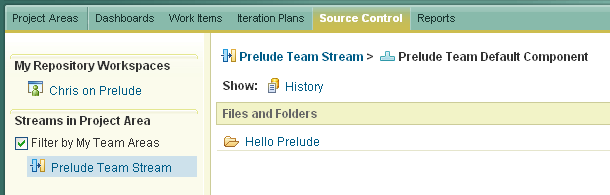
- On the left side of the page, click the Prelude Team Stream to see the components that are in this stream:

- Click Prelude Team Default Component to see Files and Folders contained in the component:
- You can then browse folders and sub-folders to view a particular file:
- While viewing a file or folder, you can click History to see the history of that file:
Web UI Dashboard perspective
Note: The Dashboard is only available in Rational Team Concert Standard edition.
The Dashboard lets you define and organize your project dashboards with a layout of dynamic viewlets that display different facets of the project area.
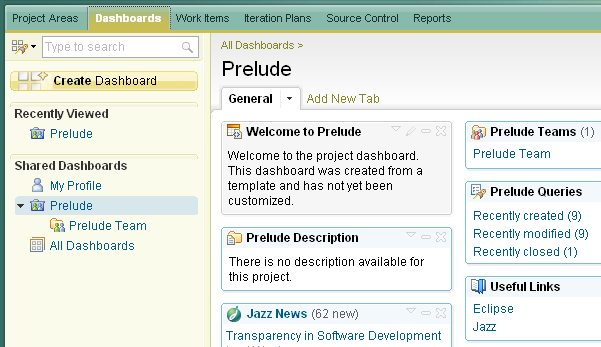
- Click the Dashboards tab in the main menu. A default dashboard for the Prelude project area displays:
- To create a new dashboard for Chris, click the Create Dashboard button.
- Click the Add Viewlet link located on the top right corner of the dashboard to open the Viewlet Chooser.
- In the list of viewlets select the Event Log viewlet:
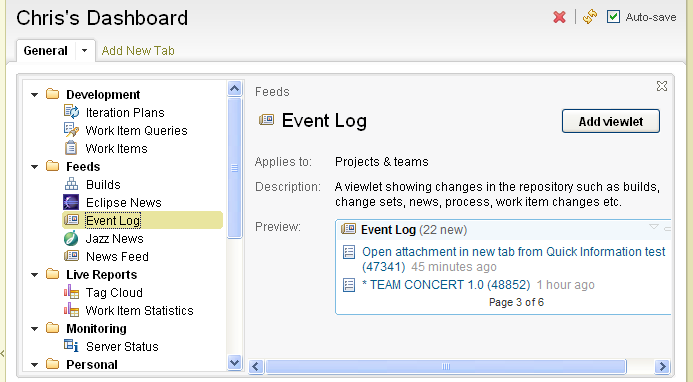
- Click the Add viewlet button. The Event Log viewlet is now added to Chris’s dashboard.
- Click the close button (
 ) of the Viewlet Chooser.
 You just created a personal dashboard for Chris and customized it with an event log.
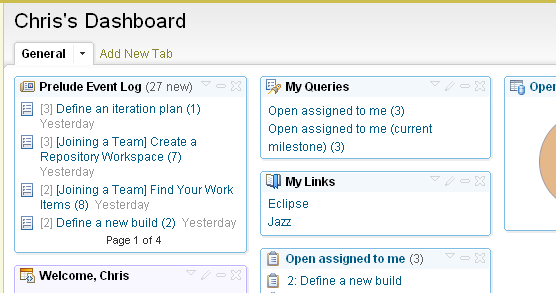
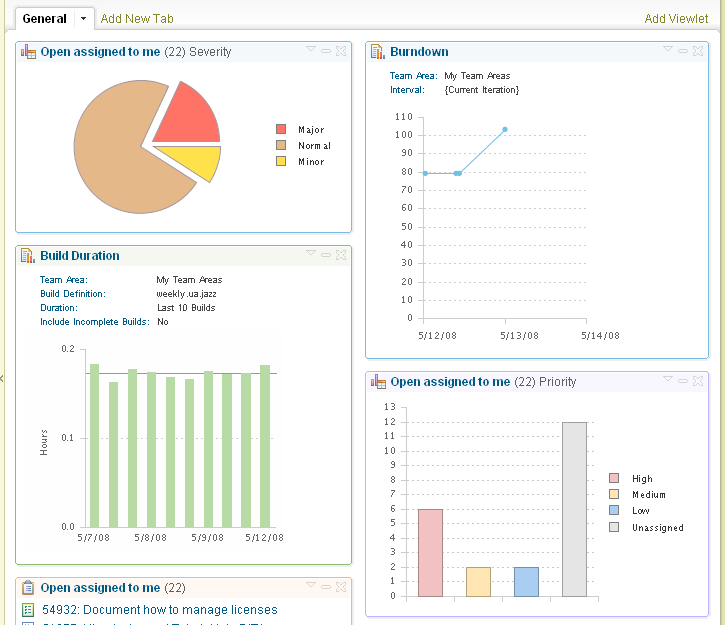
Some types of viewlets show current status, with queries and feeds, while other types of viewlets report on historical, aggregated data. This historical type of data will become useful only when the data warehouse contains enough snapshots to paint a clear picture of progress over time.
In the meantime, here is an example of a dashboard from the Jazz development project:
Using Jazz Build
The Jazz Build System is a fundamental component of Jazz. By itself it does not build anything, but it does provide the infrastructure to retrieve your team’s work from the Jazz repository, make it available to your build scripts, and deliver the results back to Jazz. You, as a Jazz user and consumer of builds, can monitor running builds and access the results. Since the early days of Jazz, the Jazz Build System has been used to build Jazz itself.
The focus of this section is to examine the Jazz build user interface from the perspective of a developer who is a consumer of what Jazz build provides. However, you will need to do some setup that might normally be done by your build administrator or release engineer. To make Jazz build produce what your project requires may involve quite a bit of customization and adaption of build scripts to meet your project requirements. Fortunately, Jazz build makes it easy to get it running so you can see how it operates just as if it were working for your team.
How does the Jazz Build System work? Here is the big picture.
- Define a schedule: A particular build operates on a schedule you define. Recall from the section on Jazz source control that a team shares their development work in one or more team streams.
- Check for changes: When it is time to run a build for a team, Jazz build checks to see if there are any changes in the content of the team’s streams and accepts the changes, known as change sets, into its own repository workspace so it has a current copy of the stream(s).
- Fetch repository content and run build: The build then fetches the repository workspace content to the file system where your build scripts perform the build.
- Publish artifacts to repository: Build artifacts are published into the Jazz repository for access by Jazz users.
- Send notification that a build is complete: The status of all builds is reported in real time and you are automatically notified when builds complete.
Setting up Jazz build
The Jazz Build System includes the Jazz build engine and the Jazz build toolkit. Getting these installed and operational is quite easy. From your Jazz client you will complete the following tasks:
- Define a build script (we’ll let your Eclipse Jazz client do most of the work here)
- Define a build definition that identifies your build script
- Define a build engine to run the defined build
- Start the build engine that will respond to build requests, run builds, and publish results
This will allow you to request a build, examine the results and explore the build user interface as though you were a developer and a consumer of what Jazz build produces.
Note that the set up steps are somewhat lengthy. If you want, you can pause now and return to this later. If you decide to not pursue the build set up, you should read the next section titled Touring the Jazz Build User Interface. Here you will learn how you can request builds and examine build results.
Creating a build script
Make sure you have a repository connection defined and you are logged in.
To create a build script:
- In the Package Explorer view, right-click a project; then click Export.
- In the Export Wizard, on the Select page, under General, select Ant Buildfiles and click Next.
- On the Export page, ensure that your project and all check boxes are selected and click Finish.
A build.xml file is added to your project. This file uses Ant scripting language. This script will compile your project and produce Java class files. Note it is identified as an outgoing change. Do not deliver it yet.
Creating a dedicated workspace
You can create a dedicated repository workspace for use by the Jazz build definition for your project. During a build, the Jazz build engine, which is connected to the Jazz repository using a preassigned user identifier, uses this repository workspace to identify the content to be built. First, it accepts any incoming changes from the team’s stream and then loads the repository workspace contents into the local file system for processing.
Normally, you would define a dedicated user (named build, possibly) and define a repository workspace for that user. In this tutorial, for simplicity, build will receive this extra assignment.
To create a dedicated build workspace:
- In the Team Artifacts view, right-click My Repository Workspaces; then click New Repository Workspace.
- In the New Repository Workspace wizard, on the Select a Stream page, click the Flow with stream radio button and in the pane below, select Prelude Team Stream (Prelude Team).
- Click Next.
- on the New Repository Workspace page, check the repository workspace name and click Next.
- on the Components to Add page, confirm that the stream’s component is selected and clear the Load repository workspace after creation check box.
- Click Finish.
Both repository workspaces display in your view. Only your current one is loaded. The new one will be used by the build.

Creating a build definition and build engine
You can create a Jazz build definition for your project. You will define this new repository workspace for use by Jazz build, so when the build runs it can accept any changes from the team stream prior to the start of the build.
To create a build definition:
- In the Team Artifacts view, expand the project folder.
- Right-click Builds; then click New Build Definition.
- In the New Build Definition wizard, on the New Build Definition page, accept the defaults and click Next.
- On the General Information page, in the Available build templates pane, select Ant – Jazz Build Engine and click Next.
- On the Pre-build page, select Jazz Source Control and click Next.
- On the Additional Configuration page ensure that all options are selected and click Finish. The build definition view opens.
You can create a build engine from the build definition view.
- To create a build engine, complete the following steps:
- In the Supporting Build Engines pane, click Create Engine.
- In the Create Build Engine dialog box, in the Engine ID field, type a build engine identifier.
- Click OK.
- Click the Jazz Source Control tab.
- In the Load Options pane, in the Load directory field, type fetched.
- To specify a repository workspace, complete the following steps:
- In the Build workspace pane, click Select
- In the Select a Stream or Workspace dialog box, in the Matching items pane, select the build workspace and click OK.
- Click the Ant tab.
- In the Build file field, type the following path: fetched/projectname/build.xml, where projectname is the name of your Jazz project.
- In the Java Home field, type the file path to your Java compiler. For example, C:Program FilesIBMTeamConcertjdk.
- Click Save.
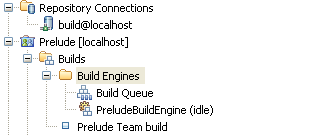
Set up is complete! If you examine the Team Artifacts view you will see the build definition and build engine listed.
Delivering the build script
Before we start the build engine to run our builds, recall that the build script (build.xml) in your Hello Prelude project has not been delivered to the stream. Without it, the Jazz build engine won’t have the necessary instructions to execute the build. Let’s deliver that change now.
- In the Pending Changes view, under Prelude Team Default Component, right-click Unresolved; then click Check-in and Deliver.
- In the Check-in and Deliver Wizard, in the Change set comment pane, type a comment and click Next.
- On the Associate Work Item page, select an existing work item or create a new one and click Next.
- On the New Work Item page, edit the fields and click Finish. The build script is now in the stream. When the build runs the script will be available.
Starting the build engine
Start the build engine. From a command line, navigate to installdir/buildsystem/buildengine/eclipse, where installdir is the build server toolkit installation directory.
- Type jbe -repository repositoryURL -userId username –pass password -engineId engine , where:
- repositoryURL is your repository URL. For example, http://localhost:9080/jazz/.
- username is a build user name.
- password is the build users password.
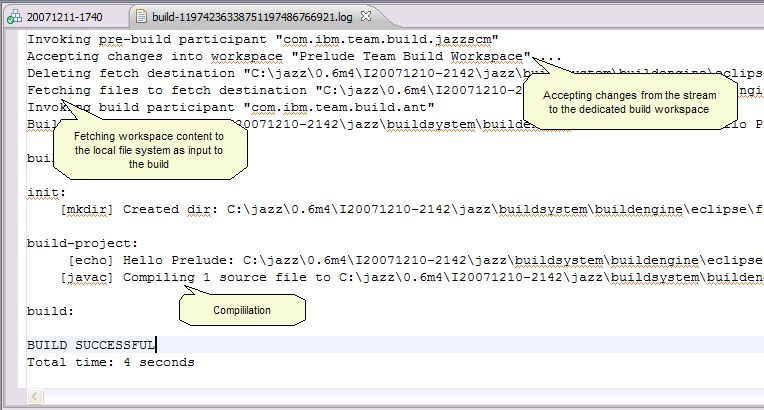
The engine starts and looks something like this on the console (you may see some other messages as well):
2007-12-11 16:08:47 Running build loop…
2007-12-11 16:08:47 Waiting for request…
Normally, you would specify a dedicated build user ID, not user build, but this is just a demo. The -sleepTime value of 1 (second) will ensure that the build requests are processed right away.
The build engine is waiting for work. It is time to run a build.
Touring the Jazz Build User Interface
The Jazz client allows you to do the following build tasks:
- Request that a build be run
- Monitor the status of builds
- Query available builds
- Inspect completed builds, identify and retrieve the artifacts produced
Let’s examine each of these tasks.
Requesting a build
You can request a build from the Team Artifacts view. You can also change build properties or request a personal build that does not impact the build definition status and that runs on a workspace that you specify.To request a build:
The build request will be processed by your build engine. You can observe this in the command window where you started the build engine.
The build shouldn’t take long and you will see this alert appear temporarily in the lower right corner of your display screen.
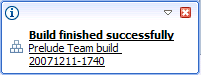
If it did not run correctly, you will need to examine the log file published in the build result.
Viewing build results
Let’s open the build result and see what happened. If you were quick you could have clicked on the build in the alert window above. Another way is to go the Team Artifacts view, expand your Prelude project area and the Builds section. You will see your build definition. Open the build result using menu action Open Latest Build Details.
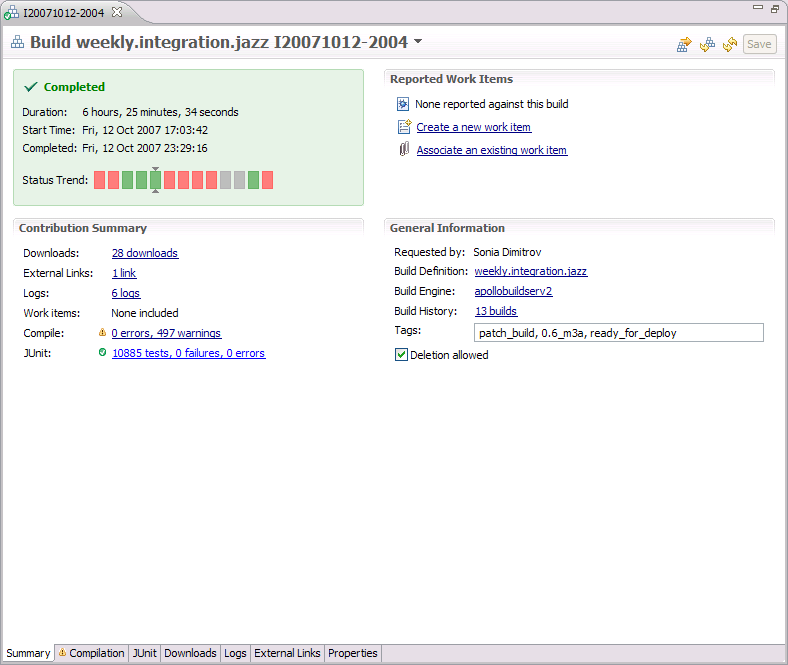
The build result editor opens.
We have Summary, Logs, and Properties tabs. Normally, you might see extra tabs for compilation, testing, downloads and possibly other results. The build script could be updated to do this.
Summary
You have completed the following tasks:
- You submitted a build request. It could have been initiated automatically on a predefined schedule.
- The request was received by the Jazz build engine (JBE) along with the build definition.
- Using a repository workspace defined to the build definition (Prelude Team Build Workspace), the JBE performed a Jazz source control accept operation to update the repository workspace from the stream. In the first build, this brought the newly created build script (build.xml) to the repository workspace, which is essential to run a build.
- The updated contents of the repository workspace were loaded into the file system, using the directory named fetched in the build definition.
- The build script specified in the build definition is called. Our script compiled the Hello Prelude project and created Java class files. A more sophisticated script might have created a jar file and published it back to Jazz.
- When the script completes, the build log and any other published results are stored in Jazz.
- The team is notified that the build has finished.
Build result editor
There a few things to point out about what the build result editor can offer:
- The status of the build: completed or not; successful or not.
- Start time, completion time, and duration.
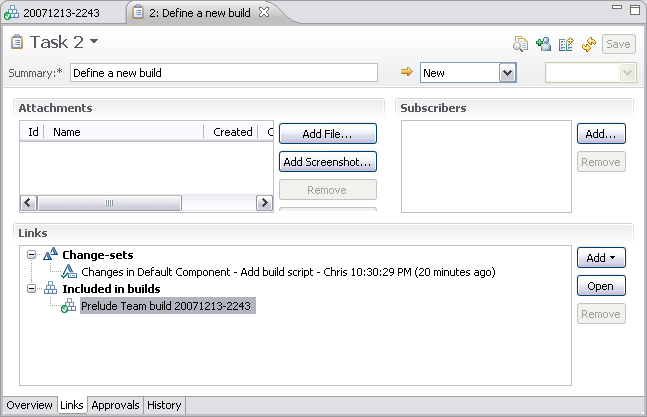
- Any work items or source control changes associated with the build. In this example you can see that one work item was included. If you were to open it, you would see that it is the work item associated with the delivery of the Hello Prelude build script. Notice in the Links section that there is a reference to the change sets that were included in the work item and the build containing these changes. In Jazz there is bidirectional traceability between work items, change sets, and builds.
- You can create a work item or associate an existing work item with this build. This is particularly useful if the build failed.
- Build history. Selecting this will display the history detail in the Builds view (you will need to request another build to see a history).
- The editor is extensible to include additional pages that your team might need.
Examining the build log
Let’s examine the build log to see if our new build script worked.
Go to the the Logs page and let’s inspect what the build did.
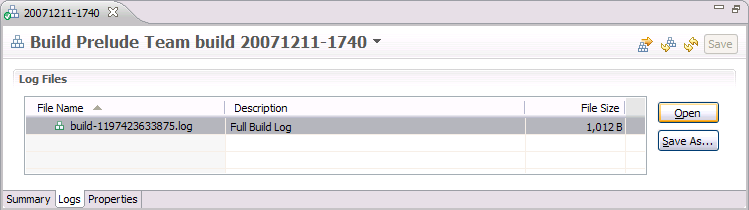
Select the log file and click Open.
Here you can see the most relevant activities that took place.
By now, you are beginning to see how Jazz makes build very visible to you and your team.
Monitoring the Status of Builds
Build status can be obtained passively or actively. Passive build information is provided in two ways: in the Team Central view Build section and build alerts that briefly appear on your screen.
As builds complete, the Team Central view, Build section, is updated with the status of completed builds for the team(s) you participate in.
For a selected build in this view you can see the results of the build or request a new build.
To customize how often the status is updated, from the Build section drop down menu, select Update Refresh Interval. In the Build Section Refresh Interval Dialog box, type the refresh interval in seconds and click OK.
Finding Available Builds
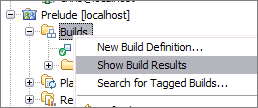
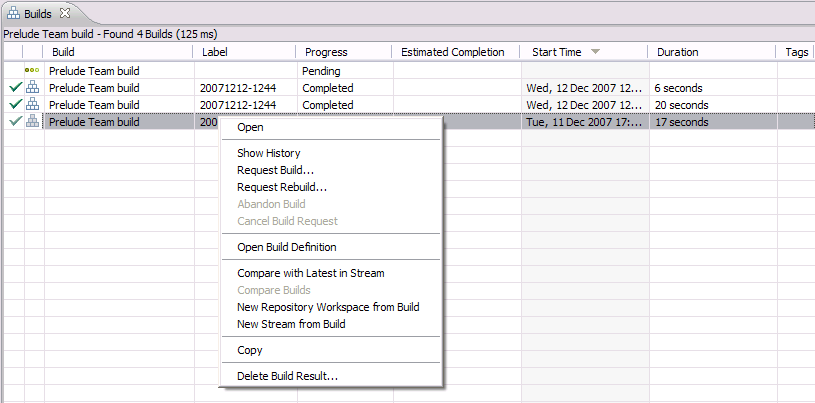
You can see what builds are available, the status of running builds, and builds queued to run in the Builds view which is accessible using the connect menu Show Build Results from the Builds folder in the Team Artifacts view.
The contents of the view can be sorted by selecting a column. Note that there are a number of interesting context menu actions. You can compare a build to the stream from which it was built or create a new stream from a build (helpful for creating a new code base from a proven code base).
You can also see build results by defining a build viewlet in your web based Jazz dashboard.

The Jazz development team has been customizing its build process for quite awhile. Jazz’s build results editor has additional tabs labeled Compilation, JUnit, and Downloads, and external links. Here are some screen shots from a Jazz integration build so you can see what the potential is.