
Setup ClearCase & ClearQuest Connectors in a ClearQuest-Enabled UCM Environment
Note: This document is out of date and has been replaced by this newer article.
1 Introduction
The intent of this article is to help setup the Rational Team Concert ClearCase and ClearQuest Connector in a Rational ClearQuest-Enabled UCM Environment. This note assumes that the following products/components have already been installed on the host system and are ready for use:
- Rational ClearCase (referred to as ClearCase henceforth)
- Rational ClearQuest (referred to as ClearQuest henceforth)
- Rational Team Concert Client (referred to as RTC Client henceforth)
- Jazz Team Server
- Rational Team Concert ClearCase Connector (referred to as CC Connector henceforth)
- Rational Team Concert ClearQuest Connector (referred to as CQ Connector henceforth)
This note also assumes that Jazz Team Server repository is configured and the RTC Client can connect to it using the pre-configured ADMIN account. In addition, this note assumes that the reader has familiarity of ClearCase UCM concepts and its inter-operation with ClearQuest. Instructions in this note are in reference to setting up a host running the Windows operating system.[1] Finally, the example in this note is tailored only for the Eclipse Way process specification bundled with Rational Team Concert. Articles supporting this use case for other process specifications will be available in the future.
2 Setup Rational ClearQuest
Setting up ClearQuest involves enabling a schema for use with CQ Connector. The term “enabling the schema” here refers to applying the most recent JazzInterop package to certain record types in the given schema. This note uses a schema based on the out-of-the-box UCM Schema bundled with ClearQuest and applies the JazzInterop package to its UCM_Project and Defect record types.[2]
An MS-ACCESS schema repository database (MASTR.mdb) containing the needed schema definition and an MS-ACCESS user database (SAMPL.mdb) based on this schema definition are attached to this note. You can choose to just download and use these databases on your host system by following instructions in Section 2.1 Use Attached Sample Databases. These databases were created using steps outlined in Sections 2.2-2.5. If you would like to learn how to create these databases, follow instructions in Sections 2.2-2.5.
2.1 Use Attached Sample Databases
- Download the MASTR.mdb and SAMPL.mdb databases attached to this note to a directory on your host’s file system (For example, C:MyCQDatabases).
- Start ClearQuest Maintenance Tool.
- Click Connection->New from the menu bar.
- Call the new connection sample_schema_repo.
- For Vendor, click MS_ACCESS.
- For Physical Database Name, point to the file system location where MASTR.mdb was downloaded in step 1 (For example, C:MyCQDatabasesMASTR.mdb).
- Click Finish.
- Wait for a message like the following in the status window:
Connect to repository : C:MyCQDatabasesMASTR.mdb Your system is now configured to establish connection to ClearQuest database "C:MyCQDatabasesMASTR.mdb". NOTE: The complete execution log has been saved in C:DOCUME~1<user name>LOCALS~1Temp2cqdbsetup_status_<date>.txt for your reference.
- Click Done.
- Click Schema Repository->Update->Selected Connection from the menu bar.
- Reset Physical Database Name to again point to the file system location where MASTR.mdb was downloaded in step 1 (For example, C:MyCQDatabasesMASTR.mdb).
- Click Next.
- For Logon Name, enter admin.
- Leave Password field blank.
- Click Next.
- Wait for a message like the following in the status window:
Updating your schema repository to C:MyCQDatabasesMASTR.mdb... The schema repository has been successfully updated with your new location information. NOTE: The complete execution log has been saved in C:DOCUME~1<user name>LOCALS~1Temp2cqdbsetup_status_<date>.txt for your reference.
- Click Done.
- Click Exit to close ClearQuest Maintenance Tool.
- Start ClearQuest Designer
- Login as admin with no password.
NOTE: If the schema wizard comes up, click Cancel to close it. - Click Database->Update User Database Properties from the menu bar.
- In the Update User Database Properties dialog, select SAMPL and click Properties.
- Reset Physical Database Name to point to the file system location where SAMPL.mdb was downloaded in step 1 (For example, C:MyCQDatabasesSAMPL.mdb).
- Click Update.
- Wait for the prompt: “The database information has been updated”. OK on the prompt.
- Click OK on the Update User Database Properties dialog.
- Close ClearQuest Designer.
- IMPORTANT: Skip Sections 2.2-2.5.
2.2 Create/Import ClearQuest Schema For Use With CQ Connector
A sample schema definition is also attached to this note. You can choose to:
- Import the schema definition into your ClearQuest environment; OR
- Create your own schema definition from scratch.
In either case, you would need to create a ClearQuest schema repository and import the latest revision of the JazzInterop package to it (unless you already have). Instructions to setup a ClearQuest schema repository are in Section 2.2.1 Setup ClearQuest Schema Repository.
If you then choose option 1 to import the attached schema definition, follow Section 2.2.2 Import ClearQuest Schema Definition and skip Section 2.2.3 Create ClearQuest Schema.
However, if you like being a maverick and would rather create your own schema, then follow Section 2.2.3 Create ClearQuest Schema and skip Section 2.2.2 Import ClearQuest Schema Definition.
2.2.1 Setup ClearQuest Schema Repository
- Create a ClearQuest schema repository using ClearQuest Maintenance Tool. For this example, we have named the ClearQuest connection sample_schema_repo.
NOTE: Do not create any user databases yet. - Go to the CQ Connector installation folder (default location: C:Program FilesIBMClearQuestConnector).
- Open the …gatewaycqPackage folder.
- Copy the JazzInterop folder to ClearQuest’s packages folder (default location: C:Program FilesRationalClearQuestpackages).
- Register the latest JazzInterop package to ClearQuest by running the following packageutil command in a command window (NOTE: At the time of writing this note, 1.06 was the latest revision of the JazzInterop package):
packageutil registerpackage JazzInterop <Latest Package Revision> <Package Location>
For example:
C:RationalClearQuest>packageutil registerpackage JazzInterop 1.06 C:RationalClearQuestpackagesJazzInterop1.06 +++ Registered version '1.06' of package 'JazzInterop' located in 'C:RationalClearQuestpackagesJazzInterop1.06'
- Install the latest JazzInterop package into the schema repository by running the following packageutil command in a command window:
packageutil installintoschemarepo -dbset <ClearQuest Connection Name> <ClearQuest User Name> <ClearQuest Password> JazzInterop <latest package revision>
For example:
C:RationalClearQuest>packageutil installintoschemarepo -dbset sample_schema_repo admin "" JazzInterop 1.06 +++ Installed package from 'C:RationalClearQuestpackagesJazzInterop1.06' into master database 'sample_schema_repo'
2.2.2 Import ClearQuest Schema Definition
- Download the attached schema definition file UCMInteropSchema.txt to a directory on your host’s file system.
- Import the schema in the schema definition file by running the following cqload command in a command window:
cqload importschema -dbset <ClearQuest Connection Name> <ClearQuest User Name> <ClearQuest Password> <Schema Location>
For example:
C:RationalClearQuest>cqload importschema -dbset sample_schema_repo admin "" C:TempUCMInteropSchema.txt ********************************************************* Starting importschema ********************************************************* ********************************************************* Successfully completed importschema *********************************************************
- IMPORTANT: Skip Section 2.2.3 Create ClearQuest Schema.
2.2.3 Create ClearQuest Schema
- Enable package editing for a ClearQuest administrative user by running the following packageutil command in a command window:
packageutil enablepackageediting -dbset <ClearQuest Connection Name> <ClearQuest User Name> <ClearQuest Password> -enable <ClearQuest User Name>
For example:
C:RationalClearQuest>packageutil enablepackageediting -dbset sample_schema_repo admin "" -enable admin Enabled the package editing option for user 'admin'
- Start ClearQuest Designer as the administrative user (used in step 1 above).
NOTE: If the schema wizard comes up, click Cancel to close it. - Click File->New Schema from the menu bar to create a new schema.
- Choose the latest version of the UCM schema as the base schema in the wizard. Click Next.
- Give UCMInterop as the name of the new schema. Click Finish.
- When asked to create a database associated with the new schema, click No.
- When asked if you want to check out the new schema, click No.
- Bring up the Package Wizard by clicking on Package > Package Wizard from the menu bar.
- Select the JazzInterop package with the highest version number (as registered in step 5 in Section 2.2.1 Setup ClearQuest Schema Repository) and click Next. (If the package does not show in the list then click More Packages and select JazzInterop package with the highest version number and click OK).
- Choose UCMInterop schema from the list of schemas and click Next.
- Select the Defect and UCM_Project record types to apply this package to and click Finish.
- After step 11, the UCMInterop schema is checked out and the package is applied to the Defect and UCM_Project record types.[3]
- Open the State Transition Matrix for the Defect record type (under Record Types->Defect->States and Actions).
- Add a new state transition from Submitted to Open state using Open action from the drop down list.[4]
- Save the schema (File->Save Work).
- Check in the schema using File->Checkin from the menu bar.
- Use the supplied comment and click OK to check in the schema. Wait for the prompt: Schema “UCMInterop” has been checked in successfully.
- Disable package editing for a ClearQuest administrative user by running the following packageutil command in a command window:
packageutil enablepackageediting -dbset <ClearQuest Connection Name> <ClearQuest User Name> <ClearQuest Password> -disable <ClearQuest User Name>
For example:
C:RationalClearQuest>packageutil enablepackageediting -dbset sample_schema_repo admin "" -disable admin Disabled the package editing option for user 'admin'
2.3 Create ClearQuest Users For Use With CC/CQ Connector[5]
For the example in this note, we need three ClearQuest user accounts with the following attributes:[6]
- ClearCase Sync User
- Login: ccsync
- Password: ccsync
- Name: ClearCase Sync User
- Email: ccsync
- Groups: Everyone
- Privileges: Active User, All User/Groups Visible
- Subscription: All Existing and future databases
- ClearQuest Sync User
- Login: cqconnector
- Password: cqconnector
- Name: ClearQuest Sync User
- Email: cqconnector
- Groups: Everyone
- Privileges: Active User,All User/Groups Visible, SQL Editor
- Subscription: All Existing and future databases
- RTC Client User
- Login: jazzuser
- Password: jazzuser
- Name: Jazz User
- Email: jazzuser
- Groups: Everyone
- Privileges: Active User, All User/Groups Visible
- Subscription: All Existing and future databases
Complete the following steps:
- Start ClearQuest User Administration as an administrative user.
- For each of the users mentioned above create a user account by clicking User Action->Add User.
- After all users have been added click OK in the ClearQuest User Administration dialog and finally click Yes to save user accounts.
2.4 Create ClearQuest User Database
- Start ClearQuest Designer as an administrative user.
NOTE: If the schema wizard comes up, click Cancel to close it. - In ClearQuest Designer, click Database->New Database from the menu bar.
- For the example in this note, we chose SAMPL as the logical name of the database (and entered User Database in the comment field). Click Next.
- Enter physical database properties and make it a Production Database. Click Next.
- Accept default values for Timeout and Poll Intervals. Click Next.
- Choose the UCMInterop Schema with the highest version number. Click Finish.
- Wait for the prompt: “Database was created successfully and then click OK.
- Close ClearQuest Designer.
2.5 Create ClearQuest Jazz Query Root Tree
- Start the ClearQuest client.
- Login to the user database as the ClearQuest admin user.
- Navigate to the Public Queries Folder.
- Create a new folder called JazzConnector as a child of the Public Queries folder.
- Create a new folder called CCCQProject as a child of the JazzConnector folder.
3 Setup Rational Team Concert
- Start Jazz Team Server
- Start the RTC Client
3.1 Create Rational Team Concert Users For Use With CC/CQ Connector
For the example in this note, we need three Rational Team Concert user accounts with the following attributes:
- ClearCase Sync User
- Name: ClearCase Sync User
- User Id: ccsync
- Email Address: ccsync
- Repository Groups: JazzUsers
- Client Access Licenses: Rational Team Concert – ClearCase Connector
- ClearQuest Sync User
- Name: ClearQuest Sync User
- User Id: cqconnector
- Email Address: cqconnector
- Repository Groups: JazzUsers
- Client Access Licenses: Rational Team Concert – ClearQuest Connector
- RTC Client User
- Name: Jazz User
- User Id: jazzuser
- Email Address: jazzuser
- Repository Groups: JazzAdmins, JazzUsers
- Client Access Licenses: Rational Team Concert – Developer
Use the steps outlined below to add new user accounts to Rational Team Concert :[7]
- In RTC Client, create a new Repository Connection to the server using the pre-configured ADMIN account.
NOTE: If you get a Repository Connection Certificate Problem, choose to Accept this certificate permanently and click OK. - For each of the user accounts listed above, right click the repository connection and click New->User to create a new user account.[8]
- Click No on the prompt to import user accounts.
- Provide the required attributes and click Save.
- Close the user editor.
3.2 Create Project Area and Team Area
- Connect to the repository as the RTC Client User account.
- Right click the repository connection and click New->Project Area.
- Give CCCQProject as the name to the project area. It is worth noting that this name must match the name of the query tree folder created in Section 2.5 Create ClearQuest Jazz Query Root Tree. Click Next.
- Choose the Eclipse Way Process (If no templates are visible, deploy the process templates to the server first and then choose again). Click Finish.
- In the project area editor, go to the Work Item Categories tab; right click the CCCQProject Team under Team Area and click Open.
- In the team area editor, add the following users as members:
- ClearCase Sync User
- ClearQuest Sync User
- Jazz User
- Give each of these users teamlead and contributor process roles.
- Save the team area.
- Clear the selection of any users to whom you do not want to send a team invitation (usually all of them).
- Close the project area and team area editors.
3.3 Import Sync Rules For ClearQuest Records
- Download the following synchronization rules attached to this note to a directory on your host’s file system:
- com.ibm.rational.clearquest.sample_schema_repo.Defect.xml
- com.ibm.rational.clearquest.sample_schema_repo.UCM_Project.xml
- com.ibm.rational.clearquest.sample_schema_repo.users.xml
- com.ibm.rational.clearquest.sample_schema_repo.Attachment.xml
- Open the Synchronization Rules view by right clicking on repository connection and selecting Administer->Synchronization Rules.
- In the Synchronization Rules view, right click the project area and click Import Synchronization Rules.
- Click Create new external repository connection. Click Next.
- Give the connection some descriptive name (For example, MyCQConnection).
- For Rational Team Concert v2.0 or higher, enter the following URL under Connection info:
http://localhost:8081/cqconnector/gateway
- For any Rational Team Concert version prior to 2.0, enter the following URL under Connection info:
http://localhost:8081/InteropGateway
- For Rational Team Concert v2.0 or higher, enter the following URL under Connection info:
- Leave user ID and password blank
- Choose CCCQProject project area from the dropdown list.[9]
- Leave the Disable automatic outgoing synchronization checkbox cleared
- Click Finish.
- From the file browser, choose the following synchronization rules and click OK:
- com.ibm.rational.clearquest.sample_schema_repo.Defect.xml
- com.ibm.rational.clearquest.sample_schema_repo.UCM_Project.xml
- com.ibm.rational.clearquest.sample_schema_repo.users.xml
- com.ibm.rational.clearquest.sample_schema_repo.Attachment.xml
4 Enable Outgoing Synchronization
- Open page in an internet browser: https://localhost:9443/jazz/admin
- Login as pre-configured ADMIN user.
- Click Advanced Properties.
- In the Item Interoperation Section, set Connector – Outgoing Sync Enabled to true.
- Set the Outgoing Sync Task UserId to cqconnector.
- Set the Outgoing Sync Task Fixed Delay (seconds) to 60 for faster syncs.
- Save the properties using the Save button on the top right corner of the page.
- Wait for Configuration changes saved successfully message.
- Logout of the administration console.
5 Setup ClearQuest Connector Gateway
5.1 Setup ClearQuest Connector Gateway Properties
- Go to the CQ Connector installation folder (default location C:Program FilesIBMClearQuestConnector).
- Open the cqconnector.properties file using a text editor.
- Verify the following property values:
cq.userid=cqconnector cq.password=cqconnector com.ibm.team.uris=https://cqconnector:cqconnector@localhost:9443/jazz
Make sure the following properties match the ones from your ClearQuest environment. If they do not, change them to appropriate values.
cq.dbSetDbName=sample_schema_repo/SAMPL cq.queryTreeRoot=Public Queries/JazzConnector
- Close the properties file.
5.2 Start the ClearQuest Connector Gateway
- Set CQ_HOME environment variable to the install location of ClearQuest (typically this is C:Program FilesRationalClearQuest on Windows).
- Start a command window.
- Go to the CQ Connector installation folder (default location C:Program FilesIBMClearQuestConnector).
- Run the server.startup.bat batch file.
- Step 4 should start the ClearQuest gateway (running under Tomcat Application Server) in a new command window.
- Verify ClearQuest Gateway by pointing an internet browser to the URL:
- For Rational Team Concert v2.0 or higher, enter the following URL under Connection info:
http://localhost:8081/cqconnector/gateway
- For any Rational Team Concert version prior to 2.0, enter the following URL under Connection info:
http://localhost:8081/InteropGateway
- For Rational Team Concert v2.0 or higher, enter the following URL under Connection info:
6 Create ClearQuest-Enabled UCM Project
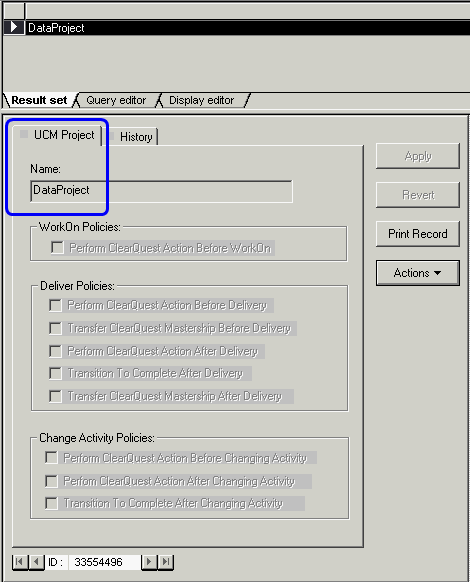
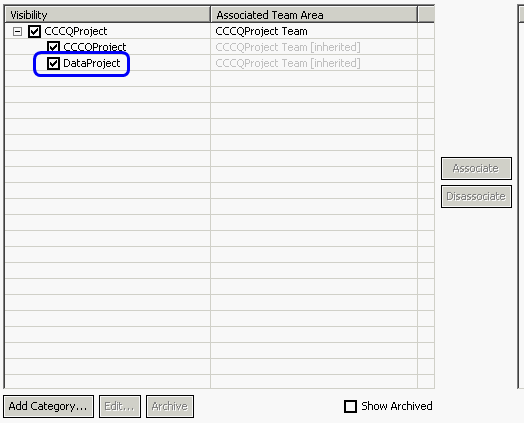
Create a new ClearQuest-enabled UCM project with appropriate modifiable components against the user database created in Section 2.4 Create ClearQuest User Database. If prompted for a user name and password, use the RTC Client User account as created in Section 2.4 Create ClearQuest User Database. Create a project integration stream selecting an appropriate set of component baselines. The UCM Project is linked to ClearQuest through a UCM_Project record type. This record type is mapped to a Work Item Category in Rational Team Concert using the synchronization rules in Rational Team Concert. After this step, you should expect to see a new category appear under Work Item Categories on the Project Area editor page for CCCQProject [10].
Following is a screenshot of the UCM_Project record in ClearQuest after the UCM Project is ClearQuest-enabled:
Following is a screenshot of the Work Item Category corresponding to the UCM_Project record in Rational Team Concert:
7 Create Defect Record For Use In UCM Project
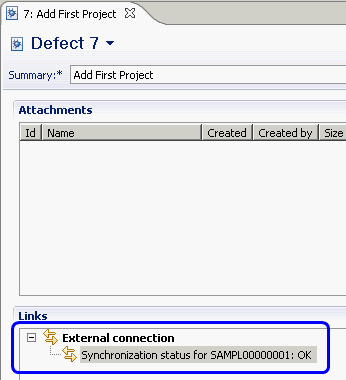
Create a new Defect record in ClearQuest and assign it to the UCM Project created in Section 6 Create ClearQuest-Enabled UCM Project. Verify the defect as being synced as a new Work Item (If not, use debugging instructions in footnote [10]). Open the External connection on the new Work Item to verify ClearQuest properties being synchronized.
Following is a screenshot of a ClearQuest Defect record synchronized to a Rational Team Concert Work Item:
8 Import ClearCase UCM Stream In Rational Team Concert
Import the UCM integration stream created in Section 6 Create ClearQuest-Enabled UCM Project as a synchronized stream in Rational Team Concert. Add a UCM Component root as synchronized folder from the ClearCase side. Verify existing projects (if any) in the Component root are brought into Rational Team Concert.
8.1 Verify ClearCase Provider Properties For ClearQuest[11]
The CC Connector sync algorithm will need to create a UCMUtilityActivity record in ClearQuest for changes from Rational Team Concert. This UCMUtilityActivity record is then set as UCM activity to record changes from Rational Team Concert. The sync algorithm uses the values of the following ClearCase Provider Properties to establish a session with ClearQuest.
Open the synchronized stream properties and verify/change the following properties to the given values:
- CLEARQUEST_DBSET_NAME = sample_schema_repo
- CLEARQUEST_USERDB_NAME = SAMPL
- CLEARQUEST_LOGIN_NAME = ccsync
8.2 Create a Password File for the ClearQuest User
In addition to the values of the ClearCase Provider Properties mentioned above, the sync algorithm needs the ClearQuest user’s password. It attempts to read the password from the –password=<password> property in a file with a name ClearQuest User Name.cq_password. The ClearQuest user’s password file needs to be present in the ClearCaseConnector folder in the ClearCase User’s[12] home directory (typically C:Documents and Settings<Windows User Name> on Windows).
Follow instructions below to setup the ClearQuest user’s password file:
- Go to the ClearCaseConnector folder under ClearCase User’s home directory.
- Create a text file called ccsync.cq_password in this folder.
- Enter the following single property in the this file:
-password=ccsync
NOTE: The password for the ClearCase Sync User was ccsync in Section 2.3 Create ClearQuest Users For Use With CC/CQ Connector.
- Save the password file.
- Ensure password file’s attributes allow read permissions to the ClearCase User.
8.3 How CC Connector Communicates With ClearQuest
The CC Connector sync algorithm uses the CQ-Perl API to communicate with ClearQuest. A number of perl scripts are added by the CC Connector installer in the …ccctoolsScmConnectors folder. These perl scripts are invoked using ratlperl at various stages of the synchronization operation.
9 Validate Change Set-Work Item Association
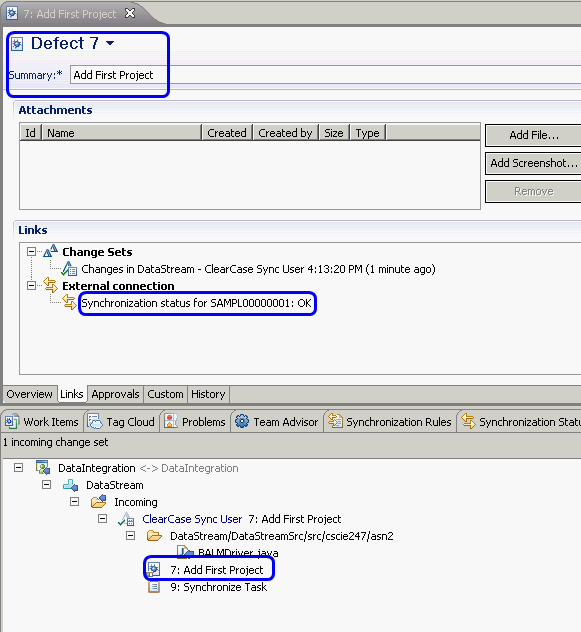
The CC Connector sync algorithm will associate an incoming change set with a new Rational Team Concert Work Item titled Synchronized Task. In addition, it will attempt to associate the change set with synchronized Work Items of UCM activities that are linked to ClearQuest and that make up this change in ClearCase.
To understand the latter statement better by an example, say a new ClearQuest defect with ID SAMPL00000001 is created in ClearQuest. The CQ Connector gateway synchronizes this defect as Work Item 7 in Rational Team Concert. In a synchronized UCM stream, SAMPL00000001 is set as a UCM activity and a change set is recorded against it in ClearCase. When this change set is brought over into Rational Team Concert, the CC Connector sync algorithm creates a new incoming change set. This new change set in Rational Team Concert is associated with Work Item 7 (which is synchronized with SAMPL00000001 in ClearQuest.)
To verify this behavior, follow the steps outlined below:
- Create a new Defect in ClearQuest.
- Set the Defect as a UCM activity.
- Make some changes in ClearCase and associate them with this UCM activity.
- Check in the changes.
- Synchronize the stream.
- Notice that the incoming change in Rational Team Concert is associated with the Work Item synchronized with the ClearQuest Defect created in step 1 (in addition to a new Synchronized Task Work Item).
It is worth noting is that regardless of the number of UCM changes brought over by the CC Connector sync algorithm, only one change set is created in Rational Team Concert. However, the sync algorithm associates this single change set with all the Synchronized Work Items of UCM activities that are linked to ClearQuest.
To understand this better by an example, say two new ClearQuest defects with ID SAMPL00000001 and SAMPL00000002 are created in ClearQuest. CQ Connector gateway synchronizes these defects as Work Item 7 and Work Item 8 respectively in Rational Team Concert. In a synchronized UCM stream, SAMPL00000001 is first set as a UCM activity and a change set is recorded against it in ClearCase. Subsequently, SAMPL00000002 is set as a UCM activity and a new change set is recorded against it in ClearCase. When these change sets are brought over into Rational Team Concert, the CC Connector sync algorithm creates only one new incoming change set containing all the changes in SAMPL00000001 and SAMPL00000002. However, this single change set is associated with both Work Item 7 and Work Item 8.
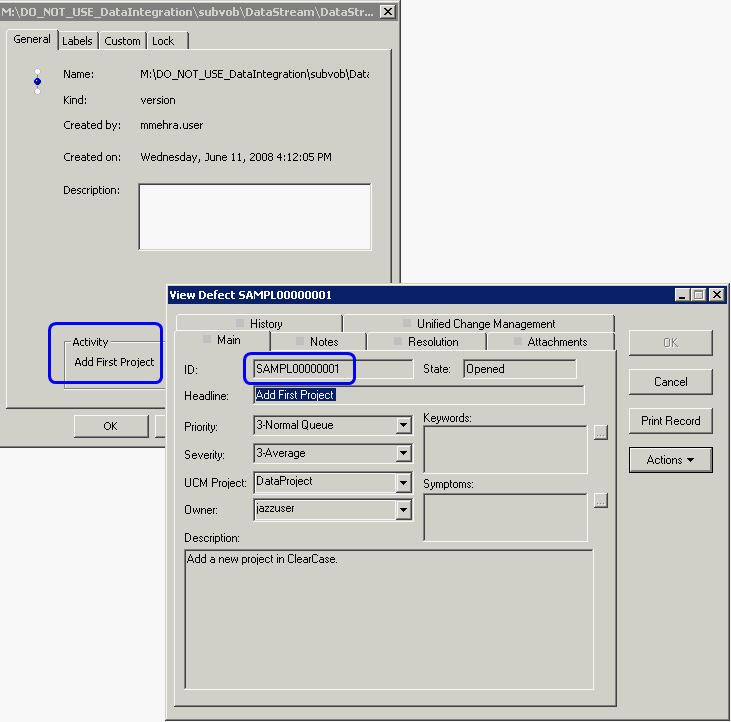
Following is a screenshot of a ClearQuest Defect record set as a UCM Activity:
Following is a screenshot of a change set associated with a synchronized Work Item:
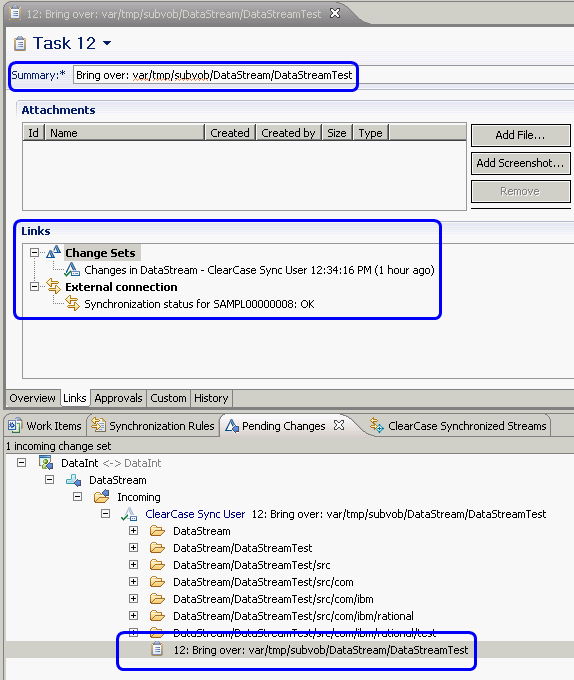
EXCEPTION CASE: It is also important to note that when a synchronized folder is brought over from ClearCase for the first time in Rational Team Concert, the incoming change set is not associated with the synchronized Work Item originally used to create the change in ClearCase. Instead, a new Work Item is created in Rational Team Concert with summary: Bring over: synchronized folder path. This is the only exceptional case in which change sets are not associated with either synchronized Work Items of UCM activities linked to ClearQuest or a Synchronized Task Work Item. Refer figure below for expected behavior:
10 Validate UCM Activity-Work Item Association
To synchronize changes made in Rational Team Concert, CC Connector sync algorithm will first create a new UCMUtilityActivity record in ClearQuest. It will set this record as a UCM activity in the ClearCase stream and will record changes against it. The description field of the UCMUtilityActivity record in ClearQuest will finally be updated to include summary information of all the Rational Team Concert Work Items that correspond to the change in RTC.
To verify this behavior, follow the steps outlined below:
- Create some changes in the merge workspace for a synchronized stream in Rational Team Concert.
- Check in the changes.
- Associate the change with a new Work Item.
- Deliver the change from the merge workspace to the synchronized stream in Rational Team Concert.
- Synchronize the stream.
- Verify that incoming changes in ClearCase are associated with a UCM Activity linked to a new UCMUtilityActivity record in ClearQuest.
- Also verify that the description field of the UCMUtilityActivity record contains summary information from the Work Item created in step 2.
Again, it is worth noting is that only one change set is created in UCM regardless of the number of changes brought over from Rational Team Concert. Since UCM-ClearQuest integration does not allow associating one UCM activity with more than one ClearQuest record, the CC Connector sync algorithm cannot associate the UCM activity with corresponding synchronized records of Rational Team Concert Work Items in ClearQuest. Instead, it adds summary information of all Work Items that contribute to this change to the new UCMUtilityActivity record’s description field.
To understand this better by an example, say two new Work Items with ID 7 and 8 are created in Rational Team Concert. CQ Connector gateway synchronizes these defects as SAMPL00000017 and SAMPL00000018 respectively in ClearQuest. In the merge workspace of a synchronized Jazz stream, a change set is associated against Work Item 7. Subsequently, another change set is associated against Work Item 8. Both changes are delivered to the synchronized stream. Upon sync, the CC Connector sync algorithm creates UCMUtilityActivity record with ID SAMPL00000019 in ClearQuest and sets it as a UCM activity. All Rational Team Concert changes are recorded against this UCM activity. The sync algorithm updates the description field of SAMPL00000019 with the following information:
- Synchronized Task: Work Item 7
- Synchronized Task: Work Item 8
No linkages between SAMPL00000019 and SAMPL00000017 or SAMPL00000018 are created in ClearQuest.
OPTIONAL:
The CC Connector leaves the new UCMUtilityActivity in an “Active” state after synchronization. To transition this activity to a new state (Complete/Submitted), add a relevant action keyword (Complete/Postpone) to the ClearCase Provider Property: CLEARQUEST_UCM_RECORD_ACTION
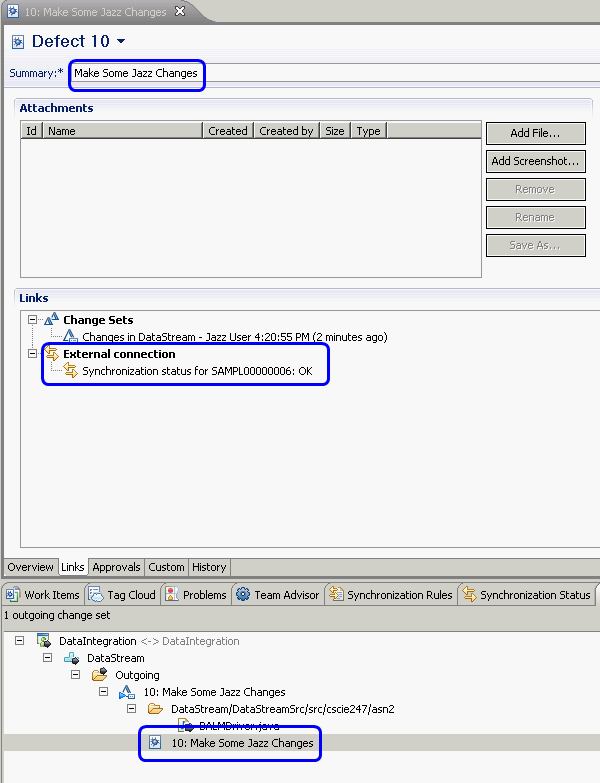
Following is a screenshot of a change set associated with a Rational Team Concert Work Item. The Summary of this Work Item will be copied into a new UCMUtilityActivity record created by the synch algorithm:
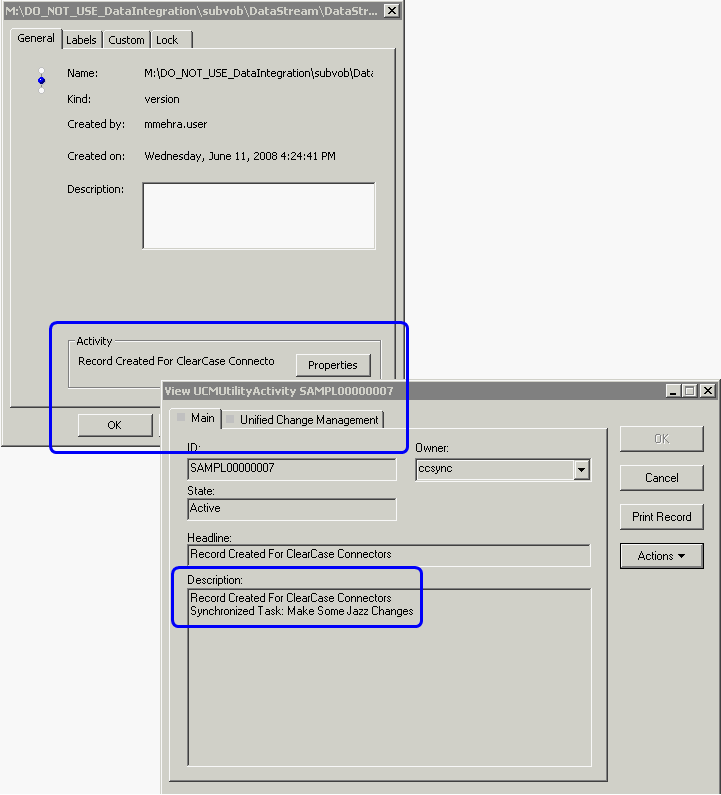
Following is a screenshot of the new UCMUtilityActivity record created by the sync algorithm:
Attachments
- ClearQuest Schema Repository: MASTR.mdb
- ClearQuest User Database: SAMPL.mdb
- ClearQuest Schema Definition: UCMInteropSchema.txt
- Sync Rule for UCM_Project Record Type:com.ibm.rational.clearquest.UCMInterop.UCM_Project.xml
- Sync Rule for Defect Record Type:com.ibm.rational.clearquest.UCMInterop.Defect.xml
- Sync Rule for attachments Record Type:com.ibm.rational.clearquest.UCMInterop.Attachment.xml
- Sync Rule for users Record Type:com.ibm.rational.clearquest.UCMInterop.users.xml
[1]These instructions can be applied to a UNIX environment wherever appropriate.[top]
[2]Records of these types will later be synchronized as Work Item Category (in Project Area) and Work Item respectively in Rational Team Concert.[top]
[3]A Change_History action is added to these record types if the package is applied correctly. Verify this by looking under Actions (in States and Actions folder) for these record types.[top]
[4]We need to do this to plug a process difference between the state model of a ClearQuest Defect and the state model of a RTC Work Item. In RTC, Work Items can be transitioned from New->In-progress state directly where as Defects in ClearQuest must be Assigned first. Alternatively, a new state to represent the Assigned state (with appropriate transitions from other states) can be added to the Work Item’s workflow in the process configuration of the project area.[top]
[5]Users in ClearQuest are mapped to users in Rational Team Concert using values from following ClearQuest fields: Login (maps to User Id in RTC), Name (maps to Name in RTC) and Email (maps to Email Address in RTC) fields. It is necessary that values in these fields must match exactly those from Rational Team Concert for this mapping to work correctly.[top]
[6]The ClearCase Sync User and the RTC User accounts have normal ClearQuest user privileges; The ClearQuest Sync User must also have SQL Editor privileges in addition to normal user privileges.[top]
[7]For additional information, refer Sections Creating a user (under Collaborating ->Working with projects, teams, and process->Creating and modifying a team area->Adding and modifying users) and Creating a synchronization process account (under Managing change and releases->Configuring and using the ClearCase Connector->Configuring synchronization) at Rational Team Concert InfoCenter at http://www-1.ibm.com/support/docview.wss?rs=3488&uid=swg27012781.[top]
[8]You might have noticed that the ClearQuest user accounts have the same attributes as the RTC user accounts. This is intentional as we want to have a common mapping for users in the two repositories. For details refer footnote #5. Also, in the out-of-the-box RTC Client/Server, user accounts are given the same password as the login name when they are created.[top]
[9]We are restricting the external repository connection to this project area only. In general, you can restrict access to the external repository connection by setting permissions in a project area and then selecting that project area in the Project Area field of the new external repository connection. After you set a project area for an external repository connection, you cannot change it. If you need to set the field to a different project area or to no project area, you can delete the external repository connection and create a new one.[top]
[10]It may take from a few seconds to minutes for changes from ClearQuest to show up in Rational Team Concert. If a significant period of time has elapsed and you still do not see the UCM Project as a new Work Item Category, close and reopen the Project Area editor (if it was already opened).If you still do not see the new category then it means that CQ Connector synchronization is not working properly. Check the ClearQuest Gateway console window for any logged exceptions. Also check the gateway properties (as mentioned in Section 5.1 Setup ClearQuest Connector Gateway Properties) for correctness. Also bring up the Synchronization Status View by right clicking on the External Repository Connection and selecting "Show All Unsynchronized". This view should show error/pending statuses on records being synchronized. Additionally, create two new private ClearQuest queries of type JazzConnectorChangeEvents and JazzConnectorSyncHistory. The first query shows all records waiting to be synchronized while the second one shows all currently synchronized records. If syncs are working properly, the first query should not return any data for a significant period of time; it may show some data as soon as changes are made but subsequent refreshes should not show them again.[top]
[11]For additional information, refer Section Configuring a synchronized stream to support UCM projects that are enabled for Rational ClearQuest (under Managing change and releases->Configuring and using the ClearCase Connector->Working with a ClearCase Synchronized Stream) at Rational Team Concert InfoCenter at http://www-1.ibm.com/support/docview.wss?rs=3488&uid=swg27012781.[top]
[12]The ClearCase User is the OS user who imported the UCM stream into Rational Team Concert and is currently logged into the host running the ClearCase Sync Engine. It is also the user ID listed under CLEARCASE_LOGIN_NAME Provider Property and is meant to be valid ClearCase user account.[top]
© Copyright 2008 IBM Corporation