
Customization of Work Items in Rational Team Concert
This article presents an overview of the possibilities to customize work items, work item attributes, and editor presentations. It covers the complete process of developing a customized work item type and thus can be read as a walk-through. However, every section focuses on only one of the customizations, allowing you to selectively choose the sections that are of special interest to you. In some cases however, a customization may require others from prior steps to apply them to the example. At the end of this article we refer to further reading material that presents more details on this topic.
The functionality shown in this article applies to both the Web UI and the Eclipse client. Since the Web and the Eclipse UI have been designed to be similar, this article will alternate between using screen shots from each interface.
Outline
- Custom Work Item Types
- Custom Attributes
- Custom Attribute Types (Enumerations)
- Workflows – State Transition Policies
- Presentations for Editors
- Attribute Customization
Note: Some of the actions shown here should only be done with careful attention, especially when using running project areas. In general, removing elements like enumeration literals, work item types, workflow states, and workflow actions can be harmful as there can be data in the repository referencing such elements. The UI will work with non-existent data in most cases by showing the element ID instead of its name. But functionality might be broken; think of a deleted workflow state that provides no actions to transition back into an existing state. Safe customizations are customizations that either add new elements (e.g. work item types) or only change UI related features like display names or editor layouts. A full overview of how to perform these work item customizations safely is presented in the article Changing your RTC Process Configuration – Best Practices.
Customizing Work Items
RTC comes with a set of powerful core features that make it an excellent out of the box solution for many development processes such as Scrum and Formal projects. To accomodate different project requirements however, RTC comes with a set of tools that allow users to customize RTC’s behavior to conform to their application needs. This article offers an explanation of these tools, how and when they should be used, and how they work together to make RTC an ideal environment for managing development processes.
Processes in RTC, such as Scrum, come with built-in work item types, like Defect and Enhancement. You may find however that these types can not accurately track your development work. Given a high degree of overlap, RTC allows you to customize every existing type. In cases, like the example in this article, however, there might be very little overlap and it makes more sense to create a new work item type than to modify existing ones. In addition, each of RTC’s types, created or modified, also has a built-in set of attributes that model the properties of that type. As with work item types, the built-in set may not be sufficient for the needs of the application. For our development purposes at RTC for example, we use the Defect work item. We do however add several attributes such as a Browser attribute that indicates in which browser an observed defect is happening.
This is the common pattern among the customizations we shall walk through in this article. To cover the general use cases, you will find that RTC offers a useful set of types, attributes, presentations, and workflows. If these features are close to your application needs, then you should work on modifying them to refine their semantics. If you find those features to be extremely different, then RTC enables you to create them from scratch and incoroprate them with other components of the development process.
In this article, we will use a project called “Todo Project” for the presented customizations. You can customize work items via the Eclipse UI, but many customizations are now available via the Web UI as well. The Web UI for configuring work items can be discovered from the project area editor. In this example, we can configure work items for the “Todo Project” starting from the RTC administration Web UI by selecting . The Web UI currently supports customizing .
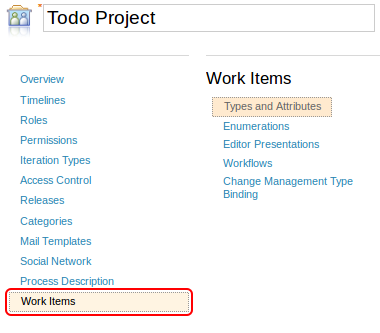
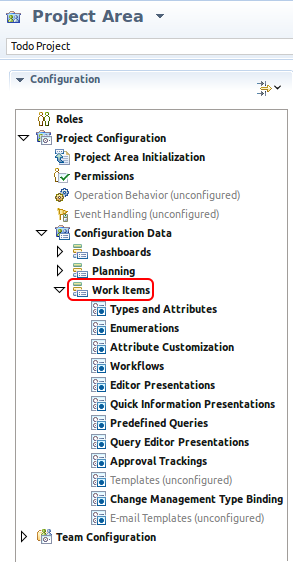
The Eclipse UI for configuring work items is accessible from the same place as in previous releases. You can right-click on the “Todo Project” and select open, then go to . As shown in , the Eclipse UI supports some additional configuration beyond what is currently available in the Web UI. These additional features are
The Running Example: A Simple Todo Item
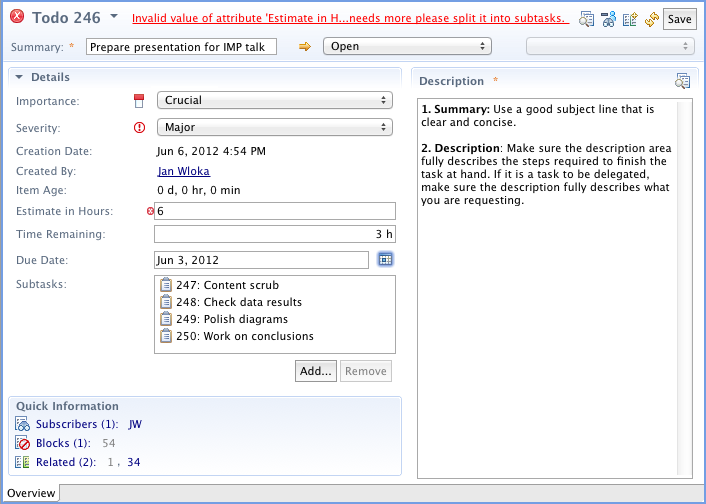
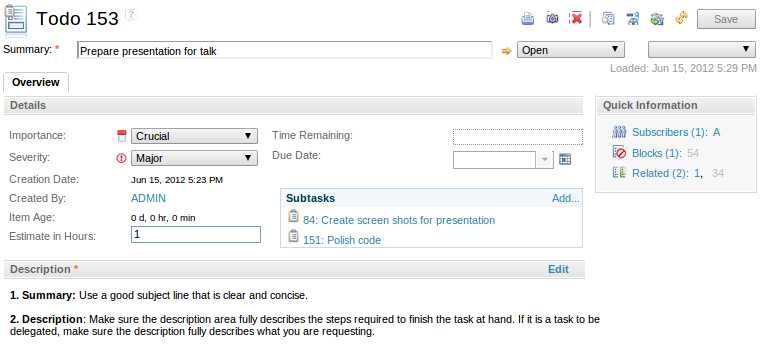
This article presents a complete scenario for creating a custom work item type. To this end, we will define and customize a simple Todo item as a running example. If you apply all customizations presented in the following sections, by the end of the article a Todo item will look like the item shown in .
A completely customized Todo item consists of the following customizations:
- A custom attribute called Subtasks that allows users to break up bigger Todos.
- A custom attribute type for an enumeration showing the Importance of a Todo.
- A custom workflow that will take the Todo from an Initialized state to a Completed state.
- An editor presentation that hides some built-in attributes and layouts the attributes of the Todo item.
- A attribute Item Age with a calculated value using a script to compute the time since creation.
- A dependent attribute with restrictions to Importance when the item’s Severity is Critical or Major.
- A condition for required attributes based on certain values of the item’s Severity.
- A number validator that ensures correct input values for Estimate in Hours values.
Custom Work Item Types
The most basic customization is to create your own work item type. Types are organized into type categories that share common behavior like the workflow, the required properties and the set of attributes.
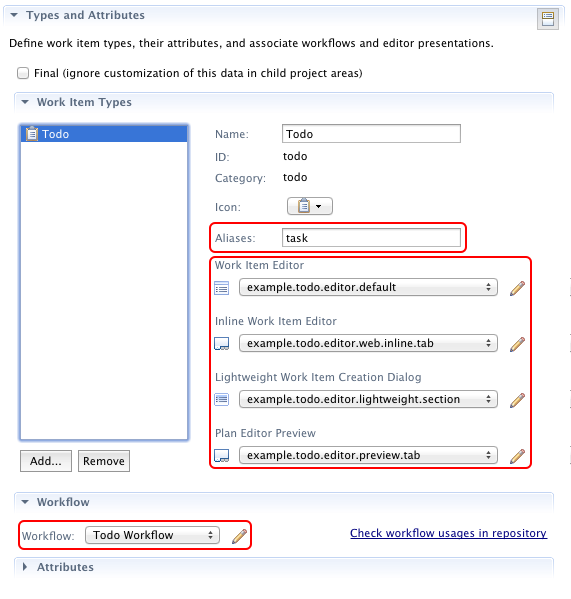
RTC ships with a number of generally useful work item types, such as Task, Defect, and Enhancement. If you wish to use a work item for a different purpose, you can define your own work item type. As shown in below, work item types have many properties that can be customized, including name, icon, aliases, attributes, workflow, and editor presentation. allow for links to be easily created between work items. For example, if the term ‘defect’ is an alias for the Defect work item type then mentioning ‘defect 123’ in a work item will create a link from that item to Defect 123. Multiple aliases can be specified using a comma separated list.
An specifies how items of that type are shown and how every attribute is presented in the work item editor. Last but not least, define possible state transitions on items of that type, e.g., the states that are available if the item is in the New state. These customizations are described in more detail in the following sections.
The configuration UI also contains the configuration that we will use in the next section to define custom attributes.
Example: A custom type for Todos
We will start to define the custom Todo item functionality, by creating a new work item type.
- In , we create a new work item type and give it the name “Todo”. We should give proper attention when choosing our ID however, because unlike the Name, the ID must be unique across the types in a project area. It is therefore advisable to follow a “namespaced” approach when choosing IDs. We also assign the type a new category because we do not want to use the existing attributes or the existing workflows of other types.
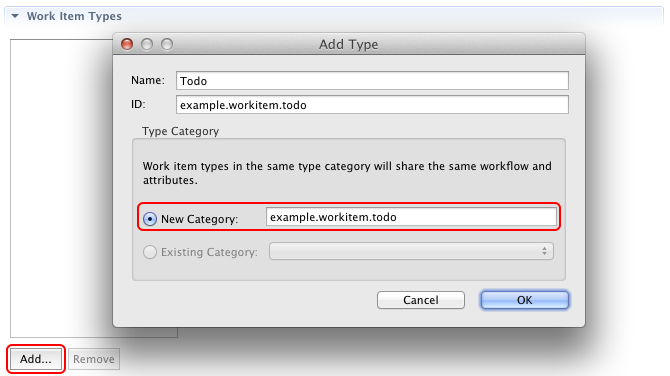 Create a new work item type Todo
 - Right now, we can not select an editor or a workflow for this new type because we have not defined them yet. We will do that in the following sections, but remember that this is the place where we will have to select them once they are defined.
- In the section a set of attributes can be found that are available for the new item type. These built-in attributes are available for all types and cannot be removed. If you want to use only a subset of them, you can limit the attribute presentations shown in the editor.
In summary, adding a custom work item type is the first step towards customizing RTC for your application needs. In the next section, we will define some custom attributes for the new type.
Custom Attributes
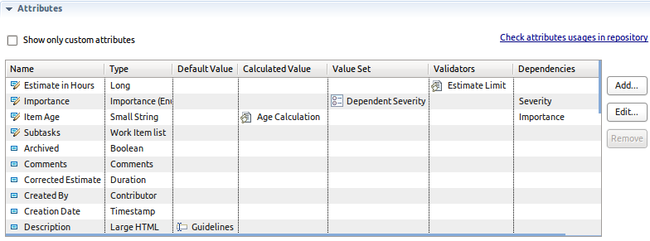
The work item type described in the previous section is in itself merely a container that houses your customizations. The real semantics of a work item come from its set of attributes. These attributes can be either built-in or custom attributes. Built-in attributes are available on all work item types and hence offer a way to describe common properties that all work items share, such as creation date and owner. For properties that are specific to a particular item type, RTC provides the ability to associate custom attributes with a work item. Every attribute can store values of a certain type. below shows the various groups of attribute types supported in RTC.
| Kind | Description |
|---|---|
| Native attribute types | Simple attribute types, such as Timestamp, Integer, Long, Boolean and Since: 4.0.1: Decimal. The semantics of these types are conformant with their definition in other programming environments. |
| Text-based attribute types | Attribute types that allows for storing any kind of text-based values. Different types are provided depending on the expected size, formatting, and presentation required for an attribute. HTML-based attributes, for example, offer formatting capabilities and support linking artifacts. Small and medium-sized attributes offer a way to more efficiently allocate database memory for attributes that are expected/required to be in a certain size range. The available text-based attributes are (the maximum attribute size applies when using UTF-8 encoding): Small String (250 bytes of text), Medium String (1000 bytes of text), Large String (32768 bytes of text), Medium HTML (1000 bytes of XML text, including tags), Large HTML (32768 bytes of XML text), String List (list of text values), and Tag (tag list for organizing and querying items). Note: In work item queries, you can only query for small and medium text attributes directly. For Large String and Large HTML attributes use a Full Text condition in queries. |
| Item-based attribute types | Attribute types used to model artifacts defined in by RTC such as users, projects, and work items. These attributes can be modeled as single items (e.g., only one user can create a work item) and as list attributes (e.g., multiple users can be set to approve a fix): Contributor (users in RTC, e.g., Creator or Owner), Process Area / Project Area / Team Area (refer to projects or teams, while a Process Area can be either), and Work Item / Item (where item can be any item managed by RTC). |
| Enumeration-based attribute types | Attributes with a fixed or extensible list of values: Enumeration is a special attribute type that can be used to defined custom attribute types (see Section Custom Attribute Types (Enumerations) for more details). |
| Other attribute types | Attribute types for planning and managing work items: Iteration (useful for iteration-based processes, e.g., Planned For), Category (is associated with a team, e.g., Filed Against), Deliverable, Duration, Timeline (refers to development line), E-Signature (digital signatures), and Wiki (Wiki style content) |
RTC does not support the addition of new attribute types. Only those mentioned in this table can be used with work item attributes.
Customizing Attributes
Once we have decided what attributes constitute our new item type, we can associate them with the selected work item type by going to then to the section. Custom attributes are indicated by  icon and built-in attributes are indicated by
  icon. New attributes can be created using the button. Built-in attributes and custom attributes are also editable in both the Eclipse and the Web UI. A convenient feature in the Web UI is that Enumeration types are shown as links to allow direct navigation to the associated Enumeration.
The Eclipse UI supports renaming, setting attribute customizations, and dependencies for all attributes via the action. Note: Modifying built-in attributes will affect all the work item types in the same project area.
Also in the Eclipse UI, you can create a new attribute directly when adding a new presentation to an editor. From a presentation editor, select or an existing presentation. In the dialog that appears, you will find the option at the bottom of the attribute combo box.
Example: A custom attribute for managing SubTasks
To illustrate the concept of custom attributes, suppose we want to have a Subtasks entry for our Todo item so that users can partition a Todo into different subtasks.
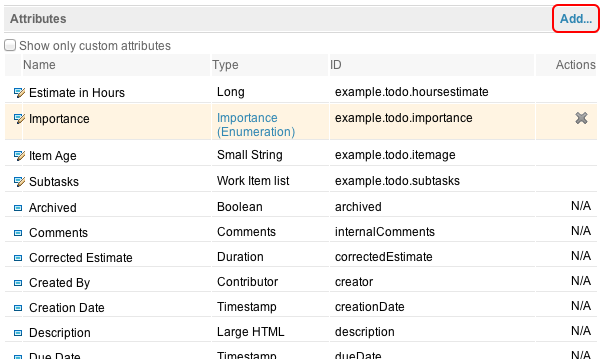
- In find the section . To create a new attribute called Subtasks of type Work Item List, we click the button. The new attribute now appears in the Attributes table marked with an icon. Note: Custom attributes can be shared across work item types. If you wish to use another Subtasks attribute that was already created in a work item type other than the Todo type, then you can do that by selecting the Reuse Existing Attribute option shown in the figure above.
 Create a custom attribute Subtasks of type Work Item List in the Eclipse UI
 - The new Subtasks attribute is defined but it won’t be shown in the editor until we define an attribute presentation and add it to the editor (see Section Presentations for Editors).
In summary, our Todo item is now capable of storing Subtasks with every item. By doing this step we have made our project area ready for further customizations, e.g., for adding presentations for the attribute to the item’s .
Custom Attribute Types (Enumerations)
There are cases, in which RTC’s predefined types (String, HTML, Contributor, etc.) are not capable of modeling a desired attribute. For example, consider the addition of a Browser picker in a defect that would allow users to choose the browser in which the defect occurs. For that purpose, a new attribute type that contains a set of available web browsers would be needed.
All custom attribute types in RTC are based on enumerations. An enumeration is a fixed or extensible list of of defined literals that constitute the possible values the attribute. Enumerations can be configured in the UI under . The UI allows for adding new or duplicating existing enumerations; it also allows for defining their literals as well. Also, a default and an unassigned value can be defined here.
RTC provides options for managing deprecated values in enumeration types. Consider the Browser enumeration mentioned above. If you wish to remove IE6 for example from the available options, RTC allows you to or that literal from the enumeration. would delete the literal from the enumeration completely even if the literal is still being used in existing work items. Before you remove a literal RTC can search its usages. , on the other hand, would stop the literal from being used in new work items while allowing old work items to retain that deprecated value.
Example: A custom enumeration type for modeling the importance of Todos
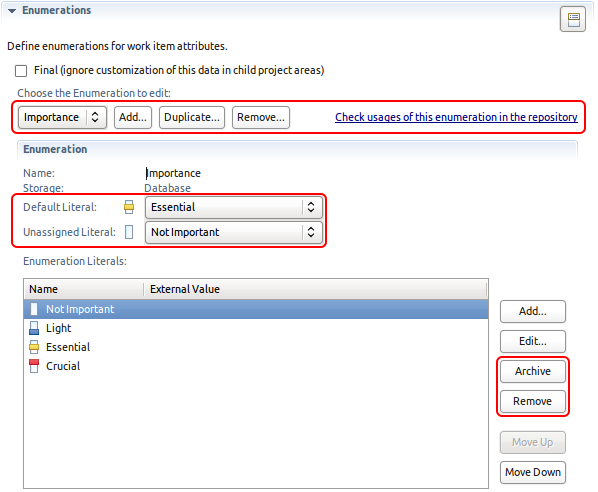
To illustrate the concept of enumerations in the context of the Todo item, we add a new attribute to indicate the importance of a particular Todo. Unlike the Subtasks example, there are no predefined attribute types that fit this need. The enumeration will have four possible values: Not Important, Light, Essential, and Crucial. We will mark Essential as the Default literal and Not Important as the Unassigned literal.
- The first step is to create a new enumeration for the custom attribute of type Importance. Besides giving it a name and an ID, we have the option of storing the enumeration either in the Process Specification or in the Database. The former limits the set of literals to the choices provided here, while the latter allows users (with resp. permissions) to add new literals to the enumeration.
 Create a new enumeration for the custom type Importance
 - After the new enumeration is created, we can create new literals and add them to it. Each literal can provide a Name, an Icon, and an optional External Value. External values can be used for accessing attributes via RTC’s REST API, such as the OSLC implementation. Click on in the section and add literals for Not Important, Light, Essential, and Crucial.
- We also assign a required Default value to which the enumeration is set when the work item is created. We can optionally indicate an Unassigned value, which is useful when customizing required attributes on work items (see “Custom Read-only and Required Attributes”). The new attribute type is now configured as shown in and can be used with custom attributes.
- Now that the enumeration is defined, we can go back to and add a new attribute of this type to the Todo item. In the Attributes section as shown in , we click for adding a new attribute to our type category. We name it Importance, stick with the given ID, and choose Importance (Enumeration) from the attribute type list.
In summary, custom attribute types in RTC can be used to model your data using abstractions that are tailored to your individual needs. These attribute types are represented as enumerations with fixed or editable value sets and can provide more meaningful semantics for your work item properties.
Workflows – State Transition Policies
RTC uses work items to track the work being done in a project. Every work item can reach different states (open, in progress, complete) while the described task is performed. This life cycle of a work item is called a workflow. A workflow is defined for every work item type category. Work item types of the same category share the same workflow. RTC models workflows as state transition policies using states that a work item can be in and actions (state transitions) that users can take to move the work item from one state to another. Every workflow can have a start action (causes initial state), a resolve action (causes complete state), and a reopen action (allows for reopening completed items).
RTC comes preconfigured with a set of generally useful workflows which users can use as starting point for defining individually tailored life cycles. Typically, a workflow starts with an New or Submitted state and ends with a Done or Resolved state reflecting the final disposition of the work item. Optionally, resolutions can be specified for actions, where each action can then have a target state and a target resolution. Resolutions are meant for helping refine the meaning of the state. The workflow customization can be found by navigating to .
You can create a new workflow either by starting from scratch or by duplicating an existing workflow. In the former case, click for adding a new workflow and add states to it. For every state select a state group that associates a predefined semantics with the state. For example, the open group would be appropriate for the New state. State groups in RTC are used across workflows to identify states with a similar semantics. In fact, this is the feature that powers the Resolved/Unresolved status description in queries as well as the New/In Progress/Done columns in the Taskboard view.
After the states are created, you can start arranging them in the section. A matrix of source (row headings) and target states (column headings) allows you to select the actions that perform the transition. You can either select an existing action, or add a new one by selecting . When the transitions are configured, you can select a Start action and optionally, actions for the Resolve action and Reopen action if your workflow supports the semantics. At the very minimum, you need to provide actions to enable users to move a work item from its initial state to its final state.
You may also specify resolutions, which are optional and refine the meaning of a certain state. For example, a Todo item can be closed for different reasons. The closed state can be augmented with resolutions like Done, Elapsed, or Invalid to provide a reason for that state.
When you have finished defining your workflow, you can bind it to a work item type category. Go back to the Workflow section in to select the newly created workflow.
Approval Trackings
Approval Trackings offer a convenient way to link workflow actions to approval changes. For each workflow, the approval types , and can be configured to trigger a workflow action when entering the , or state. This can be used for example to transition a work item from a Resolved state to a Verified state once a verification is given by another user. Approval trackings are accessible from the Eclipse UI by going to (see ).
Example: A custom Workflow with Approval Tracking
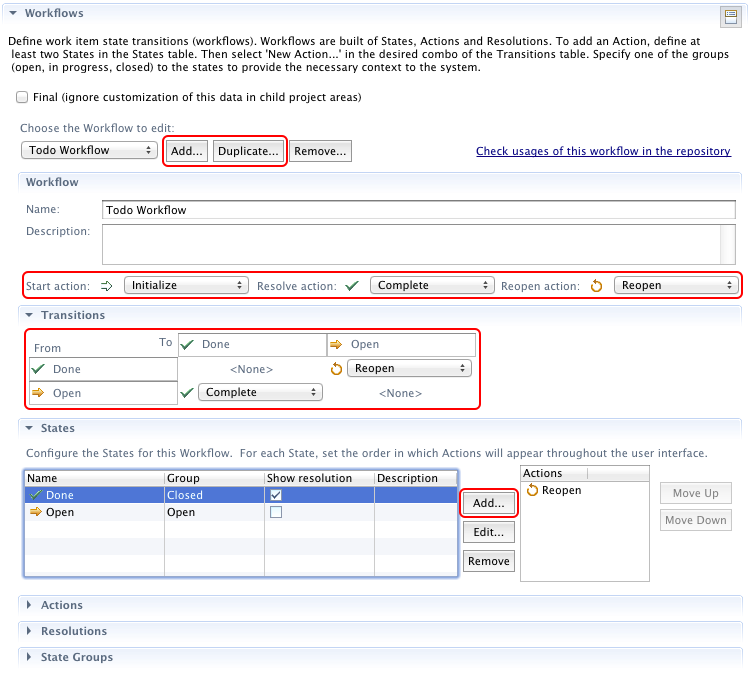
We will add a workflow the Todo item and link it to an approval tracking. Todo items have a rather short workflow. On creation they enter the Open state, and then they can be Closed. Once in the Closed state they can be Reopened. 
- In the view, we create a new workflow, add the states, the actions, and accordingly modify the transitions as shown in .
- Once we have completed the configuration of the workflow, we can bind it to our type category by going to , selecting our work item type (workflow bindings are unique per work item type), and then perform the binding in the section as illustrated in .
- We can use approvals of type Verification to indicate that the work is actually done after a Todo item was closed. If the Verification is rejected, the Todo item is automatically reopened. We add the Reopen action to the Rejected verification state as shown in below.
In summary, RTC ships with a set of generally useful workflows. If however, existing workflows do not fit into the life cycle of a custom work item type, you have the ability to create custom workflows that define the state transitions of a work item. This feature can also be augmented with Approval Trackings to link actions done by approvers to workflow states.
Now that the bulk of the customization has been done, it is time to configure how Todo items will be displayed in the editors.
Presentations for Editors
This section gives a short overview of the configuration of and . More in-depth information about the configuration is available in the article “Work Item Editor Presentations”.
In the Eclipse client, you can find the UI for customizing editor presentations under in the project area editor. There, you can specify the structure of the work item editor in terms of , , and . This same model is used for the editor in both the Eclipse and the Web UI, though their layouts differ significantly. A has a certain layout which defines slots. A can be assigned to such a slot, showing their in the specified order. The editor header can also be configured like an individual section. The Eclipse UI allows you to edit attribute presentations as well as assign some presentation-related properties (e.g. Read Only, Hide on Creation, etc.) on the presentation. These properties are accessible from the dialog that is shown when you click while a presentation is selected.
The Web UI provides a WYSIWYG editor for customizing work item editor presentations. You can find it on the administration page of a project area at . It allows you to preview your work item editors and get instant feedback as you modify them. can be added using the  button in the tab bar. To edit, remove, or move the position of a tab use the tab’s .
Sections can be added using the link in the left column of the page. To edit or remove sections, use the on the top-right of the section headers. Tabs and sections can be shared across multiple editors. In these cases, changes in the content of a shared section in one editor will appear in all instasnces of that shared section in other editors. RTC offers the ability to edit that content either by allowing the changes to appear in other editors or by duplicating the section content and making it unique for that editor presentation (see ).

As shown in and , tabs or sections that share their content across other editors are indicated by warning icons in the Web UI (shown on the left of tab and section titles) and by a [content shared] textual mark in the Eclipse UI (shown on the right of tab and section titles).
Presentations can be added using the icon in the section header. To edit or remove a presentation, hover the mouse over the presentation that you want to edit or remove and action icons will be displayed that can be used for editing or removal. Presentations and sections can be positioned and arranged with the mouse using drag and drop. Editing an attribute presentation in the Web UI also allows you to assign the presentation-related properties (e.g. Read Only, Hide on Creation, etc.) on the presentation. These properties are also accessible from the dialog.
Editor Presentation Bindings
An editor binding assigns an editor presentation to a work item type. A work item type can use multiple editor presentations for different purposes, and the same editor presentation can be assigned to different work item types. Editor bindings are configured on the same page as the work item type (see Section “Custom Work Item Types”). You can assign an editor presentation for the selected work item type through the available combo boxes (see ). Pencil buttons ( ) next to each combo box allow for direct navigation from a work item type to the associated editor presentation.
Work Item types without an assigned editor will use the default editor (which can also be modified). As there are multiple editor presentations used for different purposes, you can configure an individual binding for each case:
- Work Item Editor is the default editor for creating and modifying work items.
- Inline Work Item Editor is the editor for inline work item modification. For example, this editor is displayed when a user chooses to modify a work item within a query result set in the web interface.
- Lightweight Work Item Creation Dialog is the editor for quickly creating work items. For example, this editor is displayed when a user creates a work item when delivering a change set and also when a user creates a work item from another integrated application such as Rational Quality Manager.
- Plan Editor Preview is the editor for viewing and modifying work items inside a plan.
Every work item type can be bound to an editor. Types without an assigned editor will use the default editor (which can also be modified). You can configure an individual binding for each case.
Quick Information Presentations
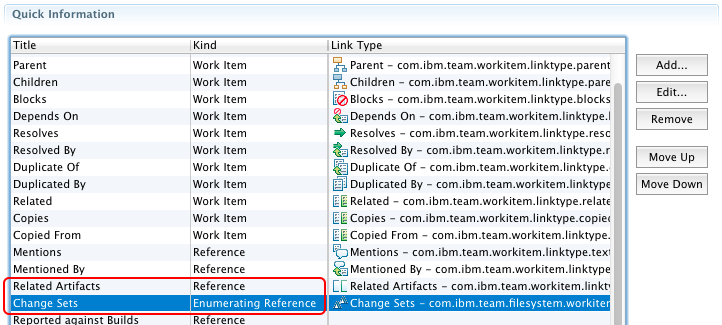
The section is initially shown on the in the default editor. It shows a summary of linked artifacts and users involved in a work item. The quick information itself can be configured with another configuration editor shown in . It allows for specifying the content of the section, the order of its entries, and how each entry is rendered. For example, entries for different link types can be shown as link count only (), as enumerated list () or as list of short abbreviations ().
Example: A custom editor for Todo items
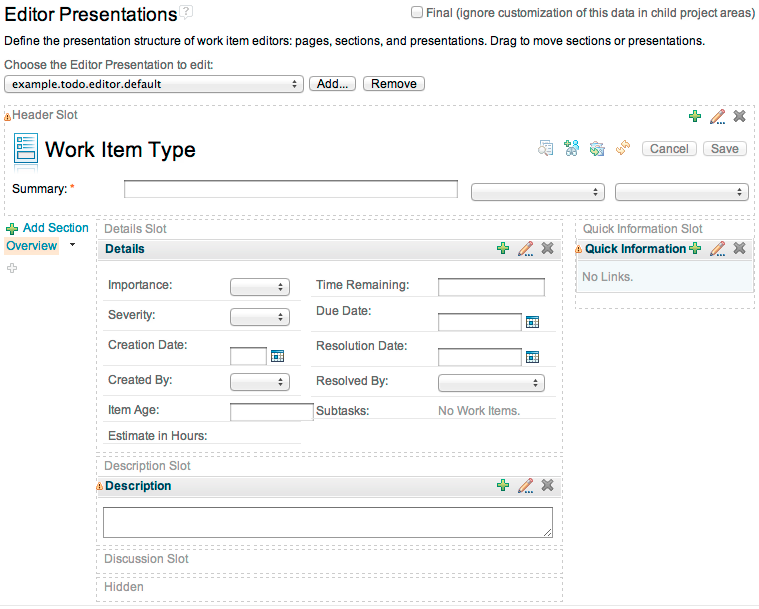
We illustrate the above concepts by creating a simple editor for Todo items. The editor will provide only a single tab, named Overview with a small Details section and a Description field as shown in .
- We use existing presentations from the default editor for the Description and Quick Information sections, and reuse the existing Header section as well. We customize the Details section to make sure our custom attributes are included and the built-in attributes that we do not want are removed.
 Configuration editor for the Editor Presentation in the Eclipse UI
 - We can hide the Created By attribute on creation of the item. For that purpose, we enable the Hide on Creation property in the attribute’s presentation dialog. Select click on and check the check box.
- Going back to we can bind our Todo item type to the newly created editor. Optionally, we can bind Plan Preview Pane and Web Inline Editor to similar custom editor presentations as shown in .
After defining and binding the editor layout, you can now create new work items of type Todo with its own custom layout.
In summary, RTC provides capabilities for modifying the layout and presentation of work item editors. This gives great flexibility across both the Eclipse and the Web UI as users can easily create new presentations and modify existing ones according to the needs of their projects.
Attribute Customization
Attribute customization is a way to add additional behavior to attributes of a work item. For example, you can validate the value of an attribute or calculate its value based on other attributes. As this article serves as more of a hands-on tutorial for the subject, space constraints do not allow to flesh all details of these powerful features. For more details about each possible customization and further examples we refer the reader to our Wiki page “Work Items Attribute Customization”.
The attribute customization functionality can only be configured in the Eclipse UI. You can find it under . Once an attribute customization is defined, it has to be associated with an attribute of the work item. This can be done in the edit dialog for each attribute. Only required and read-only behaviors have a different semantics. They can be configured in the section.
Calculated Values
Calculated values are used for attribute values that should be calculated instead of entered by the user. The calculation can use some independent data (e.g., time), or depend on values of other attributes of the same work item. The value calculation is triggered when an assigned dependency has changed. Calculated values can be created and managed in . An attribute with a calculated value customization should be used with a read-only presentation.
Calculated values have been shown to be very useful in the following situations:
- A time value to indicate the age of work items.
- The total cost to show the summary of various cost attributes in the work item.
In the context of the Todo example, we want to calculate the age of a Todo item. We use a script that retrieves the creation date and the current time to compute the Todo item‘s age:
- In the section, we add a new definition and select Script Based Calculated Value.
 Create a script-based calculated value provider
 - We use the JavaScript function shown below to subtract the current time from the creation date (in milliseconds) and return the value in human-readable form:
dojo.provide("example.calculated.AgeValueProvider"); dojo.require("com.ibm.team.workitem.api.common.WorkItemAttributes"); dojo.require("dojo.date.stamp"); (function() { var WorkItemAttributes = com.ibm.team.workitem.api.common.WorkItemAttributes; var fromISOString = dojo.date.stamp.fromISOString; dojo.declare("example.calculated.AgeValueProvider", null, { getValue: function(attribute, workItem, configuration) { var creationDate = fromISOString(workItem.getValue(WorkItemAttributes.CREATION_DATE)); if (creationDate) { var ageInSeconds = (Date.now() - creationDate.getTime()) / 1000; var days = parseInt(ageInSeconds / 86400); var hours = parseInt((ageInSeconds-days * 86400) / 3600); var minutes = parseInt((ageInSeconds-days * 86400 - hours * 3600) / 60); return days + " d, " + hours + " hr, " + minutes + " min"; } return ""; } }); })(); - We can load the script from a file of the hard drive by clicking . You can also click on to receive a sample script.
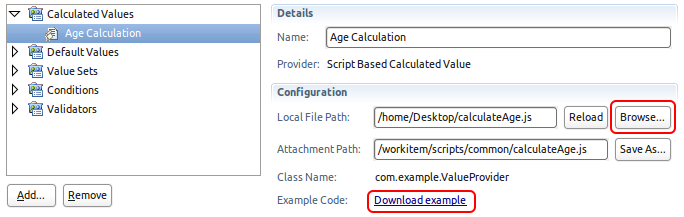 The fully configured calculated value script Age Calculation
 - In order to use the calculated value we go to and associate it with an attribute. Here, we create a new attribute Item Age, add it to the Todo item and select in the the newly created Age Calculation provider.
- Associated scripts are only executed when a dependent attribute has changed. Since we want to track the age of a Todo item, we edit the attribute Item Age and add in the attribute Modification Date. That way, every time a Todo item is modified, the Item Age is updated with the result of the script.
In summary, calculated values offer the ability to programmatically set attribute values. This gives users the ability to compute an attribute value, e.g., based on values of other attributes of the work item.
Default Values
A default value customization can be used to provide an initial value for an attribute when creating a new work item. Default values can be created and managed in .
Default values have been shown to be very useful in the following situations:
- A summary prefix that indicates the work item’s category and and creation date: “[Category @ Date]:”.
- A guideline description that outlines how to describe a task.
- A smart severity that selects an initial severity value depending on who filed a defect.
As a customization to the Todo item, we want to have a default Description that provides a guideline:
- We create a new Default Value definition and select as the provider. The selected provider has to match the attribute type that we want to associate with the value.
- We add the text that is pre-filled into the section and add some formatting to the text. The same rich text capabilities are supported as for the description attribute, e.g., Bold (ctrl+b), or Italic (ctrl+i). Also links to artifacts are supported.
 A Guideline default value with formatted text for Multi-Line HTML attribute
 - We go to , select the the Description attribute, and click . We select as the the provider we have just created.
- When we create a new Todo item now, the description will be pre-filled with the guidelines.
In summary, such default value providers can be defined for any attribute type. In case of enumerations, RTC also supports a special default value provider called that allows you to define the attribute’s default value by user role. If we look at the Importance enumeration, for example, we can set the default to be chosen according to the role of the user who created the Todo item. In general, Default Values are a convenient way to preconfigure attributes with initial values that are shown when a new work item is created.
Value Sets
RTC provides custom value sets that allows you configure how the values of an attribute are determined. In the Eclipse UI, four types of value set customizations can be configured in :
- Dependent Enumerations allow for limiting the values of enumerations based on a selected value.
- HTTP Filtered Value Set can retrieve and filter XML documents from arbitrary HTTP providers.
- Role Based User List provides all users in a project or team area with a specific role.
- Script Based Value Set is the most flexible value set provider. It allows for defining the set of possible values in a programmatically way via JavaScript.
Value Set Providers have been shown to be very useful in the following situations:
- A dependent value set of web browsers showing only browsers available for a previously selected platform.
- An available system parts value set is populated from an external HTTP service fetching newest parts from a DB.
- An accumulated risk value set computed by a script from selected values of other attributes.
As an example, we will create a Dependent Enumeration to limit possible values for the Importance attribute depending on the selected Severity of a Todo item.
- We start with defining the dependent value set. Right click on and select . In the dialog we provide “Dependent Severity” as name and select Dependent Enumerations as provider.
- In the section we can configure the source and target enumerations. For each literal in the source enumeration, we can check the values that we would like to show in the value set of the target enumeration.
 Eclipse UI for selecting dependent enumerations values for a selected literal
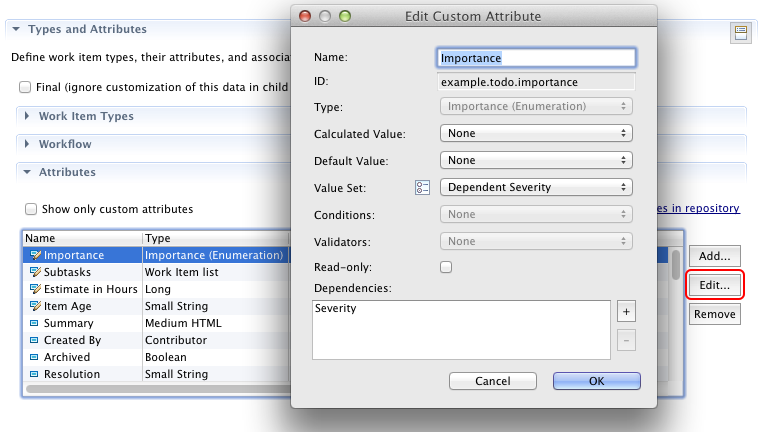
 - We go to the Attributes section in and edit the “Importance” attribute. We click and select “Dependent Severity” as . We also add the Severity attribute in to indicate that the value set is depending on it.
In summary, Value Sets provide a flexible way to define the set of possible values of work item attributes. This section gives only a basic introduction to this feature. In the next section, we present a specific value set provider configuration that allows you to fetch values via HTTP. For more in-depth instructions on how to fully customize value set providers go to the Wiki page “Work Item Attribute Customization”.
HTTP Filtered Value Set Provider
The HTTP Filtered Value Set Provider is a value set provider that allows users to fetch data sets from XML documents. These documents can be received from any server using HTTP. The provider is able to read XML data and transform it into a table of strings. XPath expressions can be used to navigate rows and columns in the table. From each row a value is created using a format pattern that describes how to construct the value from a column entry. Optionally, the value set entries can be sorted and filtered.
As an example, we will create an HTTP Filtered Value Set Provider that fetches car makes from “http://car.flashmx.us/makes”. The example car database provides data in the following format:
<xml> <node> <id>1</id> <make>Acura</make> <regions>,1,2,</regions> </node> <node> <id>2</id> <make>Aixam</make> <regions>,2,</regions> </node> ... </xml>
- We go to the in the project area editor. and create a new value set provider. We select as provider HTTP Filtered Value Set and name it “CarMakesProvider”. We enter
http://cars.flashmx.us/makesas URL. - In Row XPath expression we select a list of nodes from the XML document using
//xml/node. As Column XPath expression(s) we use./maketo select the values for each column relatively to the node. We provide in Column Identifiers e.g.Makeas name for the column. In Output Format we can use a string template that describes how to construct the value based on the columns. We enter${0}to select the entry from the only column. - We select to filter and sort the entries, because the provided data set is neither. We could use additionally variables, such as
${filter},${xy.value}, or${xy.label}. The former provides access to the current filter value. The two others allow for accessing the value and label of an attributexy. Note that value is using the internal representation of an attribute value, e.g. ‘severity.literal.l5’. An configured HTTP Filtered Value Set provider in the Eclipse UI
 - We can configure now a value set provider to a string attribute (small, medium and large strings) using the newly created provider. In we create a new attribute, use type Small String, select the newly created provider as value set provider.
- To take advantage of the new value set provider we specify a presentation that supports the new functionality for the newly created attribute. Currently two presentations are supported, the Value Set Combo Box and the Value Set Picker. This presentation simply displays any value from the value set associated with the attribute. Both a filtered and an unfiltered value set providers are supported. In both the Eclipse and the Web UI the values for the combo box are fetched in the background every time an item is opened or refreshed. This presentation should be used with caution when combined with unfiltered providers. Since it is only suited for smaller value sets.
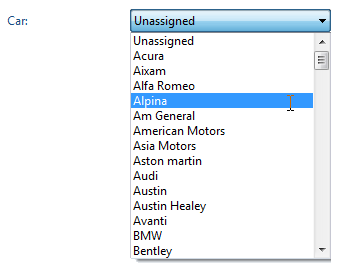 A Value Set Combo Box for the CarMakeProvider in the Eclipse UI
In summary, HTTP Filtered Value Set Providers give users the ability fetch, filter and format values from arbitrary XML data sources. To get a better understanding of this topic, we encourage the reader to consult the further readings presented in the Conclusion section.
Custom Read-only and Required Attributes
In RTC, a work item can specify required or read-only preconditions on its attributes. A required attribute needs to have a value assigned (other than the Unassigned value) before the work item can be saved to the repository successfully. In the UI required attributes are marked with an orange asterisk. A read-only attribute cannot be modified. In the UI these attributes are shown with read-only presentations. Assigning a new value to a read-only attribute will cause the save operation to fail on the server.
There are two possibilities to enforce “requiredness” or “read-onlyness” on work item attributes. Either precondition can be configured based on the state of a certain work item type, or based on a certain value of any attribute of the work item. For example, a value for the Owned By attribute can be required if the work item’s state is Resolved, or a Due Date can be required whenever the work item’s Severity is Critical.
Required and read-only attributes have been shown to be very useful in the following situations:
- Requiring certain attribute, such as the Owned By attribute, before a work item be Resolved.
- Preventing users from reopening a work item once it’s verified, i.e., its Status is set to read-only when the work item item is saved as verified.
This behavior can be configured in the Eclipse UI by going to the section of the project configuration. Every column in the table represents a role defined in the process specification for the project. Different required/read-only preconditions can be defined depending on the process role of the user.
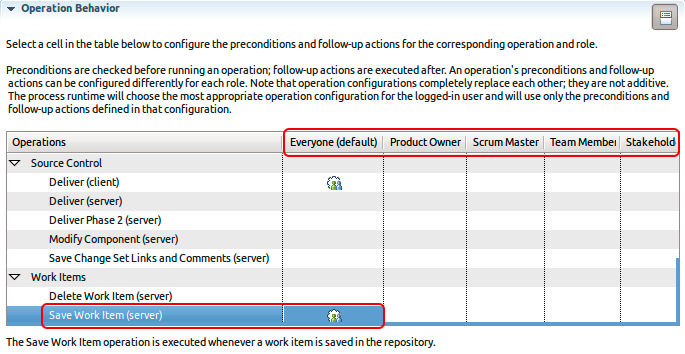
When selecting the Save Work Item (server) operation, e.g., for Everyone, the check-box can be enabled. In the section below, required and read-only preconditions can now be added to the save operation.
We illustrate this feature in the context of the Todo item. Suppose we want the Due Date to be required whenever the Severity of a Todo is Critical or Blocker. For that purpose we will need a script that resolves to true or false depending on the severity of the Todo item. The script could look as follows:
dojo.provide("org.example.workitems.providers.SevCritical"); dojo.require("com.ibm.team.workitem.api.common.WorkItemAttributes"); (function() { var WorkItemAttributes = com.ibm.team.workitem.api.common.WorkItemAttributes; dojo.declare("org.example.workitems.providers.SevCritical", null, { matches: function(workItem, configuration) { var sev = workItem.getValue(WorkItemAttributes.SEVERITY); return (sev === "severity.literal.l5" || sev === "severity.literal.l6"); // Critical or Blocker } }); })(); The literals for the severity values are defined in the process specification of the Todo project. We will start with the customization by adding this script to our conditions:
- We go to and create a new script-based condition. We select and click on .
- We name it Critical Severity and in the section we click to load the script shown from a file.
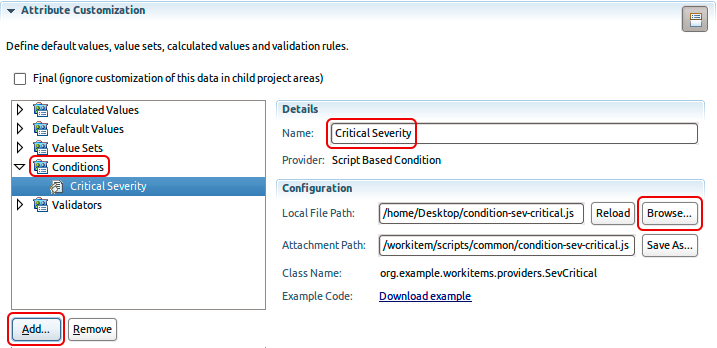 A script-based condition for detecting Critical Severity in the Eclipse UI
 - In the section, we choose the Save Work Item (server) operation and select the Everyone process role as shown in .
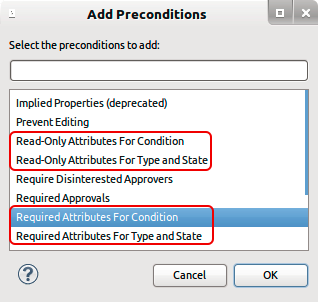
- We click on in the section and select Required Attributes For Condition in the shown dialog.
- In the final step, we click the button next to the conditions table and select the we’ve just created. We can now check all attributes that should be read-only based on that condition. We select Due Date for our example here.
 Configuration UI for preconditions in the Eclipse UI showing a read-only Due Date
Note: Since script execution implies a high degree of trust in script authors, server-side execution of scripts is disabled by default. To enable it, go to the Admin UI of your application (e.g., https://serverUrl:9443/jazz/admin) and select in the left column. Search for the Enable Process Attachment Scripts and make sure it is set to true.
In summary, required and read-only preconditions have slightly different semantics from the remaining attribute customizations. Both offer RTC users to programmatically enforce read-only or required behavior on work item attributes. For a more comprehensive step-by-step guide for customizing read-only and required behavior, we refer the reader to the “Read-only control for Work Item attributes in Rational Team Concert 4.0”.
Validators
A validator is a component that can be attached to an attribute and that forces the values of that attribute to conform to certain rules. For instance, a specific format might be needed for a custom text attribute, or a permitted value range for a number attribute. Validators can be configured in the Eclipse UI in . Violations to configured validation rules are shown as an error augmentation to the attribute presentation. In RTC, there are three possibilities to enforce validation rules:
- Number Range limits the values for a number attribute to certain thresholds.
- Regular Expression enforces a textual pattern on String values.
- Script Based Validation is the most flexible option as it allows programmatic validation with access to attribute values of the work item.
Validators have been shown to be very useful in the following situations:
- Enforce the standard pattern for email addresses, such as “a@b.c”.
- Enforce a reasonable estimations for the amount of work on work items, e.g., not above five hours.
- Enforce that owner and verifier of a work item are different users.
- Enforce valid date as input value with script based validator.
In the context of the Todo item example, we will add an Estimate in Hours attribute to all Todos. We want to ensure that users partition their work properly and don’t add tasks that will require more effort than five hours. We will add a validator to the Estimate in Hours attribute, that displays an error message asking to partition the Todo into smaller ones with less time, in case of larger estimates:
- We start in and create a new validator of type Number Range. We right click on and select . We can name the new validator “Estimate Limit” and select “Number Range” as provider.
- For every validator, you can choose the warning level with the presented message. RTC supports Information, Warning, and Error. We select Error and provide a message that is shown in a tooltip when the validator fails.
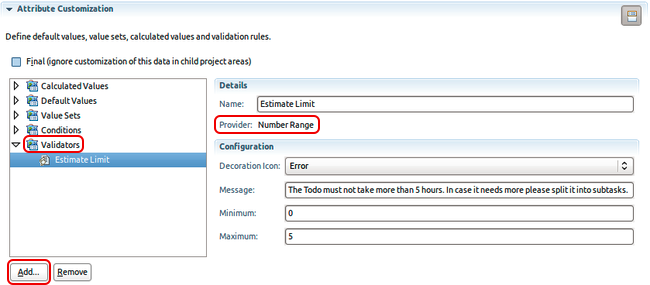 Add and configure a new validator for restricting the Estimate value
 - In we can now create a new custom attribute of type Long and associate the validator with it. In the section we click on to create the new attribute. We provide a name “Estimate in Hours”, select type Long and choose the new validator “Estimate Limit” in .
- If we now create a new Todo item and input a value larger then “5” as estimate, the editor will display an error message as shown below in .

Note: Attribute value validation by default happens only on the client side. This means that the UI shows an error for the user if the attribute value is invalid. The user however is still allowed to save that value onto the server. To enforce server-side validation, you must add the Attribute Validation precondition to the save operation in . In the operations table select and click on the User Role for which the server-side check should be enabled, e.g., Everyone. Check “Preconditions and follow-up actions” and add Attribute Validation from the dialog that is displayed when clicking on . Only validation rules that are configured as Error can be enforced on the server.
Conclusion
In this article, we introduced the customization capabilities of RTC, covering features from custom work item types to attribute customizations. If you want to properly use these customizations, it is important to realize when and where each of them can be used. When RTC’s item types, such as, Defect, Enhancement, Task, do not fit your application context, Custom Work Item Types will give you the ability to define item types that are more suitable for your purpose. RTC ships with a generally useful list of built-in attributes that model work items. In cases where you need different attributes to describe additional semantics, Custom Attributes can be created and used. Custom attributes are created by specifying an appropriate type (String, Date, etc.). When pre-existing attribute types are incapable of modeling your application context, you can use Custom Attribute Types (Enumerations) to model your type semantics. The life cycle of work items is modeled by their workflow. If RTC’s pre-packaged workflows are not suitable to model the life cycle of your work items, you can create custom Workflows – State Transition Policies. RTC ships with several default editors for managing work items. These Presentations for Editors may not always fit your application needs. Create new or modify exiting editor presentations if that’s the case. Several Attribute Customizations allow users to define a very specific behavior of work item attributes:
- Calculated Values allow for programmatically determining the value of an attribute based on the values of other work item attributes.
- Default Values allow for defining a value for an attribute which is pre-filled on work item creation.
- Value Sets provide a set of possible values for an attribute, e.g,. from other sources.
- Custom Read-only and Required Attributes define read-only and required behavior for attributes depending on user-defined conditions.
- Validators define rules to restrict user input with a customized set of rules.
In the course of this article, we illustrated the mentioned features with an example Todo item. If you navigate back to and take a look at the Attributes section, you can see how your attributes are bound to the customizations we have defined in the previous sections.
You can also see the customizations in action when opening a Todo item in the work item editor. The fully customized Todo item should look like the item shown in .
Further Readings
- The article “Advanced customizations in Rational Team Concert project areas” provides another example of customizing workflows and can be consulted for additional information.
- The article “Changing your RTC Process Configuration – Best Practices” describes best practices for changing the process specification. It provides a catalog of customizations and describes how to perform these customization safely.
- More in-depth information about the configuration is available in the article “Work Item Editor Presentations”.
- For a comprehensive step-by-step guide about customizing read-only and required behavior go to “Read-only control for Work Item attributes in Rational Team Concert 4.0”.
- The Wiki page “Work Items Attribute Customization” discusses in detail all available types of attribute customizations.
- Also in Wiki you can find “Work Items Attribute Customization Examples” which shows several examples for implementing customizations using JavaScript and Java plug-ins.
- “Data Source Value Set Providers” is another Wiki page with detailed description of how to fetch attribute values using external data sources such as XML data retrieved from RESTful APIs.
- The Wiki page “Work Items attribute customization” discusses in detail all available types of attribute customization with a dedicated section on Value Sets.
About the authors
The authors are developers in the Tracking and Planning team working on the Work Item component of Rational Team Concert with main contributions to the query engine, work item templates, and the server backend. For additional information about the topic presented in the article add your comments or questions directly in the discussion part, or visit our Jazz.net Forum.
Copyright © 2012 IBM Corporation