
The new IBM i Dependency Build template in Rational Team Concert 4.0
Overview
This document describes how to use the new IBM i Dependency Build – Rational Build Agent template to build IBM i projects. The IBM i Dependency Build template was introduced in Rational Team Concert version 4.0. You can use this new template to build IBM i applications incrementally.This new template is based on the z/OS dependency build template that has been available with Rational Team Concert since version 2. Rational Team Concert now provides a common dependency build solution for developing z/OS and IBM i applications.
The other IBM i incremental build template, IBM i Build Specification – Rational Build Agent, is still available, but it is now marked as deprecated. The new IBM i Dependency Build template offers large performance gains when performing incremental builds; as it caches traces of the build results to determine what to build, without having to perform timestamp comparisons with each of the built objects.
Prerequisites
- You must download and install the following:
- Rational Team Concert
- Rational Developer for Power Systems Software. Select the integration feature.
You do not have to use Rational Developer for Power Systems Software to perform builds, but its use with IBM i application development is recommended. Some Rational Developer for Power functionality is described in this article.
- Access to a Change and Configuration Management (CCM) server running at the equivalent client version. The server can be running on any supported platform.
- An equivalent version of the Build System Toolkit running on your IBM i build machine. Make sure that the Jazz user you specify has a Rational Team Concert – Developer for IBM Enterprise Platforms license. Use this ID to connect to the CCM server during a build.
- Working knowledge of Eclipse-based integrated developments environments (IDEs).
Configuration and setup
This section describes the configuration and setup required to build the sample mailing list application with the new IBM i Dependency Build template.- Create a Rational Build Agent build engine that connects to a Build System Toolkit running on your IBM i build server. The IBM i user specified here is used to perform the builds. Click Test Connection to verify the connection between the CCM server and the Build System Toolkit.

- Create a project area. Make sure that the user you specified in the Build System Toolkit (TestJazzAdmin1 in this example) is a member of this project area. Also make sure that this user ID has the required project area permissions to create work items, create snapshots, access search paths, work with language definitions, and so forth.

Figure 1: Project area members
- Import the sample mailing list application i Project to your workspace. The project is attached to the following jazz.net article: IBM i sample application: Maillist version 4.0.
- Deliver the project to the default component in the workspace.

Figure 2: Share the i Project to your development workspace.
- The sample mailing list application used in this article is a simple ILE RPG application that provides a character-based interface to a customer mailing list. It consists of objects that are found in a typical IBM i application, including program objects, modules, and service programs, and also display files and physical and logical data files.

Figure 3: The Maillist i Project
- In addition to the IBM i resources that are part of the sample mailing list application, the Maillist project also contains several resources you can use to configure a dependency build. Expand the Maillist project from the Navigator view and the following resources are displayed:
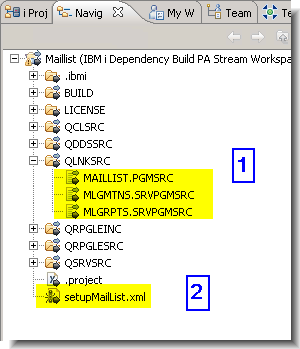
Figure 4: Dependency resources
Figure 4 explanations:
- Find link-edit files for the mailing list application in the QLNKSRC source physical file. They contain build specifications for the programs and service programs: MAILLIST.PGM, MLGMTNS.SRVPGM, and MLGRPTS.SRVPGM.
- The setupMailList.xml Ant script creates all of the system definitions used to build the application. This script also assigns language definitions and target libraries to SCM resources through various Enterprise Extensions properties.
- Run the setupMailList.xml Ant script by right-clicking the script from the Navigator view, then selecting Run as -> Ant Build …. From the JRE tab, make sure you select the run in the same JRE as the workspace option. On the Targets tab, notice the various targets provided in the setupMailList.xml script. All is the default target. To run the script again, you might choose to build the delete and all targets, in that order.
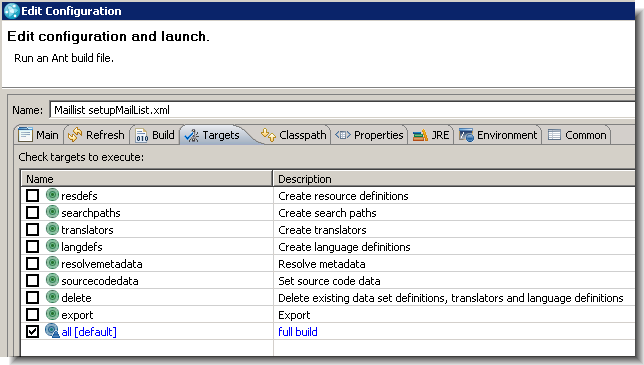
Figure 5: setupMailList.xml Ant targets
- Be sure to read through the setupMailList.xml script so that you can configure your own dependency build.
<?xml version="1.0"?>

<!--
    Licensed Materials - Property of IBM
    (c) Copyright IBM Corporation 2012. All Rights Reserved.

    Note to U.S. Government Users Restricted Rights:
    Use, duplication or disclosure restricted by GSA ADP Schedule
    Contract with IBM Corp.
 -->

<project name="Prototype" default="all" xmlns:ld="antlib:com.ibm.team.enterprise.ibmi.systemdefinition.toolkit">
    <description>Sample build script</description>

    <property name="sd.prefix"   value=""/>
    <property name="project.root"   value="../Maillist"/>

    <!-- Initialize the system definition generation tool -->
    <ld:init
        repositoryAddress="${repositoryAddress}"
        userId="${userId}"
        password="${password}"
        projectArea="${projectArea}"
        />

    <!-- Create resource definitions.
         Not sure how these will be used since load and object libraries are found
         in the project properties, and can be overriden by the build definition -->
    <target name="resdefs" description="Create resource definitions">
        <ld:resdef name="${sd.prefix}sourceLibrary"
            description="my load library"
            resourcename="_L"
            usagetype="0"/>
        <ld:resdef name="${sd.prefix}objectLibrary"
            description="my object library"
            resourcename="_O"
            usagetype="0"/>
    </target>

    <!-- Create search paths -->
    <target name="searchpaths" description="Create search paths">
        <ld:searchpath name="${sd.prefix}searchPath"
            description="Search Path"
            resourcedefinitions="${sd.prefix}sourceLibrary,${sd.prefix}objectLibrary"/>
    </target>

    <!-- Create translators -->
    <target name="translators" description="Create translators">
        <ld:translator name="${sd.prefix}PF" description="PF translator"
            commandifobjectexists="CHGPF SRCFILE(&L/&F) SRCMBR(&N) FILE(*CURLIB/&N) OPTION(*EVENTF)"
            commandifobjectdoesntexist="CRTPF SRCFILE(&L/&F) SRCMBR(&N) FILE(*CURLIB/&N) OPTION(*EVENTF)"
            searchPath="${sd.prefix}searchPath"
            outputtype="*FILE">
        </ld:translator>
        <ld:translator name="${sd.prefix}LF" description=""
            commandifobjectexists="DLTF FILE(*CURLIB/&N), CRTLF SRCFILE(&L/&F) SRCMBR(&N) FILE(*CURLIB/&N) OPTION(*EVENTF)"
            commandifobjectdoesntexist="CRTLF SRCFILE(&L/&F) SRCMBR(&N) FILE(*CURLIB/&N) OPTION(*EVENTF)"
            searchPath="${sd.prefix}searchPath"
            outputtype="*FILE">
        </ld:translator>
        <ld:translator name="${sd.prefix}DSPF" description=""
            commandifobjectexists="CRTDSPF SRCFILE(&L/&F) SRCMBR(&N) FILE(*CURLIB/&N) OPTION(*EVENTF)"
            commandifobjectdoesntexist="CRTDSPF SRCFILE(&L/&F) SRCMBR(&N) FILE(*CURLIB/&N) OPTION(*EVENTF)"
            searchPath="${sd.prefix}searchPath"
            outputtype="*FILE">
        </ld:translator>
        <ld:translator name="${sd.prefix}RPGLE" description=""
            commandifobjectexists="CRTRPGMOD MODULE(*CURLIB/&N) SRCFILE(&L/&F) SRCMBR(&N) OPTION(*EVENTF)"
            commandifobjectdoesntexist="CRTRPGMOD MODULE(*CURLIB/&N) SRCFILE(&L/&F) SRCMBR(&N) OPTION(*EVENTF)"
            searchPath="${sd.prefix}searchPath"
            outputtype="*MODULE">
        </ld:translator>
        <ld:translator name="${sd.prefix}CLLE" description=""
            commandifobjectexists="CRTCLMOD MODULE(*CURLIB/&N) SRCFILE(&L/&F) SRCMBR(&N) OPTION(*EVENTF)"
            commandifobjectdoesntexist="CRTCLMOD MODULE(*CURLIB/&N) SRCFILE(&L/&F) SRCMBR(&N) OPTION(*EVENTF)"
            searchPath="${sd.prefix}searchPath"
            outputtype="*MODULE">
        </ld:translator>
        <ld:translator name="${sd.prefix}CLP" description=""
            commandifobjectexists="CRTCLPGM PGM(*CURLIB/&N) SRCFILE(&L/&F) SRCMBR(&N)"
            commandifobjectdoesntexist="CRTCLPGM PGM(*CURLIB/&N) SRCFILE(&L/&F) SRCMBR(&N)"
            searchPath="${sd.prefix}searchPath"
            outputtype="*PGM">
        </ld:translator>
        <ld:translator name="${sd.prefix}SRVPGM" description="" introspection="true"
            commandifobjectexists="UPDSRVPGM SRVPGM(*CURLIB/&O) EXPORT(*ALL) &MODULE_ATTRIBUTE &BNDSRVPGM_ATTRIBUTE"
            commandifobjectdoesntexist="CRTSRVPGM SRVPGM(*CURLIB/&O) EXPORT(*ALL) &MODULE_ATTRIBUTE &BNDSRVPGM_ATTRIBUTE"
            searchPath="${sd.prefix}searchPath"
            outputtype="*SRVPGM">
            <ld:variable name="MODULE_ATTRIBUTE" value="MODULE(defaults)"/>
            <ld:variable name="BNDSRVPGM_ATTRIBUTE" value=""/>
        </ld:translator>
        <ld:translator name="${sd.prefix}PGM" description="" introspection="true"
            commandifobjectexists="UPDPGM PGM(*CURLIB/&O) &MODULE_ATTRIBUTE &BNDSRVPGM_ATTRIBUTE BNDDIR(&BNDDIR)"
            commandifobjectdoesntexist="CRTPGM PGM(*CURLIB/&O) &MODULE_ATTRIBUTE &BNDSRVPGM_ATTRIBUTE BNDDIR(&BNDDIR)"
            searchPath="${sd.prefix}searchPath"
            outputtype="*PGM">
            <ld:variable name="MODULE_ATTRIBUTE" value="MODULE(defaults)"/>
            <ld:variable name="BNDSRVPGM_ATTRIBUTE" value="BNDSRVPGM(defaults)"/>
            <ld:variable name="BNDDIR" value="*none"/>
        </ld:translator>
    </target>

    <!-- Create language definitions -->
    <target name="langdefs" description="Create language definitions">
        <ld:langdef name="${sd.prefix}Build_Referenced_Files" translators="${sd.prefix}PF" languagecode="PF" >
            <ld:dependencytype name="PF External file" translators="${sd.prefix}PF"/>
            <ld:scanner name="com.ibm.teamp.ibmi.metadata.scanner.dds.pf"/>
        </ld:langdef>
        <ld:langdef name="${sd.prefix}Build_Physical_Files" translators="${sd.prefix}PF" languagecode="PF" >
            <ld:dependencytype name="PF External file" translators="${sd.prefix}PF"/>
            <ld:scanner name="com.ibm.teamp.ibmi.metadata.scanner.dds.pf"/>
        </ld:langdef>
        <ld:langdef name="${sd.prefix}Build_Logical_Files" translators="${sd.prefix}LF" languagecode="LF" >
            <ld:dependencytype name="LF External file" translators="${sd.prefix}LF"/>
            <ld:scanner name="com.ibm.teamp.ibmi.metadata.scanner.dds.lf"/>
        </ld:langdef>
        <ld:langdef name="${sd.prefix}Build_Display_Files" translators="${sd.prefix}DSPF" languagecode="DSPF" >
            <ld:dependencytype name="DSPF External file" translators="${sd.prefix}DSPF"/>
            <ld:scanner name="com.ibm.teamp.ibmi.metadata.scanner.dds.dspf"/>
        </ld:langdef>
        <ld:langdef name="${sd.prefix}Build_RPG_Modules" translators="${sd.prefix}RPGLE" languagecode="RPGLE" >
            <ld:dependencytype name="RPGLE COPY" translators="${sd.prefix}RPGLE"/>
            <ld:dependencytype name="RPG External File" translators="${sd.prefix}RPGLE"/>
            <ld:dependencytype name="RPG External Data" translators="${sd.prefix}RPGLE"/>
            <ld:dependencytype name="RPGLE SQL INCLUDE" translators="${sd.prefix}RPGLE"/>
            <ld:dependencytype name="RPG COPY" translators="${sd.prefix}RPGLE"/>
            <ld:dependencytype name="RPG SQL INCLUDE" translators="${sd.prefix}RPGLE"/>
            <ld:scanner name="com.ibm.teamp.ibmi.metadata.scanner.RPGLE"/>
        </ld:langdef>
        <ld:langdef name="${sd.prefix}RPG_Include_Files(no_translators)" translators="" languagecode="RPGLE">
            <ld:scanner name="com.ibm.teamp.ibmi.metadata.scanner.RPGLE"/>
        </ld:langdef>
        <ld:langdef name="${sd.prefix}Build_CL_Modules" translators="${sd.prefix}CLLE" languagecode="CLLE" >
            <ld:dependencytype name="ILE CL External file" translators="${sd.prefix}CLLE"/>
            <ld:scanner name="com.ibm.teamp.ibmi.metadata.scanner.ILECL"/>
        </ld:langdef>
        <ld:langdef name="${sd.prefix}Build_CL_OPM_Programs" translators="${sd.prefix}CLP" languagecode="*CLP" >
            <ld:dependencytype name="OPM CL External file" translators="${sd.prefix}CLP"/>
            <ld:scanner name="com.ibm.teamp.ibmi.metadata.scanner.OPMCL"/>
        </ld:langdef>
        <ld:langdef name="${sd.prefix}Build_SRVPGM" translators="${sd.prefix}SRVPGM" languagecode="SRVPGM" >
            <ld:dependencytype name="SRVPGM External file" translators="${sd.prefix}SRVPGM"/>
            <ld:dependencytype name="SRVPGM Export file" translators="${sd.prefix}SRVPGM"/>
            <ld:scanner name="com.ibm.teamp.ibmi.metadata.scanner.SRVPGM"/>
        </ld:langdef>
        <ld:langdef name="${sd.prefix}Build_PGM" translators="${sd.prefix}PGM" languagecode="PGM" >
            <ld:dependencytype name="PGM External file" translators="${sd.prefix}PGM"/>
            <ld:scanner name="com.ibm.teamp.ibmi.metadata.scanner.PGM"/>
        </ld:langdef>
    </target>
    <!-- Resolve metadata -->
    <target name="resolvemetadata" description="Resolve metadata">
        <ld:filemetadata>
            <ld:filemetadatarule match="/MLGMTNS.SRVPGM.eelnk$" name="team.enterprise.build.var.MODULE_ATTRIBUTE" value="MODULE(MLGMTNC MLGMTNR MLGNAMR)"/>
            <ld:filemetadatarule match="/MLGMTNS.SRVPGM.eelnk$" name="team.enterprise.build.var.BNDSRVPGM_ATTRIBUTE" value="BNDSRVPGM()"/>
            <ld:filemetadatarule match="QSRVSRC/.+.BNDSRC$" name="team.enterprise.build.alwaysload" value="true"/>
        </ld:filemetadata>
        <ld:resolvemetadata sourcelibrary="${sd.prefix}sourceLibrary" objectlibrary="${sd.prefix}objectLibrary">
            <ld:langdefrule match="QDDSSRC/MLGREFP.PF$" languagedefinition="${sd.prefix}Build_Referenced_Files"/>
            <ld:langdefrule match="QDDSSRC/.+.PF$" languagedefinition="${sd.prefix}Build_Physical_Files"/>
            <ld:langdefrule match="QDDSSRC/.+.LF$" languagedefinition="${sd.prefix}Build_Logical_Files"/>
            <ld:langdefrule match="QDDSSRC/.+.DSPF$" languagedefinition="${sd.prefix}Build_Display_Files"/>
            <ld:langdefrule match="QCLSRC/.+.CLLE$" languagedefinition="${sd.prefix}Build_CL_Modules"/>
            <ld:langdefrule match="BUILD/.+.CLLE$" languagedefinition="${sd.prefix}Build_CL_Modules"/>
            <ld:langdefrule match="BUILD/.+.CLP$" languagedefinition="${sd.prefix}Build_CL_OPM_Programs"/>
            <ld:langdefrule match="QRPGLESRC/.+.RPGLE$" languagedefinition="${sd.prefix}Build_RPG_Modules"/>
            <ld:langdefrule match="QRPGLEINC/.+.RPGLE$" languagedefinition="${sd.prefix}RPG_Include_Files(no_translators)"/>
            <ld:langdefrule match="QLNKSRC/.+.PGMSRC$" languagedefinition="${sd.prefix}Build_PGM"/>
            <ld:langdefrule match="QLNKSRC/.+.SRVPGMSRC$" languagedefinition="${sd.prefix}Build_SRVPGM"/>
        </ld:resolvemetadata>
    </target>

    <!-- Set source code data.  Not required when LINK-EDIT scanners are in place. -->
    <target name="sourcecodedata" description="Set source code data">
        <ld:sourcecodedata/>
    </target>

    <!-- Delete existing data set definitions, translators and language definitions -->
    <target name="delete"
        description="Delete existing data set definitions, translators and language definitions">
        <ld:deletelangdefs/>
        <ld:deletetranslators/>
        <ld:deletesearchpaths/>
        <ld:deleteresdefs/>
        <ld:resolvemetadata clean="true"/>
    </target>

    <!-- Export system definitions to an XML file -->
    <target name="export" description="Export">
        <ld:export file="C:/tmp/exported.xml"/>
    </target>
    <!-- full build -->
    <target name="all" depends="resdefs,searchpaths,translators,langdefs,resolvemetadata,sourcecodedata" description="full build"/>
</project> - When you run the Ant script, several Enterprise Extensions system definitions are created. The script should also assign language definitions to several source members through various SCM properties. The SCM property changes should display in the Pending Changes view.

Figure 6: Setup script assigns language definitions through SCM properties.
- Check in and deliver your changes.
- Create a new build definition by right-clicking the Builds node under the project area and selecting New Build Definition…. Select Create a new build definition from the resulting dialog box and click Next. Notice that there are several IBM i-specific build templates. This article focuses on the IBM i Dependency Build – Rational Build Agent template.
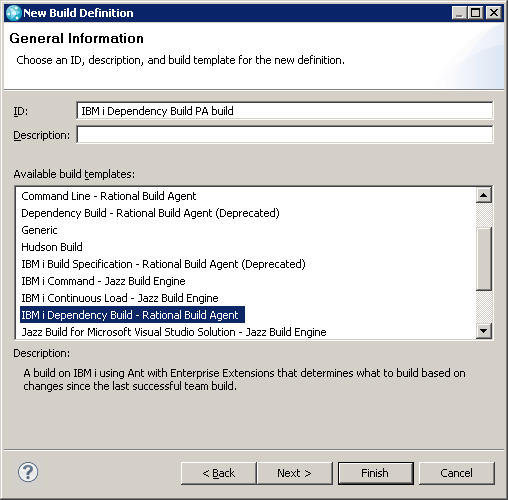
Figure 7: IBM i build templates
- Create and save an IBM i Dependency Build – Rational Build Agent build template. The editor contains five tabs. Explore each one to get familiar with the contents.
- On the Overview tab, select the build engine you created in step 1.
- The Properties tab contains no properties by default.
Tip: Larger builds might fail because of a Rational Build Agent timeout error. The default value is 300 seconds. If you need to, specify a _TIMEOUT property to override this value. - On the Jazz Source Control tab, select your build workspace. It is recommended that you create and use a dedicated build workspace. Specify a load folder in the integrated file system (IFS), and specify your own resource prefix.

Figure 8: The Jazz Source Control tab
Note that the prefix specified in this tab (AROD in this example) will be appended to your target library values to form the library names. The setupMailList.xml script included in the compressed file uses “_L” and “_O” for “load” and “object” libraries, so the load and object libraries used in the build will be AROD_L and AROD_O. - On the IBM i Dependency Build tab, verify that all of the language definitions are displayed and in the correct order (as specified in the langdefs target of the setup script). Also verify that the Ant argument value defaults to -verbose.Notice that Trust Outputs is enabled by default, and that the Fail on Errors property defaults to stopping the build when IBM i command errors or compile errors meet or exceed a severity level of 40.

Figure 9: The IBM i Dependency Build tab
Select the Dependency Options tab. Notice that the defaults are to build the entire workspace, and to Build changed items only.
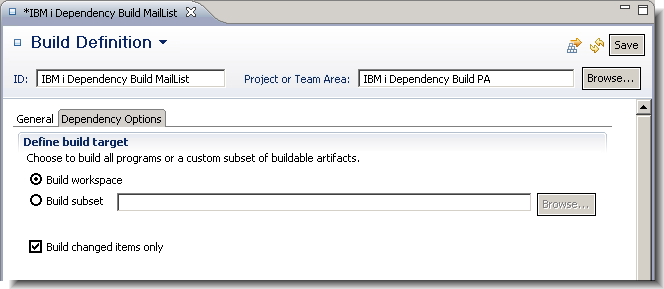
Figure 10: Dependency options
IBM i dependency build configuration, artifacts, and concepts
When you configure IBM i dependency builds, you must set up system definitions, SCM properties, and sometimes manually configure source code data. You can use Ant script to perform this configuration, and several Ant tasks are provided to facilitate this. You can find more information about these Ant tasks in the product documentation: Overview of IBM Rational Team Concert. The sample mailing list application makes use of this kind of setup script.Part of the function of the setup script is to create the IBM i system definitions required to build the sample mailing list application as illustrated in the following screen capture:

Figure 11: IBM i system definitions created by the setupMailList.xml script
The script also assigns language definitions to SCM resources through Enterprise Extension properties; for example:
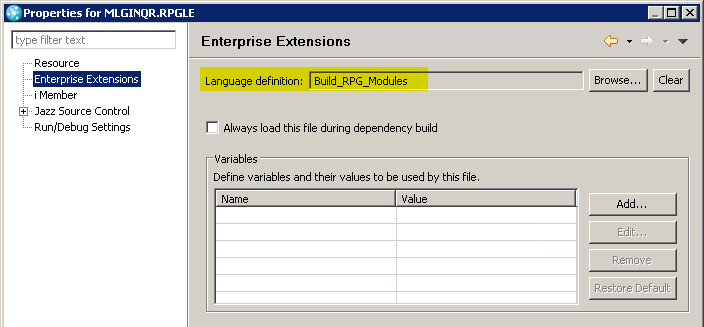
Figure 12: Language definitions are assigned to SCM resources through Enterprise Extensions properties.
Figure 11 shows the IBM i system definitions created by the setup script in the mailing list application. The following bullets describe the IBM i system definitions in more detail.
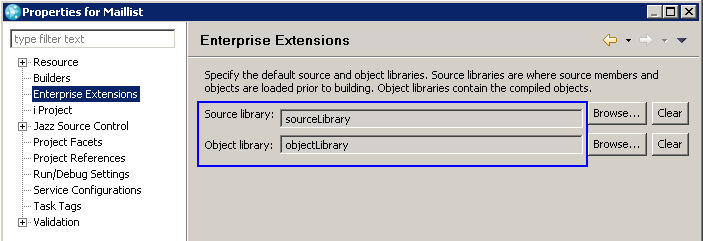
- The Libraries node contains existing and target library definitions, which you can use to create search paths. Existing Library Definitions consist of full library names that you can use to introduce common libraries required at build time. The sample mailing list application does not make use of existing library definitions. Target Library Definitions are used to specify load and output libraries and consist of a suffix to be appended to the resource prefix specified in build definitions. The mailing list application specifies two target libraries: the sourceLibrary (“_L”) and the objectLibrary (“_O”). You can also reference these definitions from i project properties. The mailing list application configures the i project with source and object libraries, as illustrated by the following screen capture:
- Use search Path definitions to specify an ordered list of library definitions. These lists can be referenced from translators and are used at build time to configure the library list.
- Language Definitions contain dependency build information such as the list of translators (described later) used in building an SCM resource. As shown in the following figure, the setup script instructs the Build_RPG_Modules language definition editor to use only the RPGLE translator.
Use the File extensions field to specify member extensions that should be automatically processed by the language definition.

Figure 12a: The Language Definition editor
Language Definitions also contain the Source Code Scanners used to collect the source code data dependencies for the associated SCM resources, and also specify the supported scanned Dependency Types.
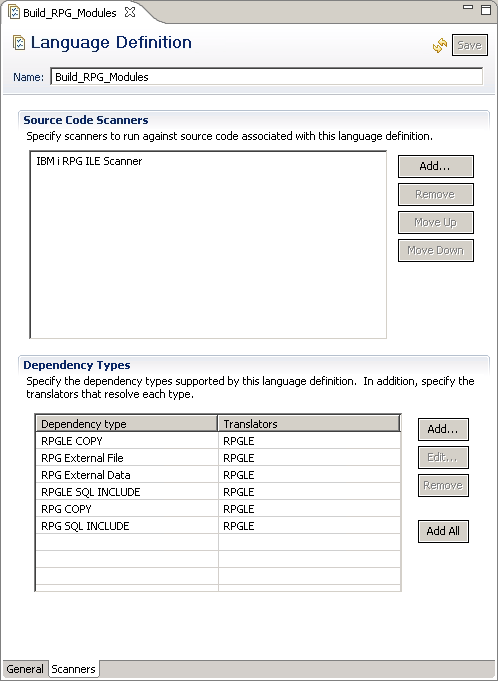
Figure 12b: The Scanners tab of the Language Definition editor
- Translator definitions control how objects are created at build time. Translator definitions can be assigned a search path. A translator will participate in link-edit support when Inspect build object and update build map is selected. A translator definition must contain default values for any user variable used in its commands.
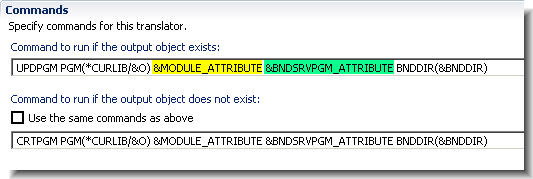
Commands consists of free form text, can contain variables, and can differ based on the existence of the output object. Variable and link – edit support are very important concepts and will be explained shortly.

Figure 13: RPGLE translator
In Figure 13, notice the use of Variables in the translator command strings. Variables have the following characteristics:
- Variables appear in command strings preceded by the “&” symbol. A variable name ends with a white space or an optional “.”. You can use the optional “.” when you want the variable value to be followed by a non-white space character; for example: “&DAY.DAY” could expand at build time to “MONDAY.”
- There are several reserved variables you can specify in your translator definition, as shown in the following table. All other variables are considered user variables.
Name Description Usage &F Physical file name
(internal) &L Library name (internal) &N Member name
(internal) &X Object description
(internal) &SRCLIB Source library
(internal) &OBJLIB Object library
(internal) &SP Search path
(internal) &O Output name
(internal) &*_ATTRIBUTE Values gathered from link-edit files.
(calculated) - You must assign user variable default values in the translator.
- You can override variables in two places:
- At the SCM level, using Enterprise Extensions. Values you enter here take precedence over all others.
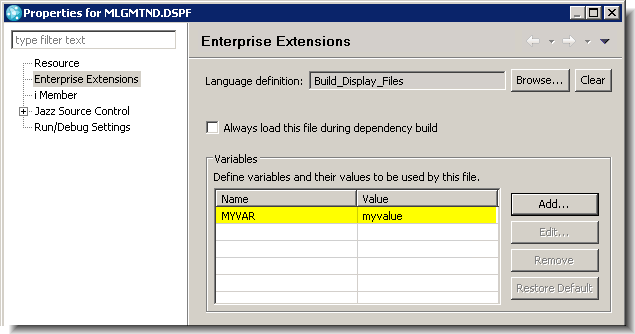
Figure 14: Variable override through Enterprise Extensions properties - At the build definition level. Values you enter here have second highest precedence. Notice that variables are entered in the standard Properties user interface, so you must qualify them with the prefix team.enterprise.build.var..

Figure 15: Variable override through Build Definition properties
- At the SCM level, using Enterprise Extensions. Values you enter here take precedence over all others.
- Variable substitution occurs at build time. You can examine the expanded command strings in the build log. The following image depicts the variable substitution that takes place at build time with the RPGLE translator. The highlighted portion depicts the command as specified in the translator. The text underneath is the expanded command string as found in the build log.

Figure 16: Variable substitution
- This support is implemented as an extension of variable support. Link_edit variable names should use the _ATTRIBUTE suffix. Select the Inspect built object and update build map translator option, as illustrated below.

Notice the commands in the PGM translator above. They each make use of link-edit variables. - You can specify attributes in your SCM source files. The following screen capture illustrates how two such attributes can be defined in a source member:

- You can reference attributes as variables in translator commands.
- Attribute variables used in command strings are substituted with the corresponding mined attribute values at build time. You can find expanded command strings in the build log file.

Performing builds and examining results
The section demonstrates the build support for the new Rational Team Concert IBM i Dependency Build template.- Submit the build. Right-click the build definition, select Request Build…., and click Submit on the resulting dialog box.
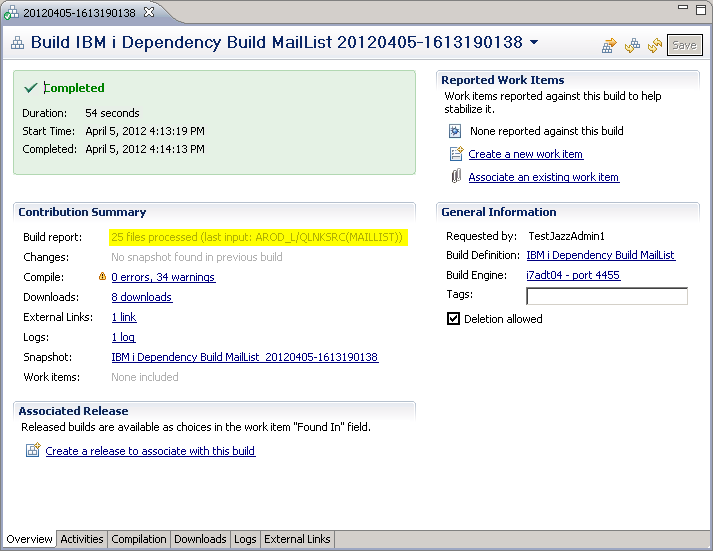
- Wait for the build to complete, then open the build results. Switch to the Builds view, wait until the progress shows “Completed,” then open the results by double-clicking the build.

Figure 17: The Builds results view - Examine the build results. Notice that the results page contains several tabs. Explore each of them to get familiar with what each tab contains.
- The Overview tab contains summary information and links to other tabs. Notice that the text next to Build report (highlighted in the following image) identifies the number of objects built (25 in this case). Note that this is also a link to the build report.
- The Activities tab contains build timing information.

- The Compilation tab contains compilation results. From this tab, you can examine compile errors and warnings. Note: If you double-click a warning or error from this view, an LPEX Editor session begins with the source code loaded and the cursor on the line in error.

- The Downloads tab contains links to the generated Ant scripts and properties files used during the build.

- The Logs tab contains pointers to the log files.
- The External Links tab contains a link to the build report and, if you selected Publish buildmap links in the build definition, to each of the build maps. Click buildReport.xml to view the build report in a browser. From the Output column, you can click links to individual build maps.
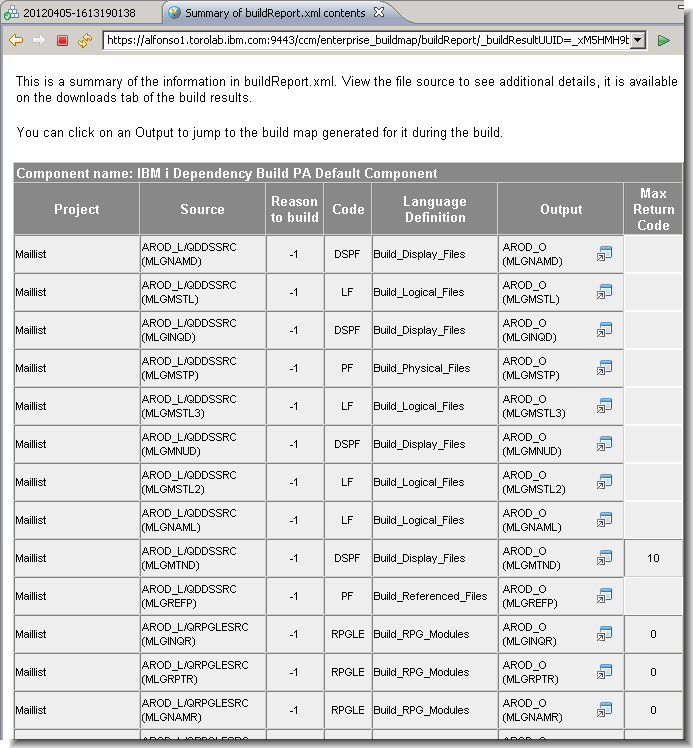
Figure 18: A build report
- The Overview tab contains summary information and links to other tabs. Notice that the text next to Build report (highlighted in the following image) identifies the number of objects built (25 in this case). Note that this is also a link to the build report.
- You can use Rational Developer for Power Systems Software to examine what you built.
- Switch to the Remote Systems Explorer perspective. Find your output library in the Remote Systems view, right-click it, and select Show in Table.

Figure 19: Show in Table - From this order the user can infer the order in which objects were built. You can customize the Object Table view to include the Last Modified column. Click the Last Modified column title twice to have the results ordered chronologically in descending order.

Figure 20: Ordered output library contents in Object Table view
- Switch to the Remote Systems Explorer perspective. Find your output library in the Remote Systems view, right-click it, and select Show in Table.
Incremental builds
This section discusses how to modify a display file source member, deliver the change, then perform a build. This incremental build builds only the affected output objects, and it completes faster than a full build.- Make and deliver a change to the MLGINQD.DSPF source member.
- Note that this change should result in the rebuilding of the following three objects:
- The MLGINQD DSPF object itself
- The recompilation of the affected RPG programs; in this case MLGINQR.RPGLE. (See source code data information for the MLGINQR.RPGLE member in figure 32.)
- The MAILLIST.PGM program
- Perform a preview build. A preview build allows you to see what will be built, without actually running a real build.
- The Request Build wizard, shown below, includes a Preview build option; select it.

Figure 21: The Request Build wizard - Click submit, then verify the following results:
- The builds view displays. This view identifies this build as a preview build.

Figure 22: The Builds view - Open the build report by opening the build results and then clicking the buildReport.xml link from the External Links tab of the build results editor.

Figure 23: Link to build report - Use this report to identify the objects that would have been built if this were an actual build. You can also use this report to examine the dependency set for each buildable resource with a reason to build value of less than 6. The screen capture below shows the dependencies for the MLGINQD DSPF object.

Figure 24: The Preview build report
The Reason to build codes are explained at the end of the report.
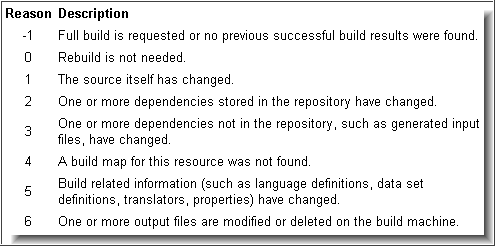
Figure 24A: Reasons to build
- The builds view displays. This view identifies this build as a preview build.
- The Request Build wizard, shown below, includes a Preview build option; select it.
- Perform the actual incremental build.
- Locate the build definition in the Team Artifacts view.
- Submit your build request by right-clicking your build definition and selecting Request Build…. Click Submit.
- Wait for the build to complete.
- There are several ways to determine what was built.
- Open the build results. Double-click the build result from the Builds view. Notice in the Overview tab that the number of files processed is three. This means that the associated translators processed three input resources.

Figure 25: The Overview tab - Click the link next to Build report to view your build report. Notice that only the expected items were built.

Figure 26: The new build report - Proceed to the Compilation tab. Notice that display file member MLGINQD and RPG member MLFINQR were compiled.

Figure 27: The Compilation tab
- Switch to the Remote Systems Explorer perspective. Locate your output library in the Remote Systems view, right-click it, and select Show in Table. Order the list in descending chronological order, and notice that the three objects modified by the build are listed at the top. You can also see the order in which all objects were built (*DSPF FILE, *MODULE, and *PGM).

Figure 28: *Object table view showing built objects in chronological order - Another way to review what you built is to explore the audit report in Rational Developer for Power Systems Software.
Every object created by your IBM i dependency build is tagged with a timestamp-based ten-character signature.

The audit report contains tag signatures. Notice that, as expected, only three objects in the ouptput library share the most recent tag.

- Open the build results. Double-click the build result from the Builds view. Notice in the Overview tab that the number of files processed is three. This means that the associated translators processed three input resources.
Working with source code data
Dependency builds rely on data collected by the source code data collection service on the CCM server.Source code data scanning occurs either asynchronously (default is every hour) or synchronously when you invoke builds or manually reset the source code data in a stream. Your system administrator can control several aspects of source code data collection from the Web interface, using the “…./ccm/admin” URL and selecting Advanced properties.

Figure 29: Source code data configuration through advanced properties
Note: The maximum number of files in source code data defaults to 1000. Increase this value if the number of source files in your projects exceeds 1000.
Rational Team Concert Enterprise Extensions provides several source code data scanners for the IBM i platform. Scanners are associated with language definitions.
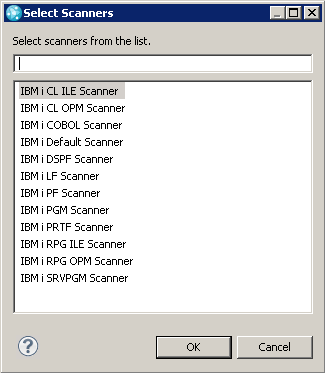
Figure 30: IBM i source code data scanners
Expand the Source Code Data node under Enterprise Extensions in the Team Artifacts view to control and monitor data scanning on your streams. The following screen capture illustrates the available actions. Perform these actions to select which streams to scan, to manually update or reset scanned information, or to create queries.

Figure 31: Source code data actions
There are several ways to inspect your scanned source code data.
- Use the source code data editor. Locate the member you want to examine in a resource view, such as the Navigator view. Right-click that member and select Enterprise Extensions -> Open Source Code Data Editor.
The Dependency Properties section shows the dependencies for the selected member. Notice also the section titled User-defined Data. Any additions made here are persisted even when the streams are scanned again. This is also where you can modify manual dependencies. You should manually indicate dependencies when there are no scanners applicable to the resource, or when the scanners are unable to determine a dependency by scanning the source file.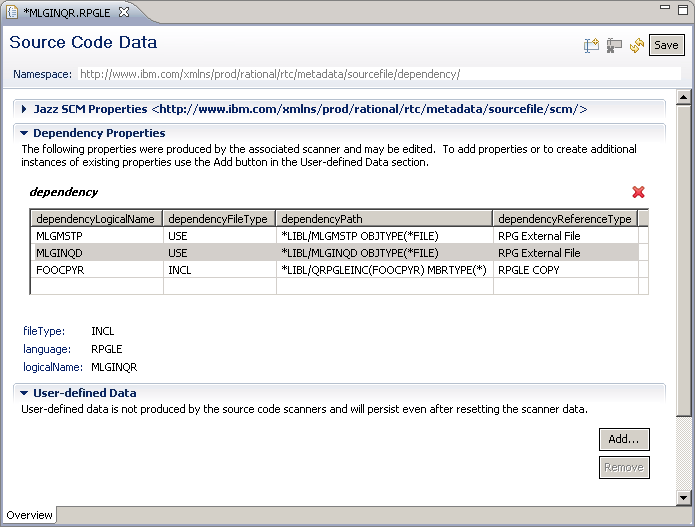
Figure 32: The Source Code Data editor
- Another way to inspect source code data is through impact analysis. Locate a member in the Navigator view. Right-click it and select Enterprise Extensions -> Impact Analysis…. You can select to display the list of objects that depend on the selected resource, or the list of objects that the selected resource depends on. Select Show files that this file depends on from the resulting editor, and click Finish.
The results are displayed in the Source Code Data view, as shown in the following image. Notice that the information line (highlighted in Figure 33) summarizes the result of your impact analysis.

Figure 33: The Source Code Data view - Another way to view source code data is through queries. To create a query, right-click Source Code Data and select New Query ….
To show all resources that contain dependencies of type INCL, configure the query as follows. Use the Run button to test the query as it is being developed.
Use the Result Layout tab in the query editor to configure which columns to display and how to sort the results.
Figure 34: Source Code Data Query editor and the Conditions tab

Figure 34a: Source Code Data Query editor and the Result Layout tab
Summary
The objective of this article is to demonstrate the new IBM i Dependency Build template introduced in Rational Team Concert version 4.Important dependency build concepts such as source code data, variable support, and link-edit files were introduced and explained.
With the addition of this new build template in version 4, the Rational Team Concert product now provides consistent Enterprise Extensions build, promotion, and deployment solutions across the z/OS and IBM i platforms.
Copyright © 2012 IBM Corporation