
Implement dependent and parameterized HTTP Value Set Providers
This article provides step-by-step instructions to implement dependent and parameterized HTTP Value Set Providers.
Overview
While the use of various Value Set Providers increases in the context of Work Item customization, it might be a new requirement to introduce some dependency between these providers, and use XPath expressions to parameterize the value of a given attribute depending on the selection of another attribute.Note: it is assumed here that the reader is familiar with Work Item customization, Value Set Providers and has some basic knowledge about XPath. Useful links on both topics can be found at the bottom of this page.
Setup
To use scripts deployed as process attachments you need to enable corresponding functionality at server level:- Go to administrative page of your RTC server
https://your.server.name:9443/ccm/admin. - Open the Server tab.
- From the left side-bar open Configuration > Advanced Properties
- In the Work Item Component find the Enable Process Attachment Scripts property and set its value to
true. - Save your changes
Alternatively you can add the following line to teamserver.properties:
# Allow to use scripts deployed as process attachments
com.ibm.team.workitem.process.scripts.enabled=true
Review XML content
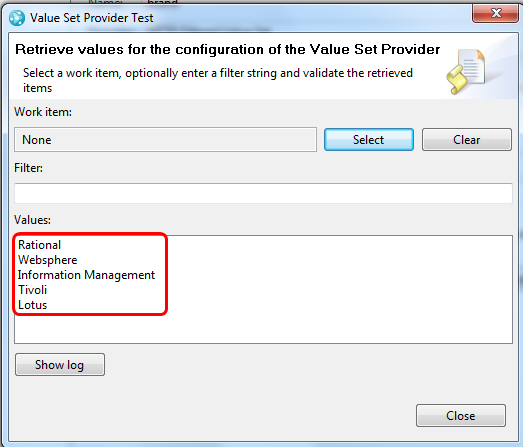
The XML file that will provide the value sets is related to IBM Software catalog, and consists in:- brands: Rational, Tivoli, Websphere, …
- products: Team Concert, Application Developer, ….
(...)
 <brand>Rational</brand>
 <software>
 <product><name>Unknown</name></product>
	<product><name>Team Concert</name></product>
	<product><name>Application Developer</name></product>
	<product><name>ClearCase</name></product>
	<product><name>ClearQuest</name></product>
 </software>
(...)
Scenario Summary
The purpose here will be to have 2 dependent enumerations – Brand and Product – displayed as combos and populated by custom HTTP Value Set Providers.When selecting a Brand – say Rational – the second Product combo will be populated with corresponding values (Team Concert, Application Server, …)
Deploy the XML File
Deploying the XML file containing depends on your network topology and resources available to you.You may deploy the XML file to any server using HTTP.
The only constraint is that XML content needs to be accessible using a URL, along with a user and password if required.
Create the Project Area
- start the RTC Eclipse Client
- connect to the RTC Server
- create a Project Area (aka PA) – SCRUM Template
- add yourself as member of the PA – with all roles
- save your changes
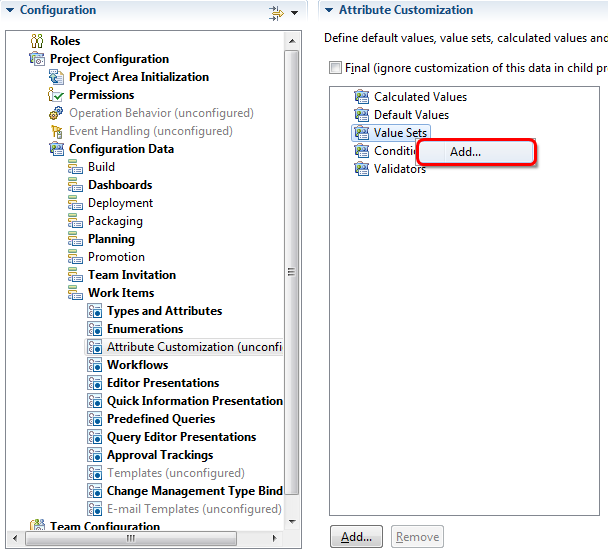
Add the HTTP Value Set Providers
- In the PA Editor, go to Project Configuration –> Configuration Data –> Work Items –> Attribute Customization
- Right-click Value Sets and select Add
Brand HTTP Value Set Provider
- Fill in provider details:
- Name: “brand”
- Type: Value Sets
- Provider: HTTP Filtered Value Set
- Fill in the HTTP Value Set provider parameters:
- XML Data Source URL: URL to the XML file you deployed (depends on your configuration)
- Row XPath Expression: //xml/node
- Column XPath Expression: ./brand
- Column identifier: brand
- Entry label format: ${0}
- Authentication method: depends on the resource where the XML file was deployed
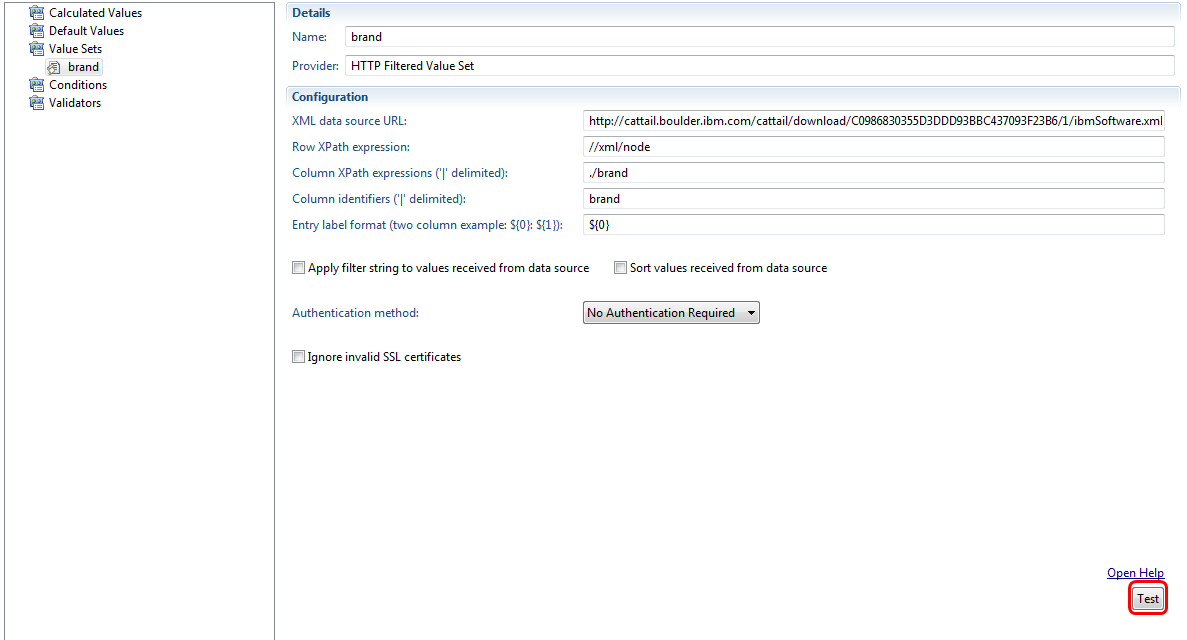
- Click on the Test button: verify values are fetched correctly
Product HTTP Value Set Provider
In the same way we created the Brand HTTP Value Set Provider, create the Product HTTP Value Set Provider:- Fill in provider details:
- Name: “product”
- Type: Value Sets
- Provider: HTTP Filtered Value Set
- Fill in the HTTP Value Set provider parameters:
- XML Data Source URL: URL to the XML file you deployed (depends on your configuration)
- Row XPath Expression: DO NOT PUT ANYTHING YET
- Column XPath Expression: ./name
- Column identifier: product
- Entry label format: ${0}
- Authentication method: depends on the resource where the XML file was deployed
- check: Apply filter string to values received from data source
Implement the parameterized HTTP Value Set Provider
Keeping our scenario in mind – Product list will depend on Brand selection – we need to specify the corresponding parameterized Row XPath Expression.- In Row XPath Expression, put: //xml/node[brand=’${brand.value}’]/software/product
- At run time, the value of the variable brand in the XPath expression will be replaced with the value of the brand selected in the Brand combo
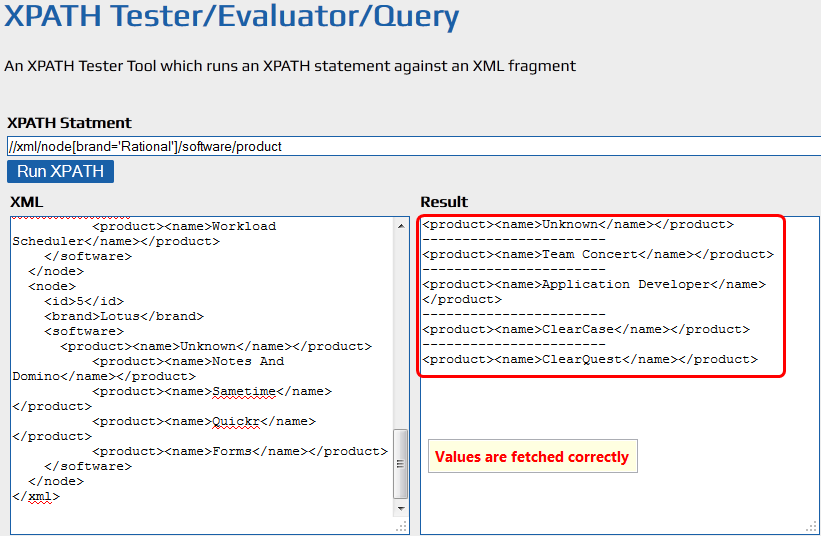
Validating the Xpath Expression
You may want to use the XPath validator in order to validate / test your parameterized Xpath Expression:- copy / paste the XML content of your value set provider in the left hand part
- copy / paste your Xpath expression in the XPATH Statement section
- replace the value of ${brand.value} with a valid value – ex: Rational so that Xpath expression to test looks like //xml/node[brand=’Rational’]/software/product
- click the Run XPath button
- verify that expected values are fetched and Result section in the right-hand section is populated
Verifications
The parameters for the product HTTP Value Set Provider should look like: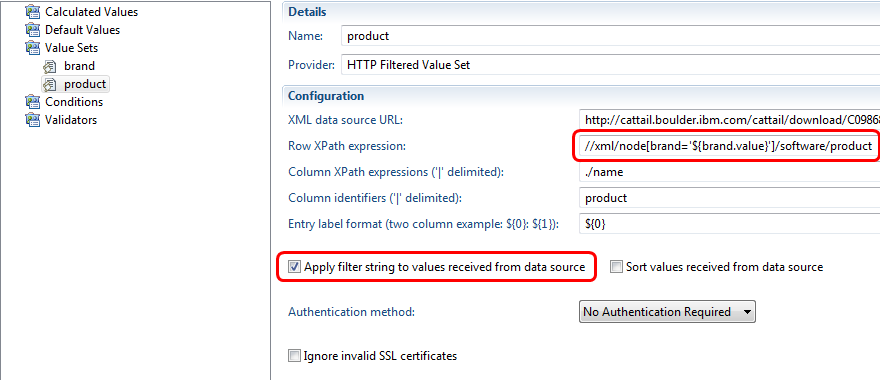
- Save your changes in the PA Editor
Add the custom attributes
- In the PA Editor, go to Project Configuration –> Configuration Data –> Work Items –> Types and Attributes
- Keep Defect type as selection
- In the Attributes list section, click the Add button
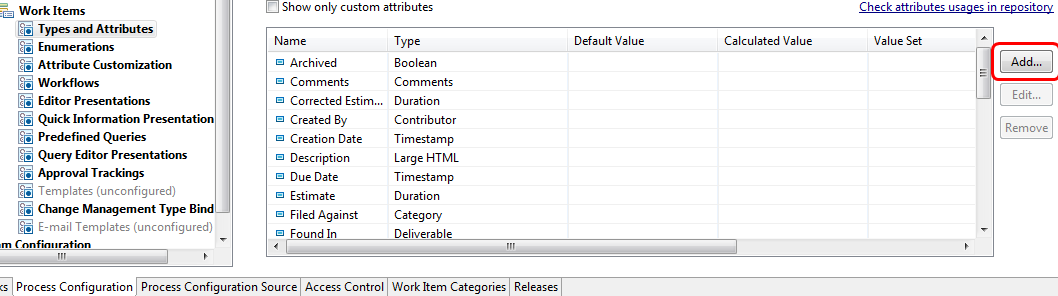
- Create the 2 attributes with the following parameters:
- Name: Brand
ID: brand
Type: Medium String
Value Set: brand - Name: Product
ID: product
Type: Medium String
Value Set: product
Dependencies: Brand
- Name: Brand
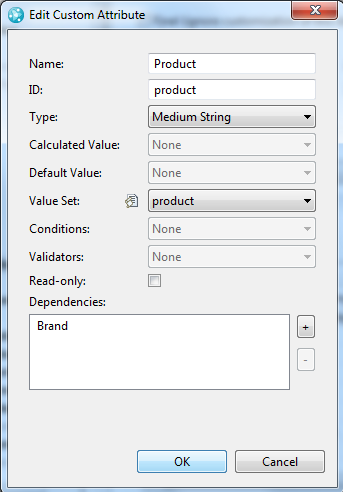
Note: it is important here to declare the dependency between Product and Brand.
Add the presentations
- In the PA Editor, go to Project Configuration –> Configuration Data –> Work Items –> Editor Presentations
- Keep “com.ibm.team.workitem.editor” editor as selection
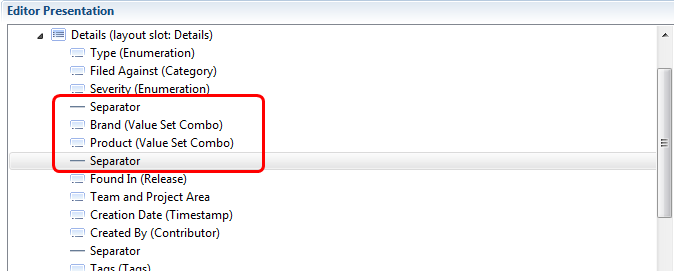
- Expand the Overview –> Details tab, and select the first Separator
- Click the Add Presentation button
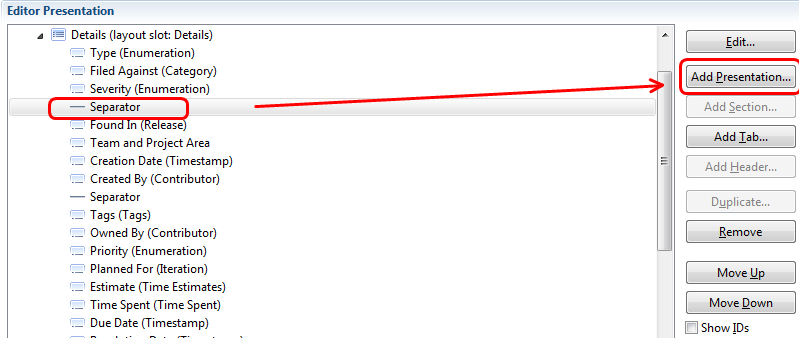
- Add the same presentation for the 2 attributes:
- Attribute: Brand
- Kind: Value Set Combo
then - Attribute: Product
- Kind: Value Set Combo
- Add a Separator (non-attribute based presentation)
- The final result should look like:
- Save and close the PA Editor
Verifications
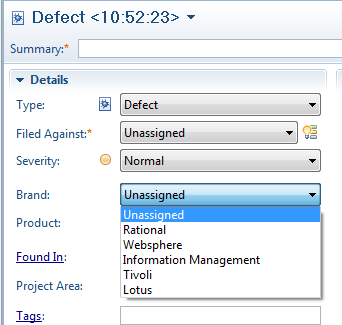
The same verifications should be performed from both the Eclipse Client and the WebUI.- Create a new defect
- Verify:
- both combos show “Unassigned” as selected value
- the Brand combo is populated with the expected values
- Product combo is enabled (not in error)
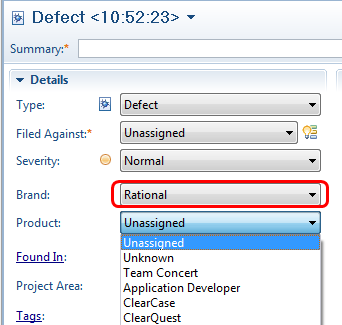
- Select a Brand value
- Verify that the Product combo is populated with the expected values
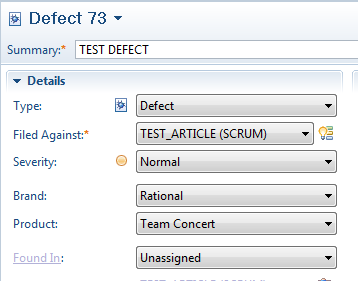
- Save your defect: expect no error
Note: Product combo will not be populated if selecting “Information Management” as Brand. This is due to jazz.net work item 249279.
For more information
- Customization of Work Items in Rational Team Concert
- Work Items attribute customization
- XPath Syntax
- XPATH Tester / Evaluator
About the author
Eric Jodet is a member of the Rational Team Concert L3-Dev Team, in charge of the Work Item Component.
Copyright © 2013 IBM Corporation
Dashboards and work items are no longer publicly available, so some links may be invalid. We now provide similar information through other means.
Learn more here.