
Rational Team Concert 3.0 and Build Forge: An integration scenario
This article will cover a multi-environment integration scenario between Rational Team Concert and Build Forge. We will explore how a developer can kick off Build Forge projects from Rational Team Concert Build Definitions. The source code and binaries requested by Build Forge will be stored in the developer’s environment.
This scenario is particularly useful when developers are building one part of a larger system. For instance, when looking at system integration activities, the system integrators can easily configure how they want to build the entire system. With this integration in place, you will be able to make use of the enterprise automation capabilities of Build Forge and the collaboration and traceability aspects of Rational Team Concert.
It is recommended to have at least intermediate knowledge of Build Forge and Rational Team Concert. You should have an understanding of the content referenced in the following articles:
- A Deployment Guide: Getting started with Rational Team Concert 3.x (Adopting Build)
- Continuous Integration Best Practices with Rational Team Concert
- Rational Build Forge Jazz Wiki Page
- Build Forge Infocenter: Administering Servers – Server Auth, Selectors, Collectors, Manifests…
Environment:
- Windows server: RTC 3.0 Server, Build Forge 7.1.2 Server
- Red Hat Linux Enterprise 5.5 Server: RTC 3.0 Client, Build Forge Agent, buildtoolkit
Scenario Diagram:
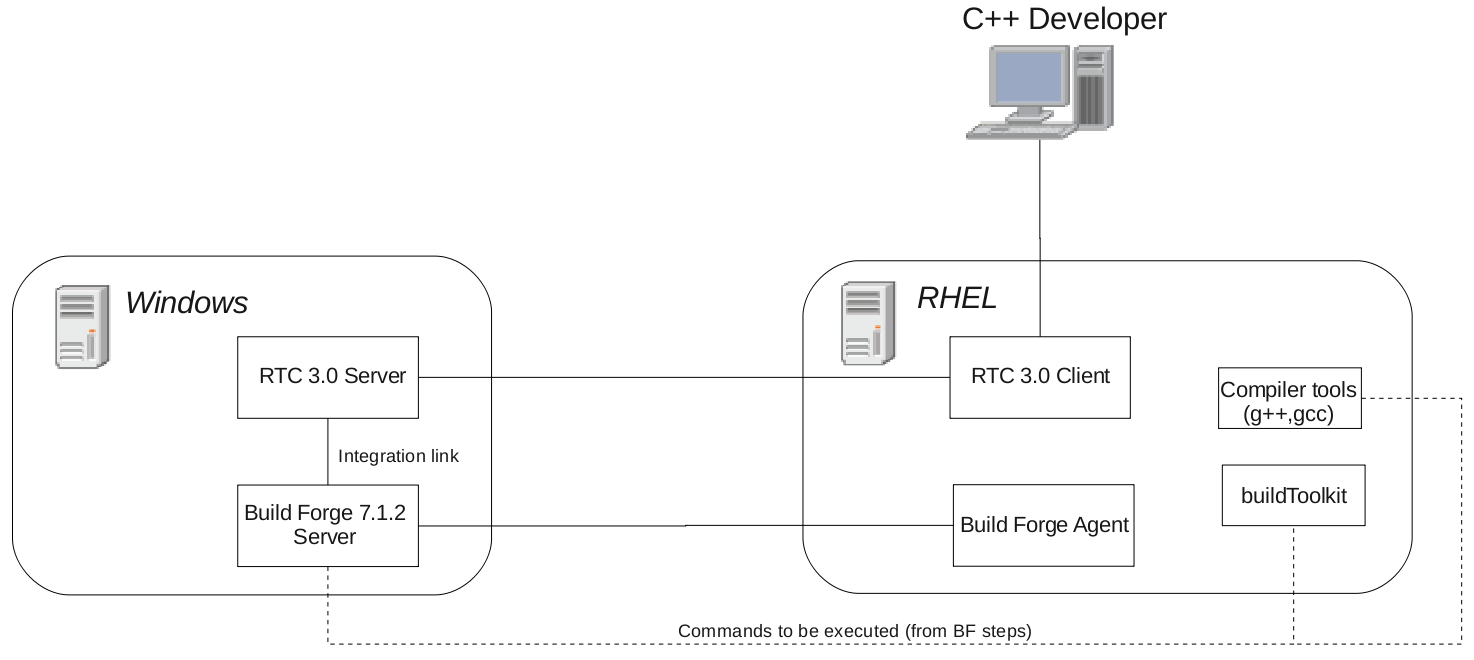
Figure 1: Topology
Note: For the purposes of this scenario, the Build Forge Agent, buildtoolkit and RTC Client are all sitting on the same Server. Normally, these would run separately; that is, the RTC Client would not be sitting on the build environment (RHEL Server).
A quick overview of the scenario is as follows:
- Developer works in Red Hat environment on a C++ project.
- Developer requests a build from a RTC Build Definition; this request triggers a Build Forge project.
- The Build Forge project dictates the build to be performed on the Red Hat environment and binaries to be stored there.
A more technical explanation of what is happening, highlighting important artifacts:
When a Build Definition is requested from RTC, all the properties needed to perform the build are passed on to Build Forge. Build Forge stores this information in the form of variables in an Environment so that a Project can use it. The execution of the project is then triggered. Build Forge finds an appropriate Server to run the Project on by comparing a Selector variable (gcc version) against the Manifest. The Manifest contains Collector information gathered by the Build Forge Agent, which is running on our Red Hat Enterprise server. Once a Server is selected, as first Step, the Build Forge project loads an Adaptor (JazzJBE.xml) to facilitate the integration between Build Forge and RTC. This adaptor runs the Jazz Build Engine, which is part of the buildtoolkit, to accept and fetch source code based on the properties passed on by the RTC Build Definition (A more typical continuous integration scenario with RTC would have the Jazz Build Engine running in the background on the build Server, listening for requests. With the JazzJBE adaptor, the Jazz Build Engine is launched on demand). The second Step runs the build command on the RHEL Server. Progress report and logs on this Project can be viewed in both RTC and Build Forge.
Pre-requisites:
It is assumed RTC 3.0 and Build Forge 7.1.2 are already installed and running on the Windows Server. The RHEL Server has RTC 3.0 Client and buildtoolkit installed as well as a Build Forge Agent listening on port 5555:
bash-3.2# telnet localhost 5555 Trying 127.0.0.1... Connected to localhost.localdomain (127.0.0.1). Escape character is '^]'. 200 HELLO - BuildForge Agent v7.1.1.4-0-0010
Setting up the scenario:
The first series of steps are going show how to connect to the RHEL server. We will set up a Server Auth user, a simple Collector and Selector.
A Server Authentication user is configured in Build Forge. This user must have access to run our desired commands on the RHEL Server. In this case, we use id ‘root’:

Figure 2: Server Auth
Next, a Collector is set up to make sure a Server with our build requirements exists. A command will be ran through the Agent on the RHEL server, its output sent back and parsed in the Windows Server. In this example we require a Server with a specific gcc version:
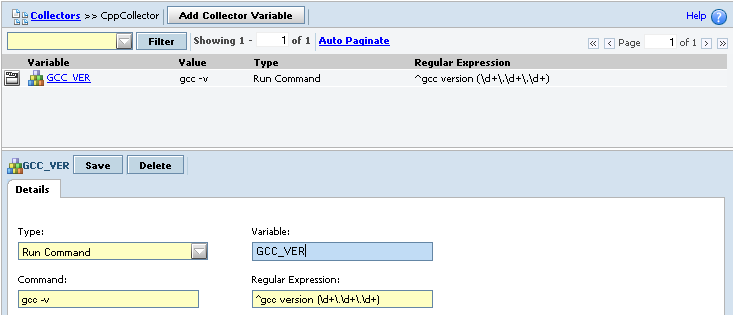
Figure 3: A simple collector
It is now time to create the logical Server that will point to our RHEL Server. We will assign it our Server Auth and Collector information:
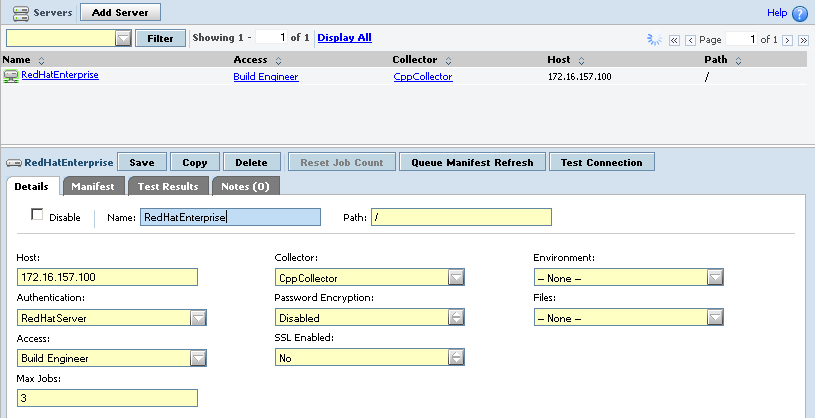
Figure 4: Our Logical Server
Next up, configuring a Selector. This Selector will specify a requirement to build our code, in this case it is a specific GCC version:
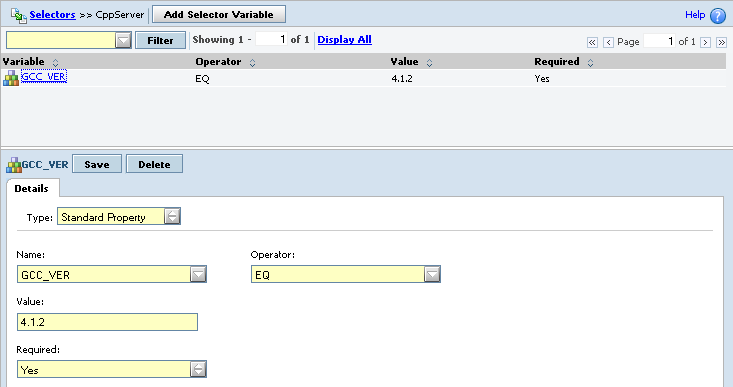
Figure 5: A simple Selector
Now we define an Environment for the project. We will start from scratch and define four new variables:
- Repository_Address: Location of the RTC Server.
- Build_User: RTC user with access to control the build lifecycle – RTC builds will be launched as this user. Typically, a dedicated ‘build’ user is created.
- Build_Password: RTC user password.
- Build_Engine_Path: Path to Jazz Build Engine executable. Ex: ‘/opt/IBM/TeamConcertBuild/buildsystem/buildengine/eclipse/’

Figure 6: Defining Environment Variables
As we will see later on, this information is needed by the Adaptor. The rest of the environment variables will be automatically populated from RTC.
It is now time to create a Build Forge project for the integration and assign it our previously configured environment and selector. For this example, we will use the ‘Hello World’ project:

Figure 7: Project Overview
In this example, two Steps are defined. The first step (Figure 8) loads the JazzJBE adaptor. This adaptor has capabilities to launch the Jazz Build Engine and perform all the code fetching operations, based on the configuration in the RTC Build Definition. The second Step (Figure 9) performs the actual compilation on the RHEL Server.
Note: The JazzJBE adaptor shipped with Build Forge 7.1.2 contained backward slashes, which are incompatible in Linux environments – replace them with forward slashes for a workaround. A fix was applied in 7.1.2.1. See Work Item: 138754 for more information.
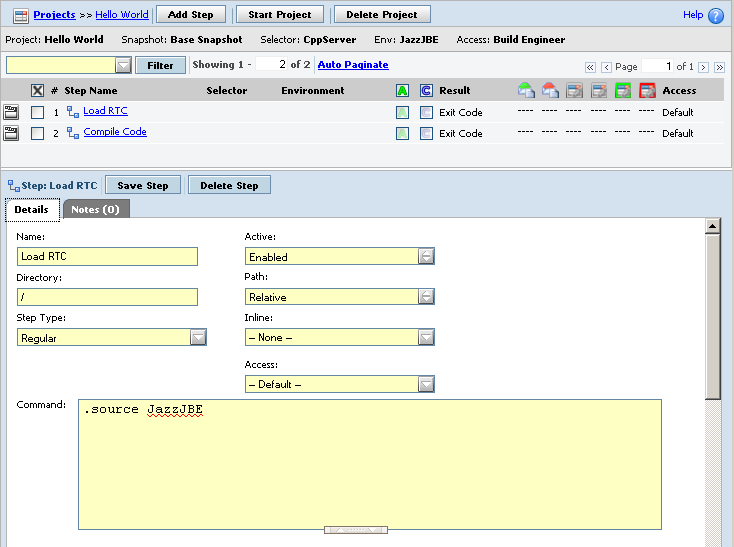
Figure 8: Step 1, Load JazzJBE Adaptor
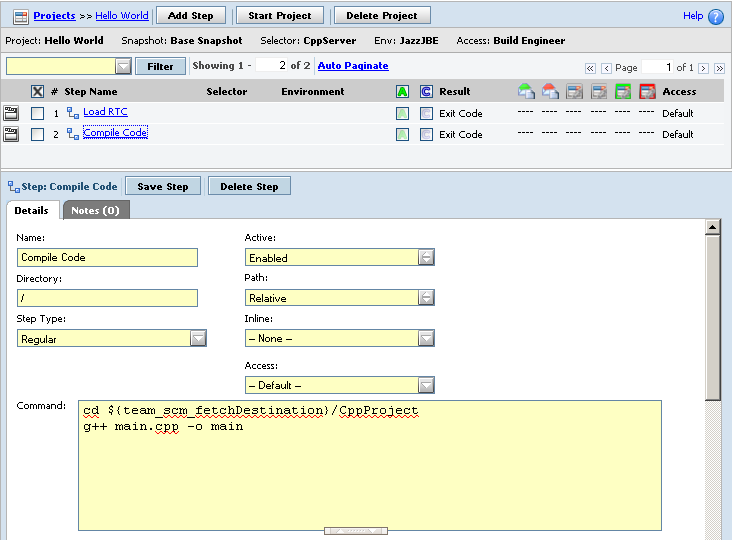
Figure 9: Step 2, Compile code
The configuration is now complete for Build Forge, we are now ready to configure the RTC side of things and kick off the build.
The specifics on this configuration and additional details can be found in the RTC 3.0 Infocenter:
It is important to understand the best practices around building code with Jazz Source Control. A typical Build Definition will load a dedicated Workspace owned by a ‘build’ user – a dedicated build user that has a ‘Build System’ license assigned. This Workspace will flow changes from the desired Stream so that it is up to date with team changes the moment the Jazz Build Engine is invoked. With this in mind, let’s start configuring RTC:
The first thing you want to do is set up the Build Engine. Give it an ID and select Rational Build Forge as build engine type. Remember that a Build Engine is used by a Build Definition to identify the Server that performs the build. More precisely, the Jazz Build Engine executable will have the Build Engine ID passed to it as an argument and then fetch build requests for that specific ID.
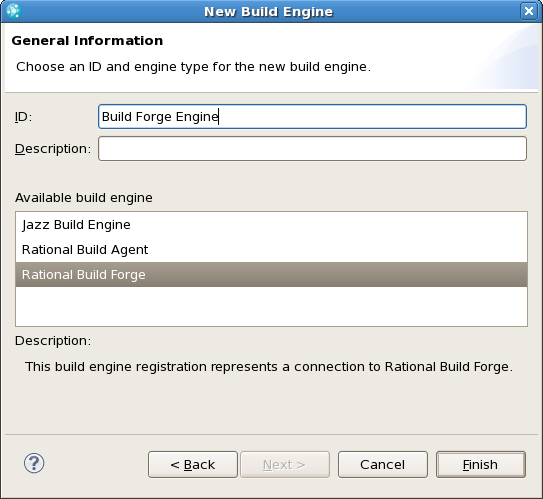
Figure 10: Create the Build Engine
The new Build Engine will have a Build Forge tab at the bottom. On this page, enter the Build Forge server information and credentials for authentication:
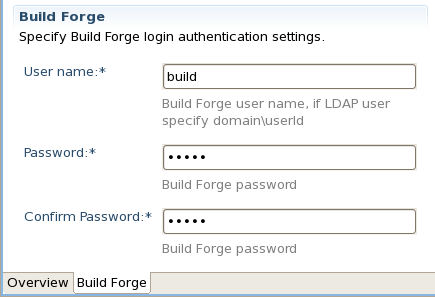
Figure 11: Build Forge credentials.
Typically, a dedicated ‘build’ user that exists in Build Forge is entered here. Ensure you can establish a connection to the Build Forge server, from the RTC Build Engine:
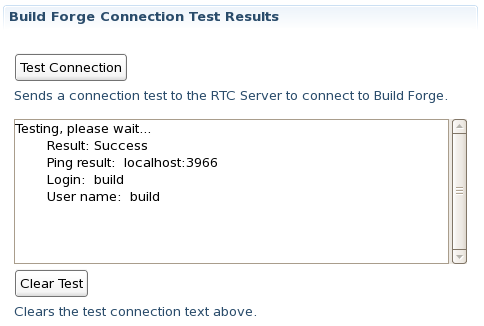
Figure 12: Testing connection to Build Forge server
Now that the Build Engine is set up, we need to create a new Build Definition that supports it. Select ‘Rational Build Forge’ as type, and Jazz Source Control in the Pre-Build Options page. Ensure all other options are checked in the final screen.
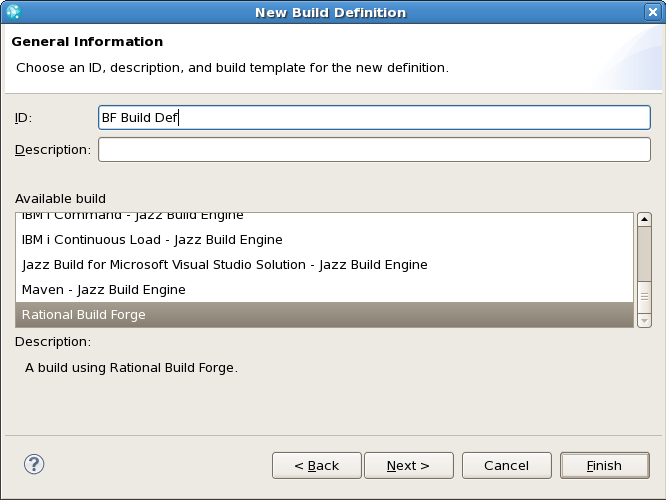
Figure 13: Create the Build Definition
In the Overview tab of the newly created Build Definition, click on ‘Edit’ to assign the Build Engine to it.

Figure 14: Assign a Build Engine to the Build Definition
The next important configuration step is the Jazz Source Control tab in the Build Definition. Start by creating a new dedicated Workspace to build from. The Workspace must be owned by the user that is passed as an argument to the Jazz Build Engine executable. If you recall, we created this ‘build’ user in RTC and defined it as an Environment Variable in Build Forge (Figure 6).
In the same Jazz Source Control tab, you will see a ‘Load Directory’ field. We have set it to ‘Workspaces’. Pay special attention to this, as the folder structure might get a bit confusing.

Figure 15: Load Directory
Special note on folder structure:
At this point, you might be wondering where the ‘Load Directory’ field fits in. Here is a quick reminder on exactly where the source code files are going to reside:
In our example, it turns out to be: /Hello_World/BUILD_$B/Workspaces/* where * is the Workspace file contents, without the Components name (Folders are not created for RTC Components). See Figure 16 for an example.
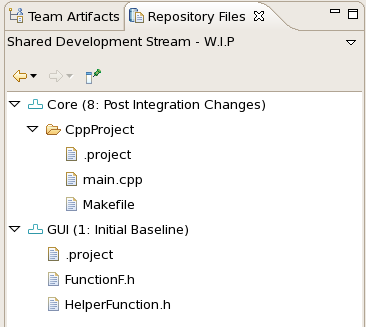 | bash-3.2# tree /Hello_World/BUILD_37/Workspaces /Hello_World/BUILD_37/Workspaces |-- CppProject | |-- Makefile | `-- main.cpp |-- FunctionF.h `-- HelperFunction.h 1 directory, 5 files |
Lets break ‘/Hello_World/BUILD_$B/Workspaces/*’ down further:
| / | Directory field in first Build Forge Step (Figure 8) |
| Hello_World/ | Build Forge Project Name |
| BUILD_$B/ | Build Forge Project Tag Format |
| Workspaces/ | ‘Load Directory’ in the RTC Build Definition (Jazz Source Control tab) |
| * | RTC Workspace file contents |
This explanation has hopefully given you some insight into the folder structure with this integration. Lets keep moving!
Selecting a Build Forge project in the ‘Build Forge’ tab and clicking on ‘Synchronize Properties’ will update the environment variables for both RTC (Figure 18) and Build Forge (Figure 19). This is mainly used to push variables from RTC to Build Forge.

Figure 17: Build Forge projects in the Build Definition
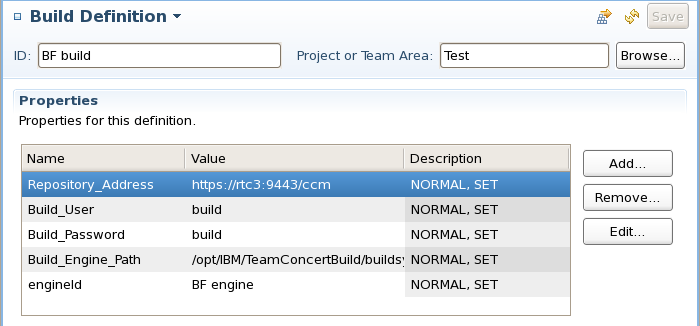
Figure 18: Environment variables updated in RTC
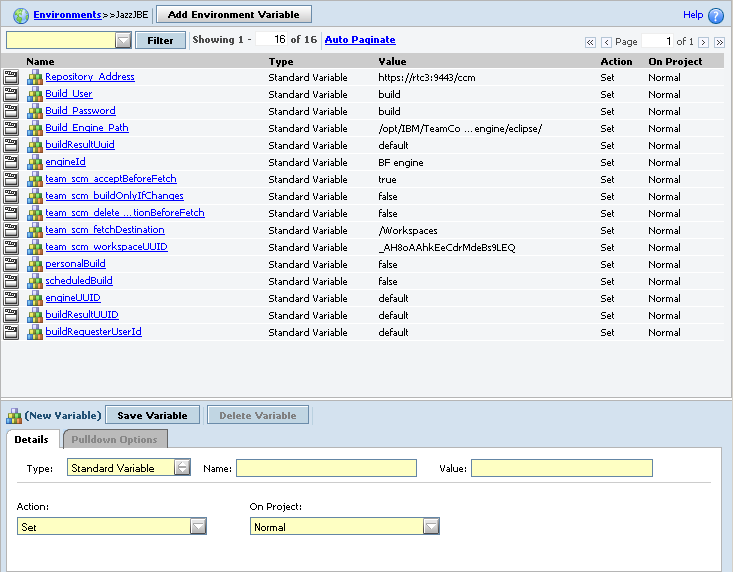
Figure 19: Environment variables updated in Build Forge
Once you have configured the Build Engine and the Build Definition, you are ready to kick off a build!
Request a team or personal build from your Build Definition and monitor its progress in both RTC and Build Forge. You will be able to see the status of your Build Forge project in RTC, including what Step is currently being executed (Figure 20). In Build Forge you can explore the job status and results (Figure 21), just as you would with any other Build Forge project:

Figure 20: RTC build progress
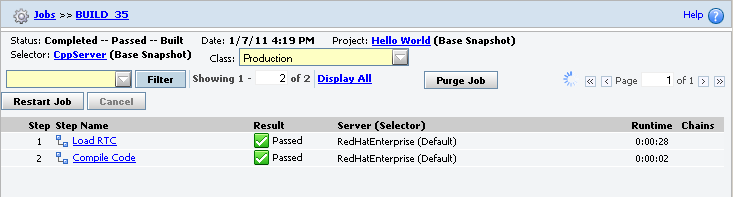
Figure 21: Build Forge job result
Additionally, build result with links (Figure 22) and Build Forge logs (Figure 23) can be viewed in RTC:
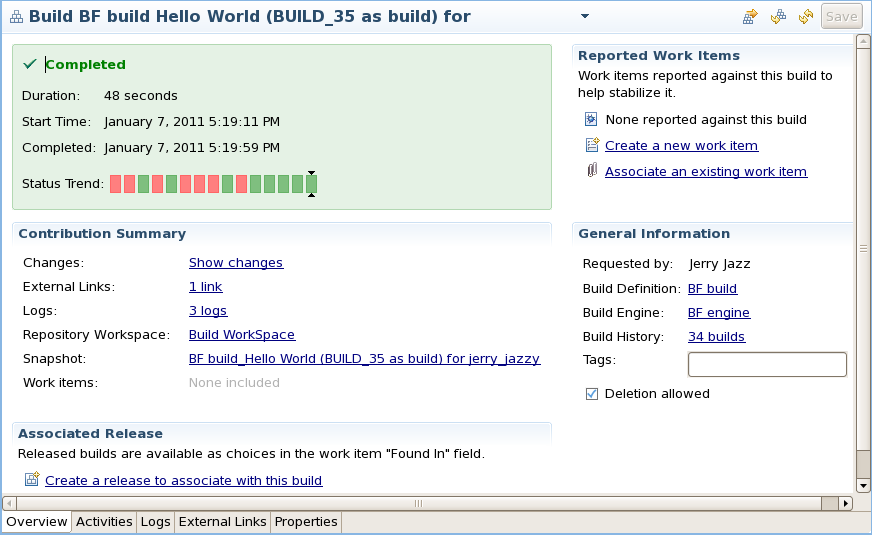
Figure 22: RTC Build Results
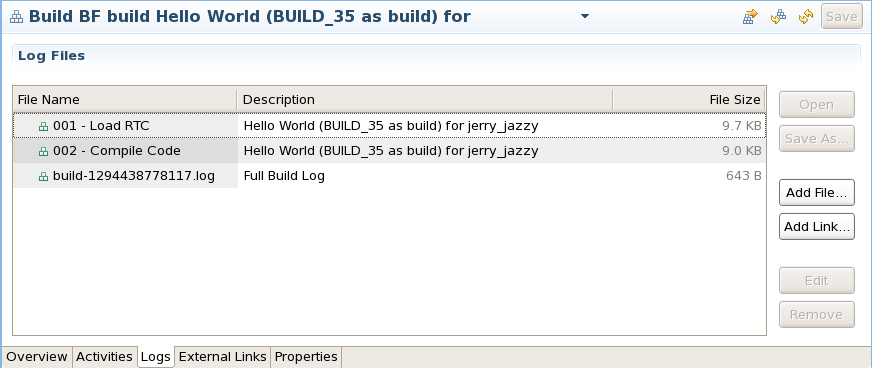
Figure 23: Build Forge logs are accessible from RTC
We can now navigate to the directory where the source code and binaries have been delivered to:
bash-3.2# pwd /Hello_World/BUILD_35/Workspaces/CppProject bash-3.2# ls main main.cpp Makefile bash-3.2# ./main Hello World! bash-3.2#Note: We did not call make in this example, but g++ instead.
Conclusion
Through this integration scenario, we have seen how a Developer is able to stay in his development environment to request builds, view build results and access build content (such as binaries) all the while being integrated with the enterprise process execution framework: Rational Build Forge. As stated earlier in the article, this integration truly brings the best of both worlds: to be able to make use of the enterprise automation capabilities of Build Forge and the collaboration and traceability aspects of Rational Team Concert.
It is important to understand that although this scenario has been specific to C++, it could have been easily tailored for other make-based tools as well as other non make-based tools such as Ant and Maven. I would also like to highlight that this Build Definition can be kicked off from any interface supported by Rational Team Concert: it can be kicked off from the WebUI, the Eclipse Client and Visual Studio (2005, 2008, 2010).
For more information
- A Deployment Guide: Getting started with Rational Team Concert 3.x (Adopting Build)
- Continuous Integration Best Practices with Rational Team Concert
- Rational Build Forge Jazz Wiki Page
- Build Forge Infocenter: Administering Servers – Server Auth, Selectors, Collectors, Manifests…
About the author
David Castellanos is an IT Specialist who focuses in Rational Team Concert and Build Forge deployments. David can be contacted at dcastel@us.ibm.com.
© Copyright 2011, 2012 IBM Corporation