
Continuous Integration with Rational Team Concert and Microsoft Visual Studio
Introduction
Since Rational Team Concert support for Microsoft Visual Studio was introduced in version 1.0.1.1 in February 2009, the Jazz capabilities available to Visual Studio users has seen significant enhancements. While the initial release supported developer centric operations, primarily focused around source control, subsequent releases added support for builds, plans, feeds and reports, among other things.
The article Continuous Integration Best Practices with Rational Team Concert discusses a practical implementation of a Continuous Integration system with RTC, focusing on the Eclipse RTC Client for Java development. The objective of this technical article is to describe how a similar scenario for Continuous Integration can be implemented with the RTC client for Visual Studio.
The particular practices called out in the Jazz.net article referenced above that we will cover here from a Visual Studio perspective are:
- Automate the Build
- Make Your Build Self-Testing
- Every Commit Should Build the Mainline on an Integration Machine
- Make it Easy for Anyone to Get the Latest Executable
- Everyone can see what’s happening
- Create a build definition based on the Visual Studio build template
- Run unit tests with MSTest as part of the build and publish the results as part of the overall build result
- Use the RTC Ant build toolkit tasks for progress monitoring, artifact and link publishing
- Run the Jazz Build Engine
- Request a personal build
- View and compare build results, including the MSTest results and the complete build
Contents
- Prerequisites
- Process Summary
- Setup
- Starting the build engine
- Add the Solution to Jazz SCM
- Exercising the RTC CI Engine from Visual Studio
- Using the build results
- Summary
- For more information
Prerequisites
- You need to have a 4.0.1 RTC Server installed, with a Project Area that you can access. The Project Area should have a Source Control Stream with a Component that you can add files to.
- You need to have an existing Visual Studio solution that builds cleanly. The example in this article uses the Hello World example project from http://code.msdn.microsoft.com/Hello-World-Sample-02330a9e.
- You need to have a Visual Studio MS Test project in the solution that can be invoked to run tests.
- You need to install the Build System Toolkit (on your machine or another build machine).
- The build process file will need access to a Java VM and Ant.
- The team area has a user “build” with password “build” that will be used to run the build engine
Process Summary
The Jazz™ Team Build component of the Jazz technology platform provides support for the automation, monitoring, and awareness of a team’s regular builds. Jazz includes the Jazz Build Engine and an Ant build toolkit that can publish build information to the Jazz repository.
The following figure illustrates how the components in a Continuous Integration solution with RTC and Visual Studio interact:

Using the figure above a summary of the process is:
- A build request on a build definition is generated either on a schedule or by a user from the Visual Studio, Eclipse or Web client.
- The Jazz Build Engine receives the request
- The JBE fetches the source from an RTC Workspace to a specified location on the build server
- The JBE accepts any changes delivered to the stream that the Workspace flows with
- The JBE generates a property file with a number of properties (name=vale pairs) to be used by the Ant build process
- The JBE invokes msbuild on a Visual Studio solution
- If a project within the solution contains a <Exec> task or a Pre/Post-Build command that calls Ant, it launches Ant with the specified target in jazzbuild.xml
- The Ant target typically makes use of one or more tasks from the RTC Build Toolkit
- Once the build is complete any logs and results including build results and MSTest run results are collected into an RTC Build Result which is published to the RTC server
Setup
Add the RTC Ant build toolkit invocations to the project
MSbuild allows customization of the build process through Pre/Post-Build events . Making use of these events we include Ant calls to the RTC Ant Build Toolkit. The RTC Ant build toolkit contains several Ant tasks that are helpful in creating a richer build experience in Team Concert. For example, you can enable fine-grained progress monitoring by using the startBuildActivity task, and publish build logs and artifacts using the logPublisher and artifactLinkPublisher tasks.- We first create an MSBuild project file to hold common properties for re-usability such as the command to invoke Ant, the location of the Jazz build file and the location of the build properties file.
- Launch the Visual Studio IDE open the Hello World Solution, add a new XML File Item and name it MyCommonProperties.xml. Open the file for editing and add the following content to it.
<?xml version="1.0" encoding="utf-8"?> <Project xmlns="http://schemas.microsoft.com/developer/msbuild/2003"> <PropertyGroup> <AntCommand>ant -lib C:IBMTeamConcertBuildbuildsystembuildtoolkit</AntCommand> <propertyFile>-propertyfile C:tmpmybuild.properties</propertyFile> <jazzbuildxml>-f $(fetchDestination)c#jazzbuild.xml</jazzbuildxml> </PropertyGroup> </Project>
- Next create the Ant build file which will hold the RTC Build Toolkit tasks we will invoke. Add a new XML File Item to the Hello World Solution and name it “jazzbuild.xml“. Open the file for editing, and add the following content to it. The Jazz build Ant Task Reference pages detail the various Ant tasks that RTC provides. In the jazzbuild.xml file we use startBuildActivity, artifactLinkPublisher and linkPublisher to contribute additional information to the build results.
<?xml version="1.0" encoding="utf-8"?> <project name="jazz build targets" default="startActivity"> <property name="userId" value="build"/> <property name="password" value="build"/> <import file="C:IBMTeamConcertBuildbuildsystembuildtoolkitBuildToolkitTaskDefs.xml"/> <target name="startActivity"> <startBuildActivity repositoryAddress="${repositoryAddress}" userId="${userId}" password="${password}" activityIdProperty="buildactivityId" label="${activityLabel}" autoComplete="true" verbose="true" buildResultUUID="${buildResultUUID}" /> </target> <target name="publishActivity"> <tstamp/> <startBuildActivity buildResultUUID="${buildResultUUID}" label="${activityLabel}" autoComplete="true" repositoryAddress="${repositoryAddress}" userId="${userId}" password="${password}"/> <artifactLinkPublisher repositoryAddress="${repositoryAddress}" userId="${userId}" password="${password}" buildResultUUID="${buildResultUUID}" url="file:///${team.scm.fetchDestination}/C#/HelloWorld1/bin/Release/HelloWorld1.exe" localFilePath="${team.scm.fetchDestination}C#HelloWorld1binReleaseHelloWorld1.exe" label="HelloWorld1.exe"/> <linkPublisher repositoryAddress="${repositoryAddress}" userId="${userId}" password="${password}" buildResultUUID="${buildResultUUID}" url="http://www.ibm.com" label="www.ibm.com" /> </target> </project> - Now we import the properties defined in MyCommonProperties.xml into one or more of Visual Studio project files during the build process. You need to first unload the project to be able to edit its project file source in Visual Studio.
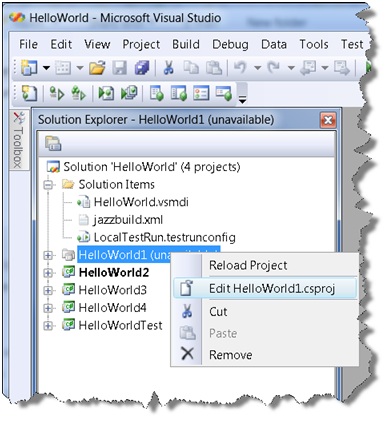
Find the following line towards the bottom of the file:
<Import Project="$(MSBuildBinPath)Microsoft.CSharp.targets" />
and the following line after it:
<Import Project="..MyCommonProperties.xml" />
- Save, close and reload the project.
- Finally for one or more of the projects add Pre- and Post-built event commands in the Project Properties page.
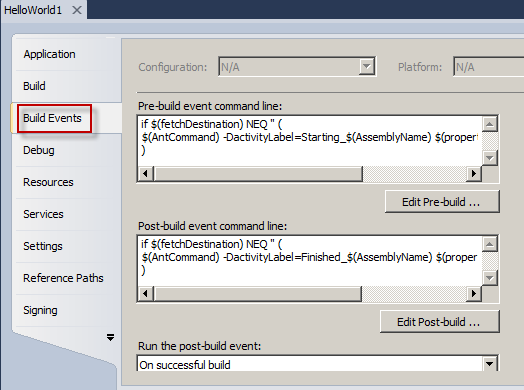
Pre-Build command:
if $(fetchDestination) NEQ '' ( $(AntCommand) -DactivityLabel=Starting_$(AssemblyName) $(propertyFile) $(jazzbuildxml) startActivity )
Post-Build command:
if $(fetchDestination) NEQ '' ( $(AntCommand) -DactivityLabel=Finished_$(AssemblyName) $(propertyFile) $(jazzbuildxml) publishActivity )
In essence the MS Build Pre/Post-Build event commands call Ant on thestartActivityorpublishActivitytargets in the “jazzbuild.xml” file. Theif $(fetchDestination) NEQ '' (condition ensures that those tasks are only executed if we invoke the build using the Jazz Build Definition, thus allowing the build to be run natively within Visual Studio. You could use any of the properties that will always have a value when using the JBE instead of $(fetchDestination).
Create the Build Definition and the Build Engine
While most of the actions relating to build including, requesting builds, viewing build results and comparing builds can be done within the RTC Visual Studio Client, creating and modifying the Build Definition and Build Engine must currently be done in the RTC Eclipse client.
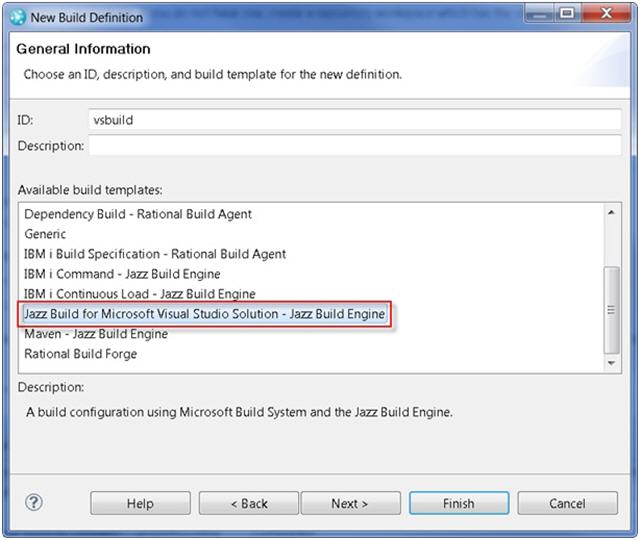
- Start the Team Concert Eclipse client. Connect to the project area that contains the Visual Studio Solution, navigate to the Team Artifacts view, right-click the Builds node and click New Build Definition.
- Select the project/team area to associate with the build and type an ID for the build definition, such as vsbuild. In the Available build templates, select the Jazz Build for Microsoft Visual Studio Solution – Jazz Build Engine template and click Next
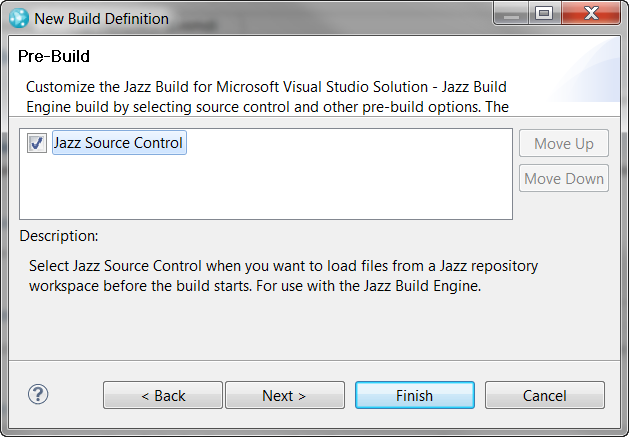
- In the Pre-Build dialog select Jazz Source Control and click Next
- In the Post-Build dialog Select MSTest Configuration and click Finish

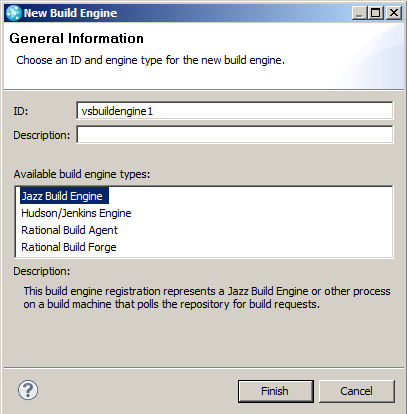
- On the General page of the Build Definition editor, in the Supporting Build Engines section, click Create…, type an engine ID such as vsbuildengine1 , select “Jazz Build Engine” and click Ok
- On the Schedule page, click Enabled, click Continuous Interval in Minutes and set the interval to 10 minutes.

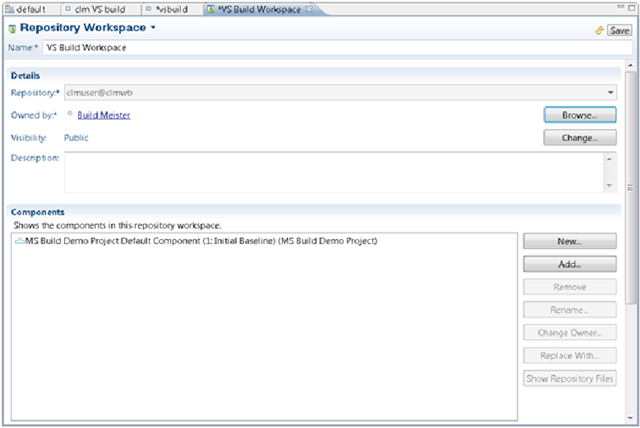
- On the Jazz Source Control page, in the Workspace field click Create and create a workspace with the name VS Build Workspace flowing with the stream the Visual Studio Solution is developed in and assign the “build” user as the workspace owner.
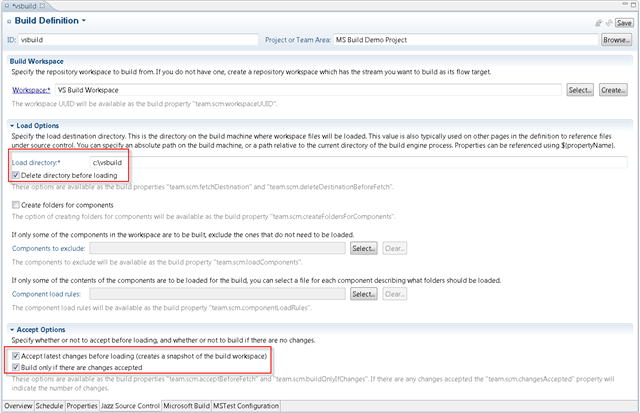
- On the Jazz Source Control page of the Build Definition editor, in the Load directory field enter
"c:vsbuild"without the quotes.
Enable the Delete directory before Loading, Accept Latest Changes before loading and Build only if there are changes accepted options.
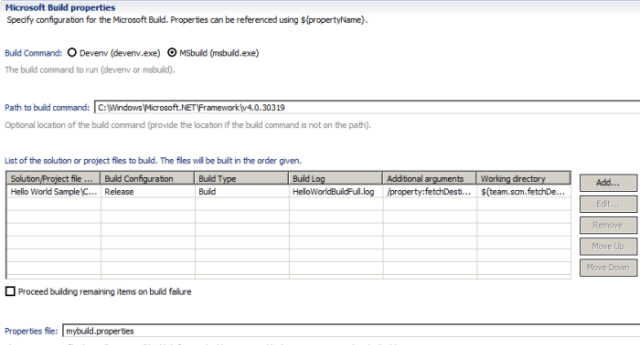
- On the Microsoft Build Page set the following properties:
Build Command: MSBuild
Path to build Command:C:WindowsMicrosoft.NETFrameworkv4.0.30319
Solution File Name:HelloWorldHelloWorld.sln
Build Configuration: Release
Built Type: Build
Build Log:HelloWorldBuildFull.log
Additional Arguments:/property:fetchDestination=${team.scm.fetchDestination}
Properties file:mybuild.properties
Working Directory:${team.scm.fetchDestination}
Most of the properties are self-explanatory but the following bear explaining further:
Build Log: The Jazz MSBuild template will automatically publish a build log to the build results with most of the key build process related information in it. This Build Log file is an additional, more comprehensive log file that is typically used for troubleshooting.
Additional Arguments: Strictly not required but we use the fetchDestination in the Pre/Post MSBuild targets to conditionally invoke Ant only if the build request is via the JBE. Other arguments to msbuild can be added here if required
Properties file: This file is created in the directory where the jbe.exe resides and contains a list of the Jazz property values that the Ant build toolkit tasks in jazzbuild.xml uses, including the unique ID for the build result (buildResultUUID) and address of the Jazz repository (repositoryAddress). We pass this file to Ant using the –propertyfile parameter.
Working Directory: This is set to the value of the Load Directory field on the Jazz Source Control page to allow use of paths relative to that directory.
- On the MSTest Configuration page, enter the following information and save the build definition:
Path:C:Program Files (x86)Microsoft Visual Studio 10.0Common7IDEmstest.exe
MSTest Specification File (vmsdi):HelloWorld.vsmdi
MSTest Results file:HelloWorldTest.trx
Working Directory:${team.scm.fetchDestination}HelloWorld
The one-time setup that will allow us to begin using RTC as a CI engine with Visual Studio is now complete. We can now start the build engine and proceed to exercise it.
Starting the build engine
Before builds can be run, the Jazz Build Engine must be started. If the build engine is not started, build requests will just sit forever in the build queue. Typically, the build engine runs on a dedicated remote build machine.Open a command prompt or shell, change directory to
C:TeamConcertBuildbuildsystembuildengineeclipseand run the following command
jbe -vm C:IBMTeamConcertBuildjdkbinjava -repository https://clm.jkebanking.net:9443/ccm -userId build -pass build -engineId vsbuildengine1 -sleeptime 10
Notice how the -engineId argument matches the build engine ID created during the setup.
The build engine should print a message like “Waiting for request…”
Add the Solution to Jazz SCM
We will now add the Hello World Solution, including jazzbuild.xml and MyCommonProperties.xml, to Jazz SCM.
- In the Solution Explorer tool window, right-click the solution and select Share Project(s) in Jazz.
- Select the repository from the drop-down list. If you are not connected to the repository in which you want to share the project, click Login. Specify the repository workspace and component to use.
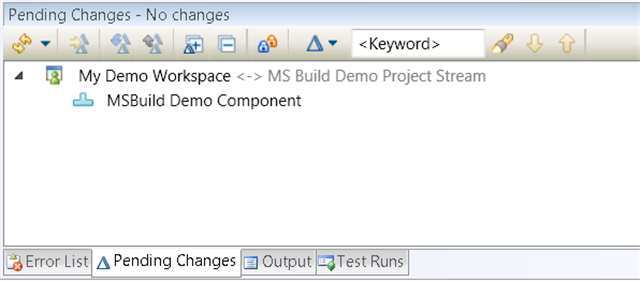
- Deliver the Share Projects Change Set, so that there are no changes remaining in the Pending Changes Window (Team Concert > Windows > Pending Changes).
Exercising the RTC CI Engine from Visual Studio
Now that we have the various components of the CI solution ready, we can walk through a scenario that exercises it and demonstrates how it helps address the various CI best practices.
Make a change
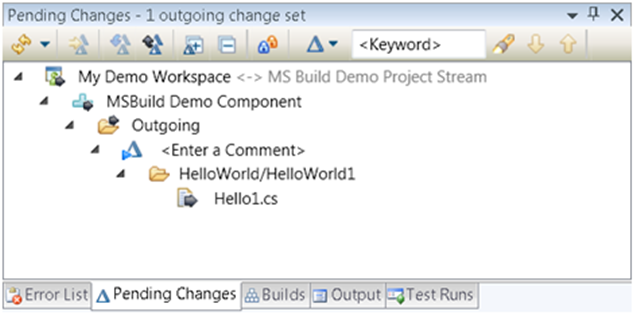
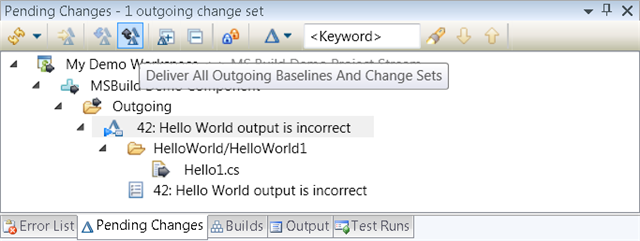
- Simulating a situation where a bug in the source need to be fixed, open the Hello1.cs file, make a small change to it and save it. You should see the change listed as an Outgoing Change in the Pending Changes view:
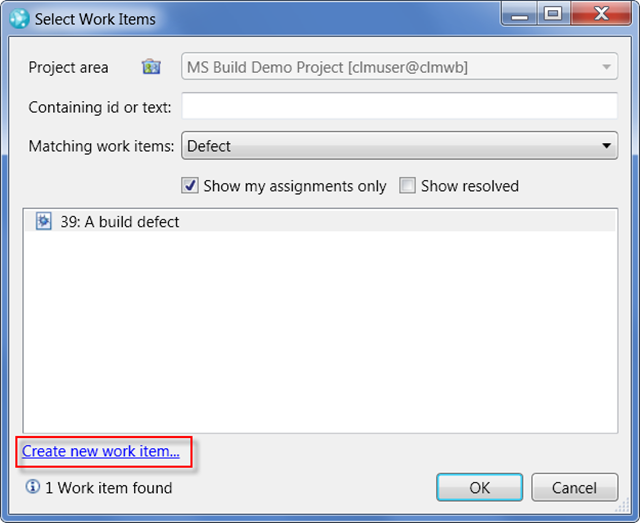
- We will now associate the change with a new Defect which will then be automatically included in a new build. Right-click the Enter a Comment Node and select Associate Work Item. In the Select Work Items dialog click the new work item link and Select Defect in the Work item Type dialog.
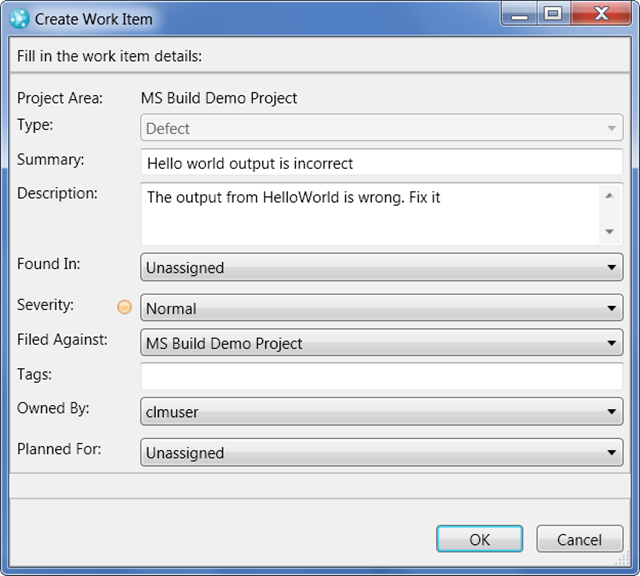
- Complete the Create Work item Dialog and Click Ok.
Run a pre-flight build
Before we deliver this change to the Stream for the rest of the team to be able to access, best practice dictates that we should ensure that this change does not break the build. We can do this very easily by running a “pre-flight” build using the Private Build feature in RTC.
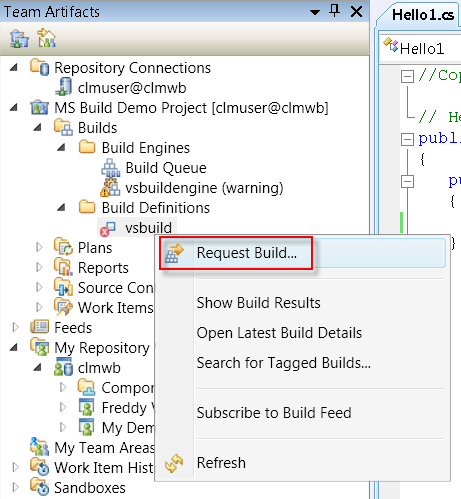
- Navigate to the Team Artifacts window in Visual Studio (Team Concert > Windows > Team Artifacts), expand the Builds node, right click the vsbuild Build Definition and select Request Build.
- In the Request Build dialog, enable the Personal Build option, click Browse and select My Demo Workspace for the Repository Workspace.

Normally a build request uses the Workspace configured in the build definition to get the source from. A personal build however, is a build that will be run against your personal development workspace, allowing you to validate your latest changes without having to first deliver your changes to the team stream. For a more in-depth look at the benefits of personal builds, see How I Learned to Stop Worrying and Love Personal Builds .
- On clicking Submit, the Team Concert Builds window will open to show the progress of the requested build (and previous build results if any)

- Double-clicking the latest result opens the build Results details window.
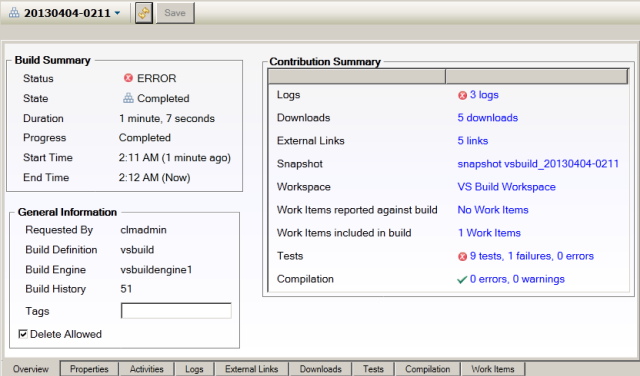
Notice the Summary information and the different Tabs (Activities, Compilation, Downloads etc) that show the details of the build. For this build all we are interested in is making sure the compilation succeeds. We will examine some of the other Tabs later.
Deliver the Change to the team Stream
Now that we know or change compiles, we will deliver it to the Team Stream by clicking Deliver All Outgoing Baselines and Change Sets in the Pending Changes view.
This change will now be automatically picked up, along with others from the rest of the team, by the scheduled build. Team Concert can notify the different interested parties of the build status through email, feeds, viewlets on dashboards or desktop popup messages. Each of the notification methods is configurable at the project and/or personal level ensuring that critical build related information is made available as and when required.
Examine the Build Results
Now assuming that the scheduled build has run (remember we set it to run every 10 minutes), let’s examine the results in further detail.-
Overview Tab
The Overview tab shows us a condensed view of the overall status, including Compilation status, Unit Test status, which Workspace was used for the build and links to more detailed information. Notice also the Snapshot link. By virtue of having used JAZZ SCM, the build definition automatically creates a snapshot which is a record of the contents of a repository workspace at a particular time. A workspace snapshot consists of a collection of baselines, one for each component in the repository workspace This snapshot can then be used to fix build issues by creating and populating a repository workspace or stream from the snapshot using the Build Results context menu.
-
Activities Tab
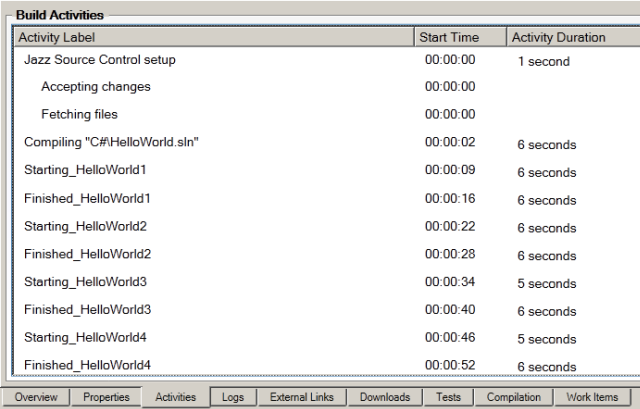
The Activities tab shows us the build’s progress. This is of particular interest to us as we have contributed the StartActivity and publishActivity rows, by invoking the RTC StartActivity and FinishActivity Build Toolkit tasks in the MSBuild PreBuild and AfterBuild targets respectively. Using such an approach is especially useful for long-running builds where we wish to have fine-grained progress monitoring of the many steps that may be present in out build process.
-
Compilation Tab

The Compilation tab shows the compilation results with errors or warnings and pointers to the source of those errors or warnings, if any.
-
Downloads Tab
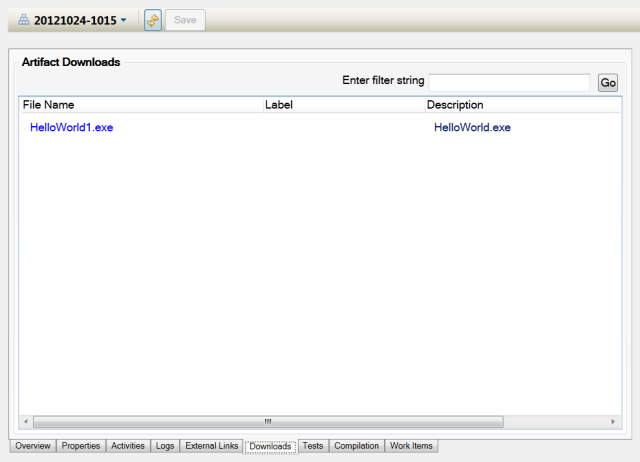
The Downloads tab is where we make it easy for any interested party to get access to the latest artifacts produced by the build. We contributed to this using the artifactLinkPublisher RTC build toolkit task invoked as part of the AfterBuild target in jazzbuild.xml.
-
External Links Tab
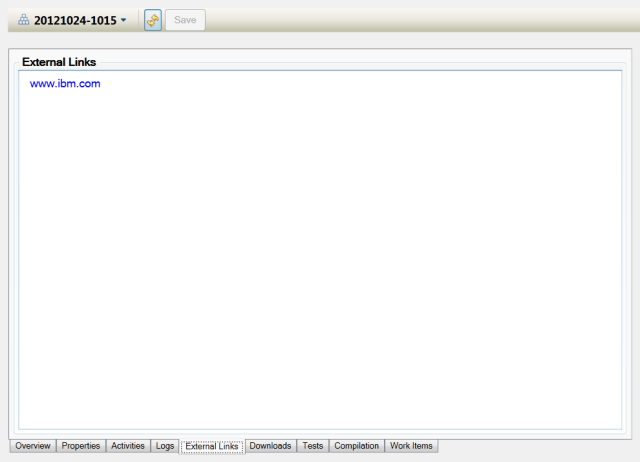
The External Links tab can be used to publish links to external information if required. We contributed to this using the linkPublisher RTC build toolkit task invoked as part of the AfterBuild target.
-
Tests Tab
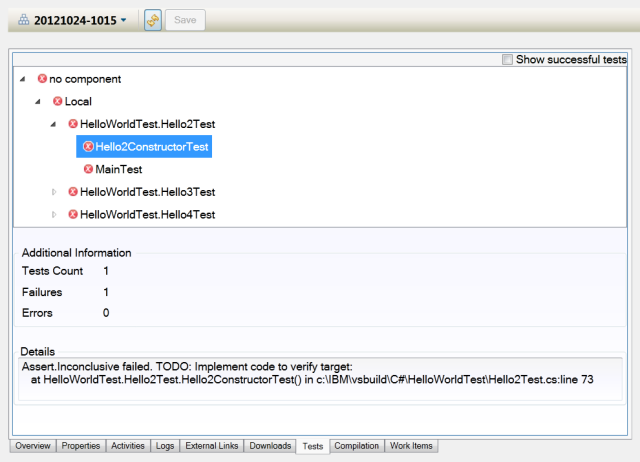
The Tests tab shows the results of the MSTest run. Expanding and selecting any of the individual results shows the specific cause and point of failure including exact line number.
-
Logs Tab
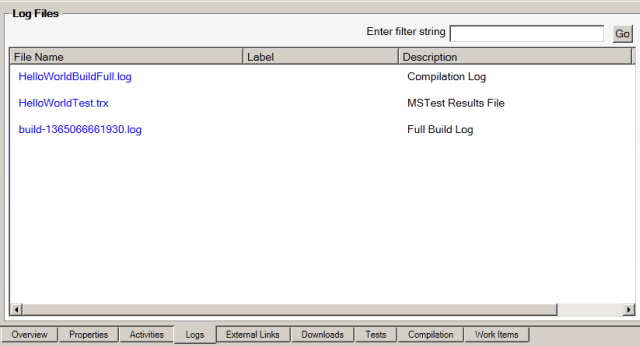
The Logs tab has links to a summary log, a more comprehensive build log and the actual MSTest result file. We can also add links to results from other tools that may have been run as part of the build such as static analysis tools like FxCop.
-
WorkItems Tab
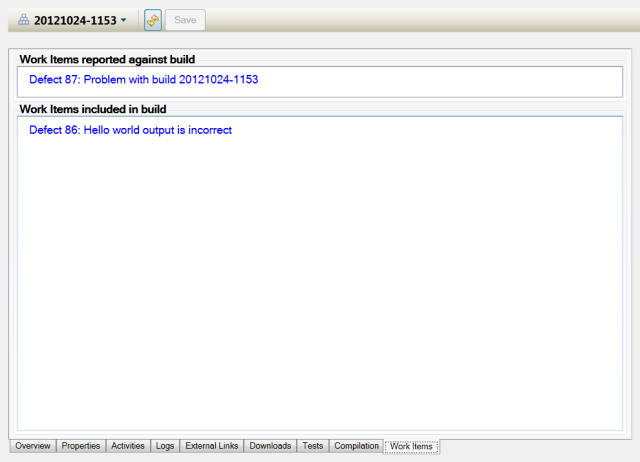
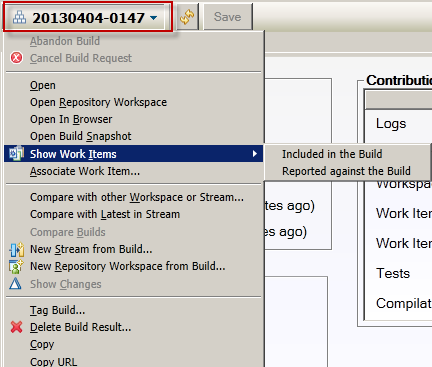
Finally the WorkItems tab provides traceability back to the defects, tasks, or enhancements that may have been included in this build. In this example we see that a link to the Defect that was fixed has been automatically included. In addition there is a link to a defect found in this build during testing.
Using the build results
With all of the above information easily available to us there are a number of extremely useful actions on these build results that we can take advantage of, including:
- Populate a new stream with the results of a build
- Compare the changes in any two builds
- Create a new Repository Workspace from a build
- Associate work items with a build (Work Items Reported Against build)
Summary
Rational Team Concert has powerful features for Visual Studio development that make it simple to use as a CI engine, providing invaluable support for improving the build and release management functions of development teams. Through this article we have shown how some of these features can be easily implemented.For more information
- Continuous Integration Best Practices with Rational Team Concert
- RSC 2009: CRM27 – Heterogeneous Development using Eclipse and Rational Team Concert Visual Studio
- Rational solution for Collaborative Lifecycle Management 2012 Deployment Guide
- Create plans and work items in the RTC client for Microsoft Visual Studio IDE
- Mapping your Visual Studio Projects and Solutions to Jazz Components
- Getting started with build setup
- Using build activities to monitor build progress
- About Personal Builds
- Frequently Asked Questions about Rational Team Concert client for Visual Studio IDE
- Flexible mapping of sources to Jazz components
Copyright © 2013 IBM Corporation