
Configuring certificate authentication in Rational Team Concert 3.0 using WebSphere Application Server 7.0
One of the new features of Rational Team Concert 3.0 is the ability to login using either a certificate (.p12) file, or a smart card. Until now the only way to login is via a username and password, which is not secure enough for some customer operating environments. Logging in using an SSL certificate file or smart card is referred to in this document as Certificate Authentication. While a certificate file and a smart card are very different, conceptually they are both certificates that are used for authentication. Certificate authentication is more secure than BASIC and FORM-based authentication. Certificate authentication uses HTTP over SSL in which authentication is done using a public key certificate that is issued by a trusted organization known as a certificate authority.
The rest of this article assumes that WAS 7.0 is being used, and that the WAS administrator has already logged into the Integrated Solutions Console. In a default WAS install, the Integrated Solutions Console is available at http://<yourserver>:9043/ibm/console.
While certificate authentication is supported by Tomcat, this document only describes how to do so using the WebSphere Application Server (WAS) since that is our preferred deployment platform.
Prerequisites
This article assumes that the you are familiar with the concepts behind certificate authentication and WAS usage. Specifically, the following steps must be performed before the rest of the instructions can be completed:
- A WebSphere Application Server has been installed and upgraded to the fixpacks required by RTC 3.0. An article covering the full list of prerequisites is available at https://jazz.net/library/article/496.
- WAS has been configured to use the user registry that is desired. Two previous articles have been written about using Federated realms and using LDAP in WAS.
- A certificate authority and user certificates already exists and the certificate authority’s public certificate is available to the administrator. A guide for using certificates and how to setup a personal certificate authority is the SSL Certificates HOWTO at tldp.org.
- The CCM and JTS .war files have not yet been installed into WAS. There is a modification to the contents of the .war file that is needed before the .war file can be installed
Configure WAS to accept certificates
WAS needs to be configured to support or require client certification authentication at the Transport Layer (i.e. SSL connection). There is also the ability to disable message layer authentication (username/password).
- In the WAS Integrated Solutions Console, use the left navigation pane to go to Security > SSL certificate and key management.
- On the right under Related Items, click SSL Configurations
- Click on the particular node to modify in the table (If you used default settings then click on NodeDefaultSSLSettings).
- On the right under Additional Properties, click Quality of protection (QoP?) settings
- Change Client authentication from None to Supported
- Click the OK button.
- Click the Save link at the top of the page
Additionally, WAS needs to know which certificates to trust. To validate that a certificate should be trusted, WAS contains a list of the trusted root certificate authorities. The public root certificate for the certificate authority signing the client certificates should be uploaded with the following steps:
- Copy your root certificate authority’s public certificate to the machine hosting WAS
- In the WAS Integrated Solutions Console, use the left navigation pane to go to Security > SSL certificate and key management.
- On the right under Related Items, click Key stores and certificates
- In the table, click NodeDefaultTrustStore.
- On the right under Additional Properties, click Signer certificates
- Click the Add button, provide WAS with the location of the root certificate, and click OK
- Click the Save link at the top of the page
Configure WAS to map incoming certificates to users in the registry
WAS will now be able to accept incoming certificates as an authentication mechanism, but the server does not know how to map the incoming certificate to a user. You must provide a mapping strategy between certificates and users in the registry, and the mapping is described through through two settings: Certificate mapping mode and a Certificate filter. No matter what type of user registry you are using, you need to know the values for those two settings.
The values for those two settings are highly dependent on your certificate and user registry settings, but here is a simple example to map an incoming certificate to a user in a local LDAP registry. Let’s say that your WAS server is currently configured to allow a user with the userid ‘lavinm’ to log-in. The ‘lavinm’ user would like to log-in with a certificate with the following subject: “CN=lavinm, OU=yourserver”. You could configure WAS to use the ‘Common Name’ entry in the certificate as the userId of the logged in user by using the CERTIFICATE_FILTER mode for the Certificate mapping setting and the “uid=${SubjectCN}” value for the Certificate filter setting.
The Certificate filter option is a flexible way to map certificates to users, and only a simple example has been given. There is more documentation for the filter option on step 13 of the WAS documentation for LDAP setup.
If you are using the Standalone LDAP registry then use the following steps to get to the configuration page:
- In the WAS Integrated Solutions Console, use the left navigation pane to go to Security > Global Security.
- Make sure “Standalone LDAP registry” is selected in Available realm definitions and click Configure…
- On the right, under Additional Properties, click Advanced Lightweight Directory Access Protocol (LDAP) user registry settings
- Set the Certificate mapping and Certificate filter settings and click OK
- Click the Save link at the top of the page
If you are using the Federated repositories then use the following steps to get to the configuration page:
- In the WAS Integrated Solutions Console, use the left navigation pane to go to Security > Global Security.
- Make sure “Federated repositories” is selected in Available realm definitions and click Configure…
- For each of the repositories in the realm, click the link in the Repository Identifier column and perform the next step
- Set the Certificate mapping and Certificate filter settings and click OK
- Click the Save link at the top of the page
If you are using the Federated repositories, make sure that all of the Federated repositories are LDAP based, and not local file based. WAS does not currently support certificate authentication with a Federated repository that includes a mix of local and LDAP based realms.
Configure the RTC and JTS applications to require certificate based authentication
At this point, WAS is configured to allow certificate authentication and to map incoming certificates to known users, but the RTC and JTS applications need to be configured to accept certificate based authentication. By default the JTS and CCM application WARs use FORM-based authentication, declared in their deployment descriptor, WEB-INF/web.xml, using the <login-config> XML element. To enable certificate authentication it is necessary to update the WAR’s deployment descriptor, replacing the existing <login-config> XML element with the following XML element:
<login-config> <auth-method>CLIENT-CERT</auth-method> </login-config>
Only one <login-config> XML element is allowed, so it is required that you either delete or comment-out any other <login-config> XML elements.
Updating a WAR’s deployment descriptor requires that you edit the contents of the WAR. This can be either done in-place using a tool such as 7-zip, or by unzipping the WAR, editing WEB-INF/web.xml and re-zipping the WAR. In the case where the WAR has already been deployed into WAS, the deployment descriptor can be updated directly as described in this Jazz library tech tip.
Because the deployment of RTC into WAS requires two different .war files to be used, make sure to perform the modification to both .war files before installing them into WAS
After updating the .war files for the RTC installation, continue with the RTC installation as described in the Deploying and starting WebSphere Application Server section of the RTC documentation.
Using certificates in the RTC rich client
Now that the WAS server and RTC applications are configured to allow certificate based authentication, we can configure the client to use certificates.
To use certificate authentication in the client, the IBM Java virtual machine used for the client must be replaced to allow the use of the stronger encryption used in the certificates. Start by downloading the updated IBM Java virtual machine from jazz.net. Next, rename the jdk folder to jdk.orig (so you can easily revert the change later if desired). The jdk folder is located in either <InstallDir>/jazz/client/eclipse or <InstallDir>/TeamConcert depending on whether you used the zip install or Installation Manager to install the client. Finally, extract the downloaded zip containing the replacement IBM Java virtual machine into the <InstallDir>/jazz/client/eclipse or <InstallDir>/TeamConcert folder (again depending on how you installed the client).
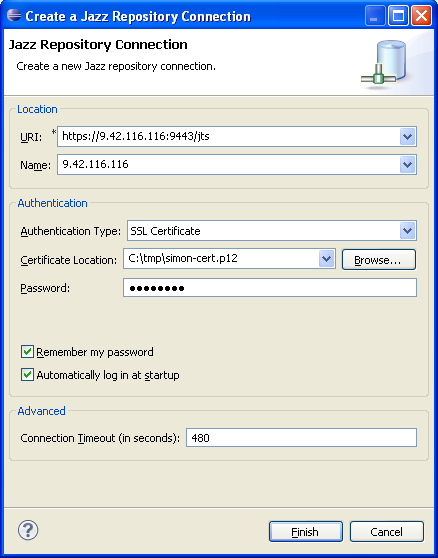
After the new security polices are in place, and the RTC client has been restarted to detect the new policies, the following screen-shot shows an example of a Repository Connection that has been configured to use certificate authentication:
Simon Archer and Matt Lavin both work on the Repository team in the Jazz Foundation project