
Enterprise Build Solutions with Build Forge and Rational Team Concert 3.0
Introduction
Rational Build Forge is an enterprise automation product. While it can be used quite efficiently for build scenarios, its main benefits are mostly in the form of general automation. Project execution of unlimited step commands that run on targeted agents, in sequence or parallel, provide the flexibility needed for a good automation engine. Build happens to need a lot of automation. Build Forge capabilities include a Build Agent that uses operating system credentials for running steps on your build machines, a collection mechanism to know what is on any particular build machine running an agent, a selection mechanism to choose a specific build machine to meet the needs of the step command (for specific tools, etc), and a generic project configuration that allows for very flexible flow of control in a highly secure environment that is centrally managed. There are many other features that just cannot be covered in this discussion.
The automation capabilities of Build Forge allow you to implement build best practices (similar to coding best practices) such as breaking up your larger scripts into smaller chunks (or steps) within a project or creating reusable libraries (organized sequence of steps) that can be called from other projects. The benefit you gain in problem determination, auditability, scalability, re-use, security, and many other abilities allows you to obtain a rapid return on investment and make your build processes very repeatable, which is a main goal for good automation.
RTC Team Build has it’s own benefits such as a very nice interface for configuring build-specific tools such as Maven, Ant, MS Build, etc. Team Build includes a Jazz Build Engine (JBE) that pulls requests from a build definition queue to build these configurations. It is very easy to take advantage of this technology. However, once you begin to make your Ant scripts larger and more difficult to debug or want to choreograph your software delivery life-cycle with several phases of activities within the same project, you will likely want to use Build Forge to accomplish these types of enterprise-level automation goals. You may at first want to reuse existing Team Build JBE-based definition configurations by calling the individual participants in the sequence you desire from Build Forge, which is possible in the new integration.
Your users likely work in RTC every day, so you most likely still want the Team Build build result to be the location of all your build artifacts, even when using Build Forge as your primary build engine. Making the RTC build result the place of record for builds and build artifacts is a goal of the integration. When using Build Forge as your build engine, you probably want the change sets, work items, snapshots, build logs, compile logs, JUnit logs, JAR/WAR/EAR output, and other generic artifacts to be added to the RTC build result the same way it’s done using Team Build and Jazz Build Engine (JBE). This can all be done and it’s been made easier than ever before. Read on to see what capabilities exist and how you can accomplish your build goals using the Build Forge integration.
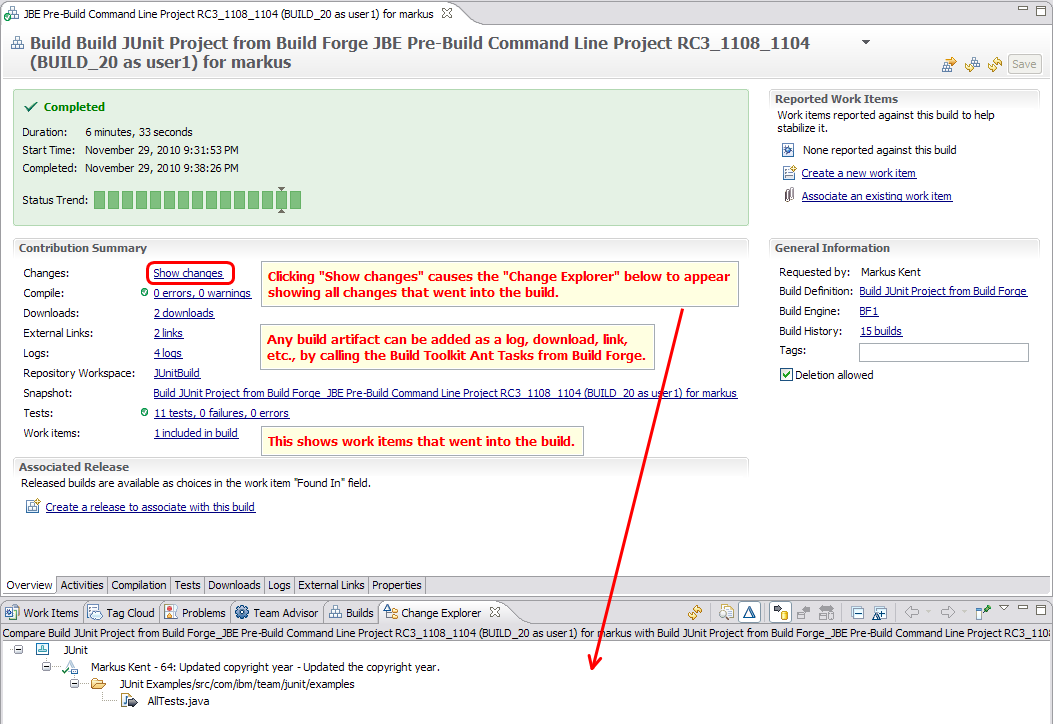
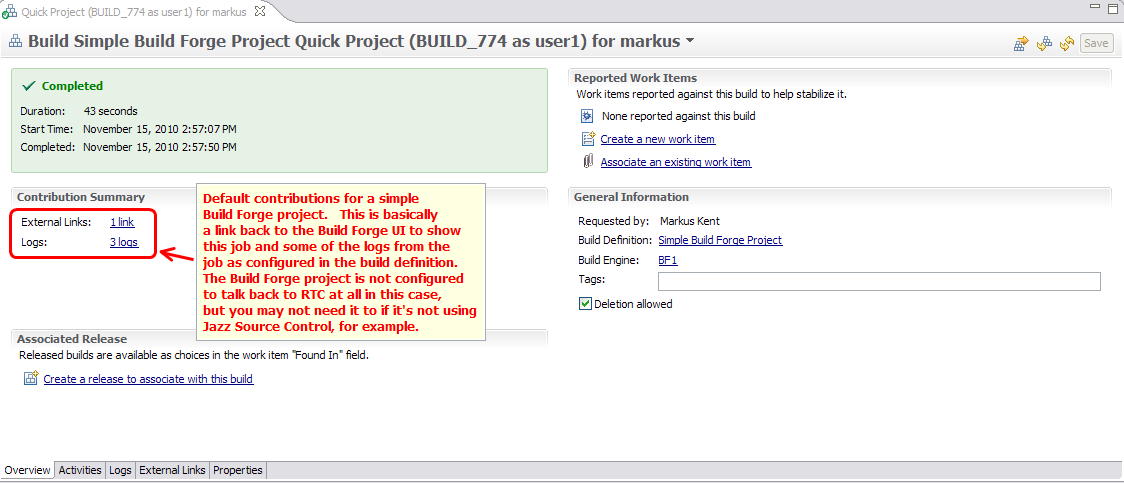
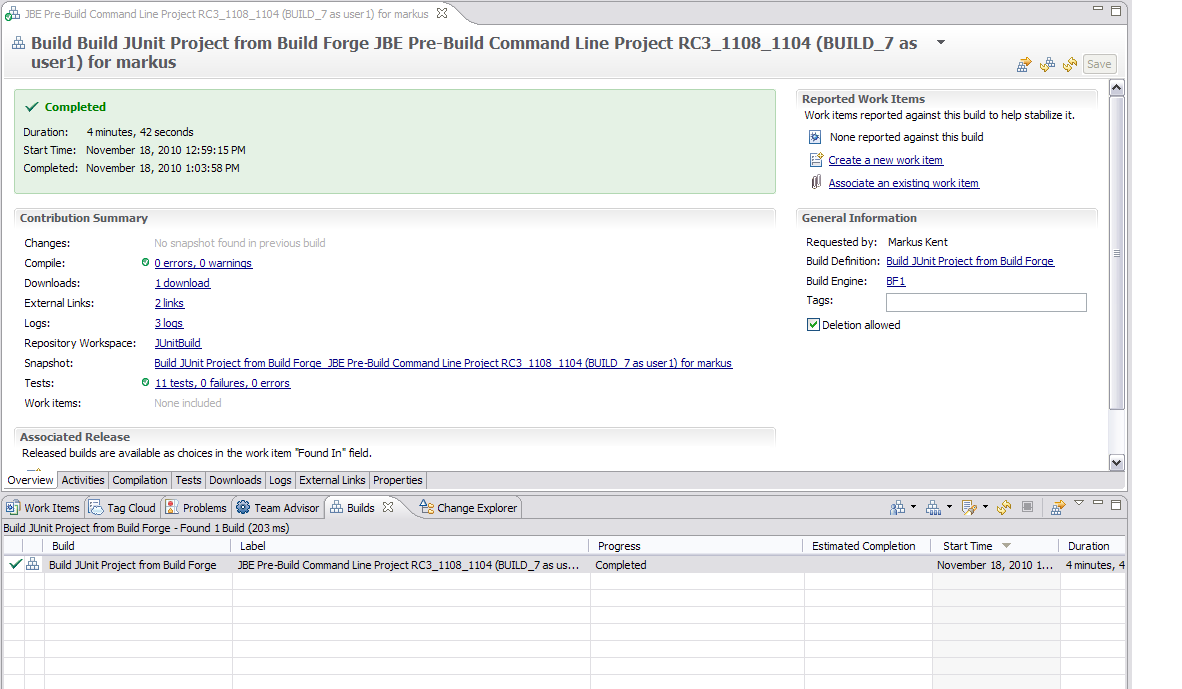
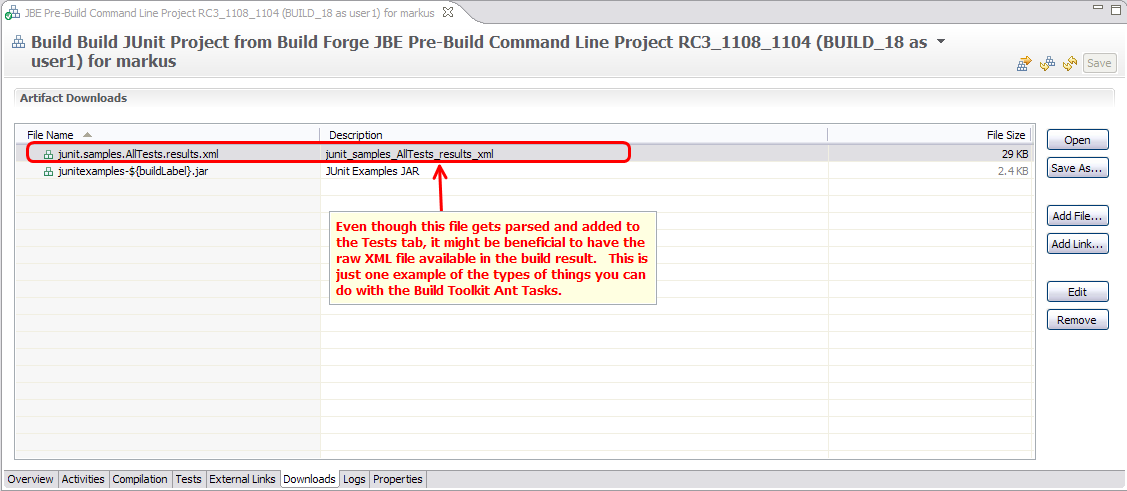
The build result below shows a rich set of contributions using the JUnit Example Project that comes with RTC 3.0. You can see it’s a one-stop-shop for users to see all of the output of any particular build. You can add other artifacts to this using the Build Toolkit Ant Tasks in your Build Forge project. How you can accomplish this will be covered in detail in the scenario sections below.
Executive Overview – Build Forge and Build Agent Integration Enhancements in RTC 3.0
There are two separate integrations we will discuss. The first is an integration with Build Forge where you can launch Build Forge projects from RTC Team Build and have information published back into the associated RTC build result. The second is an integration directly with the Build Forge Agent (aka, Build Agent) where you can submit commands from RTC Team Build straight to targeted Build Agent machines. This differs from the Jazz Build Engine which is configured to pull build requests from a specific build definition on a given RTC Team Build instance. If multiple Jazz Build Engines are configured for a single build definition, it is non-deterministic as to which JBE will run the build.
The diagram below is a very rough depiction of the interaction when the following actors are used together: an RTC server, a Build Forge server, Build Forge Agents, and Jazz Build Engines. There are three main RTC build engine types as the diagram shows: Jazz Build Engine, Build Agent, and Build Forge. Jazz Build Engines pulls requests from the associated build engine it’s referencing. Build Agents are pushed commands from the RTC build request or steps from the Build Forge job. Build Forge is pushed requests to start jobs from the RTC build request. A Build Forge job is based on a Project definition that has choreographed step automation. Which RTC build engine you choose to use depends upon your build requirements and existing environment. For example, if you already have a lot of machines with JBE installed, you might want to stick with the Jazz Build Engine build engines. On the other hand, if you have Build Forge already and most of your builds are done through Build Forge, you should probably use the Build Forge build engine. If you have the Build Agent installed on a lot of systems but have simple comments to run from RTC, then using the Build Agent build engines makes the most sense. Either way, it all comes down to how you want to run commands on build systems and how much control you want over running those comments, how granular you want to make each command, how much security you need, and so forth.

Build Forge Integration
The main purpose of the integration with Build Forge is to be able to utilize the enterprise automation capabilities in Build Forge from within RTC Team Build, as discussed above. There is a Build Forge integration for RTC 2.0.0.2 as discussed in Configuring Build Forge to Integrate with RTC Team Build and Advanced Build Forge Integration with RTC: Continuous Integration and Using Build Toolkit Ant Tasks for Richer Build Result Contributions. The RTC 3.0 integration has been made easier to install, configure, and use. A client and server plug-in still exists, but you’d hardly know as it has been completely integrated into the core runtime so there’s no need to install anything to use it.
The following bullets describe the main improvements in the Build Forge integration in RTC 3.0.
-
Installation Improvements
The RTC 2.0.0.2 integration requires that you install the plugin on the client and server sides. The instructions for doing this part of the integration are quite lengthy as you can see from Configuring Build Forge to Integrate with RTC Team Build. The need for these instructions go away with RTC 3.0 as the integration with Build Forge is installed out-of-the-box. The RTC 3.0 plug-ins work with Build Forge 7.1.1.3 and forward. It’s recommended that you use Build Forge 7.1.2 with RTC 3.0 to get the best overall experience.
Previously, after installation you would need to configure a user for the server-side plugin code to run as so that you could assign some required RTC build permissions for the server-side code to run correctly. Typically, the default ADMIN user is removed during installation so it was required to configure another RTC user in the Advanced Properties configuration of the RTC server. These requirements have all been removed now. The permission checks within the server-side code are no longer needed as the code is fully integrated in the core runtime and runs as trusted server code. There are still the same user permissions required to configure build definitions and request builds, but that’s as expected and desired from a security perspective.
-
Environment Property Handling Improvements
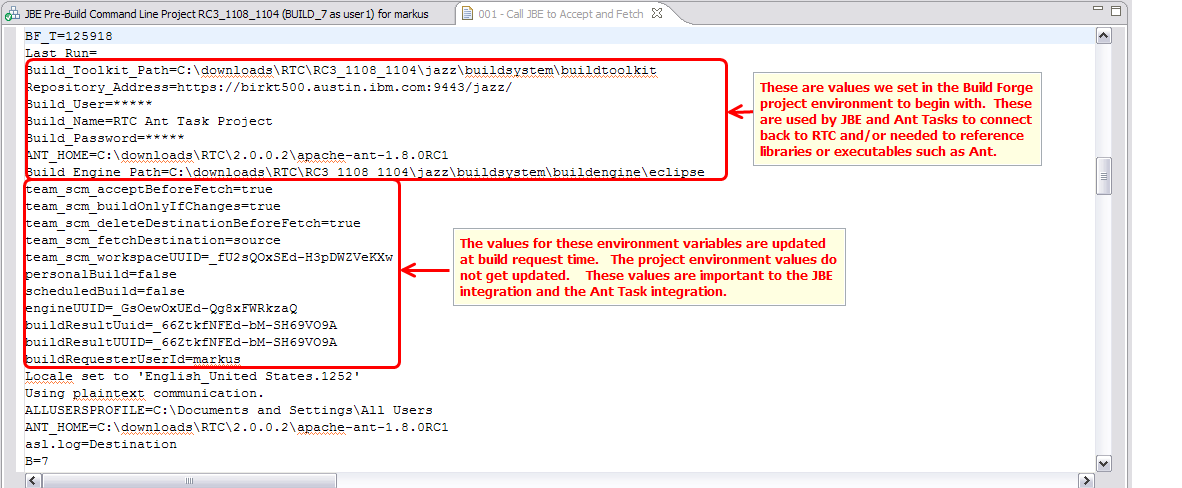
There are enhancements in the property handling between a Build Forge environment and the RTC properties of a build engine and/or build definition. To improve the integration, there are some important RTC property values that get automatically populated in the Build Forge build environment for every build request. These properties help the integration by having some of the required parameters be readily consumed by the Build Toolkit’s Jazz Build Engine or Ant Tasks when run from Build Forge adapters or steps. Some of the properties that get automatically set in the Build Forge environment for each build request include:
- buildResultUUID– This is a very important property that allows Build Toolkit utilities (JBE and Ant Tasks) called from a Build Forge job to link artifacts back to the RTC build result for each build request.
- engineUUID– This property determines the engine unique ID for the engine that is executing the request. This is needed as a parameter to JBE when using it run RTC participants configured in a build definition.
- buildRequesterUserId – This property is set in the Build Forge environment with the RTC identity of the user that requested the build. This is mostly for audit purposes and is not used by JBE or Ant Tasks.
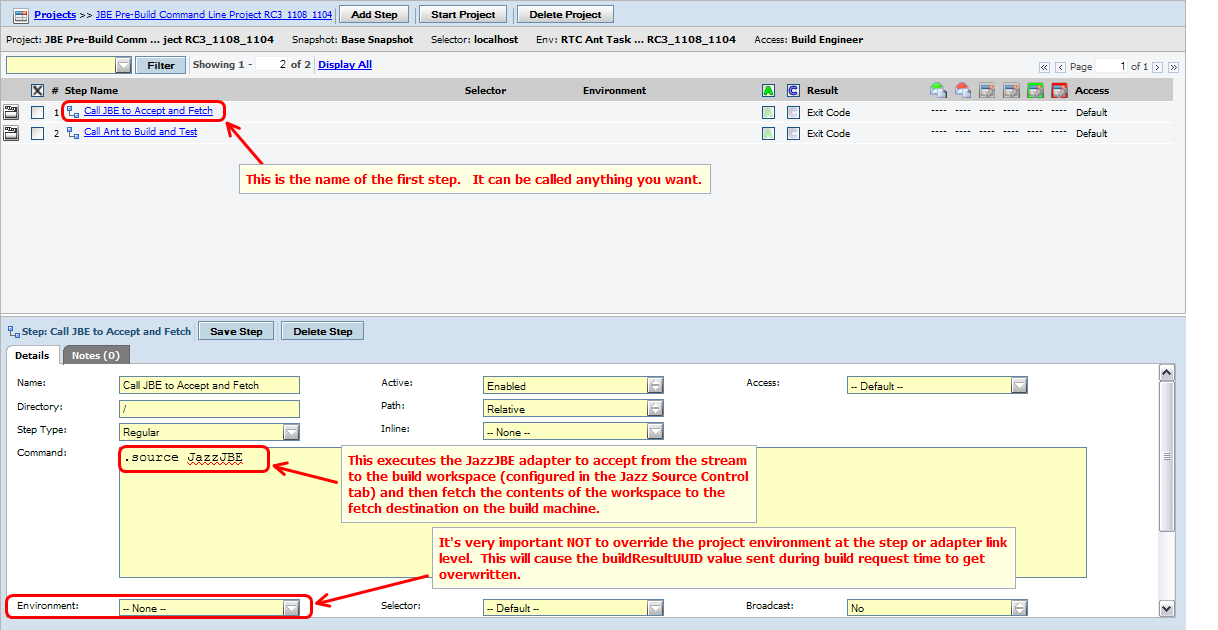
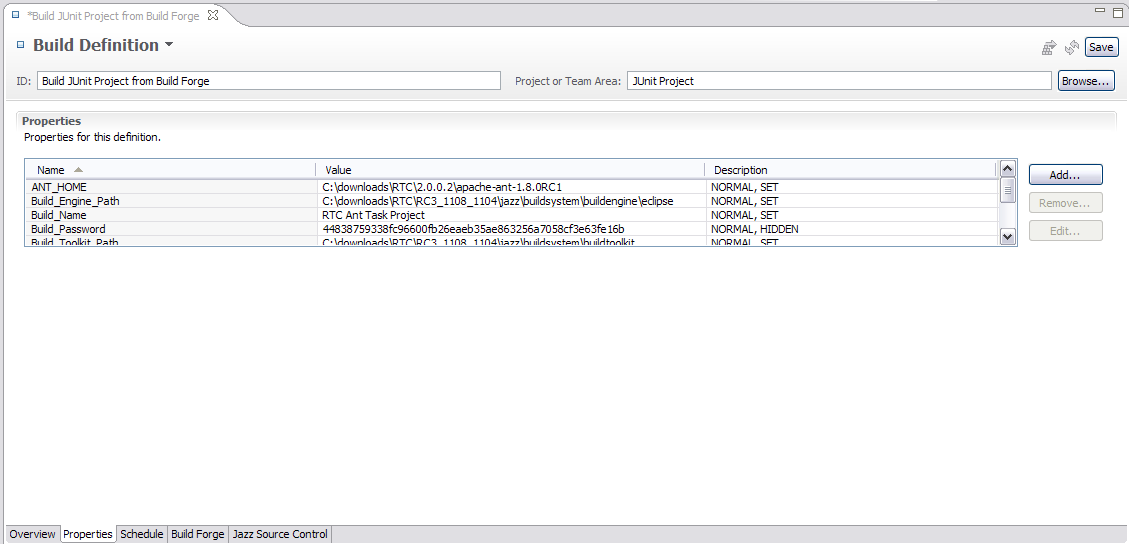
When a Build Forge project is selected from the RTC build definition, the Build Forge project environment (properties and values) is set in the build definition Properties tab, automatically. Any Build Forge project that will be used by RTC must have a Project environment selected in Build Forge to use any advanced integration capabilities. Additionally, any Build Forge project that expects to run JBE or Ant Tasks from an adapter or step, must not override the environment from the adapter link or step as that will unset the buildResultUUID and engineUUID properties specified during the build request back to their default values.
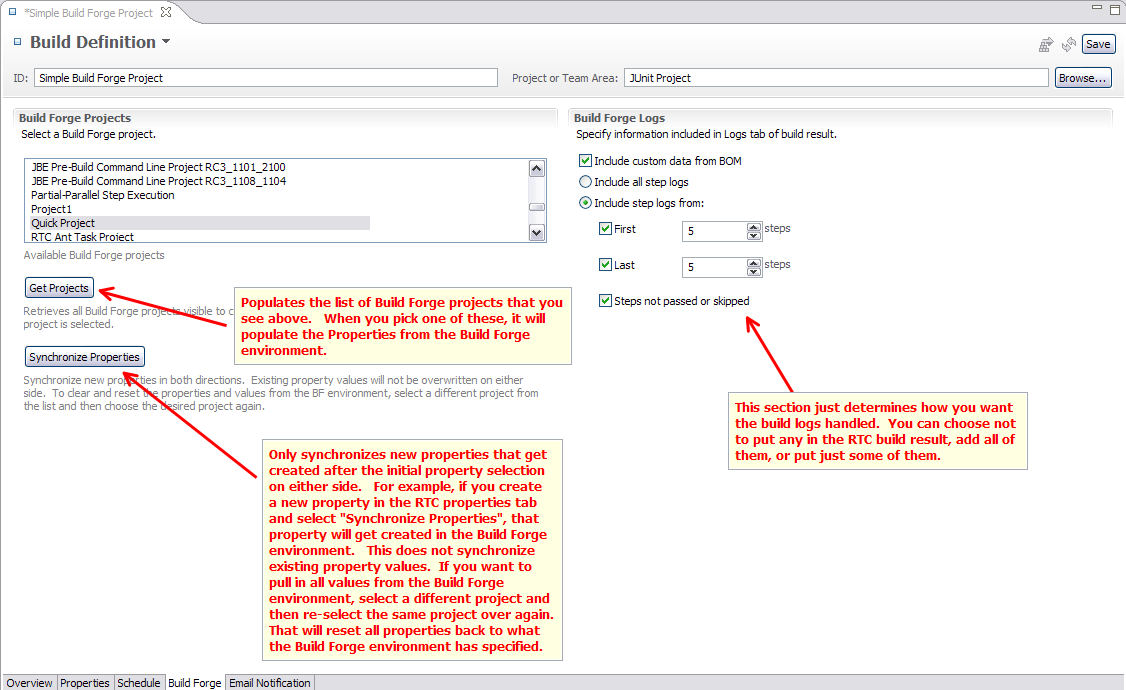
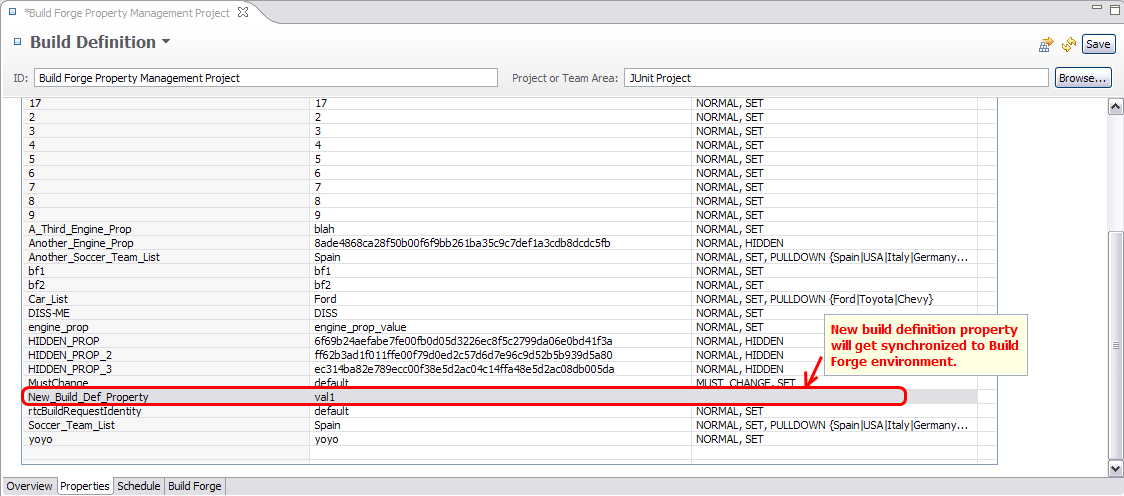
After the initial population of properties from the project selection, you can add new properties to either the Build Forge project environment or the RTC properties tab and then synchronize the new properties in both directions by seleciting Synchronize Properties from the Build Forge tab in the RTC build definition. It’s important to note that the values of existing properties will not synchronize during this action, only new properties that don’t exist on either side will get synchronized in both directions.
-
Build Engine Improvements
Previously, there was one Build Forge engine in the entire RTC instance called “RationalBuildForgeConnector”. This engine was just a marker for Build Forge build definitions to be queried by the Build Forge server-side plugin. The Build Forge service layer connection information was located in the Build Forge build definition. This meant you had to specify the connection information every time you configured a new build definition.
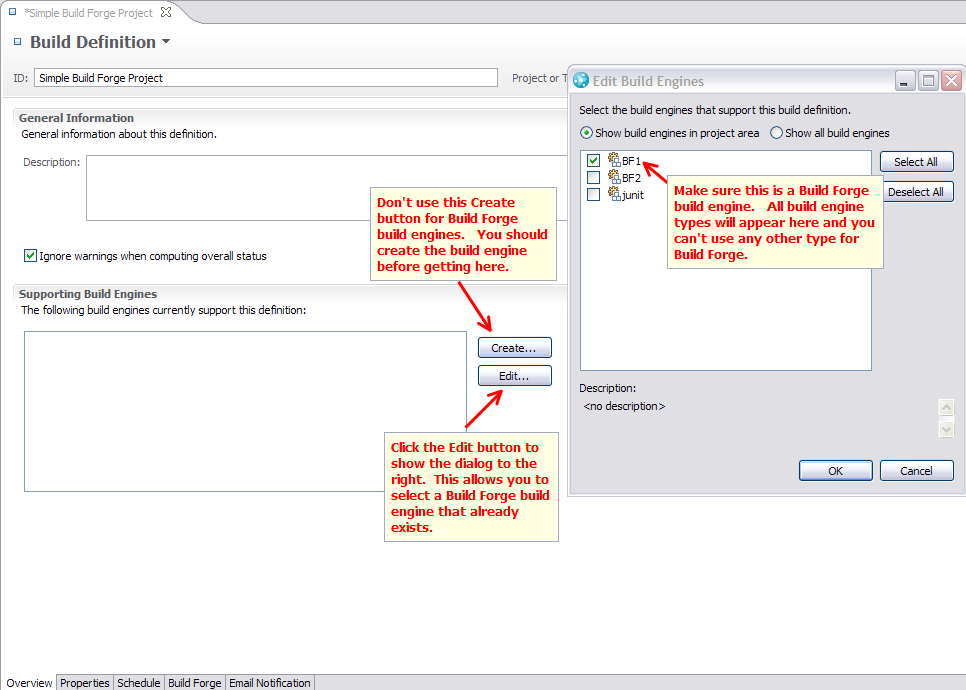
RTC 3.0 changes the contents and organization of build engines. The Build Forge build engine has been decoupled from the build definition. The connection information to Build Forge, including host, port, connect securely, user ID and password, has been moved into the build engine configuration. If you only use a single Build Forge console and always use the same dedicated Build Forge user, you only have to enter this information in one build engine configuration. When you create a new build definition, simply associate the same build engine each time and you can connect to Build Forge when specifying Get Projects from the build definition.
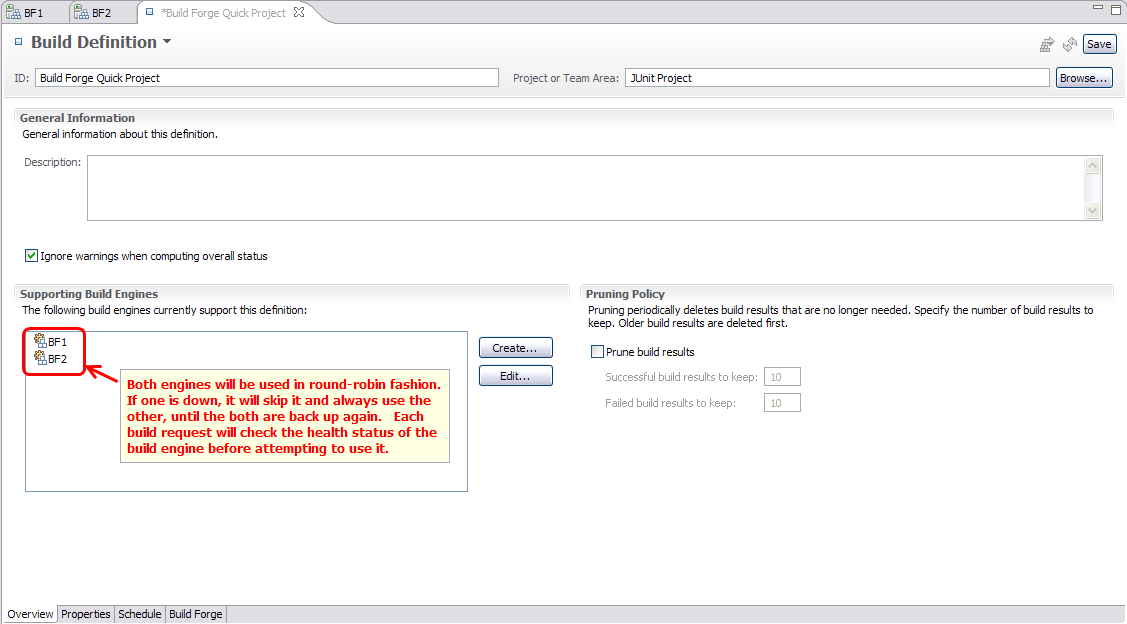
You may also associate more than one Build Forge build engine to a specific build definition to support a clustered Build Forge setup (multiple Build Forge installations pointing to the same database). This helps spread the work across multiple Build Forge service layers with round-robin distribution of builds and allows for fail-over in case one of the consoles is down for service.
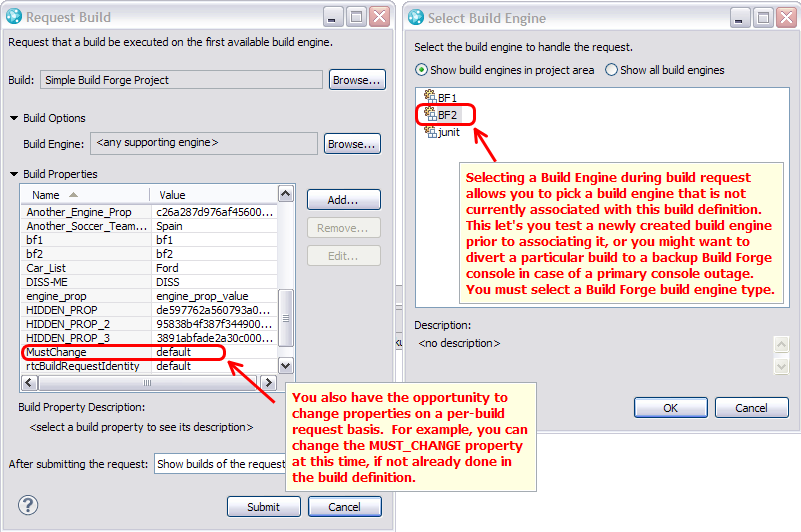
Finally, during a build request you can select a specific Build Forge build engine which to run a request. This does not have to be one of the build engines currently associated with the build definition. You might have setup a new clustered Build Forge console and want to test it. This is a way to select the new engine and run a build against before making the association with the build definition.
-
Source Control Integration Improvements
In RTC 3.0, the Jazz Source Control participant can be optionally selected for use in the Build Forge build definition. By choosing this participant, it reduces manual configuration considerably on the Build Forge side and allows JBE to be used for the accept/fetch phase instead of using the Ant Tasks. Once you configure the Jazz Source Control tab in the RTC build definition, you can run a JazzJBE adapter on the Build Forge side to connect back and retrieve this configuration information to perform the source control accept and fetch operations. The only information to configure on the Build Forge side is the RTC repository address, build workspace user id and password, and local path to the Jazz build engine (jbe.exe). Details of how to configure this will be discussed in the scenarios below.
Continuous integration can be setup by enabling the schedule in the RTC build definition with the Jazz Source Control configuration set to Build only when changes are accepted in the build workspace from the stream. Build Forge understands JBE’s return codes for determining when there were no accepted changes (do nothing and clean up), when there were accepted changes (fetch source and start building) or when an error occurred (fail the build).
Additionally, the integration with the Jazz Source Control tab allows you to run personal builds. In the Build Request Dialog, you can select Personal Build and override the default workspace with your own workspace where changes have been made but not delivered. The benefit of doing this is to check-in changes, run a personal build to ensure there’s no build or unit test breakage, and if healthy, deliver your changes and run a production build using the default build workspace.
Build Agent Integration
A new build engine type has been added to RTC Team Build called Build Agent. This allows you to setup a build engine which connects directly to a Rational Build Forge Agent, which you may already have installed on your build machines. You can configure a Command Line build definition that allows you to submit commands directly to the Build Forge agent without needing the Build Forge console installed. For simple scenarios, such as extracting source and building a single Ant or Maven script, this may be the way to go. There’s also a broadcast capability that enables some deployment scenarios where a single build definition can run a command against multiple agents with one request. Currently, the Build Agent cannot be associated with most of the build definitions that JBE can be configured for. However, the Build Agent can be used for the flexible Command Line build definition and is also used extensively for enterprise (iSeries and zSeries) build configurations.-
Installation
The Build Agent integration is also completely integrated in the runtime and installed out-of-the-box. You don’t have to do anything to have this available for you to configure. The Build Agent build engine can connect with most versions of the Rational Build Agent from version 7.02 forward. If you want SSL support, you must use Build Agent v7.1 or later. When using the job monitor function for the z/OS platform, you will need to use Build Agent v7.1.2.
Some of the Rational Build Agents are included with the RTC Build Toolkit in the jazz/buildsystem/buildagent directory. If you cannot find the Build Agent platform you are looking for in the Build Toolkit, you can download any Agents from the Build Forge 7.1.2 Download Page, including the source package for building an agent on any platform.
-
Environment Property Handling
Property handling in the Build Agent is fairly simple. You can set properties in the build engine or build definition and they will be set in the OS environment on the Agent where the build is run. There are some specific properties that get set automatically in the Agent’s environment for every build request. These properties help the integration by allowing necessary information be consumed by the Build Toolkit Jazz Build Engine or Ant Tasks, including buildResultUUID and engineUUID.
You can parameterize your commands in the build definition so that the properties defined will get substituted prior to sending the command to the agent using the properties in the build engine or build definition. For example, if you specify ${propertyName} in your command, and the propertyName exists in the build engine or build definition properties, it will get substituted before being sent to the agent. To have a property expanded on the Build Agent, you should use the %propertyName% syntax for Windows agents and $propertyName syntax for Unix/Linux agents.
-
Build Engine Features
The build engine is created separately from the build definition, as described above in the Build Forge integration. For the Build Agent integration, it’s even more important that this capability exists. You can create a build engine for each agent machine that exists in your environment and can pool the engines to service requests for a particular build definition so that you can have better round-robin build distribution, fail-over capabilities, and the ability to broadcast requests to all of the build engines (agent machines) associated with a build definition at one time. When you request a build, you have the option to select a specific build engine (which represents a build machine) to run the build against, overriding the list of build engines currently configured or the order of round-robin distribution of existing build engines.
-
Source Control Integration
When creating a Build Agent build definition, the Jazz Source Control configuration can be optionally selected. You configure it the same way you would with any other build definition, with the exception that JBE will get invoked automatically on the Agent when a build request is run. This means you have to setup JBE on the agent and you have to setup properties that indicate where JBE is located and how to connect and authenticate back to RTC from the Agent. The configuration is discussed in more details in a scenario below.
Build Forge Scenarios
The following sections describe a scenario and then show step-by-step instructions for setting up that scenario. One scenario may be a portion of an overall scenario, so some of these might be put together to form larger scenarios.Scenario Prerequisites
- You need to have an RTC 3.0 server installed. You should configure an adminstrative ID with at least a Developer client access license.
- You need to have an RTC 3.0 Eclipse client installed. If you want to follow along with the scenarios, you will need to install the Example RTC project in Eclipse to create a default Project Area, Users, Source Control components, Repository Workspaces, etc. Once you complete installing the Example project, you need to grant Markus Kent and Bill Cassavelli (both users created with the example) a Developer Client Access License.
- You need to have a Build Forge 7.1.1.3 or later server installed. We recommend installing Build Forge 7.1.2 which includes the latest JazzJBE adapter that will be used in scenarios below. You will need at least one Build Forge agent installed. The agent version can be 7.02 or later. We recommend installing a Build Forge 7.1.2 agent just to keep consistent with the level of Build Forge server you are running.
- You need to create one or more dedicated Build Forge users that can be configured in the RTC build definitions and have the necessary permissions and visibility to Projects that will be used in these examples. The scenarios will specify when a Build Forge project needs to be created to support the scenario and what steps are needed in the Project.
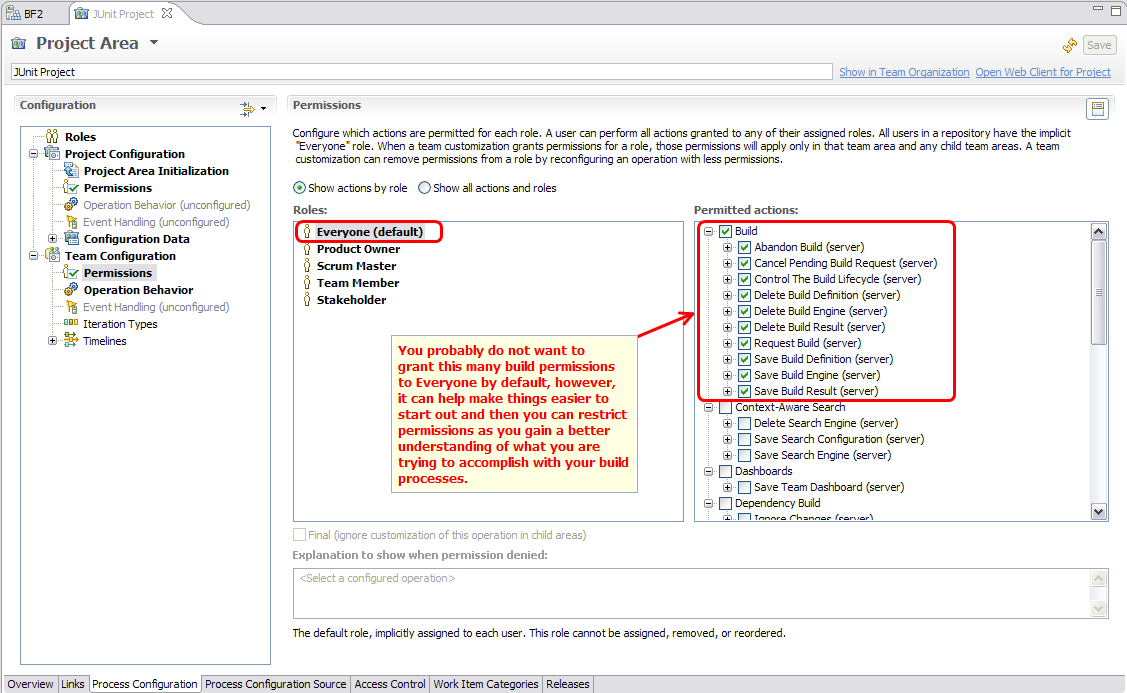
Granting build permissions to RTC user roles
This scenario discusses how to set the proper permissions for RTC users who will work on creating build engines and build definitions in RTC Team Build. This is a prerequisite to the rest of the scenarios described below.
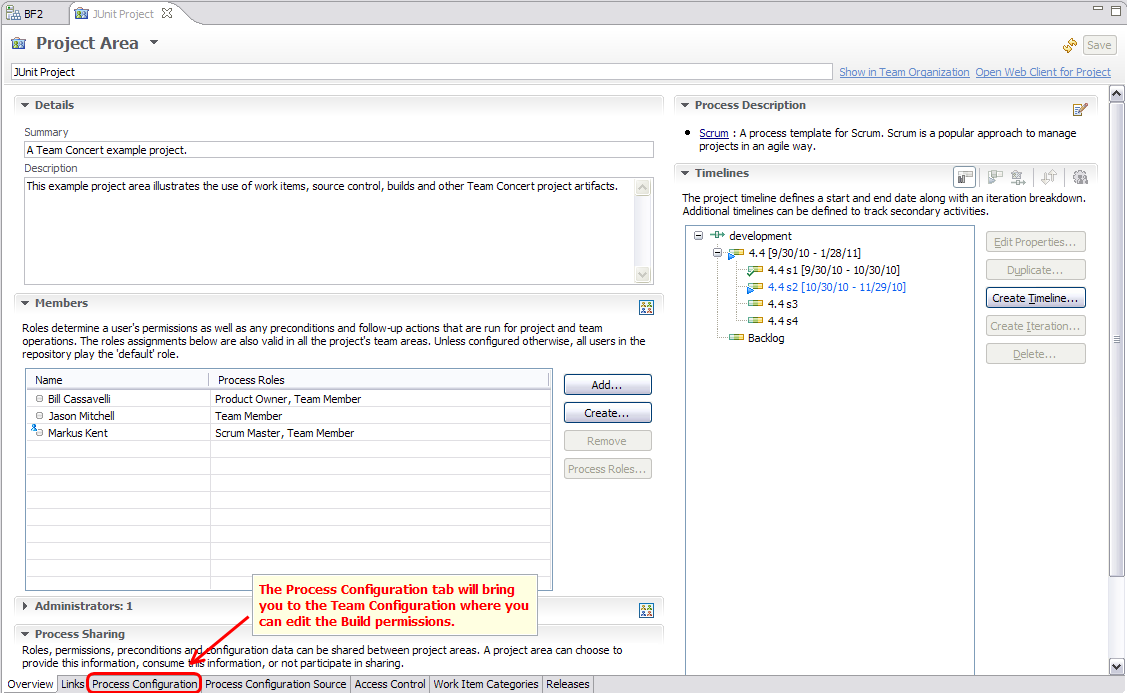
1. From the Team Artifacts view of the Eclipse client, right click on your Project Area and select Open. This will bring you to the following Project Area editor. Click on the Process Configuration tab so that you can get to the Team Configuration and edit the Build permitted actions.
Configuring a Rational Build Forge build engine
This scenario talks about the information needed to setup an RTC Build Engine to communicate with Build Forge. This includes host and port information, credentials, and setting up a secure connection.
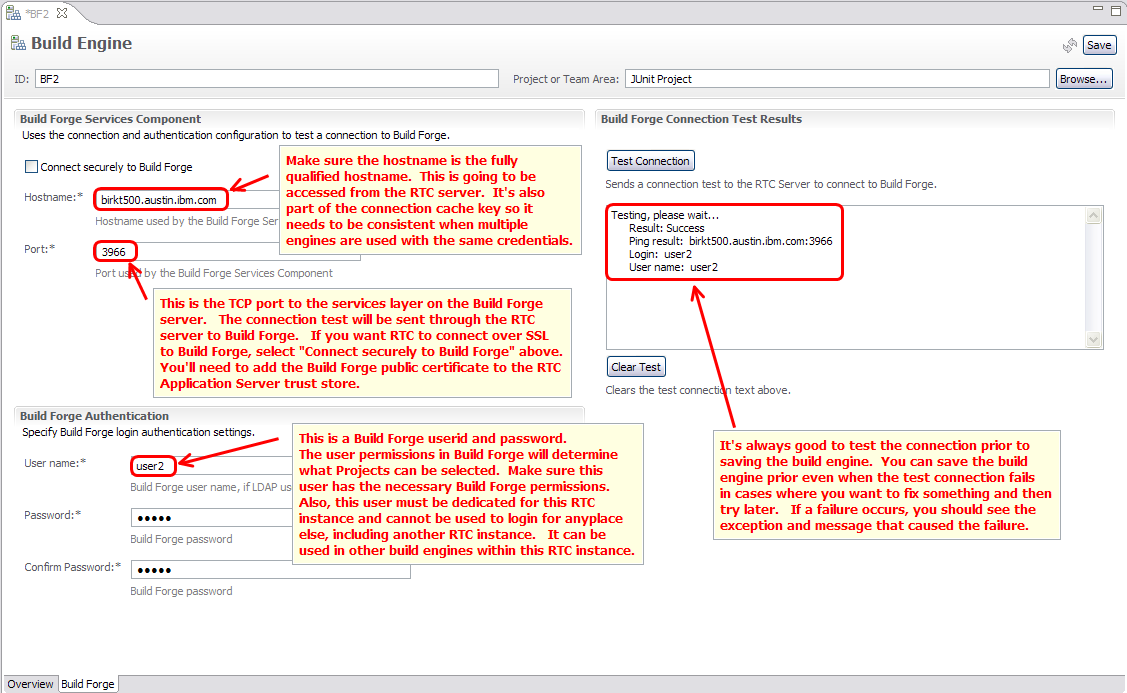
| Tip: A Build Forge user configured in a specific RTC instance should not be used anywhere else to avoid session conflicts. Session conflicts will show up on the Build Forge server as authentication errors that occur about every 15 seconds. You can use the same Build Forge user in multiple engines within the same RTC instance (server), but to do so you have to make sure the hostname is entered consistently to avoid another connection attempt from the RTC server to Build Forge. For example, you don’t want to enter the hostname for one build engine as “host” and then another build engine as “host.domain”, even if both will successfully connect to the Build Forge server. |
3. Go to the Overview tab if you need to configure any build properties. This is typically not necessary for Build Forge build engines since you are connecting to the Build Forge console, not the Build Agent machines directly.
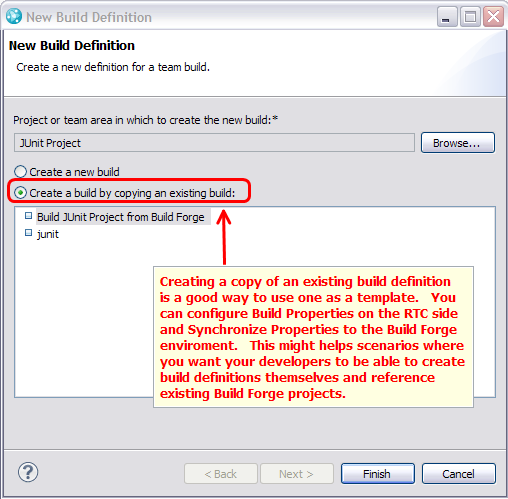
Configuring a simple Build Forge project build definition
This scenario discusses how to associate a Build Forge build definition with a Build Forge engine, get a list of Projects from Build Forge and what happens when you select one for use. It will also discuss how to request a build and the flow of a build request to a Build Forge job and back into the RTC build result.| Tip: Always create a Build Forge build engine prior to creating a Build Forge build definition. Once you start creating a build definition, if you do not have a build engine to associate with it, you have to cancel out and start over after creating the build engine. In RTC 3.0, there is no default Build Forge build engine, so you must create at least one that will connect to the Build Forge services layer prior to creating a Build Forge build definition. |

6. Next, go to the Build Forge tab to select a Build Forge project. You will only see those projects which the configured build engine user has permissions to see. As soon as you select a project, the Properties tab will get populated with all of the properties specified in the Build Forge project’s project-level environment. Once the selection has been made, you can change values in the Properties tab to override those in the project environment. You should now be able to click Save to save the build definition.
8. After you Save the build definition, you’ll see Simple Build Forge Project appear under Builds in the Project Area. If you right click on the build definition name, you can select Request Build and you will see the following dialog appear.
9. Once you click Submit on the dialog above, a build request will appear in the Builds queue as you can see below.

Using Jazz Source Control in a Build Forge project using the JazzJBE.xml adapter
This scenario discusses how to integrate the Jazz Source Control configuration, which is optionally selected in the Build Forge build definition configuration, into a Build Forge project. The integration here uses the JazzJBE.xml source adapter which can be called as an adapter link or via the .source command in a step. This scenario has step-by-step instructions for getting the source code accepted from a stream to your build workspace and then fetched from your build workspace to the build agent machine for use in later steps. This scenario discusses how to setup a continuous integration configuration. This scenario also discusses how to first perform a personal build against a user’s workspace to verify changes, and then build using the build workspace once the user’s changes have been delivered.Configuring the Build Forge project (all steps done in Build Forge)
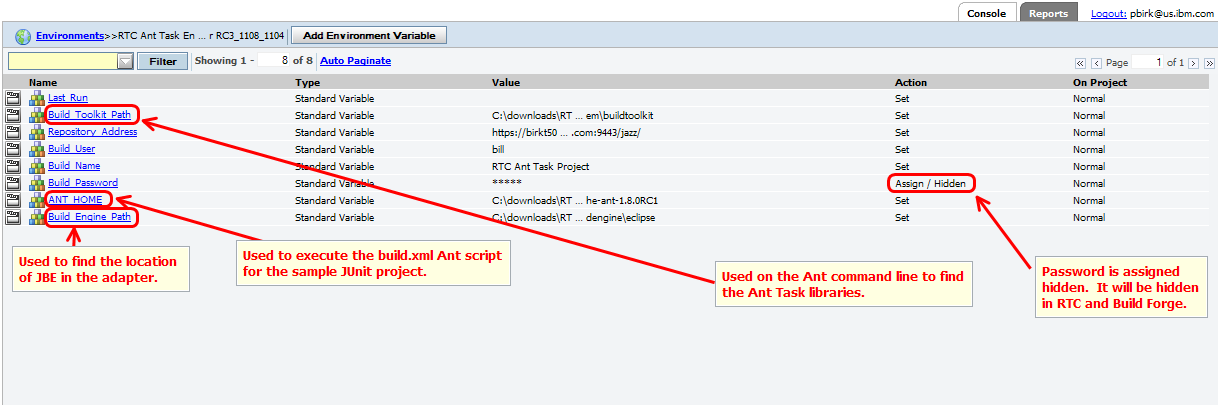
| Property Name | Default Value | Description |
| Last_Run | <empty> | This is used to set the time of the last run. |
| Build_Toolkit_Path | <rtc_install_path>/jazz/buildsystem/buildtoolkit | Used to reference the location of the build toolkit. This is used with the Ant -lib parameter to reference the Ant Task libraries. |
| Repository_Address | https://<hostname>:9443/jazz | Used to connect to RTC from JBE and Ant Tasks |
| Build_User | bill | The username of the repository user that owns the build workspace. |
| Build_Password | bill | The password of the repository user that owns the build workspace. |
| Build_Name | RTC Ant Task Project | Name you want the project to be called in the JUnit Example project. |
| ANT_HOME | <ant_install_path> | Location of Ant 1.8 or later installation. |
| Build_Engine_Path | <rtc_install_path>/jazz/buildsystem/buildengine/eclipse | Location where jbe.exe exists. This is used by the JazzJBE adapter. |
| Current_Date | .date %d-%m-%y.%H:%M:%S | Sets the current timestamp to update Last_Run. |
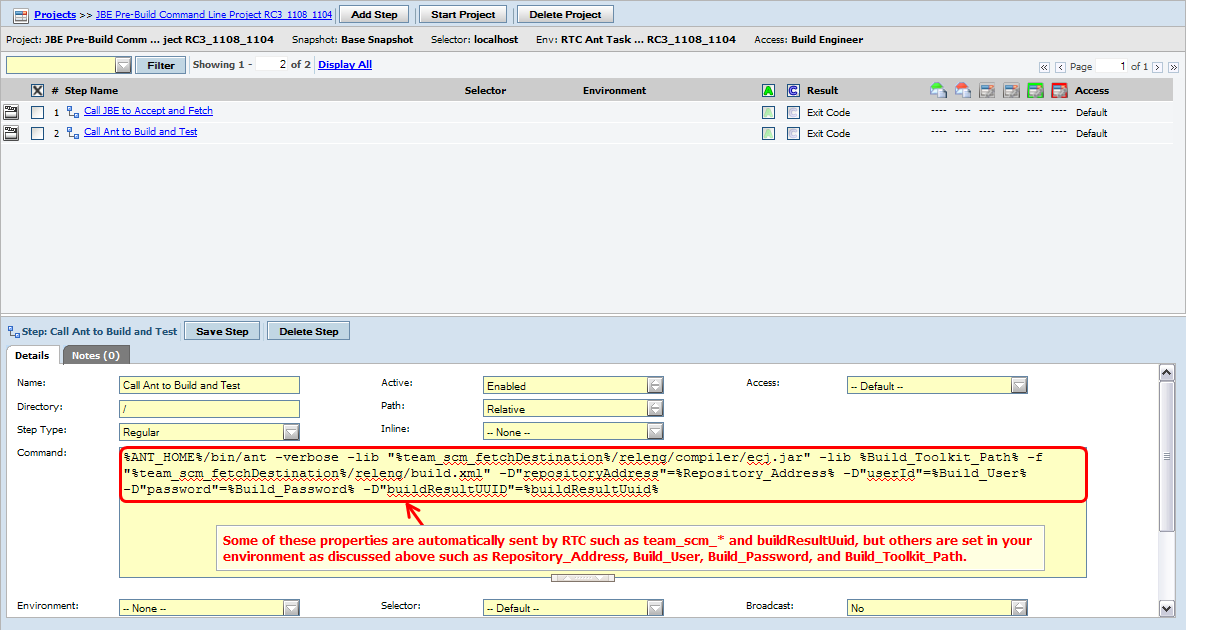
Variable substitution works differently between Windows and Linux, so this step has two different flavors depending on the OS you are running on.
For Windows, the step looks like the following:
%ANT_HOME%/bin/ant -verbose -lib "%team_scm_fetchDestination%/releng/compiler/ecj.jar" -lib %Build_Toolkit_Path%
-f "%team_scm_fetchDestination%/releng/build.xml" -D"repositoryAddress"=%Repository_Address% -D"userId"=%Build_User%
-D"password"=%Build_Password% -D"buildResultUUID"=%buildResultUuid%
For Unix/Linux, the step looks like the following:
$ANT_HOME/bin/ant -verbose -lib "$team_scm_fetchDestination/releng/compiler/ecj.jar" -lib $Build_Toolkit_Path
-f "$team_scm_fetchDestination/releng/build.xml" -D"repositoryAddress"=$Repository_Address -D"userId"=$Build_User
-D"password"=$Build_Password -D"buildResultUUID"=$buildResultUuid
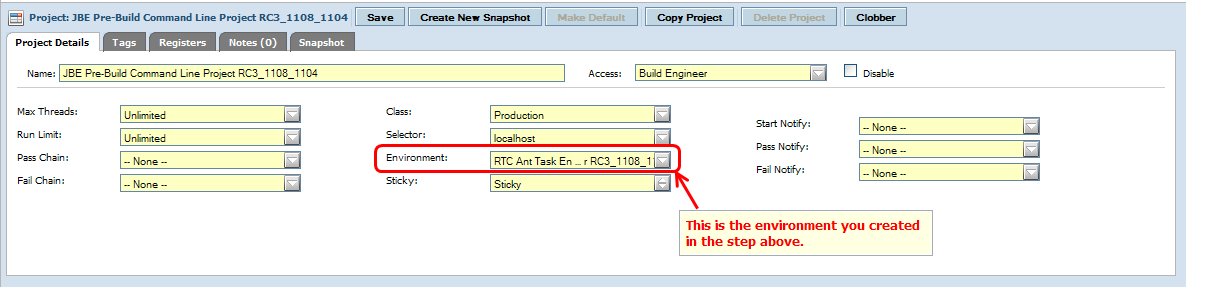
Configuring RTC to call the Build Forge project (all steps done in RTC)
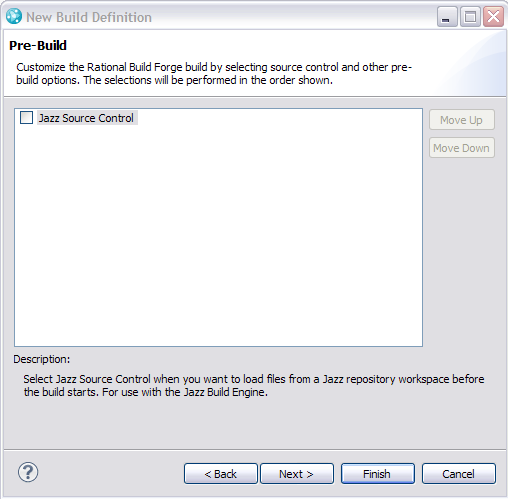
Once you have the Build Forge project configured. You can configure the RTC build definition to reference it. Refer to the previous scenario for steps on setting up a Build Forge engine and associating that with the Build Forge definition. Make sure you select Jazz Source Control as an optional Pre-Build participant. Once you do this, you can select Get Projects from the Build Forge tab and select the project you created above.

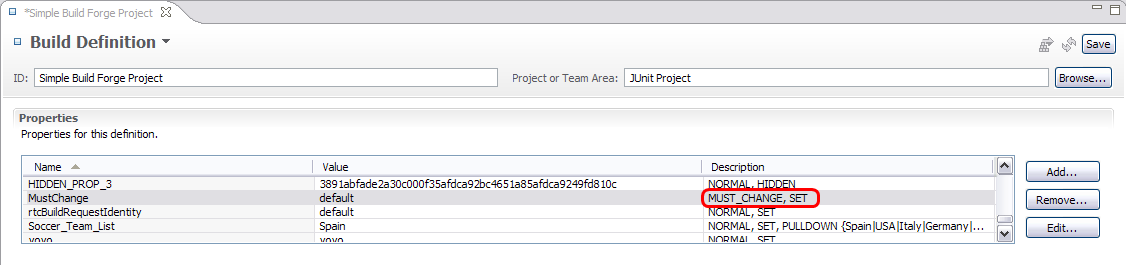
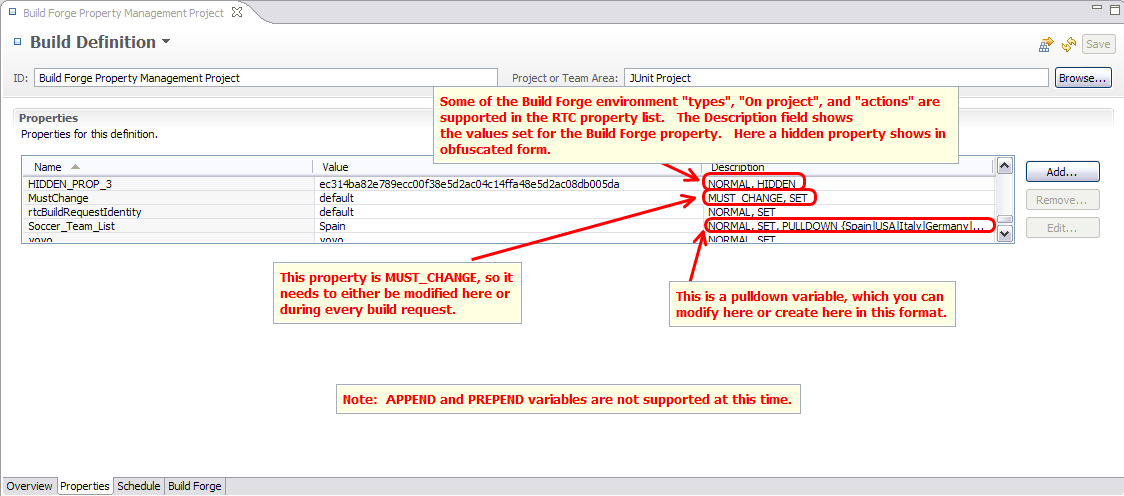
3. Review the Properties tab and make any updates to the values where you want them to differ from what’s specified in the Build Forge environment. The values you specify will get sent back to override the values in the Build Forge build environment for each build request. You must make changes to any MUST_CHANGE or REQUIRED properties that need modification.

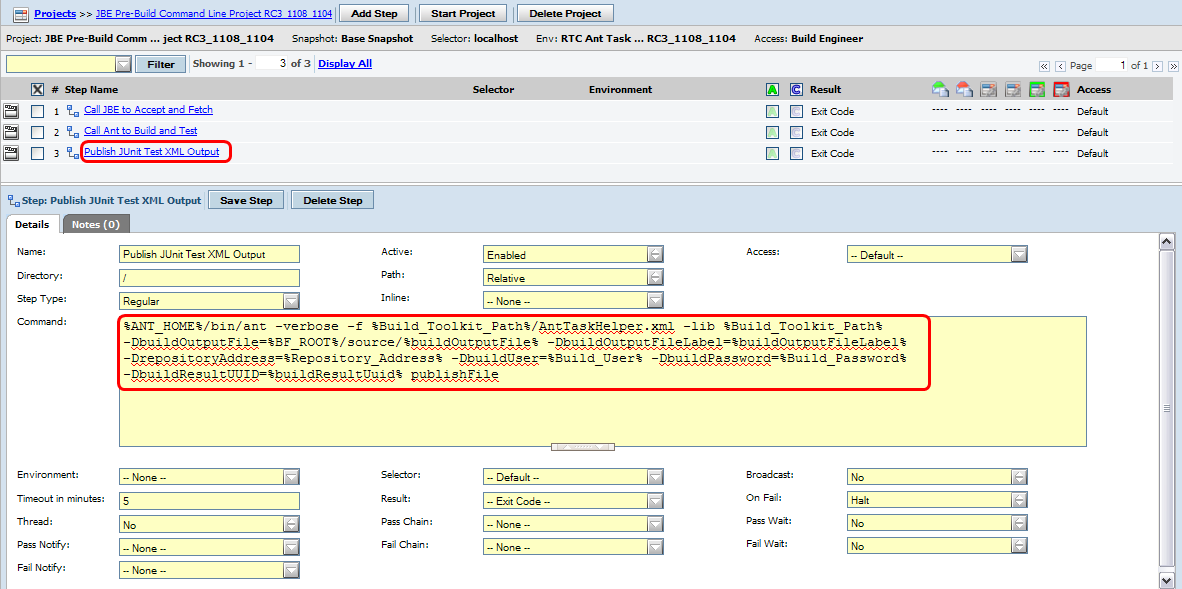
Using the Build Toolkit Ant Tasks from Build Forge to add artifacts to the RTC build result
This scenarios talks about how you can link artifacts back to the RTC build result using the Build Toolkit Ant Tasks. You’ll find that utilizing the Ant Tasks for adding contributions is simple and taking advantage of them can improve the overall end-user experience with the build result. This makes the RTC build result a one-stop shop for retrieving status and artifacts from your builds.We will extend the scenario above by adding another step to the project which will publish the raw JUnit XML file to the Downloads tab in the build result. This file is created in ${build_root}/source/test.results/junit.samples.AllTests.results.xml after running the JUnit tests. This just demonstrates one of the Ant Tasks you have at your disposal, but following this example will show you how to call any of them in a Build Forge step.
	<project name="AntTaskHelper" basedir=".">
	    <!-- project-specific variables -->
		<property name="buildUser" value="build" />
		<property name="buildPassword" value="build" />
		<property name="repositoryAddress" value="http://localhost:9443/jazz" />
		<property name="buildResultUUID" value="default" />
                <property name="buildOutputFile" value="test.results/junit.samples.AllTests.results.xml" />
                <property name="buildOutputFileLabel" value="JUnit Example JAR" />

        	<taskdef name="artifactFilePublisher" classname="com.ibm.team.build.ant.task.ArtifactFilePublisherTask" />

	    <target name="publishFile">
                <artifactFilePublisher repositoryAddress="${repositoryAddress}"
		                       userId="${buildUser}"
		                       password="${buildPassword}"
                                       verbose="true"
		                       buildResultUUID="${buildResultUUID}"
		                       filePath="${buildOutputFile}"
		                       label="${buildOutputFileLabel}"/>
            </target>
	</project>
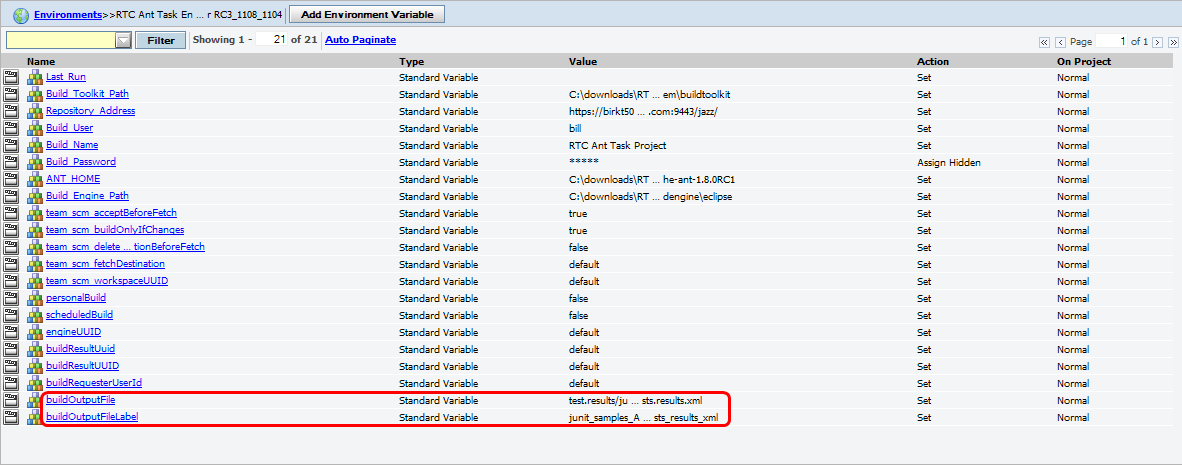
| Property Name | Default Value | Description |
| buildOutputFile | test.results/junit.samples.AllTests.results.xml | This is the relative path to the file we want to upload to the Downloads tab. |
| buildOutputFileLabel | junit_samples_AllTests_results_xml | This is the label of the file. |
%ANT_HOME%/bin/ant -verbose -f %Build_Toolkit_Path%/AntTaskHelper.xml -lib %Build_Toolkit_Path%
-DbuildOutputFile=%BF_ROOT%/source/%buildOutputFile% -DbuildOutputFileLabel=%buildOutputFileLabel%
-DrepositoryAddress=%Repository_Address% -DbuildUser=%Build_User% -DbuildPassword=%Build_Password%
-DbuildResultUUID=%buildResultUuid% publishFile
Tip: For variables on Windows, specify as %property%. However, for variables on Unix/Linux, specify as $property. To call the above command on Unix/Linux, the command would look like this:$ANT_HOME/bin/ant -verbose -f $Build_Toolkit_Path/AntTaskHelper.xml -lib $Build_Toolkit_Path |
Let’s break this Ant task call down into individual parameters:
- %ANT_HOME%/bin/ant – The fully-qualified path to the Ant executable.
- -f %Build_Toolkit_Path%/AntTaskHelper.xml – A reference to the Ant script we created above.
- -lib %Build_Toolkit_Path% – A reference to the libraries where the Build Toolkit Ant Tasks are located.
- -DbuildOutputFile=%BF_ROOT%/source/%buildOutputFile% – A fully-qualified path to the output file. Note that the %BF_ROOT% is a fully-qualified path to the build root directory. Then we append /source/ and then we append the value of the property buildOutputFile which is described above.
- -DbuildOutputFileLabel=%buildOutputFileLabel% – This is the name of the file we are uploading.
- -DrepositoryAddress=%Repository_Address% – This is the repository address used by the Ant task to connect back to RTC.
- -DbuildUser=%Build_User% – This is the repository user that owns the build workspace.
- -DbuildPassword=%Build_Password% – This is the repository user’s password that owns the build workspace.
- -DbuildResultUUID=%buildResultUuid% – This is the critical piece of information that helps the Ant task know which build result to upload to.
- publishFile – This is the Ant target we are calling in the AntTaskHelper.xml and is the last part of the command.
4. Finally, request a build from RTC to see if the JUnit XML file gets uploaded to the Downloads tab.
Configuring failover and round-robin distribution to redundant Build Forge consoles pointing to the same database
This scenarios talks about how to configure RTC build engines to take advantage of a clustered Build Forge environment. This involves setting up multiple Build Forge consoles referencing the same Build Forge database. The Build Forge installation guide has a section titled Configuring redundancy on page 84. This scenario complements the redundant configuration by creating an engine per redundant services layer component. You can then associate the redundant RTC build engines with a single RTC build definition. When a build is requested, if one of the Build Forge service layers is down, the RTC component will route the build to the other configured build engine to support failover to one of the redundant systems. Additionally, it will distribute the builds to all of the redundant service layers to share the workload in a round-robin fashion.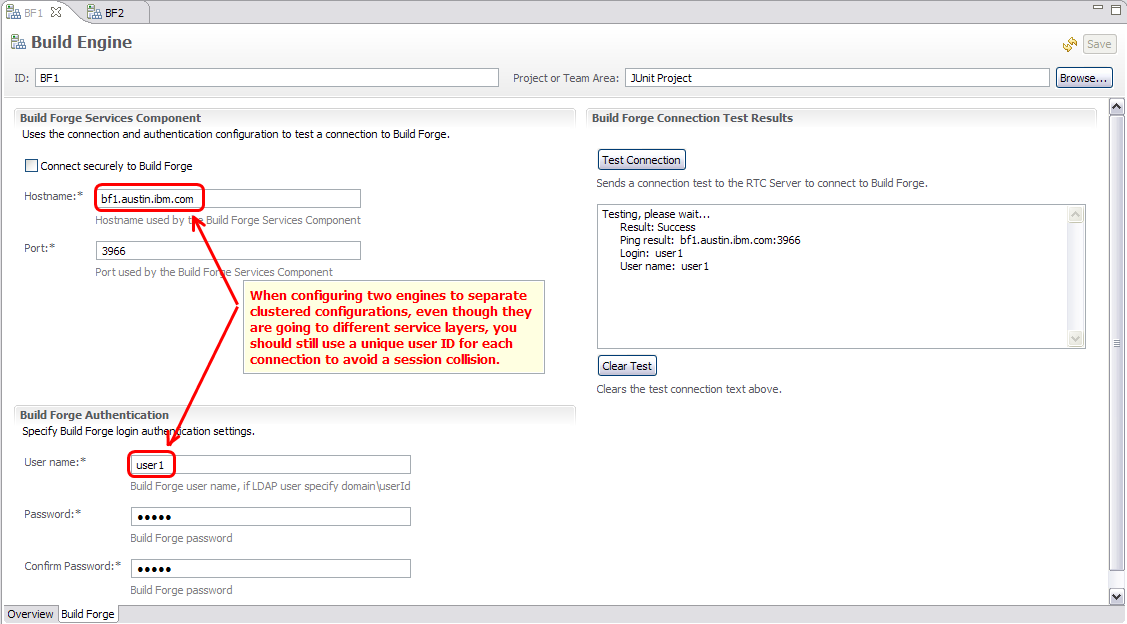
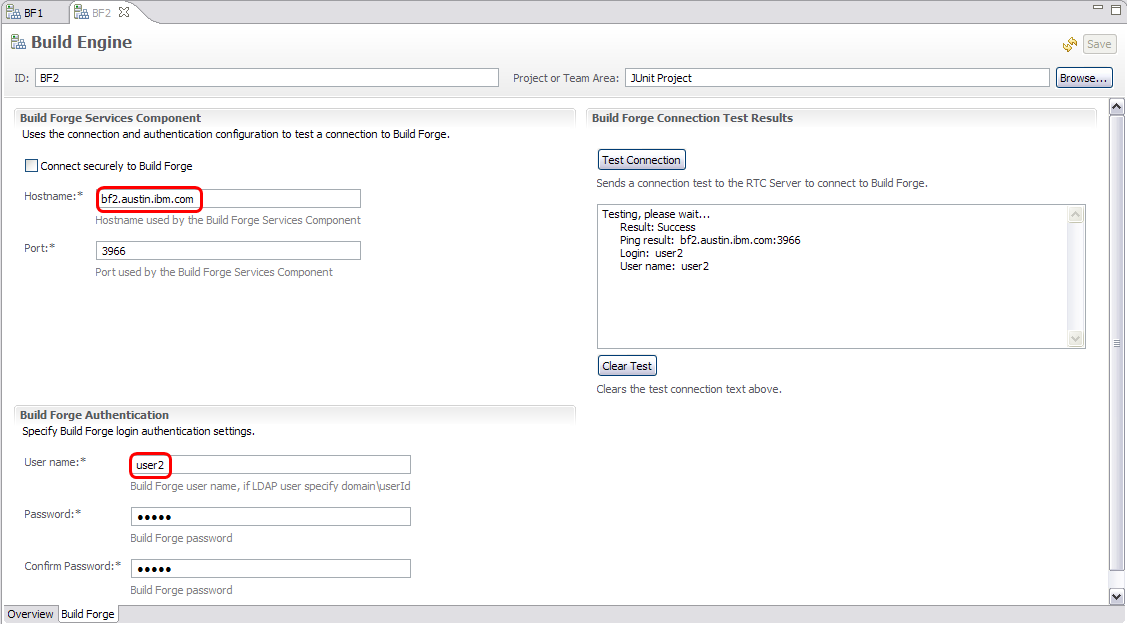
| Tip: Ensure both users have the same Build Forge permissions so that they have the same visibility and permissions to projects. This will avoid behavior differences that you might notice by using two different engines for the same build definition. |
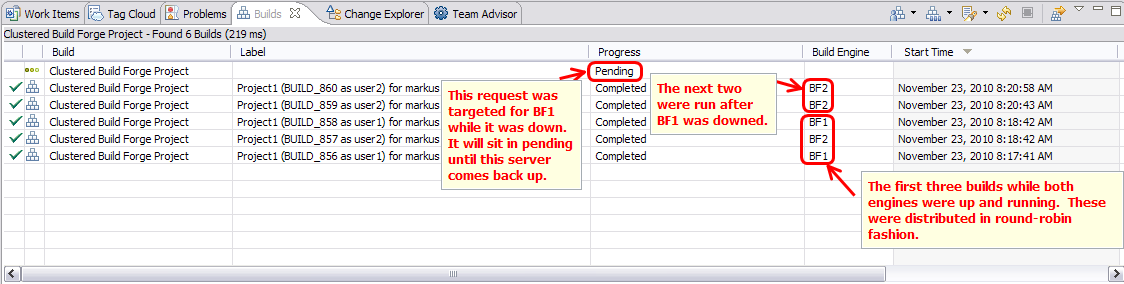
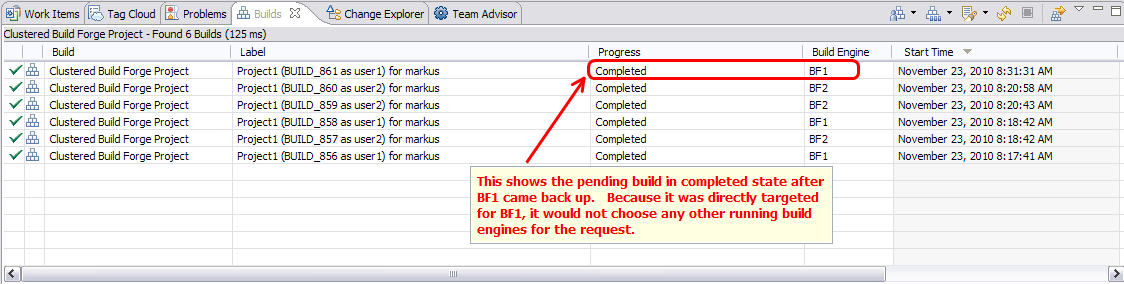
3. Now, by running some builds, we can see the behavior of the round-robin distribution support and failover support. We will first run three builds with both Build Forge servers running. Then we’ll take down server bf1.austin.ibm.com and continue running two more builds. The distribution should be something like BF1, BF2, BF1, BF2, BF2. It first alternates between BF1 and BF2 in sequence, and once it deteremines BF1 is down, it will always go to BF2. Finally, while BF1 is down, let’s target the build request to it directly and it should sit in pending state until BF1 comes back up.

Let’s look at the build queue after having done all of this.
Synchronizing properties between a Build Forge environment and the corresponding RTC build definition
This scenario discusses how to work with environment properties/values in Build Forge and RTC to accomplish your desired property management. Properties are used to hold configuration values that are needed for various purposes including connections, tool commands and parameters. You may want to copy an existing Build Definition which already contains properties and have those updated into the Build Forge environment. Or, you might want to create a new Build Definition and copy the existing Build Forge environment as a starting point. This scenario focuses on managing the properties and how you can control synchronizing properties and handling Build Forge value updates to be synchronized back to RTC properties. Some of the things covered by this scenario includes:- Initial population of Build Forge environment properties into an RTC build definition during project selection.
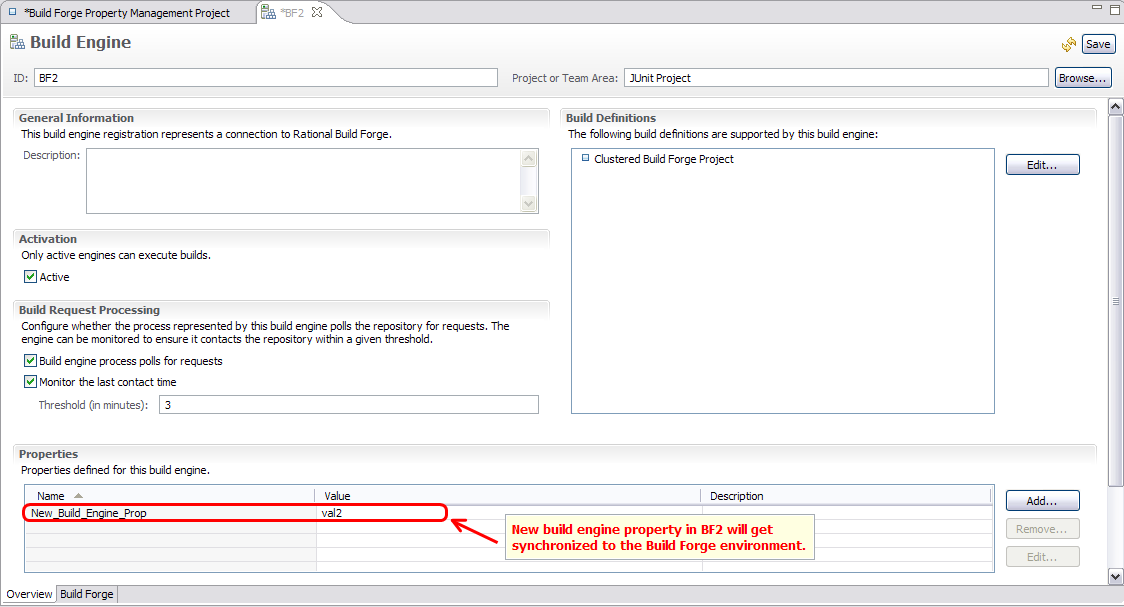
- Synchronizing new RTC build definition and build engine properties to the Build Forge environment.
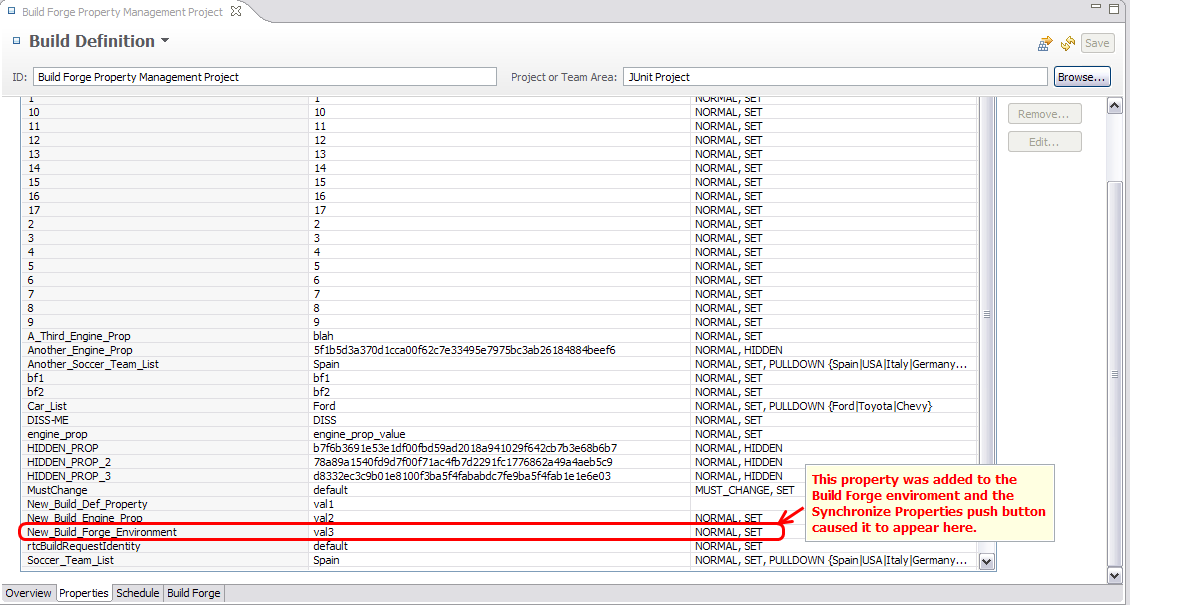
- Synchronizing new Build Forge environment properties to the RTC build definition properties.
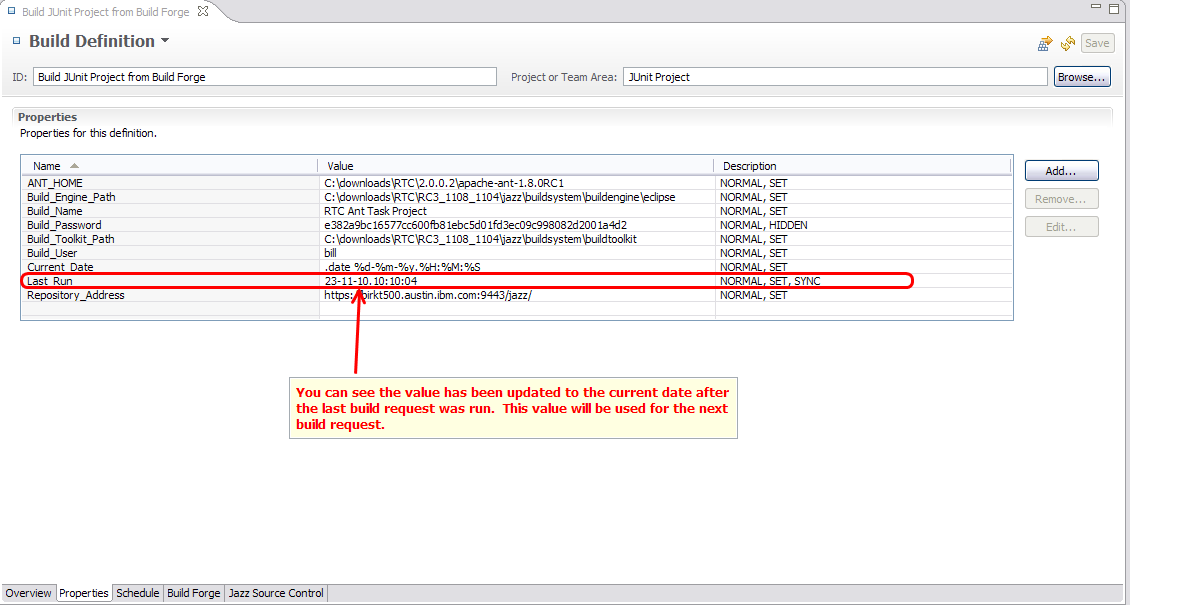
- Synchronizing a property value from Build Forge to RTC after each build request.
- Re-initializing the RTC properties and values based on the existing Build Forge environment again.
1. Initial population of Build Forge environment properties into an RTC build definition during project selection. This is done by simply selecting a project in the Build Forge tab of the build definition. You will notice that the Properties tab is populated based on the Build Forge project environment. You must have a Build Forge project environment to do any of the advanced integration capabilities. Also, you must not override the step environment if you want to use the buildResultUUID or any other RTC property for that step.

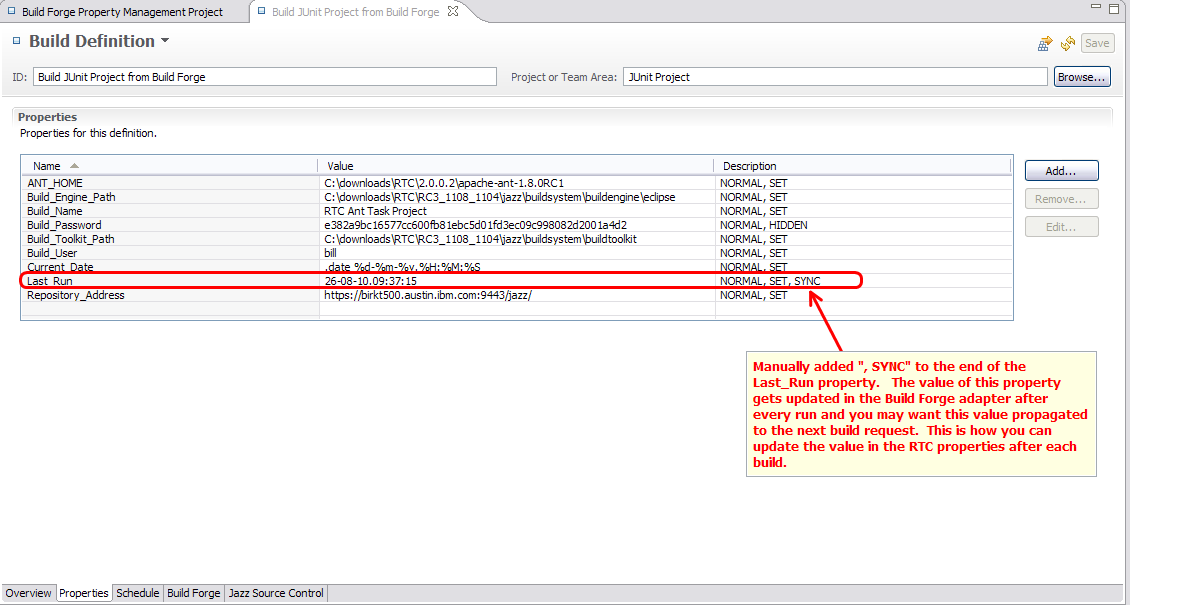
Now that the “,SYNC” has been set in the Property description, let’s run a build and see if the value gets updated in the build definition after the build request.
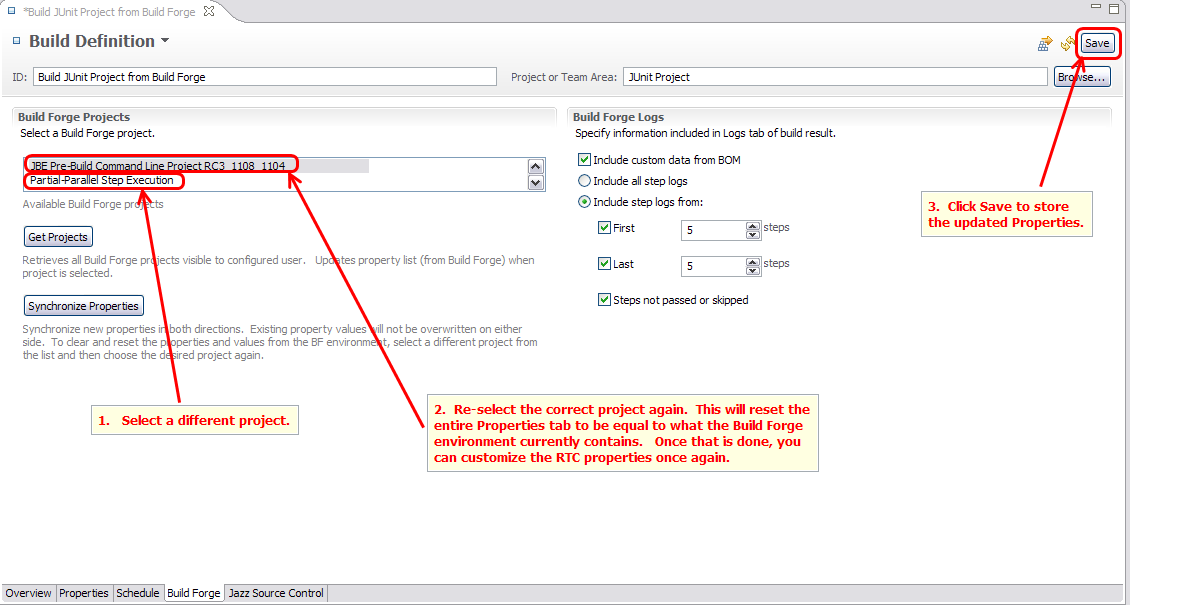
5. Re-initializing the RTC properties and values based on the existing Build Forge environment again. The only way to update RTC values based on those values set in the Build Forge environment, is to re-initialize the entire environment. This is done by re-selecting the Project again after selecting a different project from Get Projects in the Build Forge tab.
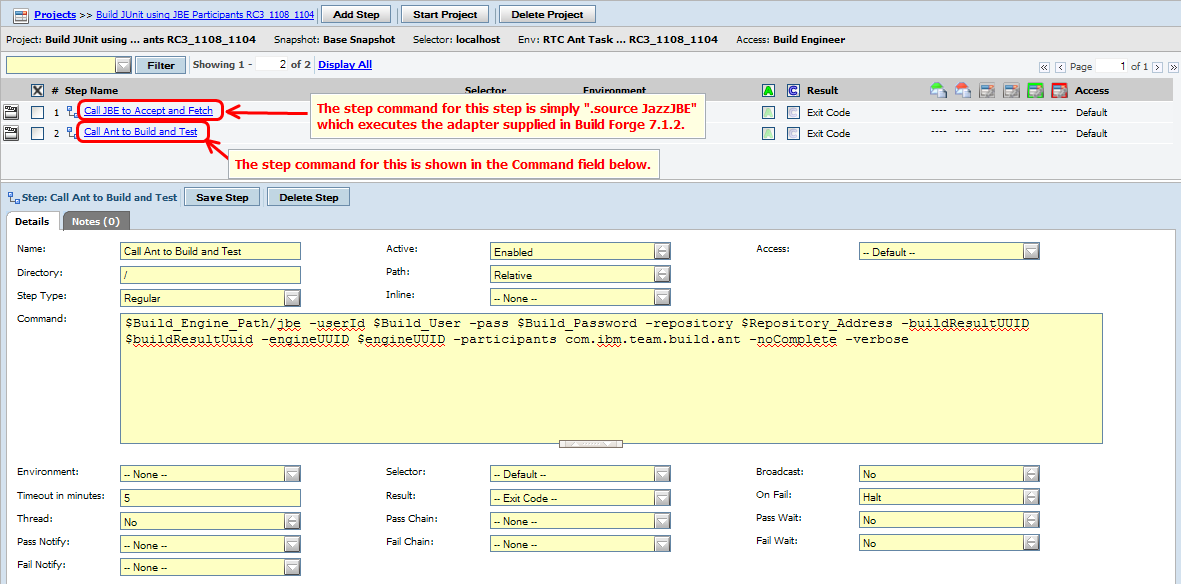
Building an existing JBE-based build definition from Build Forge
Every RTC build definition now has the ability to include, after the fact, a Build Forge participant. This means you can associate a Build Forge engine with the legacy Jazz Build Engine definition and configure a Build Forge project in the Build Forge tab that will run it. The Build Forge project will need to be configured to call JBE in a step for each participant within the build definition that you want it to invoke. JBE can be called the following way for various participants:
${Build_Engine_Path}/JBE -repository ${repository} -userId ${userId} -pass ${password}
-engineUUID ${engineUUID} -participants ${participant} -noComplete
where ${participant} can be one or more of the following (comma-delimited):
PRE_BUILD:
- com.ibm.team.build.jazzscm (Jazz Source Control)
BUILD:
- com.ibm.team.build.ant (Ant build)
- com.ibm.team.build.cmdline (Command Line build)
- com.ibm.team.build.maven (Maven build)
- com.ibm.team.build.msbuild (MS build)
POST_BUILD:
- com.ibm.team.build.jdt.publishing (Java Compile publishing)
- com.ibm.team.build.junit.publishing (JUnit Test publishing)
- com.ibm.team.build.mstest.config (MS Test publishing)
- com.ibm.team.build.nunit.config (NUnit Test publishing)
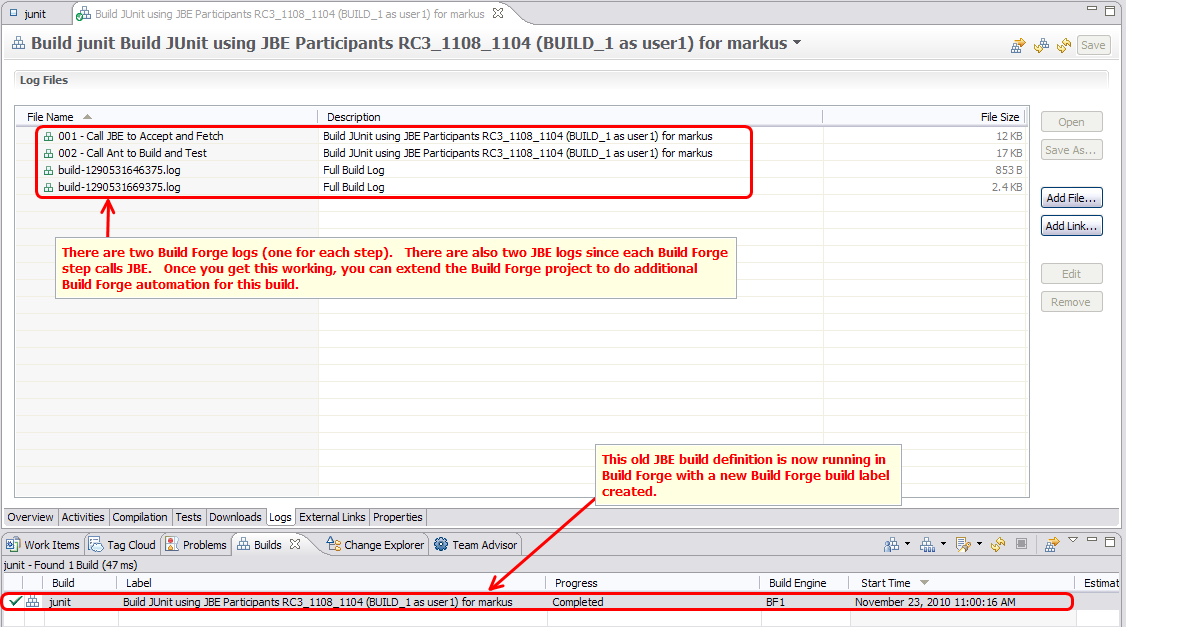
In Build Forge, you can configure a step to build the PRE_BUILD participant “com.ibm.team.build.jazzscm” using the JazzJBE.xml adapter that’s shipped with Build Forge 7.1.2 (and shown in a scenario above). This is done in an adapter so that you can easily create a continuous integration scenario. You can configure the BUILD participants in a Build Forge step by calling JBE as described above. You can then configure the POST_BUILD participants in a Build Forge step the same way. When you launch a build request from the build definition, it is no longer picked up by JBE directly, but is submitted to Build Forge as a Job there. Build Forge runs the configured project which will run the configured participants in the order you desire along with anything else you want the project to do. This is a great way to “migrate” from an RTC build using JBE to using Build Forge for all of your centrally managed builds.
Let’s start out with the standard “junit” build definition created by the RTC JUnit Example Project. We will convert this to a Build Forge build definition and then execute it from Build Forge by associating a Build Forge project setup to run each participant.
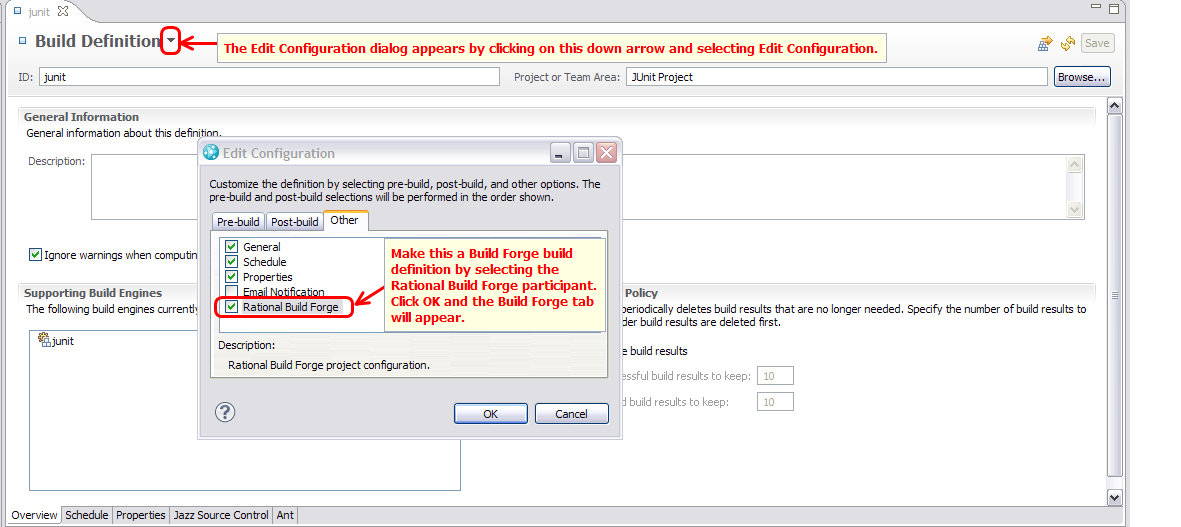
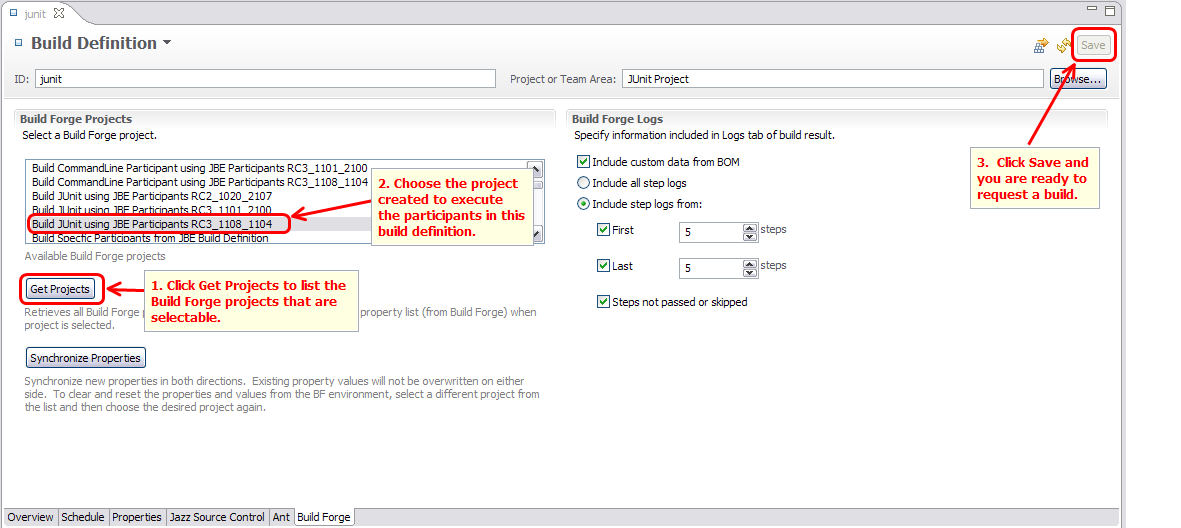
1. Add the Build Forge participant by opening the junit build definition, click on the down arrow at the top and select Edit Configuration. Then select Rational Build Forge as a participant. Click OK and the Build Forge tab will appear.
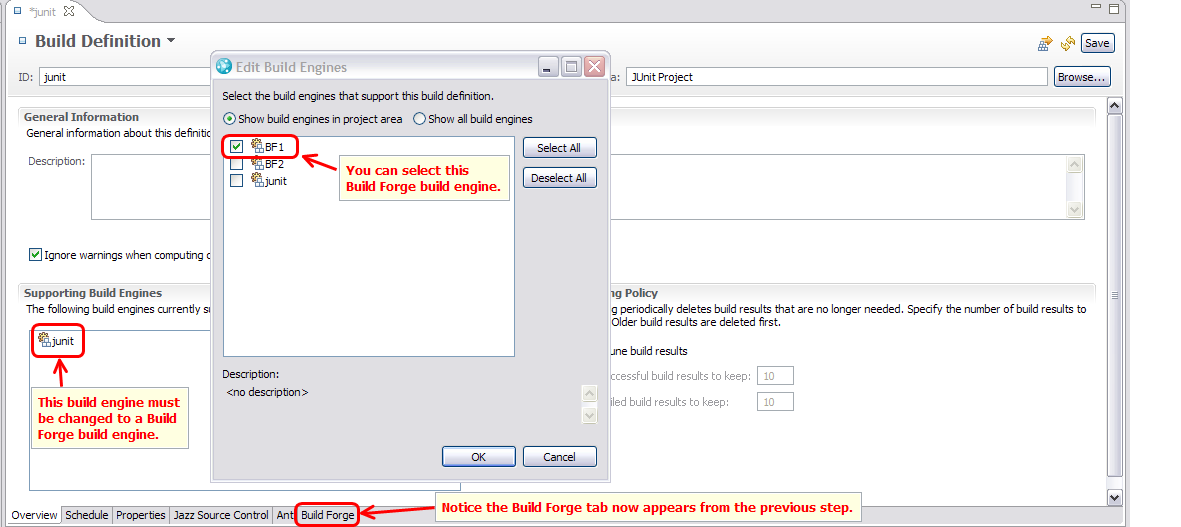
2. Change the build engine from a JBE build engine to a Build Forge build engine.
3. Before you can Save the build definition, you have to have setup a Build Forge project that you can select from the Build Forge tab which will execute the Jazz Source Control participant in one step and the Ant partcipant in another step. Here’s how that is done. It’s very important to note that this Build Forge project has a project-level environment as discussed above.
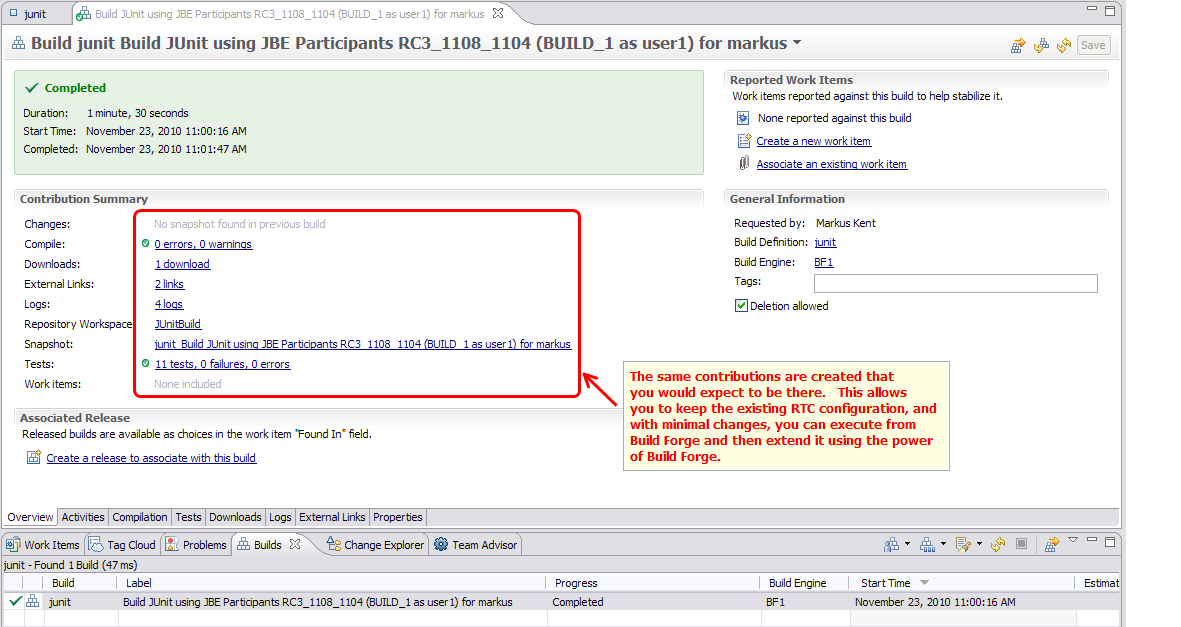
Finally, here’s the Overview tab from the Build Request showing the standard contributions you would expect from the build definition.
Build Agent Scenarios
The following sections will describe a scenario and then describe step-by-step instructions for setting up that scenario. One scenario may be a portion of an overall scenario, so some of these might be put together into one larger scenario.
Scenario Prerequisites
- You need to have an RTC 3.0 server installed. You should configure and adminstrative ID with at least a Developer client access license.
- You need to have an RTC 3.0 Eclipse client installed. If you want to follow along with the scenarios, you will need to install the Example RTC project in Eclipse to create a default Project Area, Users, Source Control components, Repository Workspaces, etc. Once you complete installing the Example project, you need to grant Markus Kent and Bill Cassavelli (both users created with the example) a Developer Client Access License.
- You need to have one or more Build Forge Agents v7.1.1 or later installed. We recommed using a Build Forge Agent v7.1.2.
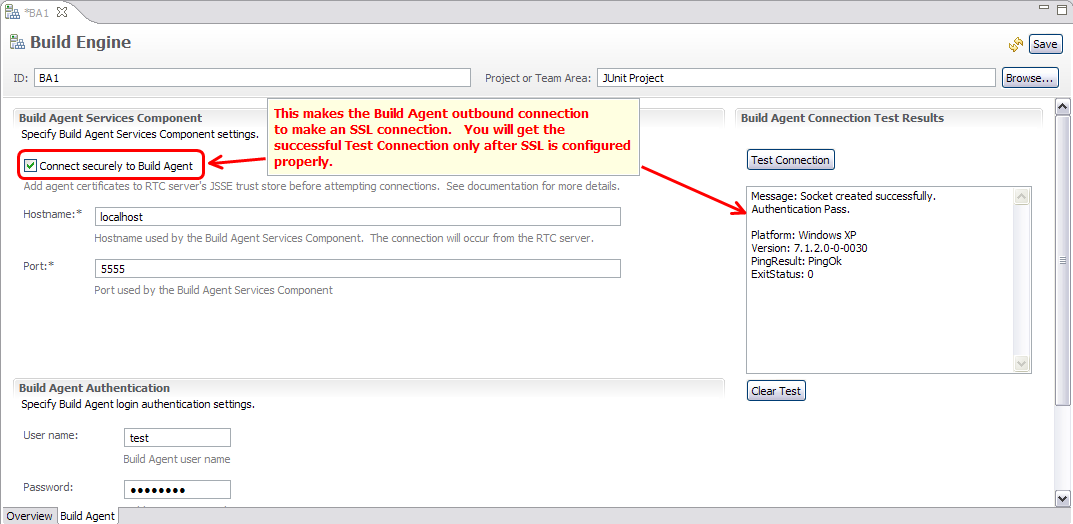
Installing, configuring, and running a Build Agent as an RTC build engine
This scenario provides documentation on how to install, configure, and run a Build Agent on a build machine. Then you can establish a build engine configuration against it and test the connection. This scenario also discusses securing the connection to the Build Agent from the RTC server.Rational Build Forge Installation Guide – This is the primary source of information for installing, configuring and running the Build Forge Agent.
- Installing Agents (page 121)
- Running an Agent (page 129)
- Configuring the Agent (page 132)
- bfagent.conf Reference (page 135)
- Configuring Agents for SSL (page 96)
Supported Platforms for Build Forge Agent Installation Binaries – This helps you determine which platforms have pre-compiled binaries.
Common Agent Telnet Commands – This shows you how you can use telnet to send commands to the agent.
About Build Forge Agent Permissions on Windows – This shows you what permissions are needed to run an Agent on Windows.
Assumption: This document assumes you have a Build Forge Agent running on a system. This will focus on securing the Agent and setting up the RTC build engine to connect to the Agent securely.
To enable SSL connections to the agent, edit bfagent.conf and unremark the following lines. Ensure the paths to the keystores are correct. Ensure the password to the buildForgeKey.pem is valid. See Configuring Agents for SSL from Rational Build Forge Installation Guide, page 96, for instructions on how to obtain and configure certificates for the Build Agent and enable SSL. The Build Agent uses OpenSSL for the SSL implementation. It uses PEM keystore types and expects you have three keystores. A password-protected one for the key (private key), one for the associated cert (public key), and one for trusted certificates (CA) used to verify peers that are connecting to it. Typically, the names of these keystores are buildForgeKey.pem, buildForgeCert.pem and buildForgeCA.pem, respectively. Assuming you have these already, we’ll discuss enabling SSL and sharing the public key with the RTC server to allow secure connections.
If you want to obfuscate this password in bfagent.conf, you can execute the following command to convert the plaintext password into an encoded form. When password encryption is enabled, you’ll get an encrypted form. Please refer to the Rational Build Forge Installation Guide for steps to enable password encryption on the Build Agent.
Syntax: <agent_install_root>/bfagent -e <password for buildForgeKey.pem>
Example: <agent_install_root>/bfagent -e buildforge
d5b123ee9921e1c900f5b7c44a82fd478ebbb2d410ed2e0fea93
ssl_key_location <agent_install_root>/buildForgeKey.pem
ssl_key_password d5b123ee9921e1c900f5b7c44a82fd478ebbb2d410ed2e0fea93
ssl_cert_location <agent_install_root>/buildForgeCert.pem
ssl_ca_location <agent_install_root>/buildForgeCA.pem
ssl_protocol TLSv1
ssl_cipher_group ALL
#ssl_cipher_override <cipher_list>
ssl_client_authentication true
Establishing the RTC server keystore for outbound connections to the Build Agent
By default, there is no personal certificate configured for the JDK to access when making outbound connections from the RTC server. You can use JSSE system properties to reference the default keystore for Tomcat used for the RTC server (preferably a valid certificate generated by the server administrator). Edit server.startup.bat and place the following JDK system properties in the JAVA_OPTS section to specify the ibm-team-ssl.keystore keystore which contains a personal certificate. This is what will be sent to the Build Agent when it requests a client certificate.
set JAVA_OPTS=%JAVA_OPTS% -Djavax.net.ssl.keyStore="<server_install_root>/jazz/server/tomcat/ibm-team-ssl.keystore"After doing this, the default RTC server keystore for outbound connections is located at <server_install_root>/jazz/server/tomcat/ibm-team-ssl.keystore. The default password for this keystore is ibm-team. It’s a best practice to use your own certificate and change the default password to the keystore. This is also configured by default in <server_install_root>/jazz/server/tomcat/conf/server.xml for use by Tomcat SSL port 9443. You will need to get the public key from the default personal certificate in this keystore and add it to the buildForgeCA.pem on the Build Agent.
-Djavax.net.ssl.keyStorePassword=ibm-team
Note: The default trust store for outbound connections is located at <server_install_root>/jazz/server/jre/lib/security/cacerts. The default password is changeit. Be careful using a different trust store unless you are familiar with adding trusted signers with the remote systems you are connecting to. This trust store contains default CA root certificates from well-known certificate authorities. It’s highly recommended that you change the default password to this trust store.
Putting the RTC public key in the Build Agent keystore
<server_install_root>/jazz/server/tomcat> keytool -export -rfc -file cert.out -keystore ibm-team-ssl.keystore
-storepass ibm-team -storetype JKS -alias ibm-team
Certificate stored in file <cert.out>
<server_install_root>/jazz/server/tomcat> cat cert.out
-----BEGIN CERTIFICATE-----
MIIB6TCCAVKgAwIBAgIES5kNJzANBgkqhkiG9w0BAQQFADA5MQwwCgYDVQQKEwNJQk0xFTATBgNV
BAsTDElCTSBSYXRpb25hbDESMBAGA1UEAxMJbG9jYWxob3N0MB4XDTEwMDMxMTE1MzI1NVoXDTEx
MTAwNTE1MzI1NVowOTEMMAoGA1UEChMDSUJNMRUwEwYDVQQLEwxJQk0gUmF0aW9uYWwxEjAQBgNV
BAMTCWxvY2FsaG9zdDCBnzANBgkqhkiG9w0BAQEFAAOBjQAwgYkCgYEAzMy+jfbNirHeOewgDBBg
ny6c/MCTe292RW85bdqx7F4sQB6QDYvvsxkHu9Esa43VT1N4kWem5I5YOuG9JipU8YyOv3nXTiKk
+RZfFFWFYt52gnkinzOykpY3/JLBdDiE4zWq/hKLh1pc4OW9XuLHYEqmF9bjIWQ3bUBsGRJdRYcC
AwEAATANBgkqhkiG9w0BAQQFAAOBgQBdAatRvKSu1/tWOzFp4jiNqsZdTDRT1+TcK3IvTMhvLmRg
fv5zaZWAdAq5+GM4NrPpMsR2Ig84Y+LlWXAnYtCLPKM4HsA1P5EG0dMuO5v48XWrGPKOaf/mONoE
DJvvaG3xj6bGkGt4tWG3Eh3ijhQbz447X7etdeaR5+yqPYHv6w==
-----END CERTIFICATE-----
Bag Attributes
    localKeyID: 31 32 37 39 30 33 37 34 32 38 39 30 36
    friendlyName: buildforge
subject=/CN=BIRKT500.austin.ibm.com
issuer=/CN=BIRKT500.austin.ibm.com
-----BEGIN CERTIFICATE-----
MIIBuzCCASSgAwIBAgIETDyP9DANBgkqhkiG9w0BAQQFADAiMSAwHgYDVQQDExdC
SVJLVDUwMC5hdXN0aW4uaWJtLmNvbTAeFw0xMDA3MTMxNjEwMjhaFw0yMDA3MTAx
NjEwMjhaMCIxIDAeBgNVBAMTF0JJUktUNTAwLmF1c3Rpbi5pYm0uY29tMIGfMA0G
CSqGSIb3DQEBAQUAA4GNADCBiQKBgQCQAxh8hxEwBhOpvLoETVfh3LoW5Gms8pZM
hc1bbU1lk+1ljEpsYqrLOP4hR5qIxIITmy4hmtor9WQjhGz/vMM/eewWiBcNVfnp
s22eAiO1kfukqnwhemH+400YIm2PnxxRl43wbC2ufeQjSnYJqosucH8lBhfFXKCD
tto9EJ4H0QIDAQABMA0GCSqGSIb3DQEBBAUAA4GBAFOcLPE+7UI4wnTgMODC+YpP
PUb1+zxwubG4FmJE8Y6sQfSxuaRhAB1aXnjn6vn9RfruMXXYFYdCst6/kW2MC/06
Vfl4/YBvqUIUKvzZw0TLCShR+d86MYyKAa1+yoSjKGbZ2LV3epW5qpX7AnzgSGcr
sJv5xZfhmgekF440eb1e
-----END CERTIFICATE-----
-----BEGIN CERTIFICATE-----
MIIB6TCCAVKgAwIBAgIES5kNJzANBgkqhkiG9w0BAQQFADA5MQwwCgYDVQQKEwNJQk0xFTATBgNV
BAsTDElCTSBSYXRpb25hbDESMBAGA1UEAxMJbG9jYWxob3N0MB4XDTEwMDMxMTE1MzI1NVoXDTEx
MTAwNTE1MzI1NVowOTEMMAoGA1UEChMDSUJNMRUwEwYDVQQLEwxJQk0gUmF0aW9uYWwxEjAQBgNV
BAMTCWxvY2FsaG9zdDCBnzANBgkqhkiG9w0BAQEFAAOBjQAwgYkCgYEAzMy+jfbNirHeOewgDBBg
ny6c/MCTe292RW85bdqx7F4sQB6QDYvvsxkHu9Esa43VT1N4kWem5I5YOuG9JipU8YyOv3nXTiKk
+RZfFFWFYt52gnkinzOykpY3/JLBdDiE4zWq/hKLh1pc4OW9XuLHYEqmF9bjIWQ3bUBsGRJdRYcC
AwEAATANBgkqhkiG9w0BAQQFAAOBgQBdAatRvKSu1/tWOzFp4jiNqsZdTDRT1+TcK3IvTMhvLmRg
fv5zaZWAdAq5+GM4NrPpMsR2Ig84Y+LlWXAnYtCLPKM4HsA1P5EG0dMuO5v48XWrGPKOaf/mONoE
DJvvaG3xj6bGkGt4tWG3Eh3ijhQbz447X7etdeaR5+yqPYHv6w==
-----END CERTIFICATE-----
Putting the Build Agent public key in the RTC server keystore
Now you need to add the contents of buildForgeCert.pem to the RTC outbound connection trust store, <server_install_root>/jazz/server/jre/lib/security/cacerts. Because this is an outbound SSL connection in the RTC server, it uses the JRE default trust store called cacerts. The default password for this keystore is “changeit“. Before you can use keytool to import the Build Agent certificate, you need to edit the buildForgeCert.pem file and remove everything before the —–BEGIN CERTIFICATE—– marker. Until you do this, you cannot use keytool to import it into cacerts.
<server_install_root>/jazz/server/tomcat> cat "<agent_install_root>/buildForgeCert.pem"
Bag Attributes
    localKeyID: 31 32 37 39 30 33 37 34 32 38 39 30 36
    friendlyName: buildforge
subject=/CN=BIRKT500.austin.ibm.com
issuer=/CN=BIRKT500.austin.ibm.com
-----BEGIN CERTIFICATE-----
MIIBuzCCASSgAwIBAgIETDyP9DANBgkqhkiG9w0BAQQFADAiMSAwHgYDVQQDExdC
SVJLVDUwMC5hdXN0aW4uaWJtLmNvbTAeFw0xMDA3MTMxNjEwMjhaFw0yMDA3MTAx
NjEwMjhaMCIxIDAeBgNVBAMTF0JJUktUNTAwLmF1c3Rpbi5pYm0uY29tMIGfMA0G
CSqGSIb3DQEBAQUAA4GNADCBiQKBgQCQAxh8hxEwBhOpvLoETVfh3LoW5Gms8pZM
hc1bbU1lk+1ljEpsYqrLOP4hR5qIxIITmy4hmtor9WQjhGz/vMM/eewWiBcNVfnp
s22eAiO1kfukqnwhemH+400YIm2PnxxRl43wbC2ufeQjSnYJqosucH8lBhfFXKCD
tto9EJ4H0QIDAQABMA0GCSqGSIb3DQEBBAUAA4GBAFOcLPE+7UI4wnTgMODC+YpP
PUb1+zxwubG4FmJE8Y6sQfSxuaRhAB1aXnjn6vn9RfruMXXYFYdCst6/kW2MC/06
Vfl4/YBvqUIUKvzZw0TLCShR+d86MYyKAa1+yoSjKGbZ2LV3epW5qpX7AnzgSGcr
sJv5xZfhmgekF440eb1e
-----END CERTIFICATE-----
<server_install_root>/jazz/server/jre/lib/security> keytool -import -trustcacerts -file
"<agent_install_root>/buildForgeCert.pem" -keystore cacerts -storepass changeit
-alias build-agent-cert -storetype JKS
Owner: CN=BIRKT500.austin.ibm.com
Issuer: CN=BIRKT500.austin.ibm.com
Serial number: 4c3c8ff4
Valid from: 7/13/10 11:10 AM until: 7/10/20 11:10 AM
Certificate fingerprints:
         MD5:  38:97:98:EA:E4:F5:79:75:C5:B6:97:D5:25:B2:38:63
         SHA1: 29:22:33:25:7F:23:8C:58:D9:D5:62:8D:15:D7:7E:90:86:8B:92:0D
Trust this certificate? [no]:  yes
Certificate was added to keystore
- If you don’t have the Build Agent certificate in the RTC server trust store, you get the following error in Test Connection
- If you don’t have the RTC certificate in the Build Agent buildForgeCA.pem keystore (with client_authentication enabled in bfagent.conf), you get the following error in Test Connection.
Build Agent Project – Prepare, Fetch, Build, and Publish
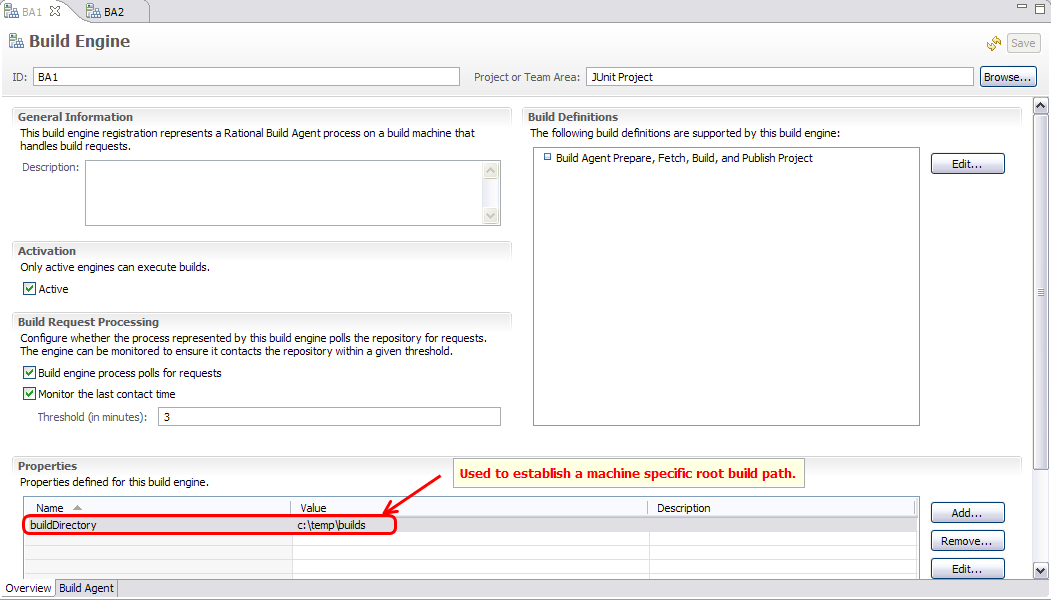
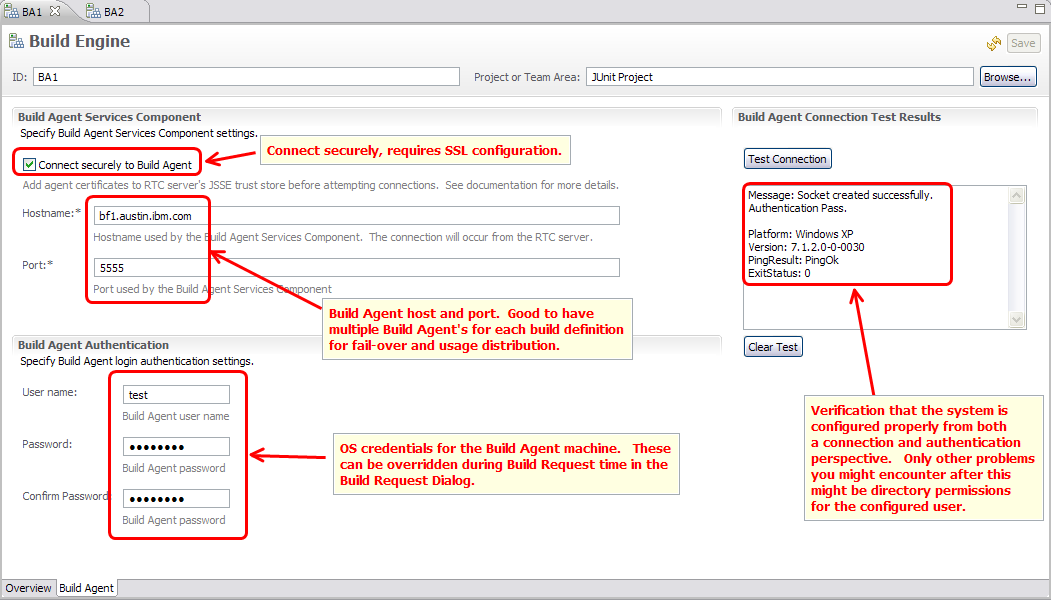
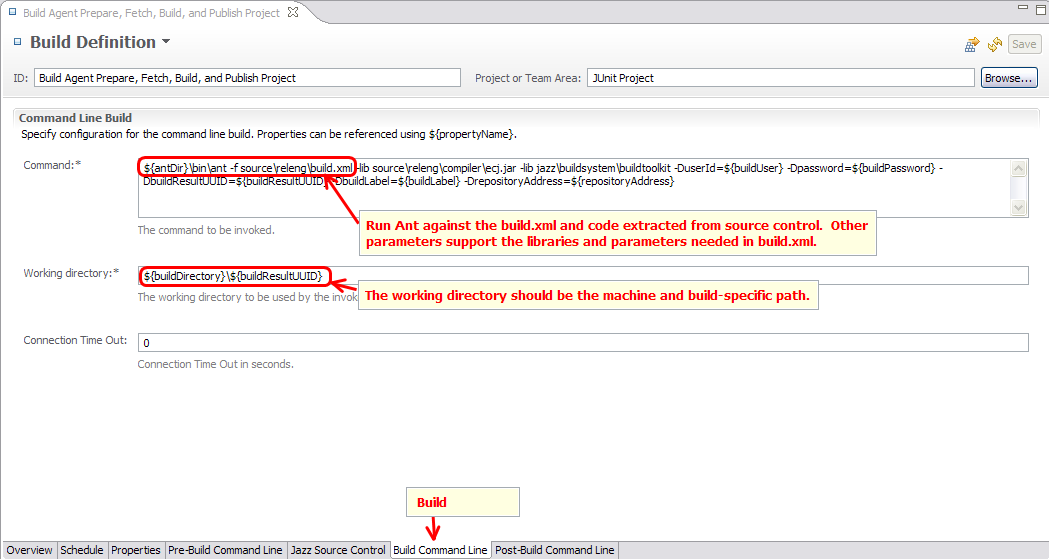
This scenario demonstrates how you can use a Build Agent Command Line build definition to perform an end-to-end build. This includes prepping the build machine from scratch with the Ant and the RTC Build Toolkit, accepting and fetching from Jazz Source Control, building the JUnit project that was extracted from source control, and publishing the compile logs as a separate Ant Task activity. This example should prepare you to use the Build Agent to the full extent.To being with, we need to create Build Engines that can be referenced by the Build Definition. The Build Engine configuration is important as it establishes the connection and authentication information to the build machine and sets up any machine specific properties such as the root build directory that you want to build on that machine. Since you will be building directly to the build agent, it’s best practice to configure a root directory (in the build engine) and a build-specific path (in the build definition) so that you have a unique path for each build. In this example, we have a buildDirectory property to configure the build root and use the buildResultUUID property for the build-specific path. You can choose any path for your builds, but this is recommended to ensure a unique path for each build.
buildDirectory: c:tempbuilds (depends on the build machine)
buildResultUUID: _VFcrYfvcEd-47ccKDtRs3g (unique for each build)
Build working directory: c:tempbuilds_VFcrYfvcEd-47ccKDtRs3g
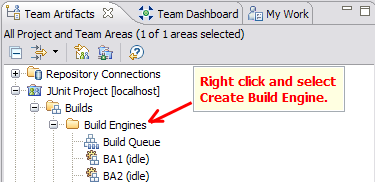
The following shows where to start creating build engines and shows two Build Agent engines already configured.
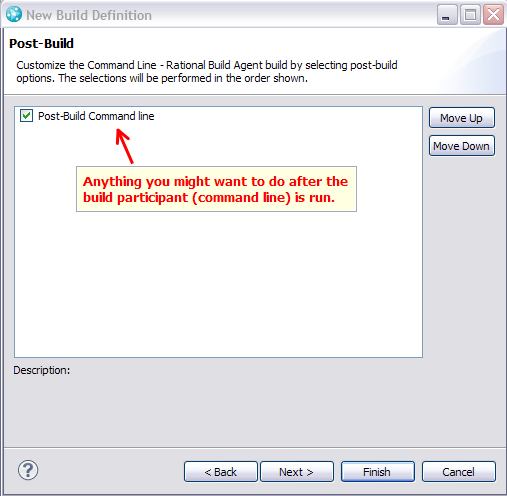
The next set of screen shots show the series of participant selections. Each participant performs an action. There’s a couple of optional Pre-Build participants, a required Build participant, an optional Post-Build partcipant and some other miscelleanous configuration elements (E-mail, schedule, etc).
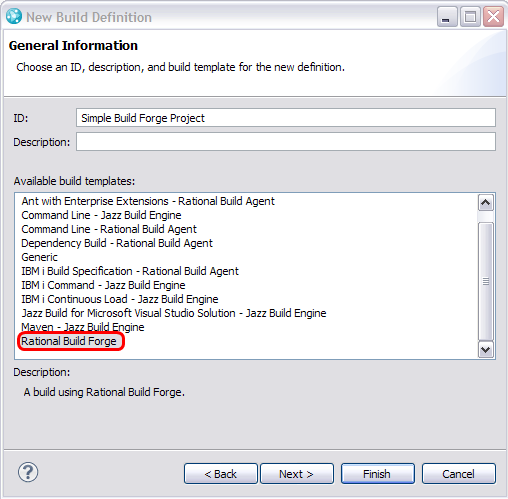
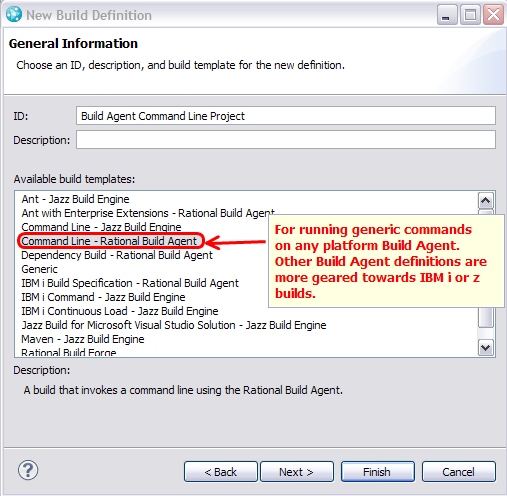
Start with selecting the Command Line – Rational Build Agent build definition template.
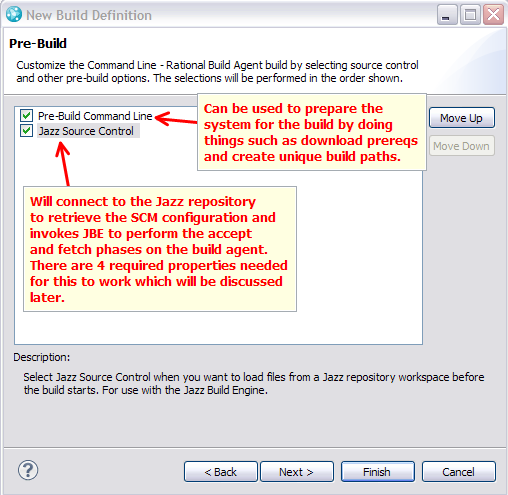
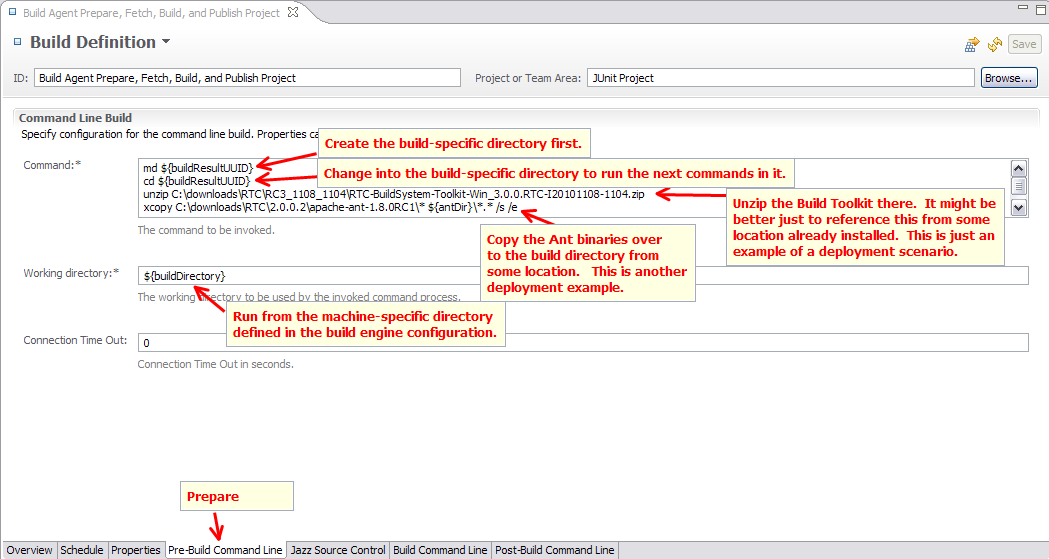
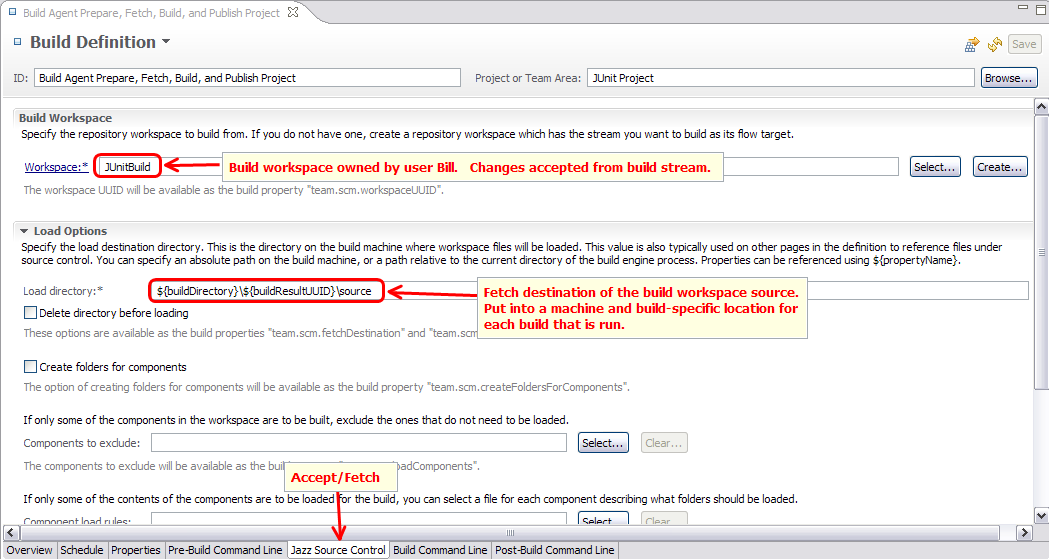
Next, choose the Pre-Build participants. One is a Command Line participant and one is a Jazz Source Control participant. In this scenario, we will use both. The Command Line participant will be used to create the build directory and prepare the build machine by installing Ant and the Build Toolkit into the build directory. While you can and probably should just reference Ant and the Build Toolkit instead of installing it each time, this is a demonstration of a deployment scenario where you can freshly install build tools on the build machine as a series of commands in this pre-build participant. The Jazz Source Control participant allows you to configure the Jazz Source Control’s behavior and runs JBE during this phase to accept changes from the stream into the build workspace and then fetches the workspace to the build machine’s fetch destination. There’s configuration options that can change this behavior, but for the most part this is what will occur.
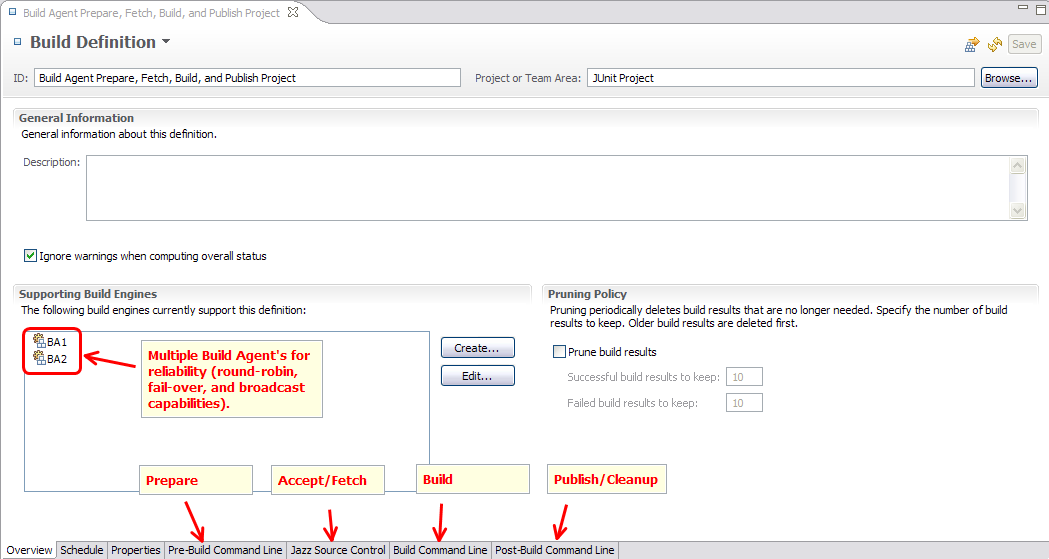
3. Configuring the Build Definition Template
One of the first things to do when configuring the build definition is to associate the build engines you want to run this build definition against. This is an ongoing exercise as you add or remove build machines based on build needs, however, it’s a requirement to have at least one Build Agent build engine ready to configure. Here we will choose two Build Agent build engines so that we can show round-robin, fail-over, and broadcast capabilities.
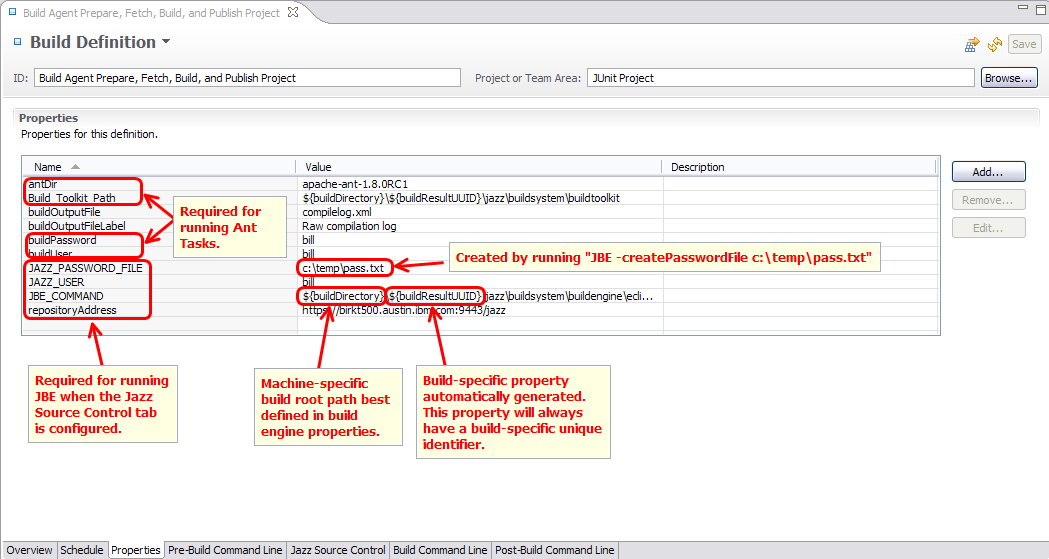
JBE_COMMAND = ${buildDirectory}${buildResultUUID}jazzbuildsystembuildengineeclipsejbe
JAZZ_USER = bill
JAZZ_PASSWORD_FILE = c:temppass.txt
repositoryAddress = https://birkt500.austin.ibm.com:9443/jazz
 <project name="AntTaskHelper" basedir=".">
     <!-- project-specific variables -->
  <property name="buildUser" value="build" />
  <property name="buildPassword" value="build" />
  <property name="repositoryAddress" value="http://localhost:9443/jazz" />
  <property name="buildResultUUID" value="default" />
  <property name="buildOutputFile" value="test.results/junit.samples.AllTests.results.xml" />
  <property name="buildOutputFileLabel" value="JUnit Example JAR" />

  <taskdef name="artifactFilePublisher" classname="com.ibm.team.build.ant.task.ArtifactFilePublisherTask" />
  <target name="publishFile">
 <artifactFilePublisher repositoryAddress="${repositoryAddress}"
    userId="${buildUser}"
    password="${buildPassword}"
 verbose="true"
    buildResultUUID="${buildResultUUID}"
    filePath="${buildOutputFile}"
    label="${buildOutputFileLabel}"/>
  </target>
 </project>
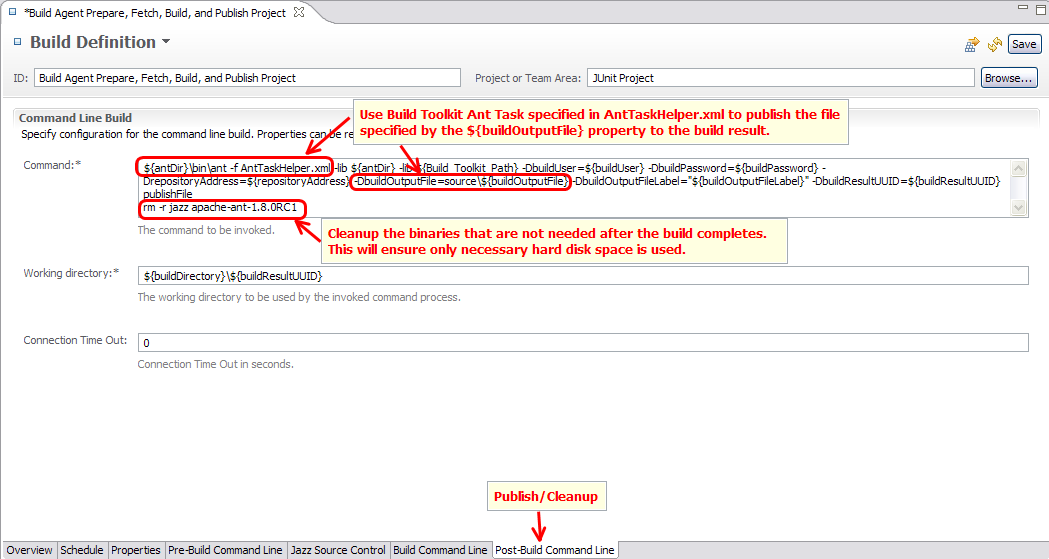
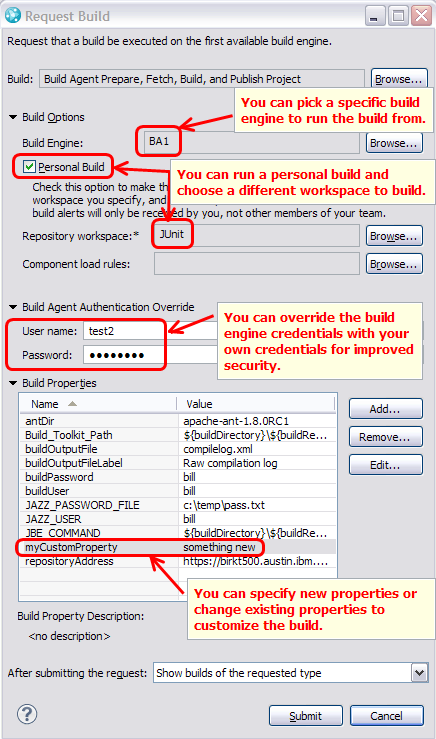
The Build Agent Build Request Dialog is very flexible. From this dialog, you can specify any Build Agent build engine to run the build from even if it’s not currently associated with the build definition. This can allow you to test a new build machine before it is formally brought into the build pool. You can request a personal build which allows you to choose your own workspace where you might have made changes that have yet to be delivered to the stream. This allows you to verify your changes prior to delivery. You can also override the OS credentials to improve security. Finally, you can add or modify properties to customize your build.

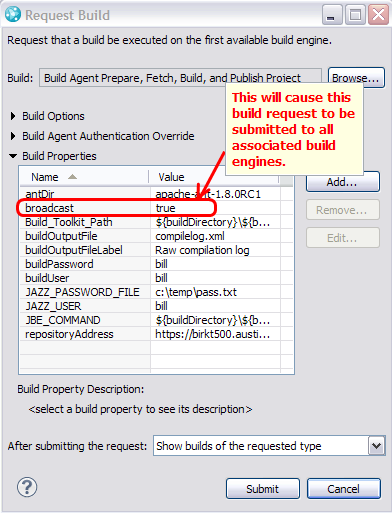
If you set a build property broadcast=true, either in the build definition or build request dialog, the build request will get issued to every valid build engine associated with the build definition. If there are five build engines that are up and running, all five build engines will get the same build request. This helps with deployment scenarios where you need to deploy binaries to all build machines at the same time.

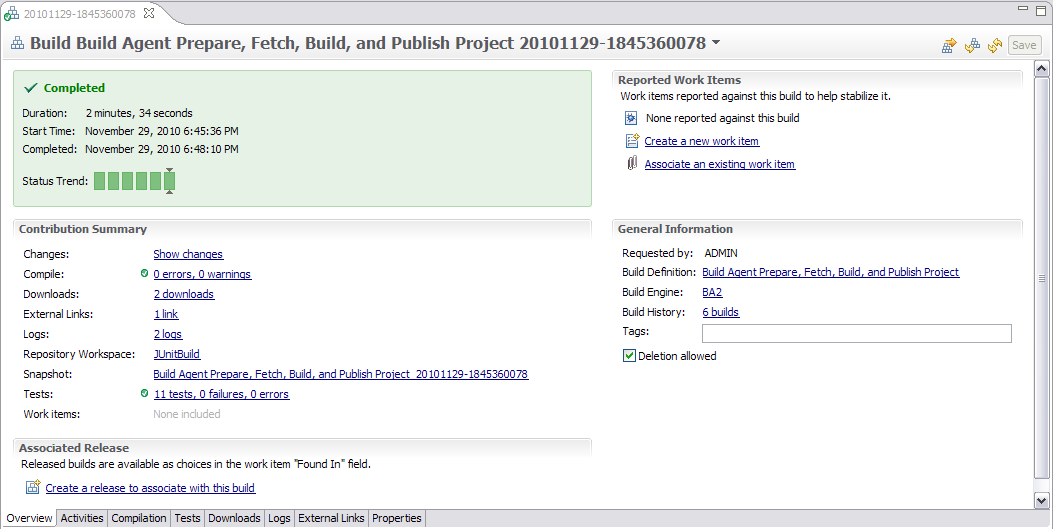
The Build Agent build result should contain all of the same contributions as the Build Forge and Jazz Build Engine build results for the JUnit project. In this scenario, we have added one more download contribution of the compilelog.xml.
For more information
- Jazz.net Build Forge Wiki
- Jazz.net RTC Team Build Wiki
- Jazz.net Build Forge Forum
- Jazz.net Using RTC Forum
- Build Forge 7.1.2 Download Page
- RTC 3.0 Download Page
- RTC Build Toolkit Ant Task Documentation
About the authors
Peter Birk is a Senior Software Engineer at IBM working on the Build Forge software development team. He has been involved in the Build Forge integration with Rational Team Concert 3.0. He’s also the Build Forge security architect. He can be contacted at pbirk@us.ibm.com.
� Copyright 2011 IBM Corporation