
Traditional planning: Managing formal projects in Rational Team Concert 4.0
Traditional plans
The planning component of Rational Team Concert allows you to plan the overall release of a project, as well as its various phases. The traditional planning model is designed to support planning for a project based on the Formal Project management process template, which comprises a set of sequential phases (Requirements, Design, Implementation, and Testing). To follow a traditional planning model, use the Formal Project Management process template, which supports a formal, or traditional, planning process.The Formal Project Management process template provides these customized work items:
- Project Change Request: Defines a change to the agreed scope and objectives of the project to accommodate a requirement that was not originally defined to be part of the project.
- Business Need: Describes a feature, an API, or an improvement to add to the product. A business need explains the work at a high level so that everyone can understand what the work is without having to understand the detail.
- Risk: Identifies an uncertain event that can negatively affect the project. This type of work item includes a matrix to calculate the probability and impact of the risk.
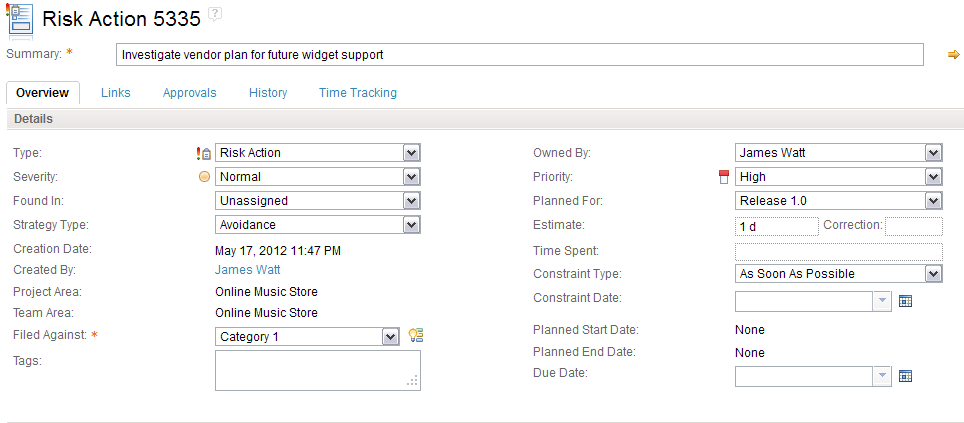
- Risk Action: Defines what must be accomplished to mitigate the risk. A risk action is a unit of work, and it is estimated in hours.
- Issue: Identifies unforeseen events that occur in a project.
- Milestone: Defines a significant point or event in the plan, where event is an occurrence, or an outcome.
- Estimates of the work items
- Actual start or finish dates of the work items, determined by the state change of the work item
- Start and end dates of the iteration associated with the plan
- Schedule constraints and dependencies of work items
- Project working days and hours
- Availability of resources who are assigned to work items
When to use traditional planning
Use the traditional planning process for a project in which work is done sequentially and is driven by a schedule that is defined by schedule dependencies, constraints, resource availability, and durations. Do not use the traditional planning process for projects that are driven by agile practices.Traditional plans for formal projects
Three types of plan are available with the Formal Project Management process template:- Release plan: This type of plan is the highest-level plan. It provides a brief overview of the project goals. Although you can create a release plan for any phase, create this type of plan for an overall release.
- Phase plan: This type of plan displays the goals to be achieved in a phase. You can create a phase plan and assign work items that are to be completed in that phase.
- Cross Project plan: This type of plan tracks the schedule of work items in other projects. You can create a cross project plan, create a tracking work item and add Tracks link to work items in different projects/plans.
For details about the different plan types, see Plan types.
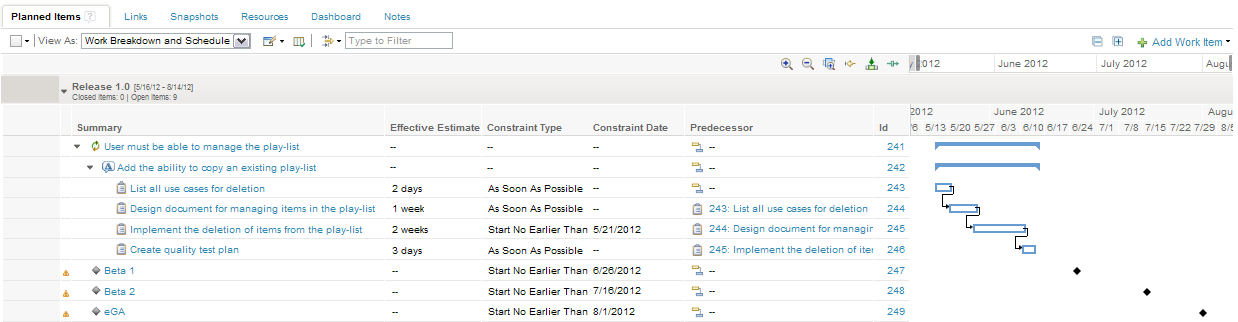
For example, Online Music Store is a project that has a traditional plan with the following artifacts:- Project Change Request: Add the ability to copy an existing playlist.
- Business Need: User must be able to manage the playlist.
- Task: Implement the deletion of items from the playlist.
- Milestones: Beta 1, Beta 2, and eGA
Dependencies and constraints
You can create schedule dependencies between two work items. Dependencies are used to calculate the schedule of work items in a plan. Only one type of schedule dependency is currently supported:- Finish-to-start: In this dependency, the start of the successor work item depends on the completion of another work item: the predecessor.

- As soon as possible: This type is the default constraint type. It indicates that the work item is scheduled to the earliest possible time that it can start, based on the existing project schedule.
- Start no earlier than: This type of constraint restricts a work item to start on or after a specified constraint date.
- Finish no later than: This type of constraint restricts the work item to complete on or before a specified constraint date.

The critical path
The critical path is the longest path through a project or an iteration. It determines the shortest time possible to complete the activities in the plan. The longest path through the plan is based on the latest of the earliest finish dates of all the work items in the plan. The critical path is calculated by using the following information:- Plan dates
- Work item estimates
- Constraints
- Dependencies
- Project area work environment
- For work items without an assigned resource:
- Project-level settings, such as working time per day, quitting time, and absences
- For work items with an assigned resource:
- Resource calendar
- Availability, including scheduled time, absences, and project allocation

Flagging potential problems within the Plan
Work items in the plan view with missing or invalid information are noted through icons (informational, warnings, or errors) located next to the work item. Hovering over such icon describes the source of the potential problem. There are three types of potential problems that are flagged for traditional plans:- Missing required attributes
- Invalid estimates
- Invalid data, including Dependency or Constraint violations

Proposed snapshots
During initial planning, the project manager takes a Proposed snapshot reflecting the initial, proposed schedule. This snapshot type is available by default with the Formal Project Management process template. For details about how to manage snapshots, see Effective planning using snapshots.
Risks and risk actions
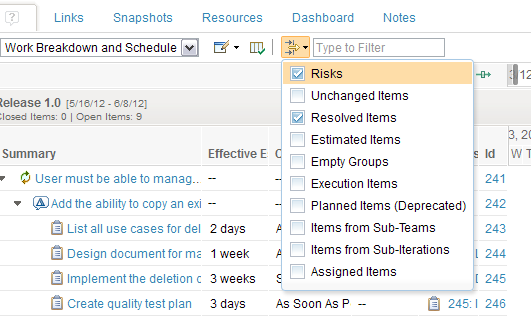
The project manager can identify Risks which may negatively impact the progress of the project, along with Risk Actions that track mitigation and containment of those risks. Risks can be defined at plan initiation or during plan execution. For details about how to define risks, see Defining risks. The Work Breakdown and Schedule view filters out by default all risks from the Plan view. Remove the default filter to view risks in the Plan view.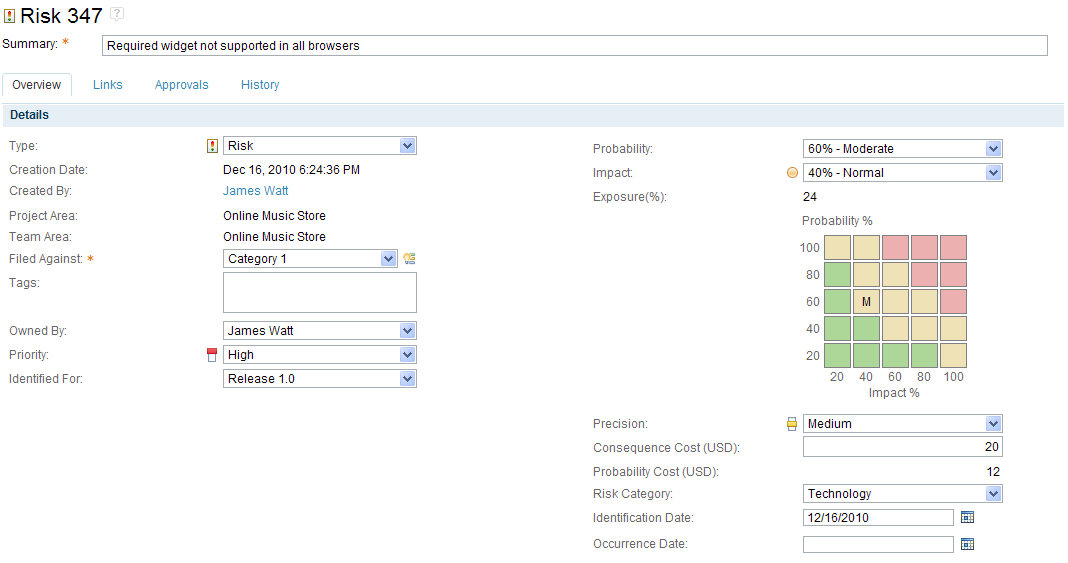

Resources
The next step after completing the initial plan is to identify the resources needed to complete the work. You can search for resources available within specific time periods (those corresponding to the start and end dates of a work item) and add them to the project. Resources are managed on the Resources tab of the Plan view. You can also allocate resources to a project on the Work Environment tab of the User editor. For details about managing resources in a project, see Managing project resources.


After resources are allocated to the project, the project manager can assign the work items in a plan to those resources.

Resource availability and the plan schedule
Resource availability is one of the criteria that contributes to the schedule calculation. If resource availability or scheduled absences change, the schedule is automatically updated to reflect the changes. For example, after a resource adds a scheduled absence (see illustration below)… The start and end dates of the work items in the plan are updated and no work is allocated during the scheduled absence. Similarly, if the resource allocation changes, that change is reflected in the schedule.

Planned snapshots
The plan is now ready to be committed, and the project manager can take a Planned snapshot. Once the Planned snapshot is created (there can be only one) the start and end dates of the work items in the snapshot become the Planned Start and Planned End dates (available by default in the Schedule Variance view of the plan and in the details of a work item). In other words, the Planned Start and Planned End dates are populated from the Planned Snapshot. There are no Planned Start and Planned End dates until a Planned snapshot is created.
Once the Planned snapshot is created, the project manager can monitor progress by looking at differences between the current plan and the Planned snapshot (committed plan). The Snapshot view includes the ability to see the differences between a snapshot and the current plan. The project manager can also take Regular snapshots throughout project execution to look at the state of the project at specific times, and compare those Regular snapshots against the Planned snapshot (committed plan) and the actual plan.
For details about how to manage snapshots, see Effective planning using Snapshots in Rational Team Concert 4.0.
Time tracking in work items
Team members can record the time spent on a work item for each day. The time entries on the Time Tracking tab of the work item are synchronized with the value in the Time Spent field of the work item. If you are using the Formal Project Management process template, the Time Spent field of the work item is read-only. You can associate each time entry with one or more time codes. Time codes group time entries for different activities on the same task. The Formal Project Management process template configures standard time codes, and you can customize time codes. For details about how to add time codes, see Adding time codes for a project.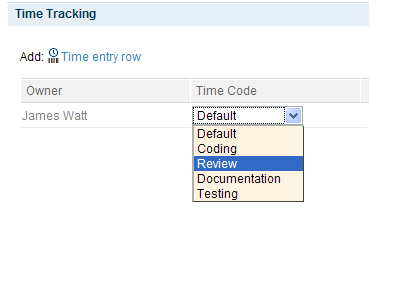
Issues during plan execution
During project execution, unforeseen events might occur. To identify and describe such problems, use the Issue work item. The main difference between an issue and a risk is that a risk is identified and defined before it occurs. An issue is recorded after it occurs.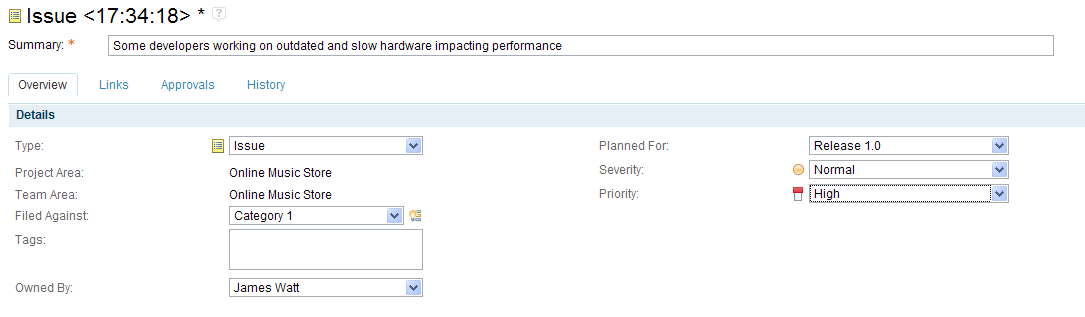
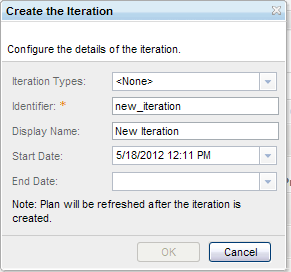
Create an iteration from the plan
During the project execution if the project manager wants to add an additional phase to the iteration structure, it can be done in the Release Plan view.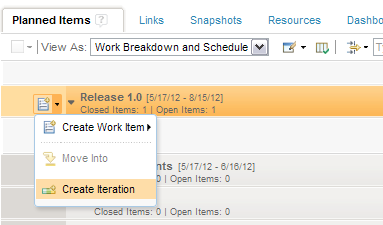
For more information
About the author
Sharoon Shetty Kuriyala is the component lead of the team developing the Planning capabilities for Rational Team Concert. She can be contacted at sshettyk@us.ibm.com.
Copyright © 2012 IBM Corporation