
Using the source control component of Jazz to manage Rational Functional Tester scripts development in globally distributed teams
Abstract
This article explains how IBM Rational Team Concert (RTC) and IBM Rational Functional Tester (RFT) can be integrated to provide source control capabilities in a test automation environment.
We will describe how RTC can work as the source control provider for RFT, and we will also review the configuration steps and tips that can be used during the integration of these tools.
Introduction
IBM Rational Functional Tester and IBM Rational Team Concert are part of the IBM Rational Family; this family offers a group of tools that can be used during the different activities executed during a Software Development Process: testing, development, builds, etc.
Before going to the detailed configuration steps, lets review a general description of these tools:
IBM Rational Functional Tester (RFT) is an automated functional testing and regression testing tool. This software provides automated testing capabilities for functional, regression, GUI, and data-driven testing. RFT supports a range of applications, such as web-based, .Net, Java, Siebel, SAP, terminal emulator-based applications, PowerBuilder, Ajax, Adobe Flex, Dojo Toolkit, GEF, Adobe PDF documents, zSeries, iSeries, and pSeries
Rational Team Concert (RTC) is part of the Agile Application Lifecycle Management (ALM) solution offered by IBM Software which helps companies to build better software products using and all-in-one Agile development for teams, which includes agile, formal and hybrid planning and reporting, all on a common platform.
Rational Team Concert helps teams collaborate for faster software delivery.
- Enhances team collaboration with integrated features including work-item, build and software configuration management.
- Provides high visibility into project activities and team progress with multilevel dashboards and reporting features.
- Facilitates planning and execution of agile or formal projects with planning tools and templates. Consistent processes help improve software quality.
- Helps improve productivity with advanced source control for geographically distributed teams.
The source control component of the Jazz technology platform manages the source code, documents, and other artifacts that a team creates. It provides change-flow management to facilitate sharing of controlled artifacts, retains a history of changes made to these artifacts, and enables simultaneous development of multiple versions of shared artifacts, so that teams can work on several development lines at the same time.
A software development team typically works with a large base of files that comprise the source code for a software product or system. As a team member, you work within this base of source code, changing file content to add new features or fix defects. After you verify that your changes are correct (by building and testing the code in a private workspace, for example), you share the changes with the rest of the team, whose members have also been changing files, including ones on which your work depends. Rational Team Concert source control organizes versionable items (files and folders) into components and streams, and provides workspaces where you can view and modify file and folder contents. Together, these repository objects represent the configuration of the system being developed and allow any configuration to be retrieved, shared, or built. They organize a team’s files, track and share changes, and keep the entire team working in concert to achieve common goals.
Problem Analysis
On the scenario used in this article, the test automation strategy is based on the ITCL (or IBM) Framework. It consists on a three-tiered architecture implemented in objects, tasks and test cases; the team is composed of several automation developers working on the development of the automation scripts.
The challenge faced is that we need a source control process to manage the team deliverables, and avoid inconsistencies and multiple access conflicts in the source code generated.
We selected the Rational tools since they provide not only the robustness of test cases automation with RFT but a complete source control capability using The source control component of the Jazz, as well as a tight integration which helps to define a full automation environment.
Integration Process Step by Step
In this section we will describe the process and pre-requisites required to integrate RFT and Jazz Source Control using the RTC Ecplise client.
Setup Prerequisites:
- Install Rational Functional Tester using the default values during the installation process.
- Install the Rational Team Concert Client using the default installation values; just make sure that when the installation process asks for the Eclipse IDE to be used, you select the one already installed for RFT.
- Make sure that you know the full path of the workspace being used by both products; the path is shown when you start the application on the Workspace Launcher screen.
- A project area already created on an RTC server, with this Project area an stream and Team area will be automatically created, we will use them during the configuration steps.
Note: The installation order of the tools is irrelevant; just make sure that you install both tools on the same eclipse IDE.
Configuration Steps:
In order to complete the integration process between Rational Functional Tester and Rational Team Concert follow these steps:
1. First you need to enable the connection between RFT and RTC; you can do this by editing the file ivory.properties located at the RFT installation directory in the folder Functional Testerbin. Locate and open this file and modify the following variable as shown below:
rational.test.ft.cm.clienttype = CCRC
2. Start RFT, and open the Team Artifacts view by going to the menu Window>Show View>Other, then in the Show view window expand the Team section, select the Team Artifacts options and click OK.
3. The next step is to create a Repository Connection, this can be done using the Create a Jazz Repository Connection wizard in RTC. To open this wizard you can use one of the following options:
a. If you don’t have any Repository Connections in your environment, a link to the Create a Repository Connection wizard will be displayed in the Team Artifacts view, as shown Figure 1.
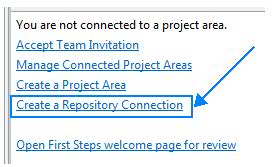
Figure 1. “Creating the first repository connection from Team Artifacts View “
b. If there are already other repository connections created, you can right click on the Repository Connection option, then select New>Jazz Repository Connection, as shown in Figure 2, and the Create Jazz Repository Connection wizard will be shown.
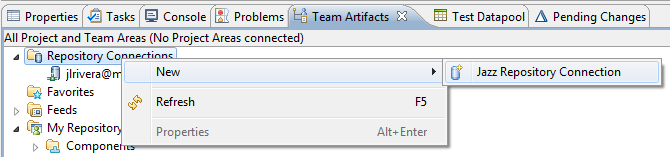
Figure 2. “Creating a Repository Connection when there are already connections configured“
4. In the Create Repository Connection window provide the information required:
a. On the URI field, enter the path to your jazz server, for example https://csnext.com/cmm9.
b. On the Name field, enter a name to identify this connection.
c. In the Authentication section you can select the authentication method to be used, in this example we will use the default one: Username and Password, as shown in Figure 3.
d. Provide a valid User ID and Password for the jazz server defined in the Location section.
e. Click on Finish.
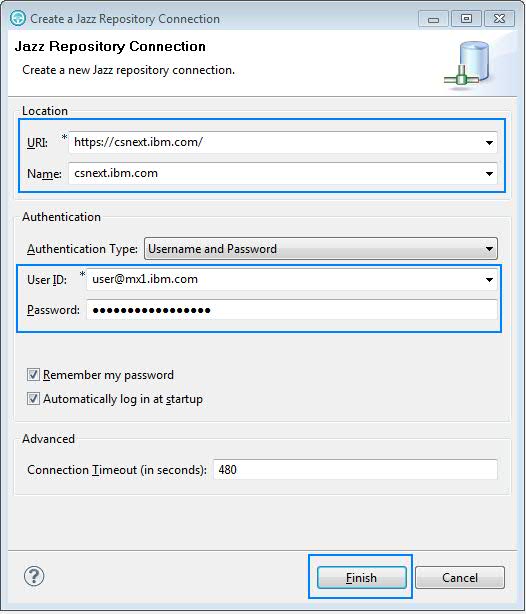
Figure 3. “Creating a Jazz Repository Connection wizard”
Note: If a Repository Connection Certificate problem wizard appears, you can accept the certificate permanently and click OK.
5. On the Team Artifacts tab, right-click on My Repository Workspaces and select New > Repository Workspace, as shown in Figure 4.
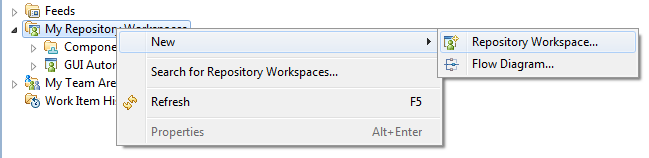
Figure 4. “Opening the create New Repository Workspace wizard”
6. The New Repository Workspace wizard will appear, select the repository connection to the server where you want to create the Workspace as shown in Figure 5, and click Next.
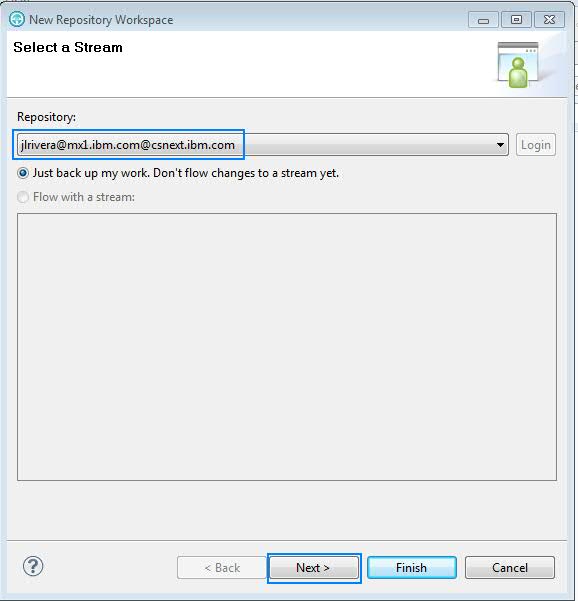
Figure 5. “New Repository Workspace wizard – Repository Connection”
7. On the Repository Workspace Name field, provide a name for your workspace and click Next, as shown in Figure 6.
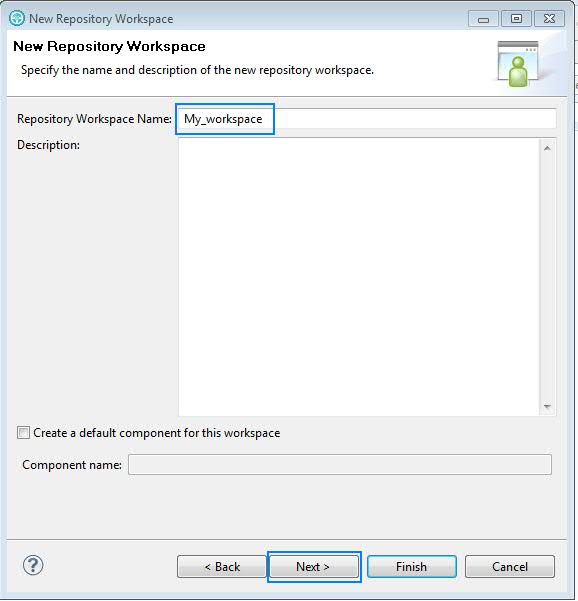
Figure 6. “New Repository Workspace wizard – Repository Workspace Name”
8. Finally on the Read Access Permission screen, select the level of permissions that you want to setup for your environment, for this example we will use Private as shown in Figure 7.
9. Click on Finish to close the wizard.
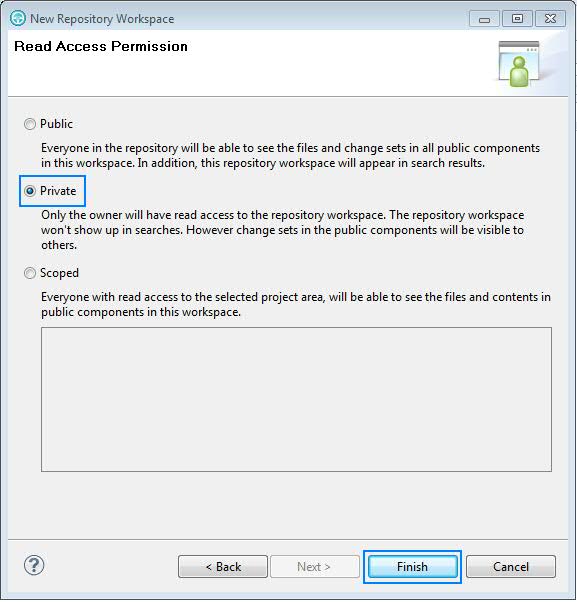
Figure 7. “New Repository Workspace wizard – Read Access Permission”
10. Now that we have our workspace created, it will be added to the My Repository Workspace section in the Team Artifacts view, go to this section and double-click on the workspace.
11. The Flow Targets wizard is shown; click on the Add button as shown in Figure 8, and the Select a Stream or Workspace wizard will be displayed.
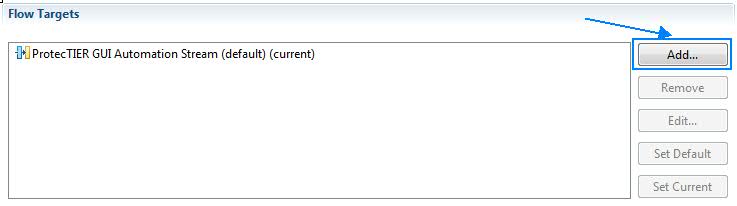
Figure 8. “Flow Targets wizard”
12. Using the Select a Stream or Workspace wizard do a search for the Stream that you want to use and click OK. See Figure 9 for more details.
13. Click OK to save the changes.
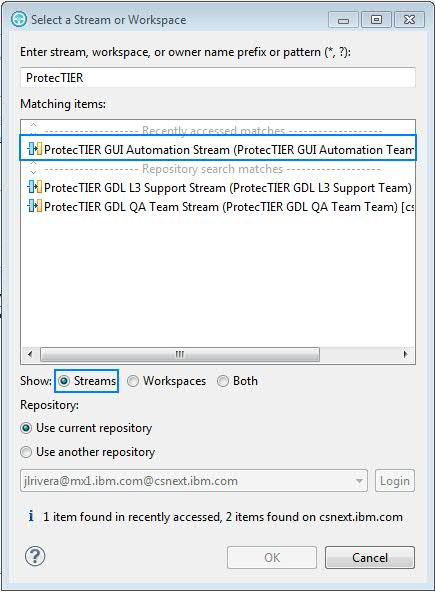
Figure 9. “Select a Stream or Workspace wizard”
14. Go to the Pending Changes view, right-click on the workspace and select the Accept option as shown in Figure 9. The Load Repository Workspace wizard will be displayed. Accepting the changes will allow the local repository to receive changes from the stream.
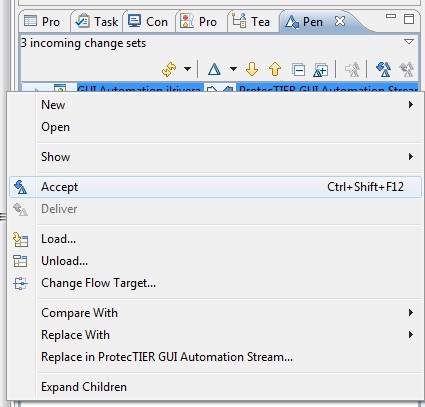
Figure 10. “Accepting changes in the Repository”
15. On the Load Repository Workspace wizard, select the option Load the root folders of the components as projects and click Next, as shown in figure 11.
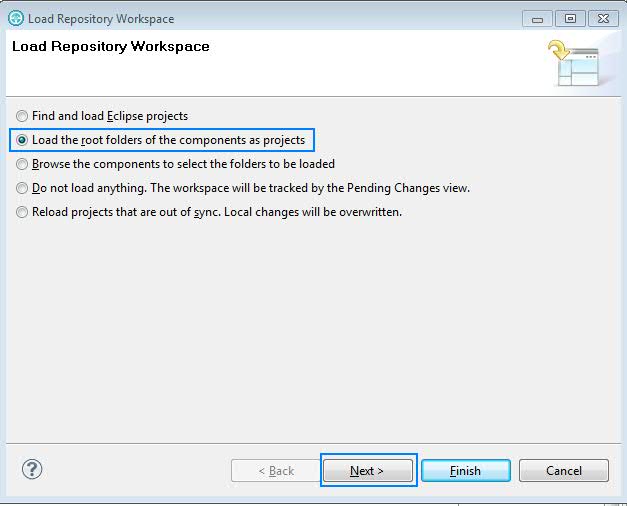
Figure 11. “Load Repository Workspace wizard”
16. On the Confirm Overwrite screen, it is important to verify that the root folder is selected as shown in Figure 12, since it will be automatically loaded. Select the folder and click Finish.
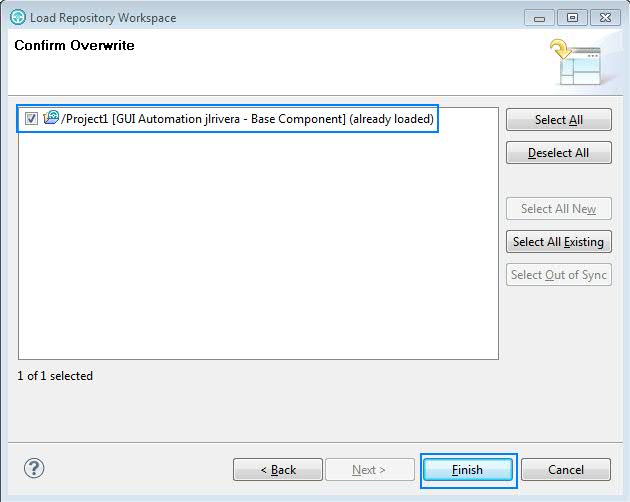
Figure 12. “Load Repository Workspace wizard – Selecting items to load”
17. Finally, we need to do a refresh of the workspace. Right click on the Functional Test Projects tab, and select the Refresh option. Optionally you can select the menu File>Refresh. Once the refresh operation finishes all the current files in the stream will be downloaded to the Workspace.
After these steps, the RFT and RTC are integrated: RFT provides the support for the scripts development and RTC the source control capabilities.
Integration Usage Description
After executing the steps in the previous section, our RFT automation development environment will look similar to the one shown in Figure 13.
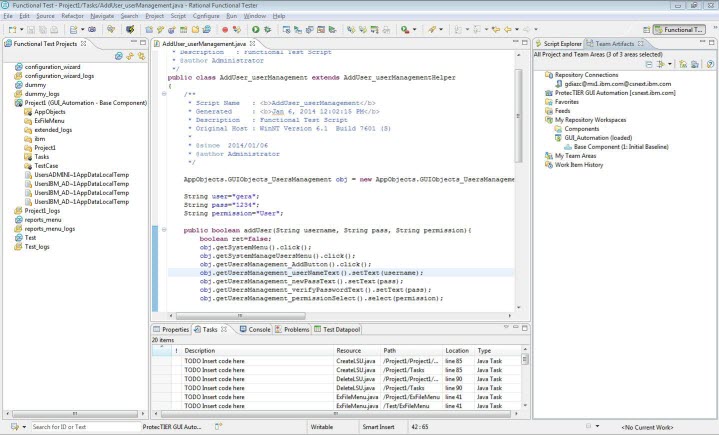
Figure 13. “Automation Environment using RFT and RTC”
On the left side, you can see the list of projects in the repository. In this example we are using the ITCL framework as mentioned before. We have 3 different folders in each project:
- AppObjects: Scripts containing only the definition of objects from the GUI.
- Task: Specific tasks that can be done in our application.
- Test case: Sequences of tasks that are executed together to automate a complete operation in the GUI.
In the middle of the interface we can see the source code of each script. The right side displays the Team Artifacts and Script Explorer sections.
Note: the order and position of the views can be easily modified by moving them (drag and drop) to a different location in the tool.
Code Delivery Process: Once the environment is ready, if we need to deliver some scripts or classes, we can right-click on the script or class from the Functional Test Projects view and select the Team>Check-in and deliver option. In this wizard we can provide some comments for the code delivered, and then specify a work item to associate with this change set (see Figure 14). Finally, by clicking Finish, all changes will be sent to the stream.

Figure 14. “Check-in and Deliver Wizard – Associate Work Item“
From the web application in RTC or using the source control menu, we can review the content in our Project as shown in Figure 15. From this view in the source control menu we can open a defined stream and display the shared project content.
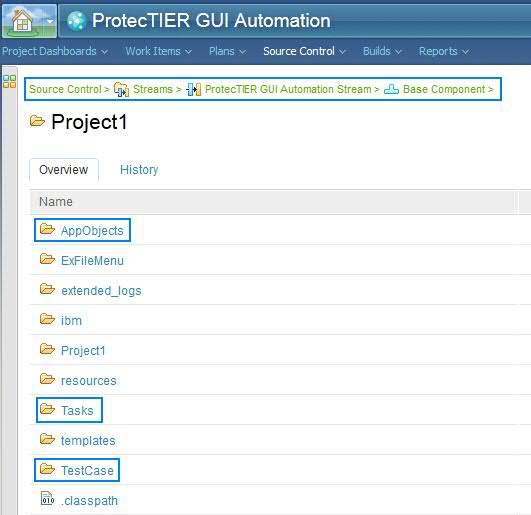
Figure 15. “Project view from RFT Source Control”
An overview of the structure of the source control process can be seen in Figure 16.
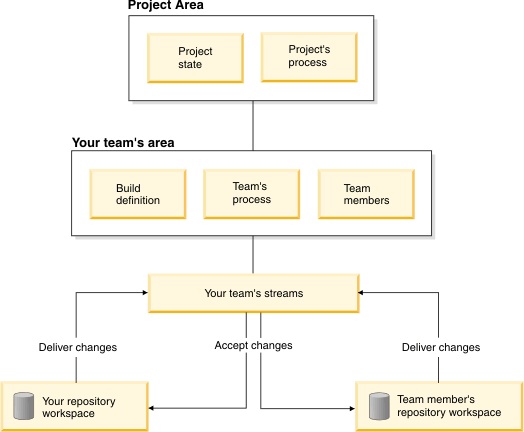
Figure 16. “General Structure of the source control process”
The general structure for the Source Control process shown in Figure 16 is represented in 4 levels: the project area level that correspond to the higher level of the project, inside the project area the team area is contained, and in the next level the stream is created, it contains the source control capabilities. Finally the stream can be connected to the personal repositories which are placed in the lowest level.
Evaluation and benefits
As we have shown in this article by adding RTC to your RFT automation environment you will add several benefits to your automation projects:
- Provide to your automation teams the tools required to use automatic source control processes by using the source control capabilities from RTC.
- Provide to your teams the ability to track plans, work items and deliverables automatically by using the Rational Team Concert plans and work items features.
- Enable your automation leads to track project progress by using the live and historical reports provided by RTC.
- Take advantage of the RTC dashboards to provide a general overview of the status of your automation project.
Conclusion
In the current global environments, where the global distributed teams are every day more common, the need of having processes and tools which provide the ability to integrate, manage and control the source code developed and updated by the different team members is a critical activity in the Software Development Process.
It is very important that when we are selecting the tools that we will use in our project, we take special attention in the integration capabilities of the tools, the strong of the integration between the tools can be a critical factor for the level of collaboration in our teams.
References
- ITCL Framework for RFT: http://www.ibm.com/developerworks/rational/library/06/0822_goel/
- IBM: http://www.ibm.com/us/en/
- Jazz technology platform terminology and concepts: http://pic.dhe.ibm.com/infocenter/rtc/v1r0m0/index.jsp?topic=%2Fcom.ibm.team.platform.doc%2Ftopics%2Fc_jazz-platform-quick-ref.html
Copyright © 2014 IBM Corporation