
Automating RSA Design Manager Imports from Rational Team Concert
With a scenario-based approach, this article will walk you through the steps to enable Rational Software Architect Design Manager Import integration with Rational Team Concert , and implement an import process that automatically publishes models from RTC repository to the RSA DM server.
Introduction
The Rational Software Architect Design Manager® (RSA DM) Import Engine® is a small application shipped with the RSA DM Server. This application allows the user to publish Rational Software Architect® models from a file system into the RSA DM server.
Note: RSA DM Import Engine works only with RSA artifacts. To import Rhapsody related artifacts, please refer to Rhapsody Design Manager infocenter.
As many development organizations use Rational Team Concert® (RTC) to store and version control the modeling artifacts, an efficient model import process to extract the latest versions of models from the RTC repository and publish them to the Design Manager server is often in demand. Such import process can be achieved by the RSA DM import integration with RTC using an Ant Script.
With a scenario-based approach, this article will walk you through the steps to enable RSA DM import integration with RTC, and implement an import process that automatically publishes models from RTC repository to the RSA DM server.
Scenario
Let’s assume that a company called JKE Bank has two RSA modeling projects: JKE Banking and JKE Banking Profile. Both projects are currently under source control in the RTC repository shown as below.
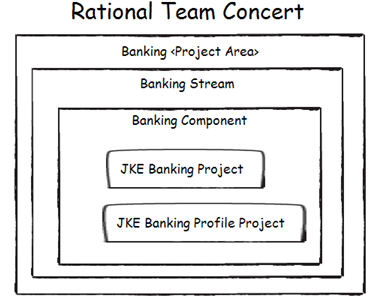
All the diagrams are generated using Rational Software Architect® Sketcher, UML, and Deployment Modeling Capabilities.
Both projects will be made available in RSA DM so that the model stakeholders can review the contents online. Since the models are evolving, JKE Bank wants to place the latest committed versions into RSA DM every day. A role-based scenario for JKE Bank looks like:
- A software architect creates and updates the models using standalone RSA.
- The software architect delivers changes into RTC from time to time.
- The model publisher requests a DM import which automatically extracts models under RTC source control and publishes them into RSA DM server on a regular basis (the import request can either be started manually or be scheduled).
- The model stakeholders login to the RSA DM server and review the models.
Picture 2 below describes the high-level import ecosystem and process:
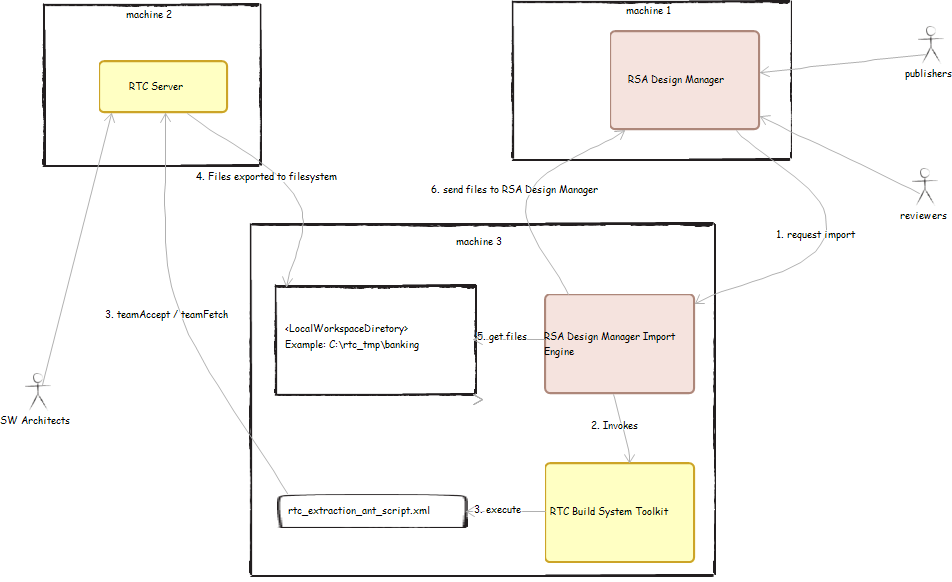
Picture 2 – High-Level Model Import Ecosystem and Process (click for full size image)
Environment and Setup
In this example, JKE Bank dedicates three physical machines. They are for RTC server, RSA DM server, and RSA Import Engine and RTC Build System Toolkit, respectively. These servers have had the following configurations completed.
Note: RSA Import Engine and RTC Build System Toolkit must be installed on the same machine. When desired, it is also valid to host RTC Server, DM server, RSA Import Engine and RTC Build System Toolkit all on the same machine or to install the import engine on either the RTC server or the RSA DM server.
Machine 1 (RSA DM Server):
- RSA DM Server has been started and running
- A new Project Area called "Banking" has been created. This is the project area that the models will be imported into.
- The user role model publisher has had a user ID named "dm_import" created, and granted with an Administrator process role in the DM project area "Banking".
Machine 2 (RTC Server):
- RTC Server has been started and running
- A Project Area called "Banking Project", which contains a stream "Banking Stream", has been created. A component "Banking Component" has been defined for "Banking Stream", with those two modeling projects (JKE Banking and JKE Banking Profile) created by Rational Software Architect® added.
- A public Repository Workspace called dm_import Repository Workspace containing the component "Banking Component" has been created. This is the workspace that the model publisher will use for model projects extraction.
- The model publisher has an RTC account created. To simplify the setting, the account ID is also named dm_import. This RTC user account has at least read access to the "Banking Component" so that he can extract the model projects to a local directory for further importing to the RSA DM server.
Machine 3 (RTC Build System Toolkit and RSA DM Import Engine):
- The Eclipse instance comes with RTC Build Build System Toolkit has been patched with the Import Engine Hook. (Refer to appendix section Steps to install Import Engine Hook Plug-in for details.)
- A local directory <LocalWorkspaceDirectory>, for example C:rtc_tmpbanking, has been created. It will be dedicated to the extracted model projects from RTC repository by model publisher using Ant Script.
- An encrypted password file for RTC user dm_import has been created. The file has been located at C:Documents and Settingsdm_importpass.txt
Tip: To generate a password file for the RTC user, refer to Using JBE to create an encrypted password file
Import process implementation
1. Develop an RTC Extraction Ant Script for Import
To implement an automatic import process when the model resources are under RTC Source Control Management (SCM), the Import Engine needs a way to interact with the RTC repository to extract the resources automatically. Ant is a very common tool used for build and automation; the Build System Toolkit provides pre-defined Ant Tasks that communicate with the RTC Server. With these Ant Tasks, an import Ant script can hook the Import Engine with RTC repositories.
Each DM project area can point to a single Ant script for model projects importing. The script to extract the RSA projects from RTC is quite basic: it uses Ant Tasks provided by RTC Build System Toolkit to accept the latest changes into the DM Import workspaces (teamAccept) and then extract the workspaces to the local file system (teamFetch). For example:
<teamAccept repository="${repository}" userId="${userId}" passwordFile="${passwordFile}" workspaceName="${rtcWorkspaceName}" verbose="true" /> <teamFetch repository="${repository}" userId="${userId}" passwordFile="${passwordFile}" workspaceName="${rtcWorkspaceName}" verbose="true" destination="${targetdir}" /> | Tip: There are circumstances where multiple components are defined for the stream and each of the components has similar folder or project structures. For RTC 3.0.x, use createFoldersForComponents attribute for the teamFetch task, and set its value to be true to avoid fetching conflicts. For RTC 2.0.0.x, this option is not available, but you can create individual Repository Workspaces for each of the components and assign a distinguished targetdir value to each of them. |
A complete sample script is attached in the attachment section. When using it, change the values in the property tasks to be valid.
The model publisher modified the values of the property tasks as below:

The model publisher tests the Ant script and places it onto Machine 3.
Tip: Use command lines to test RTC extraction script without RSA DM. For example on a Windows System perform the following commands:
<BUILDSYS_ROOT> is the location where the RTC Build System Toolkit has been installed. |
2. Configure RSA DM Import Engine
To handle requests for the import process, the RSA DM Import Engine needs to be ready and functional. The model publisher launches RSA Import Engine configuration dialog on Machine 3, shown in Picture 5 below.
Tip: On Windows systems, go to Start menu-> All Programs -> IBM Rational Software Architect Design Manager Import Engine->Configure import engine On Linux systems, use the command line <IMPORT_ENGINE_INSTALL_ROOT>import_engine.sh -configure |
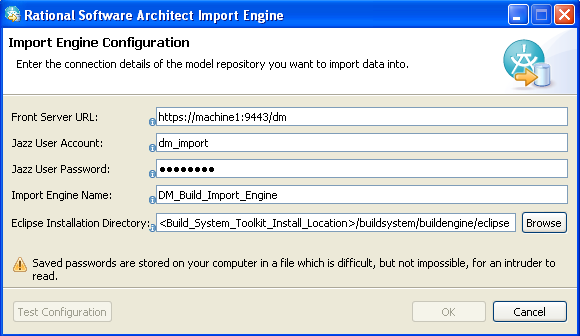
In the configuration window, the following information is required:
- Front Server URL: the URL pointing to the RSA DM server. The format is http[s]://<hostname>:<port>/dm, e.g. https://machine1:9443/dm.
- Jazz User Account: the RSA DM user ID to connect to the RSA DM server. dm_import is used in this example.
- Jazz User Password: the password for the DM User Account above
- Import Engine Name: a name for this import engine instance, i.e. DM_Build_Import_Engine. The name has to be unique to the DM server referenced by the Front Server URL across network. Take a note for this name as it will be used in the Import Definition later.
- Eclipse Installation Directory: The location of the eclipse directory that comes with RTC Build System Toolkit. For example <Build_System_Toolkit_Install_Location>/buildsystem/buildengine/eclipse
Note: For imports that use Ant Script, the value of Eclipse Installation Directory needs to point to a valid Eclipse instance. Using the RTC Build System Toolkit’s Eclipse directory, Import Engine sets the default Ant Home and adds the necessary classpath for the Ant Tasks provided by the RTC Build System Toolkit.
The model publisher clicks the Test Configuration button to verify the configuration is correct. After clicking OK, start the Import Engine if it’s not started automatically.
3. Create an Import Definition
For each Design Manager project area, there is a single Import Definition that defines the resources to be imported, assigns import engine, and provides options for automation. The Import Definition is created on Design Manager server via the web client. It can be created and modified by any user who has an Administrator process role in the DM project area.
The model publisher opens the Import Definition page. Choosing import by individual projects, the Import Definition for each project area contains:
- The name of the Import Engine instance entered on the Import Engine Configuration dialog on Machine 3, i.e. DM_Build_Import_Engine. One Import Engine instance can serve multiple Design Manager project area imports.
- The path to and filename of the Ant script that handles the RTC extraction for this project area (see section Develop an RTC Extraction Ant Script for details).
- The paths and names of the RSA projects to import. The workspace path needs to match the location <LocalWorkspaceDirectory> where the Ant Script is extracting the RSA projects, i.e. C:tmprtc_tmpbanking.
- [Optional] Setup the import to run at a scheduled time at certain day(s).
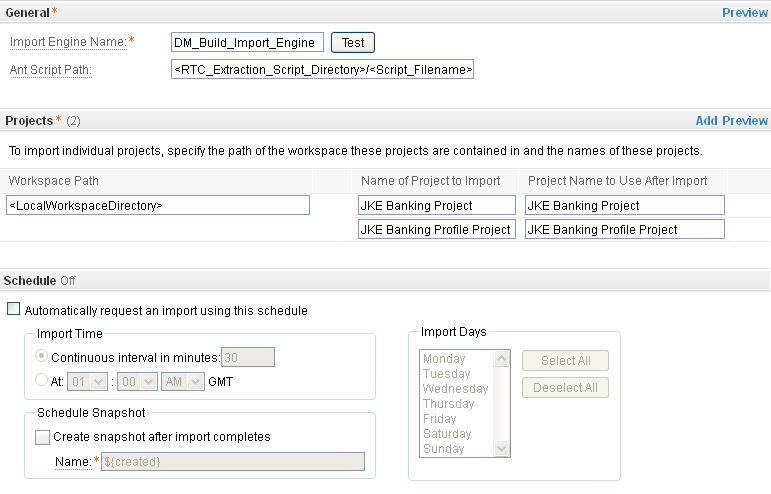
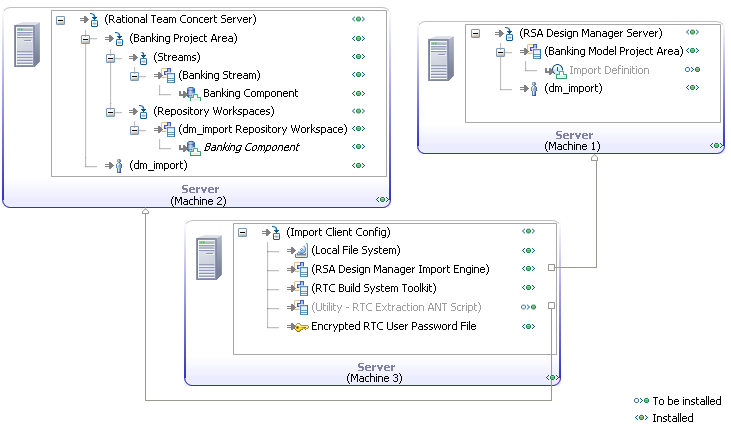
With this Import Definition, the import request will place or update Project JKE Banking and JKE Banking Profile to the DM project area "Banking". The projects mapping between RTC server and RSA DM server can be seen as below:

Here is an interaction diagram that depicts the flow of import process in details:
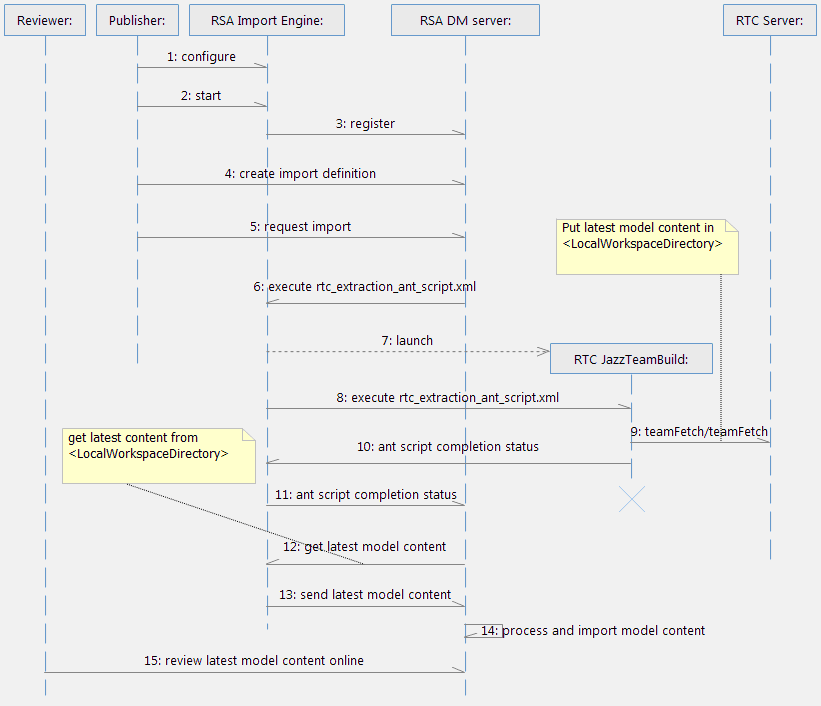
- The Model Publisher configures the RSA DM Import Engine
- The Model Publisher starts RSA DM Import Engine
- RSA DM Import Engine registers itself to RSA DM Server with a unique import engine name
- The Model Publisher creates an Import Definition via DM web interface
- The Model Publisher starts the import process (either manually or by schedule)
- RSA DM Server asks the Import Engine to execute the Ant script
- Import Engine launches the Eclipse instance from RTC Build System Toolkit
- RTC Build System Toolkit’s Eclipse instance executes the RTC Extraction Ant script; the latest model contents are extracted in <LocalWorkspaceDirectory>
- Once the Eclipse instance finishes the execution of the ant script, it terminates itself with status written in the logfile
- Import Engine then notifies RSA DM Server the completion of Ant scription execution with completion status
- RSA DM Server then asks Import Engine to send the latest model content over
- RSA Import Engine grabs latest model content from <LocalWorkspaceDirectory> and loads the content to DM Server
- RSA DM Server receives the model content, processes it and puts it on the server
- The Model Reviewers can view the latest model contents online
Appendix
1. Steps to install Import Engine Hook Plug-in
When creating a new Import Definition, we have two options to import models onto the server. They are "Import an entire workspace" and "Import individual projects", respectively.

For the former option, the target Eclipse instance specified by the Import Engine Configuration must have the Import Engine hook plug-in installed. For the latter one, the hook plug-in is not needed. The RSA DM Import Engine provides with an update site for the hook plug-in installation.
In the RSA DM Import – RTC integration configuration in this article, if choosing the "Import an entire workspace" option for Import Definition, you will need to install the Import Engine hook plug-in into the Eclipse instance which comes from the Build System Toolkit. However it is a headless Eclipse instance. To install the hook plug-in, the easiest approach is just to copy this plug-in and paste it into the plugins directory under the eclipse folder of the RTC Build System Toolkit. Here is how to do it:
- Go to <IMPORT_ENGINE_INSTALL_ROOT>/norvo-importhook-updatesite/plugins, copy com.ibm.xtools.rmpc.importhook_1.0.0.v20110418_0802.jar
- Go to directory <BUILDSYS_TOOLKIT_INSTALL_ROOT/buildsystem/buildengine/eclipse/plugins, paste the file above here
RSA DM Import Engine command line options
The import engine can also be started, stopped, and configured from command line. The syntax is:
import_engine <option>
The following options are available:
- startengine: to start engine
- stopengine: to stop engine
- configure: to start configuration dialog
- logfile=<logfile>: specify the location of import engine logspecify the location of import engine log. If the parameter is not specified, the import engine log is written to the current directory.
- eclipse.keyring=<configuration file location>: specify the location of import engine configuration file. If the parameter is not specified, the import engine configuration file is written to the directory of <USERHOME>/.eclipse/org.eclipse.equinox.security/secure_storage.
For example:
import_engine.sh -configure import_engine.sh -logfile=/home/user/importlog.log import_engine.sh -eclipse.keyring=/home/user/secure import_engine.sh -startengine import_engine.sh -stopengine
RSA DM Import Trouble Shooting
If import fails, the first place to look for more information is the import log file. By default, the log file is written to the current directory, i.e. the import engine install directory. You can change its location by starting the import engine with -logfile command parameter; see section Import Engine command line options above.
For more information
- Rational Software Architect Design Manager infocenter
- Rational Team Concert 2.0.0.x infocenter
- RTC 2.0.0.x Jazz Build Ant Tasks
Attachment – Sample ANT Script
Sample Ant script can be downloaded from here
About the author
Tao Weng is a software developer on the RSA DM team. He can be contacted at tweng@ca.ibm.com.
Hongyan is a software quality developer on the RSA DM solution and integration test team. She can be contacted at hongyan_huo@ca.ibm.com.
© Copyright 2011 IBM. All the diagrams are generated using Rational Software Architect® Sketcher, UML, and Deployment Modeling Capabilities.