
Installing the Rational solution for Collaborative Lifecycle Management in to WebSphere Application Server – Network Deployment Edition
This article covers the installation of the Rational solution for Collaborative Lifecycle Management applications into a WebSphere Application Server – Network Deployment Edition environment. The intended topology will have CLM applications on two separate application server nodes fronted by a proxy server (IBM HTTP Server with WebSphere Web Server Plugins or WebSphere Proxy Server). It assumes that the databases are already installed on a server with the host named clmdb.jazz.net. Please note that for the purpose of this article, we will use the jazz.net domain as an example.
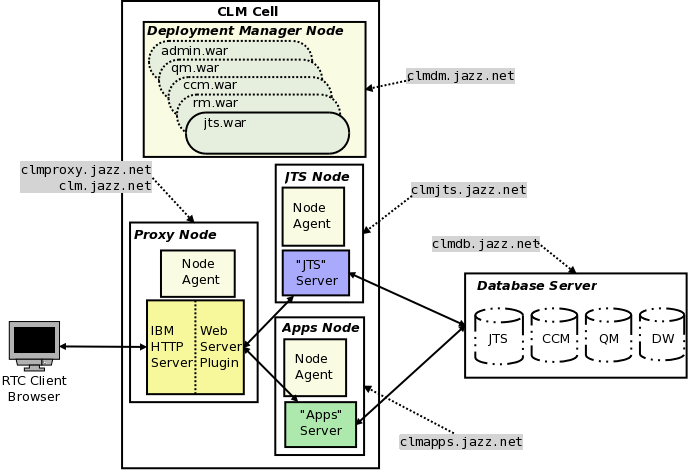
Overview of WebSphere Topology
The following components will deployed on the following hosts in the deployment that will be built.
DB2 Database: clmdb.jazz.net
Deployment Manager: clmdm.jazz.net
Nodes: clmapps.jazz.net, clmjts.jazz.net
Proxies: clmproxy.jazz.net
All application contexts will be accessible under the following:
Jazz Public URI: clm.jazz.net
Important Prerequisites
The first task is to create a distributed WebSphere Application Server – Network Deployment Edition (WAS ND) topology. To do this you will need to set up the following hosts:
clmproxy.jazz.net:
- IBM WebSphere Application Server Network Deployment V8.0.0.4
- IBM HTTP Server V8.0.0.4, 64 bit
- IBM WebSphere Web Server Plugin V8.0.0.4
- IBM WebSphere Application Server Network Deployment V8.0.0.4
- IBM WebSphere Application Server Network Deployment V8.0.0.4
- IBM Rational CLM 4.0 (JTS & RM applications only)
- IBM WebSphere Application Server Network Deployment V8.0.0.4
- IBM Rational CLM 4.0 (CCM & QM applications only)
This article assumes:
- All of the nodes should recognize each other by their host names
- All hosts are configured so that they are using an Network Time Protocol (NTP) server. This is to prevent clock discrepancies.
- The RDBMS (Oracle, DB2 or SQLServer) are already installed and databases are created
- An LDAP Server has been set up that is to be used for authentication.
- WebSphere Application Server V8.0.0.3 (or later) is installed on clmproxy.jazz.net, clmdm.jazz.net, clmapps.jazz.net and clmjts.jazz.net with no profiles created. (Do not launch the profile management tool at the end of the WebSphere Installation)
- IBM HTTP Server V8.0.0.3 (or later), Web Server Plug-ins for WebSphere Application Server V8.0.0.3 (or later) installed on clmproxy.jazz.net
- CLM 4.0, CCM and QM is installed on clmapps.jazz.net and CLM 4.0, JTS and RM on clmjts.jazz.net but not set up yet.
Create the Deployment Manager
On the host on which the deployment Manager resides (clmdm.jazz.net). Launch the Profile Management Tool, it can be launched from:
<WAS ND Installation Directory>/bin/ProfileManagement/pmt.(sh|bat)
Once the Profile Management Tool has launched, click the “Create…” button. In the dialog window that opens:
- Select “WebSphere Application Server -> Management” , click “Next >”
- Select “Deployment manager”, click “Next >”
- Select “Advanced profile creation”, click “Next >”
- Leave the defaults, click “Next >”
- Leave the defaults, click “Next >”
- Ensure that the values correspond to your environment. For example:
Node name: clmCellManager01
Host name: clmdm.jazz.net
Cell name: clmCell01
Click “Next >”
- Keep “Enable administrative security” enabled and choose an administrative user name and password. For Example:
User name: admin
Password: admin
Click “Next >” - Leave the defaults, click “Next >”
- Leave the defaults, click “Next >”
- Leave the default ports, click “Next >”
- Choose whether to run dmgr as a service, click “Next >”
- click “Create”
Ensure that the deployment manager is started.
<WAS ND Installation Directory>/bin/startManager.[sh|bat]
Enabling Automatic Node Synchronization
As there will be a lot of configuration changes, automatic synchronization of configuration changes with the node should be enabled to prevent having to constantly manually do so.
- Open a browser and navigate to the deployment manager’s Integrated Solutions Console at https://clmdm.jazz.net:9043/ibm/console
- “System Administration->Console Preferences” and select “Synchronize changes with Nodes”
- Click “Apply”
Setting up Global Security
It is recommended to fully configure the deployment manager security before creating the nodes which will host the application servers. It is preferable to do this before adding nodes, as the nodes use authentication to communicate with the deployment manager and deploying the nodes then changing the security after, will require the resynchronization of the nodes manually. This can be avoided by setting up global security first.
For this example, the file-based user repository built into WAS ND will be used to manage Jazz users and groups as in article 97. If an LDAP server is used, then the guidance in article 96 , article 549 and article 479 should be followed. It is important to do this before adding nodes as the nodes use authentication to communicate with the deployment manager and deploying the nodes then change authenticate after, you will need to re-sync the nodes manually. This can be avoided by setting up authentication first.
Create the application server and proxy node agents
The steps in this section should be repeated for each application server node (clmjts.jazz.net & clmapps.jazz.net) and for the proxy node (clmproxy.jazz.net).
On the node host, launch the Profile Management Tool. It can be launched from:
<WAS ND Installation Directory>/bin/ProfileManagement/pmt.[sh|bat]
Once the Profile Management Tool has launched, click the “Create…” button. In the dialog window that opens:
- Select “WebSphere Application Server -> Custom Profile” , click “Next >”
- Select “Advanced profile creation”, click “Next >”
- Use a profile name and path that is representative of the node’s purpose. Example:
Profile name: JTS
Profile directory: /opt/IBM/WebSphere/AppServer/profiles/JTS
Click “Next >” - Also ensure that the node name is representative of the nodes purpose and ensure that the host name is correct. For example:
Node name: jtsNode
Host name: clmjts.jazz.net
Click “Next >”
- Enter the values that correspond to the location, administrative user name and password of the deployment manager. For Example:
Deployment manager host name or IP address: clmdm.jazz.net
Deployment manager SOAP port number (Default 8879): 8879
User name: admin
Password: admin
Click “Next >”
- Leave the defaults, click “Next >”
- Leave the defaults if appropriator or change the distinguished names to be representative of the node. For Example:
Issued to distinguished name: cn=clmjts.jazz.net,ou=jtsNodeCell,ou=jtsNode,o=IBM,c=US
Issued by distinguished name: cn=clmjts.jazz.net,ou=Root Certificate,ou=jtsNodeCell,ou=jtsNode,o=IBM,c=US
Click “Next >” - Leave the default ports, click “Next >”
- Click “Create”
Ensure that the node agent is started:
<WAS ND Installation Directory>/bin/startNode.[sh|bat]Remember that you must repeat these instructions for the each node, For this article we will use the following profiles:
Host | Profile Name | Node Name |
|---|---|---|
| clmproxy.jazz.net | Proxy | clmProxy |
| clmdm.jazz.net | Dmgr01 | clmCellManager01 |
| clmjts.jazz.net | JTS | clmJTS |
| clmapps.jazz.net | Apps | clmApps |
Creating the Web Server Definition
This section covers the process of creating a web server. A web server is a configuration entry in deployment manager that represents and IBM HTTP Server and associated WebSphere Web Server Plug-in. We create a server when we want to use IBM HTTP Server as a proxy.
- Open a browser and navigate to the deployment manager’s Integrated Solutions Console at https://clmdm.jazz.net:9043/ibm/console
- Navigate to “Servers -> Server Types-> Web servers” and click the “New…” Button
- On the next page, select the proxy node (clmproxy.jazz.net) that was created previously (and into which IBM HTTP Server and the IBM Web Server Plug-ins were installed). For example, enter the following values:
Select node: proxyNode
Server name: IHS
Type: IBM HTTP Server
Click “Next”
- Click “Next”
- Ensure the installation directories for the IBM HTTP Server and Plug-ins are correct. Note that these are the installation directories on the node itself and it may very well be the case that the “Plug-in installation location” is /opt/IBM/WebSphere/Plugins rather than /opt/IBM/HTTPServer/Plugins. Make sure to specify the correct directory where the plug-ins were installed. For Example, specify the following values:
Port: 80
Web server installation location: /opt/IBM/HTTPServer
Plug-in installation location: /opt/IBM/WebSphere/Plugins
Application mapping to the Web server: All
Click “Next” - Click “Finish”
- Click “Save” to “Save directly to the master configuration” when prompted
The Web Server should now be listed. There is a post web-server creation step that may be needed. Sometimes, this entry is automatically added to httpd.conf but sometimes it is not.
- Click on the newly created web server “IHS” link
- Click on the “Configuration File” link in the “Additional Properties” Section
- If not already in the file, add the following two likes at the end of it:
LoadModule was_ap22_module <WebSphere Web Server Plug-ins Install Location>/bin/64bits/mod_was_ap22_http.[so|dll] WebSpherePluginConfig <WebSphere Web Server Plug-ins Install Location>/config/IHS/plugin-cfg.xml
Note: mod_was_ap22_http may be in the 32bits folder and not in the 64bits folder depending on the proxy architecture.
- Click “OK”
- Click “OK”
- Click “Save” to “Save directly to the master configuration” when prompted
Creating the Secure Virtual Host
All the CLM applications listen on a secure port by default, so it would be a good idea that the proxy respects this configuration and is itself using SSL. In any case, it will need to communicate with the back end servers using SSL so those certificates will be needed. In a production system one would typically obtain a certificate from a certificate authority. In this scenario, a self-signed certificate is used.
- Open a browser and navigate to the deployment manager’s Integrated Solutions Console at https://clmdm.jazz.net:9043/ibm/console
- Navigate to “Servers -> Server Types-> Web servers” and click the “IHS” server
- On the next page, select the “Web Server Virtual Hosts” in the “Configuration settings”
- Click “New…”
- On the page that appears next, select “Security enabled virtual host” as an SSL host will be set up. Click “Next”
- A self signed certificate will now be created. Enter the following, for example:
Key store file name: IHS
Target key store directory: $(WEB_INSTALL_ROOT)/conf
Key store password: WebAS
Verify key store password: WebAS
WebSpheregenerally uses “WebAS” as a default for key stores and this is used in this example to keep things consistent. Click “Next” - Enter the following value:
IP Address: 0.0.0.0
Port: 443
Click “Next” - Click “Finish”
- Click “Save” to “Save directly to the master configuration” when prompted
Creating Application Servers
Creating a “JTS” Application Server (for “JTS” and “RM”)
We will create one application server that will be used as a template to create additional application-agnostic CLM application servers. It is assumed that the JTS and RM CLM 4.0 application are installed on the node where the JTS application server will be created.
- Open a browser and navigate to the deployment manager’s Integrated Solutions Console at https://clmdm.jazz.net:9043/ibm/console
- Navigate to the “Server->Server Types->WebSphere Application Servers” Topic and click “New…”
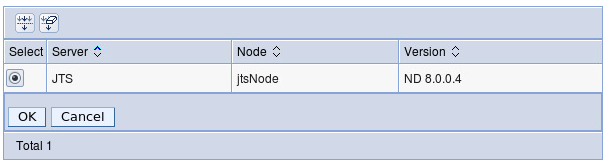
- On the next page, select an application server node (clmjtsjazz.net) that was created previously. For example, enter the following values:
Select node: jtsNode
Server name: JTS
Click “Next”
- Select the “default” template. Click “Next”
- On the next page “Generate Unique Ports” can be deselected if this is the only application server on the node.
Generate Unique Ports: false
Click “Next” - Click “Finish”
- Click “Save” to “Save directly to the master configuration” when prompted
Checking virtual hosts
In order to make sure that the application server is listening on the ports for the host on which it is in installed, their needs to be a virtual host entry for the ports. As “Generate Unique Ports” in step 4 above, the default listening ports are 9080 for http and 9443 for https. If this option was not chosen then the port numbers for the application server can be found as follows:
- Navigate to “Servers->Server Types->WebSphere Application Servers” and click on the server name “JTS”
- On the right side under “Communications->Ports”, “WC_defaulthost” and “WC_defaulthost_secure” can be found along with the corresponding port numbers.
Take note of these ports and ensure that these ports are also in a virtual hosts entry for the host on which the application server is installed on (clmjts.jazz.net). This is important because when applications are installed they are bound to a virtual host, a set of host->port number combinations that determines what hosts and ports the application will be listening on. When an application module is targeted to a server, WAS ND only allows the application to listen on a host->port combination that is in the virtual hosts list. We know that we want applications to listen on the secure port, maybe also the unsecured ports for this server so we need to that the host clmjts.jazz.net and port 9080 and 9443 are in that list.
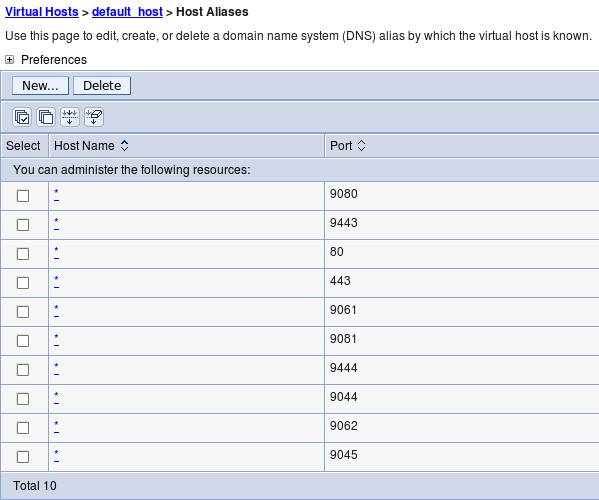
- Navigate to “Environment->Virtual Hosts” and there should be a mappings called “default_host”. Click on “default_host”
- Click on “Host Aliases” in the “Additional Properties” section
- The list of host->port mappings for the hosts should be now show. Any application that is tied to “default_host” can listen on these combinations, assuming there is a application server listening on them. There may already be a list for each node host along with a wild card entry. It make things easier to have all nodes with application servers listening on the same ports (Unselected “Generate Unique Ports” when creating an application server ensures this). If this was not the case, different host entries are needed to identify the unique ports that the server is listening on.
Preparing the Application Server for CLM
As mentioned previously, this application server “JTS” will be used as a template for the a new “Apps” server. CLM 4.0 should already be installed in a location on both the clmJTS (clmjts.jazz.net) and clmApps (clmApps) nodes.
- Global security should be setup by now, so the steps related top security shouldn’t need to be followed. If some of the options mentioned in the information center were not applied, then they should be applied but the deployment manager will need to be restarted and the nodes resynchronized. To resynchronize the nodes they must be stopped and the syncNode command executed and then restarted.
- References to “” should instead be “
In addition to these standard setup instructions, the application servers needs to additional customer properties:
- Navigate to Servers -> Server Types -> WebSphere application servers” Click “JTS”
- Under “Container Settings” expand “Web Container Settings”. Click “Web Container“.
- Add the following custom properties:
trusthostheaderport = true com.ibm.ws.webcontainer.extracthostheaderport = true
- Click “Save” to “Save directly to the master configuration” when prompted
Creating “CLM 4.0” Application Server Template
Templating the “JTS” application server will allow us to keep all the settings that have been set.
- Go to “Servers->Server Types->WebSphere application servers”, select the server and click the “Templates…” button
- Click “New…”, Select the “JTS” server. Click “OK”
- Enter
Name: CLM 4.0
Description: Template for CLM 4.0 application servers
Click “OK” - Click “Save” to “Save directly to the master configuration” when prompted
Creating an “Apps” Application Server (for QM & CCM)
It is assumed that the CLM 4.0 (QM and CCM) is installed on the node where the JTS application server will be created.
- Navigate to the “Server->Server Types->WebSphere Application Servers” Topic and click “New…”
- On the next page, select an application server node (clmjtsjazz.net) that was created previously. For example, enter the following values:
Select node: appsNode
Server name: Apps
Click “Next”
- Select the “CLM 4.0” template. Click “Next”

- On the next page “Generate Unique Ports” can be deselected if this is the only application server on the node.
Generate Unique Ports: false
Click “Next” - Click “Finish”
- Click “Save” to “Save directly to the master configuration” when prompted
As previously with the “JTS” server, ensure the virtual hosts set up is correct.
Deploying the CLM applications
The instructions in the CLM 4.0 information center regarding application deployment with the following exceptions and additions:
- Ignore the instructions at the beginning to restart the application server. We have not yet started the servers we created anyway.
- Either:
- Use a browser located on the jtsNode node (clmjts.jazz.net) to install the jts,rm and converter war files and then use a browser located on the appsNode node (clmapps.jazz.net) to install the ccm and qm war files to install the war files
OR
- Copy the jts.war,rm.war and converter.war from jtsNode (clmjts.jazz.net) and ccm.war and qm.war from appsNode (clmapps.jazz.net) to a computer with a browser and access the deployment manager’s Integrated Solutions Console from there to install the war files.
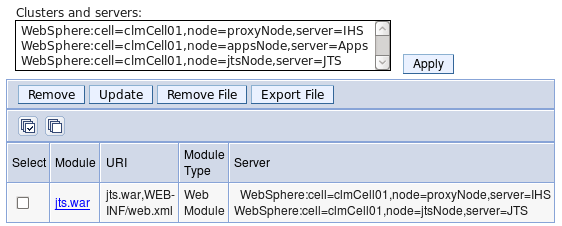
- Step 9 has additional sub-steps:
- In the “Modules” section, click “Manage Modules”
- Ensure the jts.war modules is targeted to both the “IHS” web server and the “JTS” application server. If it is not, select the “jts.war” entry, select both the “JTS” application server and “IHS” entries in the “Clusters and servers” box and click “Apply“
- Click “OK”
- Click “Save” to “Save directly to the master configuration” when prompted
- Target the “Admin”,”JTS” and “RM” modules to the “IHS” and “JTS” servers, and target the “CCM” and “QM” modules to the “IHS” and “Apps” servers.
- The clmhelp.war file can be installed on any server of choice.
Updating the Web Server Plug-in configuration
Once all the war files have been installed the the environment, the web server proxy plug in configuration needs to be updated with the new application mappings applied.
- Open a browser and navigate to the deployment manager’s Integrated Solutions Console at https://clmdm.jazz.net:9043/ibm/console
- Navigate to “Environment -> Update global Web server plug-in configuration”
- Click “Overwrite”
- Navigate to “Servers -> Server Types-> Web servers”
- Select the “IHS” Web Server
- Click the “Generate Plug-in” button
- Click the “Propagate Plug-in” button
Starting and setting up CLM
At this point, all the war files should be installed and the web server proxy should be updated. All that remains is to start all the servers and run CLM setup from the public URI (which should be pointing to the proxy server, clmproxy.jazz.net). In this article, we use the example public URI: http://clm.jazz.net/<app>. But first, the server need to be started:
- Open a browser and navigate to the deployment manager’s Integrated Solutions Console at https://clmdm.jazz.net:9043/ibm/console
- Navigate to “Servers -> Server Types-> Web servers”
- Select the “IHS” Web Server
- Click the “Start” button
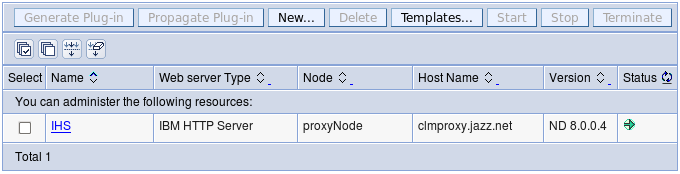
After some time, a green arrow pointing right should appear in the “Status” column. Now lets start the application servers:
- Navigate to the “Server->Server Types->WebSphere Application Servers”
- Select both the “JTS” and “Apps” servers
- Click the “Start” button
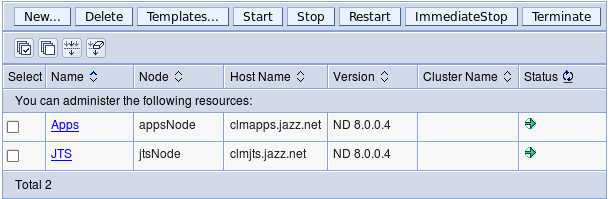
After some time, a green arrow pointing right should appear in the “Status” column. Everything is no ready to run the JTS setup and setup the CLM application.
- Open a browser and navigate to Public URI at https://clm.jazz.net/jts/setup
- Follow the instructions in the CLM 4.0 Information Center on how to run the CLM setup noting the following:
- The public URI is “https://clm.jazz.net/jts” so https://clm.jazz.net/jts/setup should be used to run setup instead of the URL identified in the instructions.
- Step 7c should be followed as CCM and QM are installed on another server.
- /rm and /admin should be detected automatically as they are on the same server as /jts
- /ccm and /qm need to be added manually with the Discovery URL’s “https://clm.jazz.net/ccm/scr” and “https://clm.jazz.net/qm/scr” respectively.
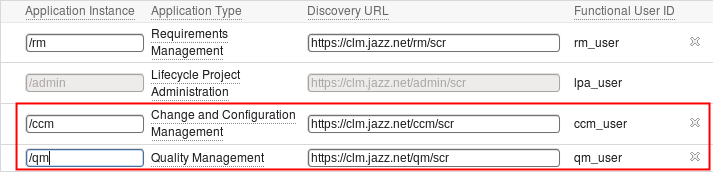
- After /ccm and /qm have been added manually, then click “Register Applications”
That’s it! All done! The applications can be accessed using
- JTS: http://clm.jazz.net/jts
- RM: http://clm.jazz.net/rm
- CCM: http://clm.jazz.net/ccm
- QM: http://clm.jazz.net/qm
- LPA: http://clm.jazz.net/admin
Copyright © 2012 IBM Corporation