
How to author and use a Process Description in CLM 2011
This article gives step by step instructions for authoring and using a Process Description in CLM 2011. For more information on CLM 2011, see the CLM Infocenter.
Overview
In CLM 2011, the Process Description tab in the project and team editors allows you to author a human-readable description of your team’s practices. This makes it easy for new team members to learn how your team works and provides live reference material for everyone on the team. The Process Description tab provides efficient ways for you to manage your practices. For example, you can attach images and files to your practices to help illustrate them, refactor your practices easily, export your process descriptions or practices to share with others, create process descriptions in multiple languages for a global team, and create a viewlet in several dashboards to make your process visible.
Prerequisites
This topic assumes you have an installation of the Rational solution for Collaborative Lifecycle Management comprised of Rational Team Concert 3.0.1, Rational Requirements Composer 3.0.1, and Rational Quality Manager 3.0.1, have run the setup for CLM, and have deployed the process templates. If you have not, follow the directions in the online help to run the setup and deploy the templates before continuing. This topic also assumes you are familiar with creating users and project/team areas in the CLM web UI, or that you already have projects, teams, and users set up with which to try these instructions.
Glossary
The Process Description is used to capture how a project or team works. It describes all of their routines and methods.
A Practice is a routine or method that is used by members of the project or team (e.g. practice “Continuous Testing” describes how to perform testing during development).
A Practice Element is a part of a practice. It is used to describe a fine-grained routine, or to provide supporting materials to the routine (e.g. practice element “Smoke Test Example” provides an example that shows how a smoke test is performed in the practice “Continuous Testing”).
A Category is also a part of a practice. It is used for organizing practice elements into groups. A category can also contain sub categories.
Create a process description in a project area
In this section you will create a project area and a process description for this project area.
- Create a new project area “My Project” with the Scrum process template, or open an existing project.
- Open the Process Description tab.
- Click Create a new process description.
- Input the name “Process Description for My Project” and some description text.
- Save. A process description for this project area is created.
Create a process description in a team area
In this section you will create a team area and create a process description for this team area.
- Open the project “My Project.”
- Create a team area named “My Team” in “My Project” (or open an existing team).
- Open the Process Description tab.
- Click Create a new process description.
- Input the name “My Process Description” and some description text.
- Save. A process description for this team area is created.
Create practices for a process description
In this section you will add practices to your process description.
- Open “My Process Description” in “My Team.”
- Click the Edit button, switching to edit mode.
- Click the Create new practice button in the Practices pane to create a new practice and input practice name “My Practice.”
- Hover over “My Practice” in the Practices pane, click the Create New Category button to create a new category, and name it “My Category.”
- Hover over “My Category” in the Practices pane, click the Create New Practice Element button to create a new practice element, and name it “My Practice Element.”
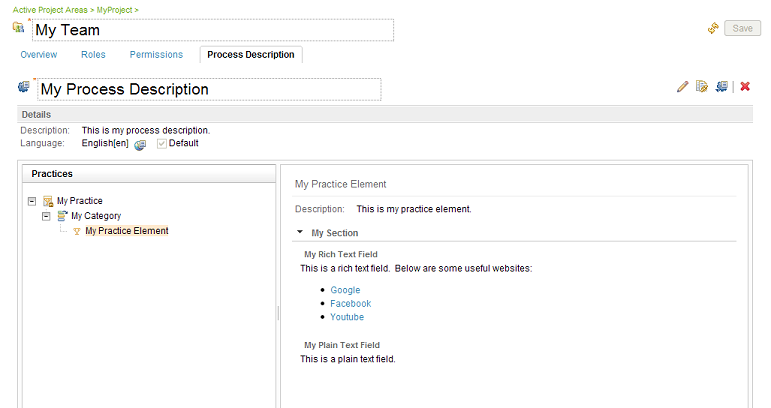
- Click Add Section in “My Practice Element” to create a new section, name it “My Section,” and input name “My Rich Text Field” for the new rich text field.
- Input some text in “My Rich Text Field,” format it using the rich text editor options, and click Apply.
- Click Add Field in the “My Section” toolbar, select Add Plain Text Field, and name it “My Plain Text Field.”
- Input some plain text in “My Plain Text Field” and click Apply.
- Click Save in the top right corner of the process description editor to save all unsaved content.
See a snapshot of a practice element:
Attach files and images to practices
In this section you will attach files and images to practices in your process description.
- Open “My Process Description,” click Edit, and select the practice “My Practice.”
- Click the Attachments section in “My Practice.”
- Click the Add File button to attach an image and a text file.
- Add a new section “Attachment Section” and open the rich text editor.
- Click the Insert Attached Images button and select the image that was uploaded in step 2.
- In the Attachments section, hover over the text file that was uploaded in step 2, and click the Copy Resource URL button to copy its URL.
- Open the rich text editor again, and click the Create Link button.
- In the Link Properties dialog input the URL from step 5 and a description, and click Set.
- Save.
See a snapshot for the attached files in practice:

Refactor practices
In this section you will reorder practices and move practice elements and categories within the practice tree using either drag and drop or the move dialog.
- Open “My Process Description” and click the Edit button, switching to edit mode.
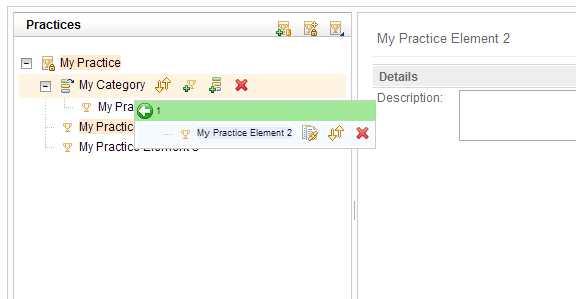
- In “My Practice,” create two new practice elements named “My Practice Element 2” and “My Practice Element 3.”
- Move “My Practice Element 2” elsewhere in the “My Practice” tree by dragging it and then dropping it with the mouse.
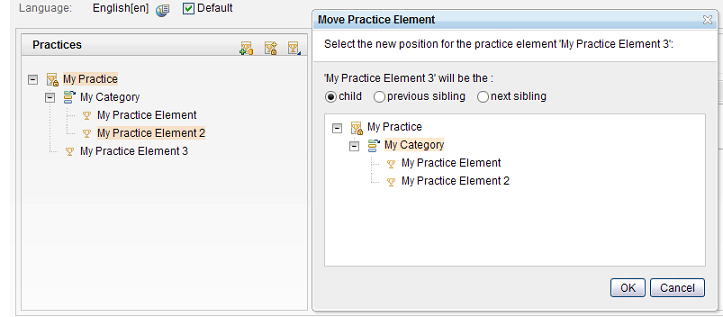
- Move “My Practice Element 3” elsewhere by hovering over it and clicking the Move Practice Element button.
- Save.
See snapshots for moving practice elements in practice:
Process description resource links
In this section you will learn how to use resource links, which point to related process description elements. Resource links support rich hovers that show an in-place preview of the linked content.
- Open “My Process Description” and click the Edit button, switching to edit mode.
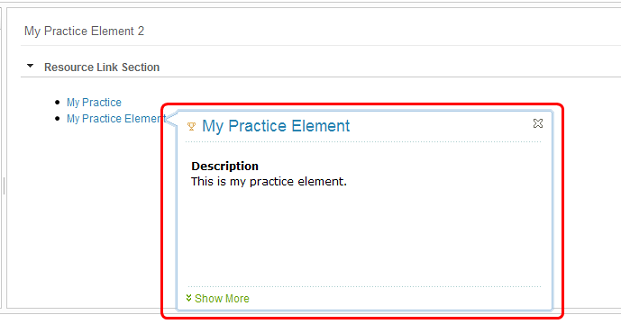
- In “My Practice Element 2,” add a new section “Resource Links Section” and open the rich text editor.
- Click the Create Resource Link button and select “My Practice,” “My Practice Element” or “My Practice Element 3” to add.
- Click Apply and then save.
- Switch out of edit mode to view mode.
- Hover over the resource link, you will see a compact rendering.
See a snapshot for resource links:
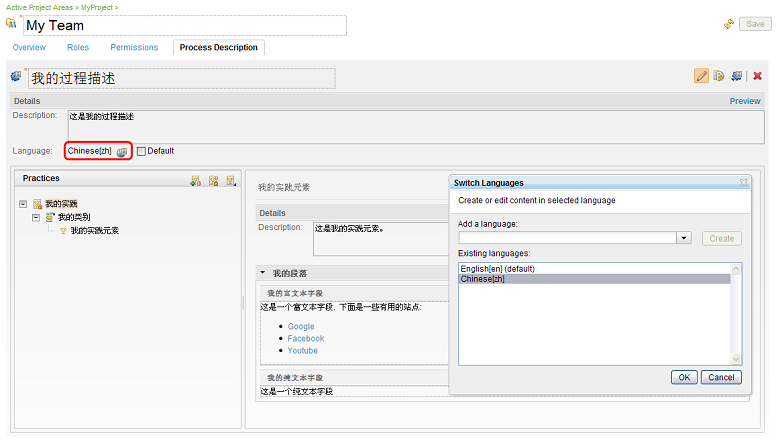
Create multiple language content for a process description
In this section you will learn how to create multiple language content for your process description. Global teams have people working in different countries and using different languages, so they need their practices described in each of those languages. Please follow the steps below to create multiple language content.
- Open “My Process Description” and click the Edit button, switching to edit mode.
- Click the Switch Language button in the Details section to see the Switch Languages dialog.
- In the Add a language dropdown list, select the language “Chinese[zh]” and click Create to add this language.
- Select the newly added language “Chinese[zh]” in the Existing languages section, and click OK to switch to Chinese language.
- Translate all of the fields in this process description to Chinese.
- Save.
- Switch language to English, you can see English content. Switch language to Chinese, you can see Chinese content.
See a snapshot for the multiple language process description:
Export process descriptions and practices
In this section you will export a process description and practice for sharing.
- Open “My Process Description.”
- Click Export Process Description to export the whole process description.
- Hover over “My Practice” and click the Export Practice button to export “My Practice.”
Import process descriptions and practices
In this section you will import an existing process description or practice.
- Open “My Process Description.”
- Click Delete Process Description to delete the whole process description. Save.
- Click the Import a process description link, and select the process description file you just exported.
- Click OK to continue and wait for the import to finish. You will see “My Process Description” again.
- Switch to edit mode by clicking the Edit button.
- Hover over “My Practice” and click the Delete Practice button to delete “My Practice.” Save.
- Click Import Practices in the top right of the Practices pane to import the practice file that you just exported.
- Click OK to continue and wait for the import to finish. You will see “My Practice” again.
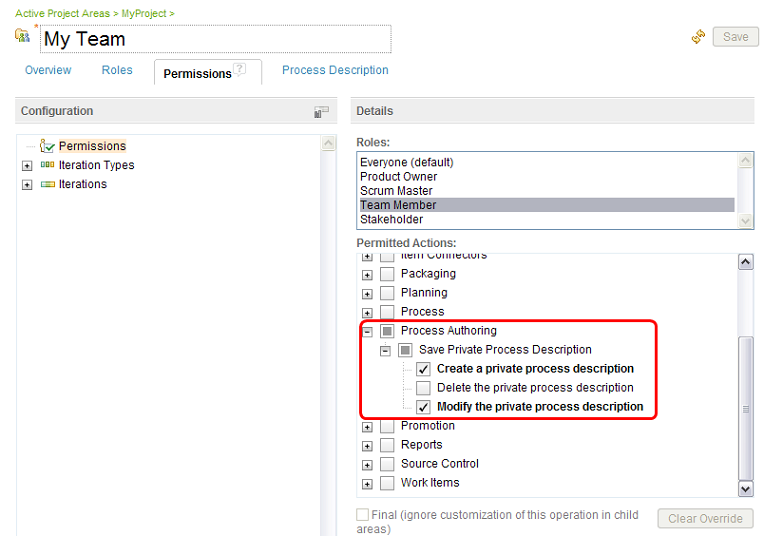
Set permissions for editing process descriptions
In this section you will set permissions for editing the process description. Note that this section needs the project and the team that were created in the “Create a Process Description in Project Area” section and the “Create a Process Description in Team Area” section.
- Create a new user “Jack” with JazzUsers repository permissions (or use an existing user like this), add him as a member of “My Project,” and assign him a role.
- Log in to your application (e.g. Rational Team Concert) as a different user who has administrative privileges.
- Open the Project Areas tab.
- Open “My Project” and then open “My Team.”
- Open the Permissions tab in the team area editor.
- Set permissions for the role you assigned “Jack.” Assign this role the permissions “Create a private process description” and “Modify the private process description.”
- Now log in as “Jack” and you can create and modify the process description in “My Team.”
- If “Jack” wants to delete the process description, then follow step 6 to assign “Delete the process description” permission to “Jack.”
See a snapshot for setting the process description permissions:
Create a process description viewlet in dashboards
In this section you will create a process description viewlet in four different dashboards. Log in as “Jack” and make sure that “Jack” has the permissions to save/edit all kinds of dashboards. Note that the process description viewlet is only available in Rational Team Concert and Rational Quality Manager.
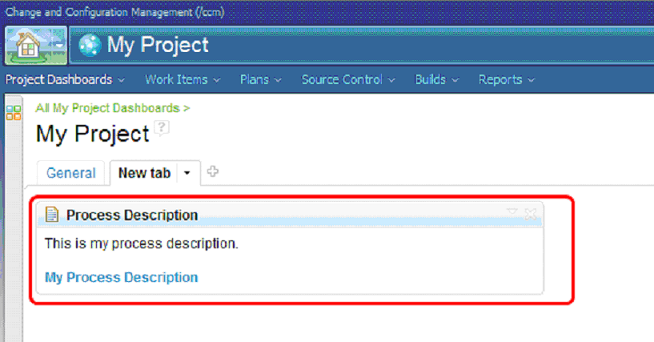
Create a process description viewlet in a project dashboard
- In the Home Menu (top left corner of the CLM web UI), find “My Project” and click it to open the project dashboard.
- Open a new tab and click the Add Widget link.
- Select Process Authoring in the Select Category section and click the Add Widget button to add a process description viewlet for “My Project.”
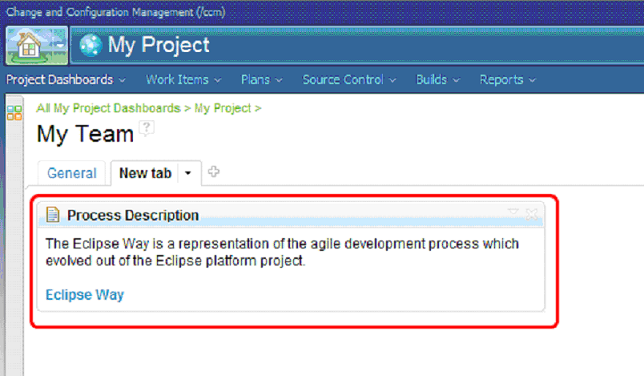
Create a process description viewlet in a team dashboard
- In the Project Dashboards dropdown menu on the project dashboard page, click All My Project Dashboards.
- You will see all of the teams in this project. Click on “My Team.”
- Follow the steps from the project dashboard to create a process description viewlet for the team dashboard.
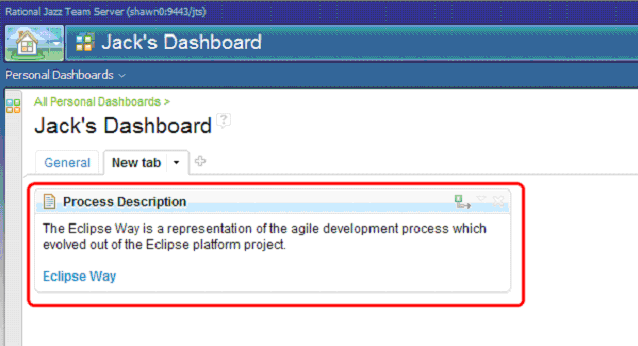
Create a process description viewlet in a personal dashboard
- In the Home Menu, find “Jack’s Dashboard” and click it.
- Open a new tab and click the Add Widget link.
- Make sure the application containing your project area is selected in the Select Catalog field, then add a process description viewlet.
- Click the preferences link in the viewlet to set the scope as “My Team.”
- Click OK. You will see the viewlet as below.
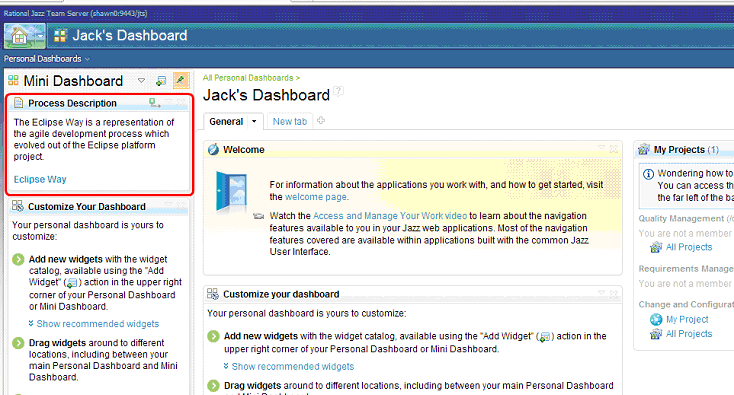
Create a process description viewlet in a mini dashboard
- Open the Mini Dashboard panel on the left side.
- On the top right of the Mini Dashboard panel, click on the Add Widget button.
- Select your application in the Select Catalog field and add a process description viewlet.
- Follow the steps from the personal dashboard to set the viewlet scope.
About the authors
ShaoMin Xing is a software engineer on the Process team of the Jazz Foundation project. You can contact him at xshaomin@cn.ibm.com.
Parker Dunton is a software engineer on the Process team of the Jazz Foundation project. You can contact him at pbdunton@us.ibm.com.
© Copyright 2011 IBM