
Getting Started with Work Items in Rational Team Concert
Summary
Work Items are the fundamental mechanism to track and coordinate development tasks and workflows and they provide the hub for linkage between the various artifacts in Rational Team Concert (RTC). This article describes how to create and manage work items.
If you already know the basics and want to skip ahead or find something else, here is the list of other Work Item related documentation:
Introduction
A Work Item is a generalized notion of a development task. Typical work item types are defects and tasks. You can easily add new work item types or extend existing types via the process specification.
The purpose of this article is to help you get started using Work Items and their user interfaces like the work item editor, the query editor and the query results view.
This article is organized along typical use cases:
We strongly recommend to first read these documents:
- The Jazz Tutorial
- Jazz Platform – Client Setup Guide
- Getting Started with Jazz Project Areas and Process
This article also assumes that a RTC server has been setup and you have access to it. Because work items exist only in the context of a project area, you must open a connection with an existing project area before creating any work item. You can use the JUnit example project setup wizard to create a sample database. To do so follow the steps in the Setting up the Jazz JUnit Example Project.
If you are not using the JUnit Example project but have created a new project area, you’ll have to do some preparatory steps before you can use it with Work Items. For this please read: Configuring Project and Team Areas for Work Items.
If you want to go one step further and configure Work Items to the needs of your company or project, learn how Work Items can be customized in Work Item Customization.
Filing Bugs – Creating Work Items
Creating a new Work Item from Scratch
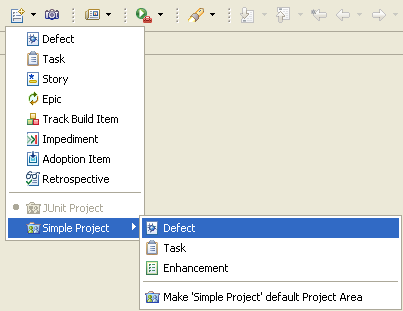
To create a new work item, select the New Work Item wizard from the File > New > Work Item menu item. The wizard allows to select the desired project area and work item type. The created work item is then opened in the work item editor.
The New Work Item toolbar action allows to select the desired type directly in the drop-down menu. If connected to multiple project areas, it is furthermore possible to create a work item for any project area, without changing the default project area. The default project area can be changed with the Make Default Project Area action in the New Work Item toolbar action drop-down menu.
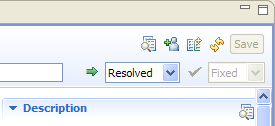
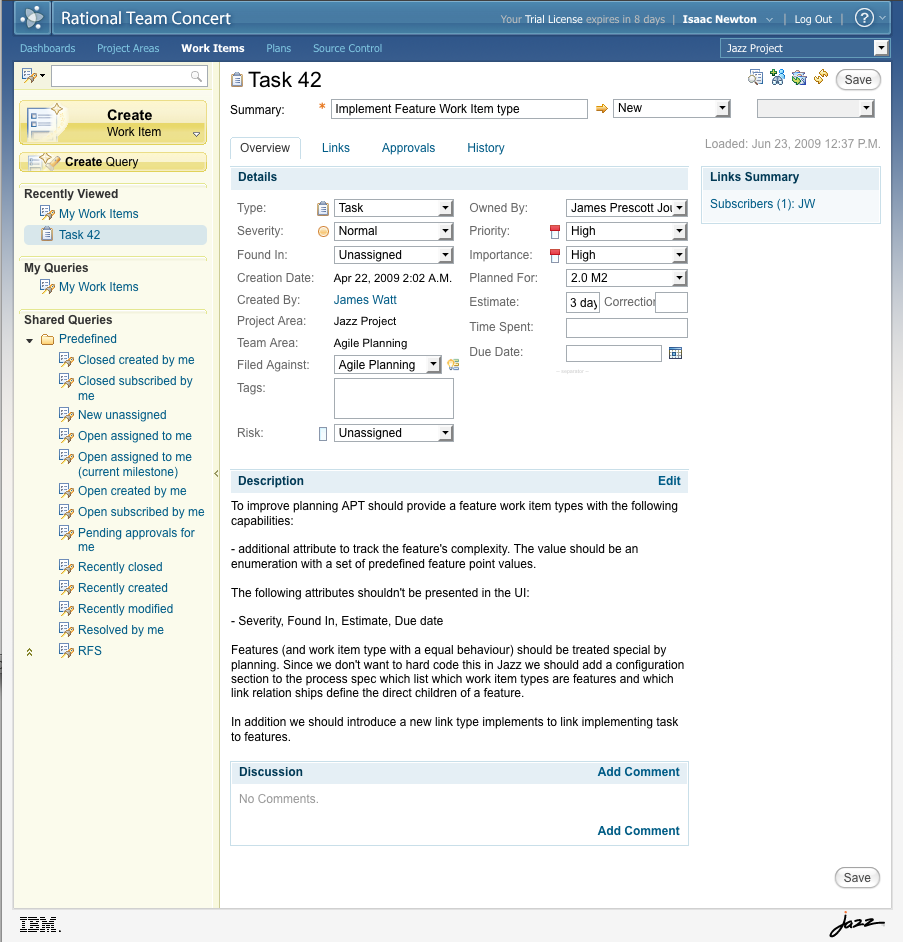
Here is an example of a work item of type Defect that has been in process for a while, so it’s status has been changed to Resolved and the resolution has been changed to Fixed.

- The Overview page displays the main attributes and provides a summary of the information found on the Links and Approval pages.
- The Links page displays file attachments, subscribed users, and links to other artifacts. Links have a type denoting the semantics of the link. Examples are the predefined link types “Parent/Child”, “Related”, “Duplicate”, and “Blocks/Depends On”.
- The Approvals page shows any Approvals, Reviews, or Verifications that have been defined for the work item. An Approval (or Review or Verification) has a “subject” that explains the reason for the approval, a list of approvers, and a due date. Every approver can accept or reject his Approval.
- The optional Custom page displays any custom attributes. This page appears only if the work item has custom attributes that are not displayed on any other tab of the editor. Custom attributes may be added to the work item type in the process specification.
- The History page, displays the history of the work item’s changes.
- The Summary field is used as the (short) title of the work item.
- The work item Type specifies the nature of this new work item. Different types can have different attributes and different state transitions. Some work item types are predefined, like Defect, Task, and Story.
- The Severity describes the impact of the work item.
- With the Found In attribute can be specified to which release of the project the work item applies.
- The Description field details the work item goals or any pertinent details about the work item.
- The Filed Against field specifies the category of a work item. Each category is associated to a team area that defines the process and team responsible for the work items filed against that category. See the categories section on how to configure your own categories and change their associations to team areas. Note that when working with multiple development lines the Planned For attribute (see below) also affects the team area a work item is associated to.
- Owner: the user in charge of this work item,
- The Priority attribute describes the importance and order in which the work item should be fixed.
- The Planned For specifies the targeted iteration (see Process guide) for this work item. When working with multiple development lines the team area a work item is associated to is determined by its Filed Against and Planned For properties. See categories section on how to change these associations.
- State/Resolution: the current state of the work item, e.g. New, In Progress, Resolved, and for specific states a resolution, e.g. for the Resolved state a Fixed or Duplicate resolution.
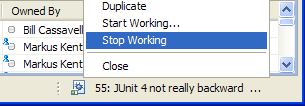
For a developer working on a work item, important state transitions are between “New” and “In Progress”. To avoid having to perform this transition in the work item editor, the two context menu actions Start Working and Stop Working are available for work items. A benevolent side effect of using these actions is that the Jazz client maintains a Current Work Item which is visible in the status line on the bottom right of the Eclipse workbench window:
- The Tags field provides content assist. This is indicated by the light bulb when the cursor is set to the field. Type some text and then press Ctrl+Space (assuming default keyboard settings) to activate content assist.
- The Summary, Description, and Discussion fields support “bold” and “italic” text styles (see Edit menu while some text is selected).
- All links in the editor are live in that they can not only be followed but also have a context menu and rich hovers for the object they link to. When hover help is provided, you may press F2 to give focus to the help box and scroll through the information.
- In the Summary, Description, and Discussion fields you can automatically create links to other Jazz artifacts with a short notation. For examples: work item 123, comment 3, item 123, bug 432, attachment 4321. These references are rendered as links and offer a context menu and a rich hover.
- You may extract a related work item from within a work item by selecting some text and using the Extract Work Item action in the context menu.
- You may start a chat session or send a mail to a comment author in the Discussion section — or any user — by using the context menu for user’s name.
- To add subscribers, attachments, or links to other Jazz artifacts to a work item, you can either use the context menu of the Quick Information section or just drag the object onto the sections on the Links or Approvals pages.
- You can create and attach a screenshot from the Quick Information section’s context menu.
- You can use the Find dialog (Control-F) to search across the Summary, Description, and Discussion sections.
- The editor’s title can be used as a source for drag-and-drop and offers a context menu.
- Votes for approvals, reviews and verifications can be set up on the Approvals page.
- Prepare your commonly used approvals as folders with all approvers in the Team Artifact view’s Favorites. The Approvals section then allows you to create new approvals by dropping a favorites folder on the section.
- You may search for duplicate work items using the action Find Potential Duplicates from the editor’s toolbar.
Other Ways to Create Work Items
There are several other ways to create new work items in Rational Team Concert:- The Capture Screenshot toolbar item (
 ) activates the screen capture tool where you can take pictures of the screen, adorn them with simple line graphics and attach the resulting image to a new work item.
 - The Error Log view context menu provides a New Work Item action to create a new work item based on the selected error log line.
- The JUnit view context menu provides a New Work Item action to create a new work item based on the selected JUnit test.
- On the Summary page of the Build editor you can use the Create a new work item action link to create a new work item based on the current Build.
- The Console view context menu provides a New Work Item action to create a new work item based on the selected text.
- In the work item editor you can use the Extract Work Item action from the Edit menu, to create a new work item based on a text selection in the summary, description, or discussion fields.
- In the work item editor’s header area the Duplicate action creates a copy of the work item and connects them with a related link.
Managing Work Items
Jazz provides rich functionality for managing work items. Here are descriptions and screen images of the primary components that can be used to manage work items.Finding Work Items
Find Work Items by ID
Enter the work item’s ID into the text entry field in the lower left corner of the workbench window and press[ENTER]. Alternatively, you can press Ctrl+Alt+W and enter the ID into the pop-up dialog. The history in the pop-up dialog allows you to quickly reopen a recently used work item. Find Work Items by Textual Content
The same text entry field in the window trim allows to search the repository for work items that contain certain words. 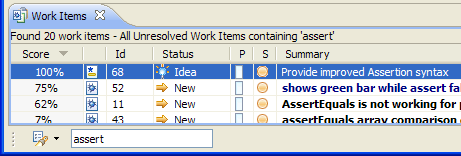
Some search hints:
- ‘collaps’ will match ‘collapsed’, ‘Collapsing’, etc.
- CamelCase words are treated specially: ‘NullPointerException’ will return work items that contain this exact term, but also others that contain just ‘NPE’. Work items that contain ‘null’ and ‘pointer’ and ‘exception’ will also be found.
- Surround the entire search string with double quotes to narrow down the search results to match exactly the phrase you entered.
The drop-down menu next to the entry field allows to limit the search scope to a specific project area and/or to unresolved work items. If the entry field contains some text, pressing the action icon will re-execute the query.
Alternatively, you can also press Ctrl+Alt+W, type some words into the pop-up dialog and select the work item from the results.
More full text options are available in the Artifacts Search page (Search > Jazz Text Search).
Find Potential Duplicates
You can try to find duplicates for a work item using the action ( ) in the Work Item Editor header or in the Description field header. In the Work Items View, you can use the context menu action Find Potential Duplicates.
 Other ways to find existing work items that are similar to some content include:
- The context menu entry Find Similar Work Items in the Error Log
- The context menu entry Find Similar Work Items in the console
- The action Search > Work Items Similar to Clipboard
- The action Search > Text > Work Items for text selected in the Work Item Editor
Find Work Items by Filter Constraints
If you need more control over the query results, or if you want to save a query for future use, you can create a query in the Query Editor. New queries can be created by selecting File > New > Work Item Queryor by using the New Query action in the Work Items View, or by using the context menu in the Team Artifacts view. Alternatively, you can duplicate an existing query using the Duplicate context menu action, or by using Save As directly in the Query Editor. 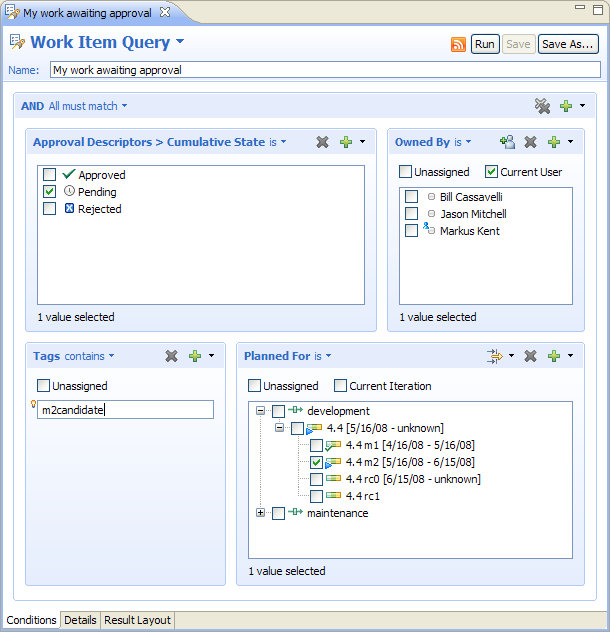
Start with a predefined set of conditions or “from scratch”:
- Start from scratch: Start with an empty set of conditions and add your own.
- Simple Query: Start with a typical set of conditions: Owner, Status, Filed Against and Full Text.
- Full Text: Create a full text query.
New conditions can be added using the Add Conditions action ( ). Each condition follows the same rules:
- As long as nothing is entered or selected, the condition is not part of the query yet.
- If you select or enter more than one value, these will be joined by OR.
- Variables are shown as check boxes at the top. These variables represent a value that can change over time. A good example is the Current Iteration variable that will always point to the iteration(s) marked as current in the process specification. Variables allow you to formulate queries that stay valid over an extended period of time, or queries which return results that depend on the user who executes the query (e.g. by using the Current User variable).
- The ‘Unassigned’ check box allows you to query for uninitialized or unset fields of a work item.
OR and AND clauses can be added using the Add Conditions action menu. A third option is to add a compact set of conditions for all attributes of a specific type. The User Group for example allows to create a query for all work items created by, modified by, owned by or resolved by a certain user. The attributes of such a group are always joined using OR.
You can check the results of the query by using the Run Button (or in RTC 2.0 by pressing Ctrl+R). The results are shown in the Work Items view. Providing a name is required to save the query.
Sharing Queries: If a query is useful for others, you can share the query with your team members, with individual users or (in RTC 2.0) with all project members. Switch to the Details page of the Query Editor and select a Team Area or some users in the Sharing section.
Defining Result Columns: Depending on the query, not all columns that are shown in the Work Items view by default make sense. You can choose a custom set of columns that will be shown every time you execute the query (both in the Eclipse UI and the Web UI). Switch to the Result Layout page and choose the columns and sort order that best suit your query results.
Tips for the Query Editor:- To find the desired attribute more easily, the Add Conditions dialog allows to hide entire sets of attributes, e.g. all built-in attributes, all custom attributes or all link attributes.
- The operator for each attribute can be changed using the drop down menu in the section header:

- In list and tree based controls, start typing the name of the value that you want to select: A filtered pop-up dialog allows to quickly navigate to the desired value.
- The controls for Tags and Approval Descriptor names provide content assist (Typically invoked by
Ctrl+Space). - Some controls provide additional functionality in the section header
- Value filtering (e.g. archived values):

Available for Filed Against, Planned For, Team Area. - Select additional users that are not yet shown in the list:

The selected users will subsequently be available directly in the list.
- Value filtering (e.g. archived values):
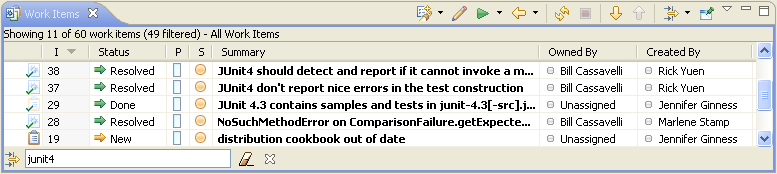
Query Results: Work Items view
The Work Items view shows the work items resulting from a work item query. The result list can be filtered by typing directly into the view: a text field appears and only matching work items are shown (Ctrl+F or pressing the filter button in the view header also opens the entry field, ESC dismisses it).
Queries can directly be run from the Work Items view toolbar ( ) once you have added your most often used queries to the Favorites domain. Clicking on the toolbar button brings up the Query Selection Dialog where you can choose from all available queries.
Columns can be added and removed using the view’s Columns menu.
Links between work items can optionally be shown using the view’s Relationships dialog.
Tracking Work Item Changes
In this section you will learn how to track changes to work items you have a relationship to. For instance, if you are the owner of a work item, you will have a strong interest in any changes to the work item, e.g. new comments that have been added. Another example is tracking the inbox of a certain component by staying informed when new work items for the component are created.
There are four common ways of tracking work item changes:
- Event Log in Team Central
- Timeline
- Notification Popup
The section concludes with showing you how the Message @Me feature can be used to directly address comments from Work Items to a user. This feature is available since RTC 2.0.
Event Log in Team Central
Team Central provides the Event Log section that is capable of showing the contents of a news feed. Out of the box, you are subscribed to two feeds that list changes to work items:
- My Work Item Changes on <Server>
- My Teams in <Project Area>
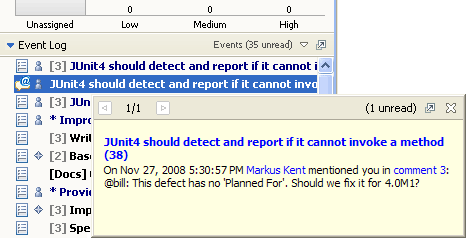
The former informs you about changes to work items where you are creator, owner, modifier or subscriber. Thus, this feed is ideal to track changes to work items that are important to you. The latter feed informs about all the changes that occur in your team. This is useful to track what’s going on for all of the team members. Clicking on a news item in the event log will open a separate window next to the section containing a detailed view of the changes. Multiple changes for the same work item are aggregated so that you can easily navigate through all changes at once. The event log will automatically show recent changes when they are available from the feed.
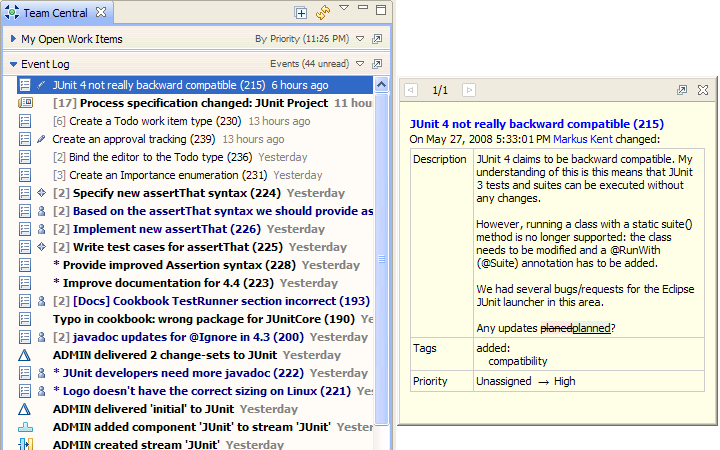
Event Log in Team Central with the changes for a work item showing.
Timeline
The timeline shows all news items of a feed grouped by date. Any feed can be opened in this view, e.g. by double-clicking on the desired feed from the Team Artifacts view or the feeds-dropdown in the toolbar. A timeline on top indicates the actual number of events for a given date-range and will update automatically as soon as the feed reloads and new changes are available.
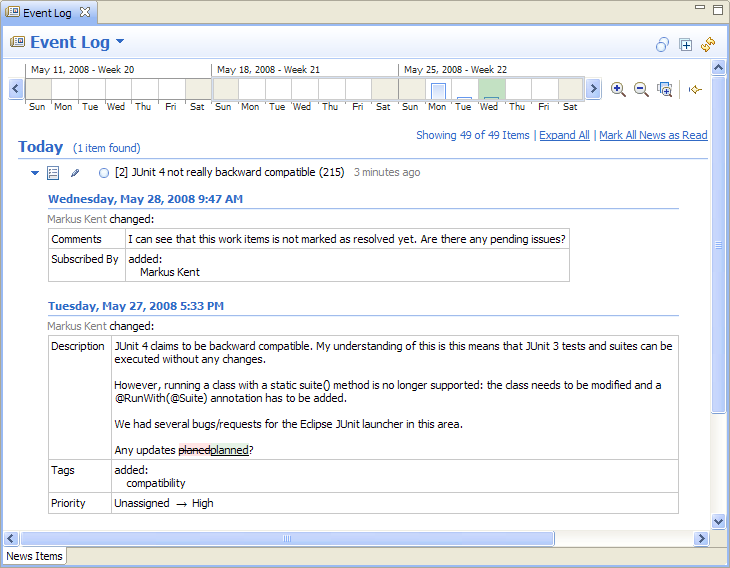
The timeline listing recent changes to work items.
Notification Popup
If you want to stay informed for changes to work items even when you are working in another application while Rational Team Concert is running you can configure notification popups to show up. Open General | Notifications in preferences to set up notification popups for the category Feeds. The popups will show up in the lower right area of your desktop and clicking on them will open the application to show the change in full detail.
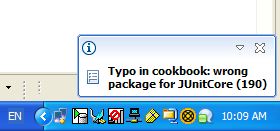
A notification popup informing about a change to a work item.
It is also possible to be notified via classic E-Mails. The tab Mail Configuration is available from the user editor. This editor can be reached from the contextual menu on your project area (Open My User Editor). The configuration provides fine grained conditions under which an E-Mail should be send to you. Similar to news items in the event log, the E-Mail will list all changes that where made to the work item.
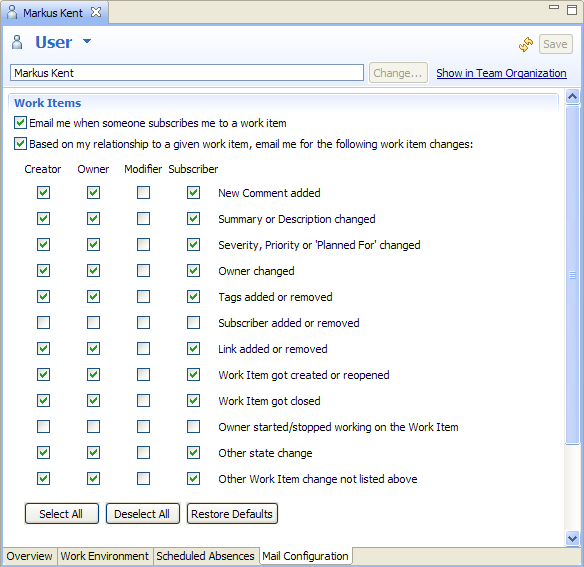
E-Mail Configuration in the User Editor.
Message @Me
Knowing that collaboration is essential in a distributed team, Rational Team Concert 2.0 allows you to address one or more colleagues when editing a work item. While writing a comment or description you can simply type ‘@’ followed by the colleague’s user ID. Content assist can help you to find the right user ID. Just press Ctrl+Space and begin typing the person’s first or last name.
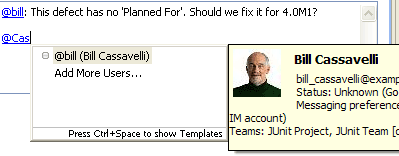
Creating a Message for a User from a Work Item
The addressed user will receive a Notification Popup and Event to make him aware of the message.
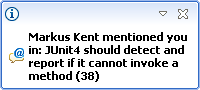
Receiving a Notification Popup for a Message @Me
Receiving an Event for a Message @Me in Team Central
Work Item perspective
The Work Item perspective includes the Team Artifacts view, the Team Central view, the Work Items view, and the Tag Cloud view which are all useful when doing bug triage where you have to manage both work items and work item queries. The perspective is less important for an individual developer who only needs access to the work items that are assigned to him.Team Artifacts view
The Team Artifacts view has a Work Item folder under every connected Project Area where you can find all work item queries stored in the repository. The “My Queries” folder contains your private queries, and the “Shared Queries” all predefined and shared queries. 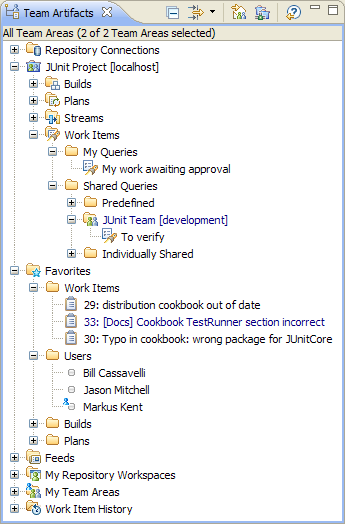
The Team Artifacts view’s top level Favorites node can be used to bookmark all “favorite” Jazz artifacts. This includes work items and work item queries. In addition you can create folders, which helps managing larger sets of favorites. So if you have too many private and shared queries under the Work Item node, you can keep only the frequently used ones under Favorites. To add an artifact as favorite, simply drag it on the desired folder under the favorites node. Alternatively, open the contextual menu on the artifact and select “Add to favorites”. This will bring up a dialog to specify the location of the new favorite.
Some tips on how to effectively work with favorites:
- Open the contextual menu on any favorite to use artifact-specific actions like
Find Potential Duplicatesfor a Work Item orSubscribe to Query Feedfrom a Query - Use drag and drop to organize your favorites and work with them. For instance, you can drag a team area from your favorites on the Quick Information area of a work item to subscribe all members of the team area.
- Double-click a favorite to open the referenced artifact in a view or editor
- Quickly open your favorites by pressing
Ctrl+Alt+F
The Team Artifacts view’s top level Work Item History node remembers all work items that have been opened in the work item editor.
Team Central
Team Central is a view with multiple sections which gives you a quick overview of information that is relevant for your work, including builds, change set deliveries, or work item activity. A typical section shows a concise summary, and connects to another view or editor that presents the information in more detail. 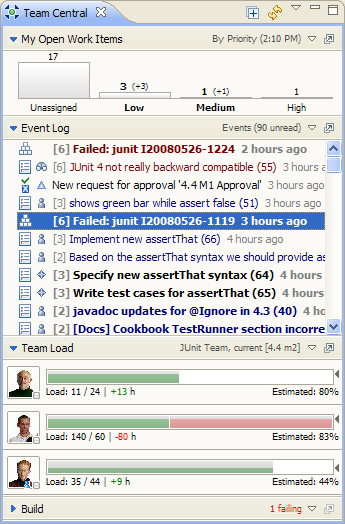
There is no limit on how many sections you can add to team central. Here is some tips on how to manage them:
- Use the view menu to create new sections
- From the contextual menu on a section you can rename, duplicate, hide and delete the section
- Re-Order sections via drag and drop
- Resize sections
- Expand or Collapse sections
- Switch between multiple perspectives using the view menu
Query Sections
Query Sections can be configured with one or more queries to get a summary of each query’s result count and how it varies over time. The counts can be broken down by a specific attribute (e.g. by Severity or most other built-in work item attributes).The query sections can be configured by dropping queries onto the section or by using the configuration dialog from the section menu.
There is one predefined query sections (additional sections can be created using Team Central’s menu):
- My Open Work Items shows the open work items owned by the current user grouped by priority.
Event Log Section
The Event Log section displays the content of one or more news feeds. By default Jazz has two preconfigured feeds that deliver events from the repository server to the client:
- My Work Item Changes on <Server>: contains change events for work items where the current user is either creator, owner, modifier, or subscriber,
- My Teams in <Project Area>: contains all events of all team areas where the current user is a member.
The following is a list of ways to subscribe to more feeds:
- From the contextual menu on a user you can subscribe to events generated by the user
- From the contextual menu on a team area you can subscribe to events belonging to that team area
- From the contextual menu on a build you can subscribe to build events of that type
- From the contextual menu on a plan you can subscribe to change-events for that plan
Tag Cloud View
Use the Tag Cloud view to create a tag cloud. For a given query, a tag cloud displays the number of work items by tag attribute. To create a tag cloud, drag a query from the Team Artifacts view on to the Tag Cloud view. When you click a link in the tag cloud, the work items with that tag value appear in the Work Items view. 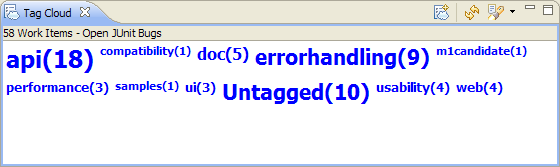
Using the Web UI
Overview
When you initially load the Web UI, you will be shown a list of project areas to select. Clicking on a project area will show the default page for that project area, which is usually the Dashboards page. To load the Work Items page, click on the Work Items link in the header. The selected project area determines the queries displayed, search scope, and available new work item types used in the Web UI. You can change project areas using the Project Area selector in the upper right of the web page. When you change project areas, the entire Web UI will refresh, so you will reset all recently viewed items and, after being prompted, lose any changes that have not been saved. You can also load the Web UI directly to a work item or query result view from a URL stored as a favorite, sent in a message, or linked from another page. If you need to open the Web UI manually, you can use a URL similar to the following example:
https://www.example.com:9443/jazz/web
The web address (“www.example.com”) and port (“9443”) will be configured for your server. Often web sites are configured to automatically route you to the appropriate port so the port number does not need to be in the URL.
The Web UI works best with the supported web browsers. The RTC 1.0 supported browsers are described in Supported Web Browsers. The RTC 2.0 supported browsers are described in the RTC 2.0 Release Plan.
When loading a work item, the work item editor appears as follows:
Apart from header and footer, the Work Item Web UI is divided into two main parts:
The left navigation part provides quick access to
- Create new work items and queries
- Perform a quick search (full text search)
- Select recently viewed work items, unsaved changes, and query results
- Run personal and shared queries
The right part is larger right and shows the editors and query results. The work item editor is shown above. The default configuration of the work item editor has four tabs:
- Overview (shown), showing Details with attributes, the Description and Discussion.
- Links, showing Subscriptions and the work item’s relationship with other work items, builds and other artifacts.
- Attachments, showing files attached to the work item and allowing new files to be uploaded.
- History, showing the changes made to the work item since it was created.
Useful tips for working with the web Work Item editor:
- If the category name does not fit in the Filed Against field, you may hover your mouse over the field to see the full category name.
- If you “hover” your mouse of the Quick Information section, you can see more information about those items. You may hover the mouse over links to image attachments (PNG, JPG, GIF) stored with the current work item to see a preview.
- The tags field will auto complete as you type.
- If you begin typing a comment and Save, but the save cannot complete because the work item is out of date (such as when someone else created a comment while you were creating yours), you can click the Refresh link next to the Subscribe Me link (NOT REFRESH OR F5 ON YOUR WEB BROWSER) and the work item will be refreshed; you will lose any changes to the description, details, links and attachments, but your comment will be preserved. If you think the work item may be be updated by someone else while you are working on it, save your property changes before spending a long time writing a comment.
- You can click on section headings to collapse or expand that section.
- You can click on someone’s name to send them an e-mail.
- The URL in the browser is updated as you navigate around in the Web UI, so you can copy the link from the address bar and send it to someone or bookmark it to get back to where you were. You can use the right mouse button over links in the left navigation section to copy links to queries or work items.
- Required fields are indicated by an orange asterisk; however, changing categories can change the required fields, so you may need to save after changing categories to see the required field markers.
- Changing Types can change the layout of the work item; however, you may need to save after changing the type to see all aspects of the new layout.
- You can navigate away to other work items in the Web UI without losing your unsaved changes, but remember to navigate back and save before closing your browser window. You will lose your unsaved changes if you navigate away from the Jazz Web UI, or Refresh using your web browser refresh button.
- The Jazz Web UI does not use cookies or maintain user information, so each time you open the Jazz Web UI, it opens with a fresh view. The Jazz Web UI does not capture right mouse clicks, so the context menu you see will continue to be your browser’s context menu.
- To move or copy the work item to another project area, use the Move/Copy button in the work item editor header.
Creating and Editing Work Items
Use the New Work Item button in the left bar to open a new work item editor. You can select the type of work item to open using the drop-down list associated with this button. Much of the functionality described in the rich client section about Creating a Work Item is available in the Web UI, too.You may bookmark the “New Work Item” link.
Recently Viewed and Unsaved Changes Lists
In the left navigation, there are two special sections called Recently Viewed and Unsaved Work. The Recently Viewed list shows the last query and several recent work items opened. When work items are changed, they are moved from Recently Viewed to the Unsaved Work list. These sections are more than just a list of links! Unlike other Jazz artifacts, the data in the items in the Recently Viewed and Unsaved Work sections are stored on your web browser and when you navigate to these items they are shown immediately without getting the information from the server. For example when you open a query and then “drill down” into a work item, then from within that work item “drill down” into a related work item, the query and two items that you had just looked at remain in the web UI cache; when you use the back button on your web browser, “drill up”, or select an item from the recently viewed list, you will switch very quickly among the views of these items.
Useful tips for working with the Recently Viewed and Unsaved Work:
- Work items that are changed but not saved are shown in the Unsaved Work section and have a “Save” action next to them in the list.
- The Recently Viewed section shows the last query run and the last five unchanged work items. Changed work items are shown in the Unsaved Work list and never removed so the list can grow longer if you leave several items in an unsaved state. One trick is if you wish to pin a work item to the list, make an innocuous change to it, such as adding a space to the tags list. Then the work item will remain on the Unsaved Work list until saved or refreshed.
- If you click on the query in the Recently Viewed list, it will (usually) show the query results just as you left them, including if you paged through the results. If you click the “Run” action on the Recently Viewed list or click on the query from the “My Queries” or “Shared Queries” list, it will re-run the query and show the new results from the first page of results. (In certain situations, the query is always re-run.)
- The Recently Viewed and Unsaved Work lists are cleared — AS ARE ALL YOUR UNSAVED CHANGES — when you press the Refresh button on your Web Browser. Only the items visited in the current Jazz session are shown in the Recently Viewed list.
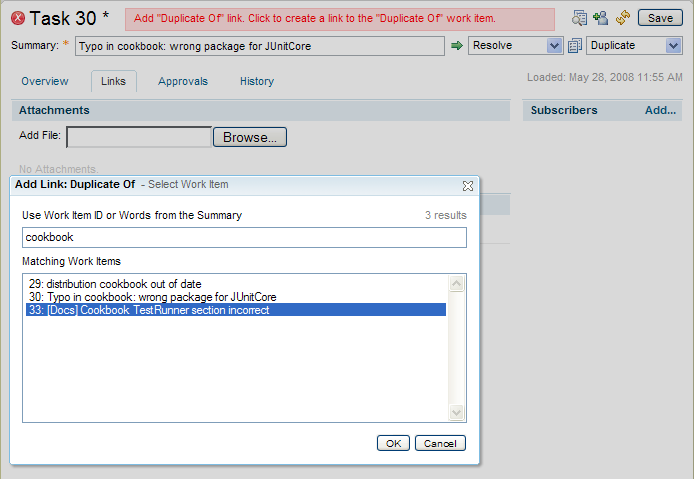
For example, if you were assigned Defect 42 and you think is a duplicate of one recently assigned to you, you could:
- Run your “Open assigned to me” query (some other query). You may wish to click the column header to sort by “Modified Date” as you look through the results to see the most recent ones first.
- When you find that Defect 25 is the same as Defect 42, open Defect 42 which will add it to the Recently Viewed list.
- Then click Defect 25 in the Recently Viewed list, go to its Links tab, and click “Duplicate Of”. Since Defect 42 is in the Recently Viewed list, it will be easy to find in “Select Work Items” dialog.
- Alternatively, you could search for the work item by entering a search term in the select work item dialog.
Finding Work Items
Find Work Items by ID or Textual Content
Use the quick search field in the left bar and enter the ID of a work item to open it directly in the Work Item Editor.Alternatively, enter some words that may appear anywhere in a work item’s content to see a list of work items that contain those words.
Find Work Items by Filter Constraints (Queries)
If you need more control of the query results, or if you need to run the same query frequently, use the New Query link to open the Query Editor. 
). Each condition follows the same rules: - As long as nothing is entered or selected, the condition is not part of the query yet.
- If you select or enter more than one value, these will be joined by OR.
- Variables are shown as check boxes at the top. These variables represent a value that can change over time. A good example is the Current Iteration variable that will always point to the iteration(s) marked as current in the process specification. Variables allow you to formulate queries that stay valid over an extended period of time, or will return results that depend on the user who executes the query (e.g. by using the Current User variable).
OR and AND clauses can also be added using the Add Conditions control.
Sharing Queries: If a query is useful for others, you can share the query with your team members or with individual users. In RTC 2.0, queries can also be shared with an entire Project Area. Switch to the Details tab of the Query Editor and select a Team Area or some users in the Team Area Sharing or User Sharing sections.
Defining Result Columns: Depending on the query, not all columns that are shown in the Query Results by default make sense. You can choose a custom set of columns that will be shown every time you execute the query (both in the Eclipse UI and the Web UI). Switch to the Result Layout tab and choose the columns and sort order that best suit your query results.
Query result view
The query result view shows you the most important work item attributes at a glance.
- The results can be further refined by typing into the filter text box in the upper right of the query result view. All work items that do not contain the text will be dynamically hidden from the result list. All visible fields are taken into account, i.e. you can also filter by owner name. It is often a good strategy to define a query without any text condition and do the text filtering directly on the result set. If there are multiple pages of results, the filter box will filter within the current page.
- Clicking on the column headers sorts the result set accordingly. Clicking a second time on a column header inverts the sort direction
- Clicking on the ID or the summary opens the work item in the editor.
From the query result view you can click on an item to open a full editor on the item, or in RTC 2.0 you can click on the edit action (
 ) on the row to open an in-line editor on the work item in the row.
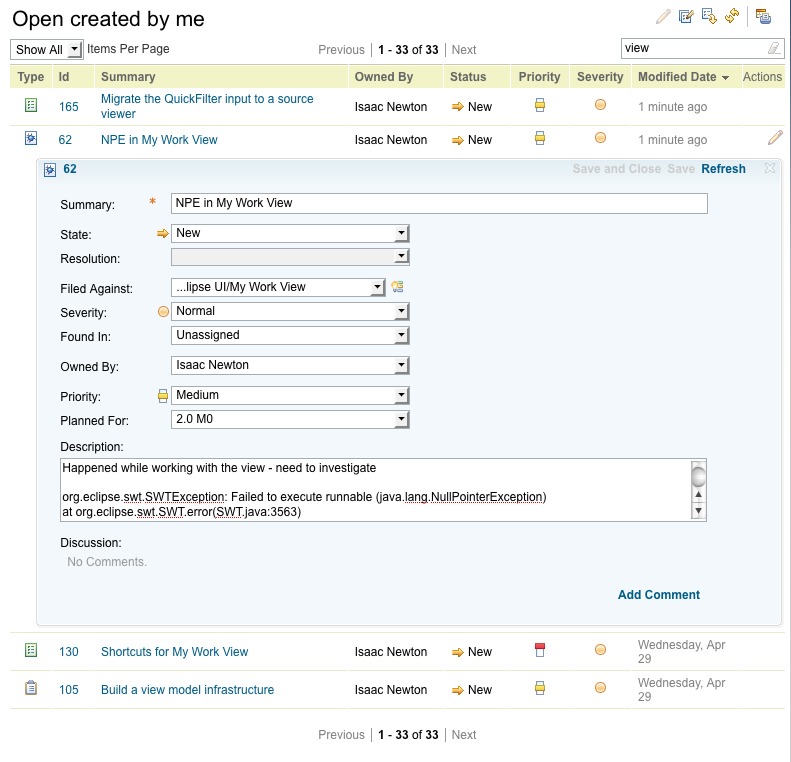
Edit multiple work items from query result view
In RTC 2.0 the query result view can also be used to change the attributes of multiple work items at once. To do this, create a query result then click on the update multiple work items action ( ). In edit mode, select the rows to be updated and choose the attribute and values to update using the plus actions (
 ), then press the Run button (
 ).
).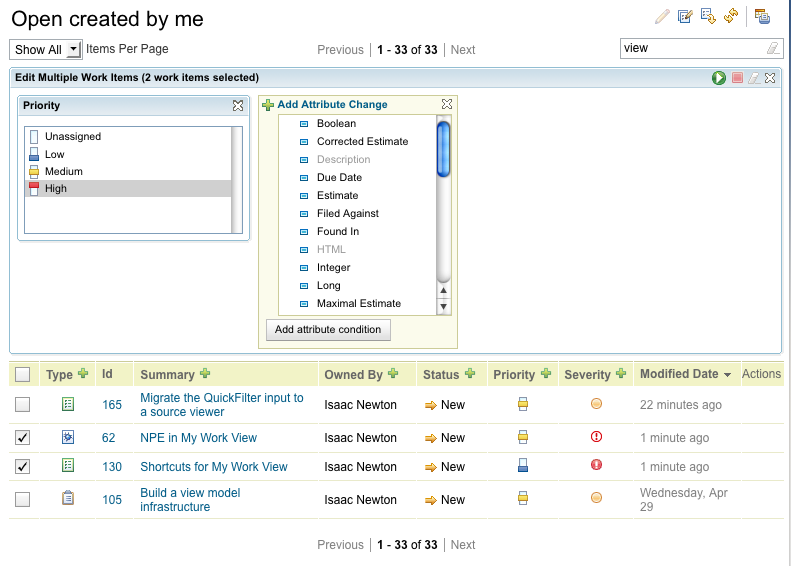
- The check box in the header can be used to select or deselect all visible rows.
- Shift-click to select or deselect a range of rows.
- You will be prompted to save all work items before going into edit multiple work items mode.