Every release we have the opportunity, and responsibility, to make progress on unifying the Web user interface across integrated Jazz applications. Unifying the UI — or more completely, the user experience — continues to be an important area of focus for the Collaborative Lifecycle Management team because we understand that when you use integrated Jazz applications across the software development lifecycle, you want a common experience from one touch point to another, particularly for common functionality.
For 2012, we set out goals for improving task flows from the Jazz Team Server setup into the application administration, as well as aligning the UI on a host of areas including navigation, dashboards and a number of other presentation and interaction patterns. While there continues to be more to do to achieve alignment and ease movement within and across the applications, as we come to the final count down for the CLM 2012 release, I am pleased to feature progress in the following four areas:
- Jazz Team Server & Application Setup
- Administration
- Navigation between and within projects
- Personal dashboard templates
1. Jazz Team Server & Application Setup
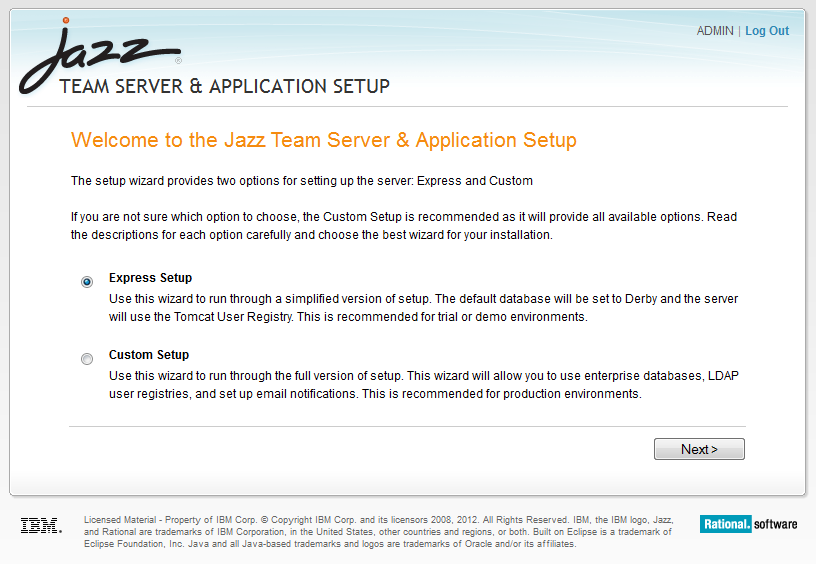
The addition of the Express Setup in the Jazz Team Server & Application Setup wizard provides an expedited way to set up a local sandbox for your personal use and testing purposes.
2. Administration
2a. Jazz Team Server Administration Home page
In 2011, we introduced an ‘administration launchpad’ with the addition of the Jazz Team Server Administration Home page. This page functions as a centralized point from which to access all administration in an integrated CLM environment, including the core JTS administration, extended JTS administration and integrated application administration.
The 2012 redesigned Jazz Team Server Administration Home page received three major enhancements this release:
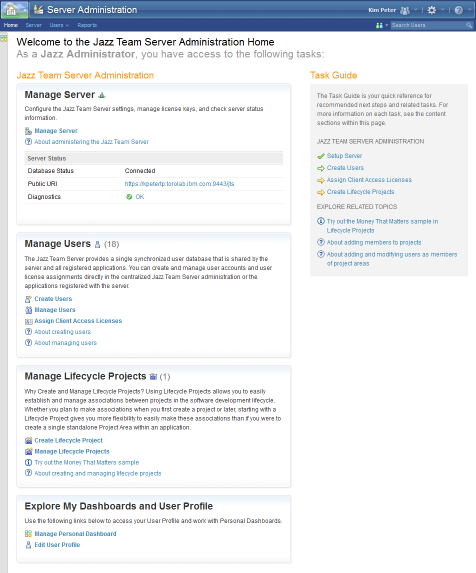
First, it provides a Task Guide with recommended steps and related tasks for the main administration areas on the JTS. This Task Guide is particularly useful for guiding order and coverage of tasks in a new setup and can help as a reminder of what needs to be done for returning administrators.
Second, the main content area of the page provides more information for each of the main tasks in the Task Guide, as well as links to other administrative areas and tasks.
Third, depending on what level of JTS repository role permission you have, the page content is tailored to your role. For instance, a Jazz Administrator will see everything, where as a Jazz User will see only things available to them, which includes access to the their user profile and personal dashboard pages.
Figure 2. Jazz Team Server Administration Home page
The Jazz Team Server Administration Home page can always be accessed from either the Home menu, on the left side of the banner, or from the Administration menu on the right side of the banner.
Figure 3. Access to the JTS Administration Home page from the “Home” and “Administration” menus
2b. Project Area editor
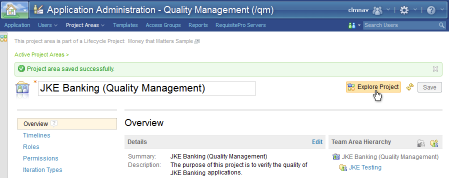
From within the Project Area editor, you can now easily return to the project dashboard by clicking on the Explore Project button in the top right of the editor.
Figure 4. Explore Dashboard button within the Project Area editor
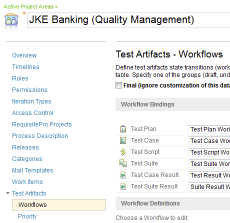
The Project Area editor now uses vertical tabs, instead of the previous horizontal tabs, for both its core and application-extended content. Any pages an application adds to the editor are nested within the vertical table of contents, on the left, and the selected page’s title reflects the context with the parent type followed by the sub-element being edited, e.g., Test Artifacts – Workflows. This new orientation allows for future growth of the Project Area editor content and is a more navigable way to manage extended content. Rational Quality Manager is the first to adopt this new tab orientation.
Figure 5. Vertical tabs in the Project Area editor for better scalability and extensibility
3. Navigation between and within projects
3a. All Projects page
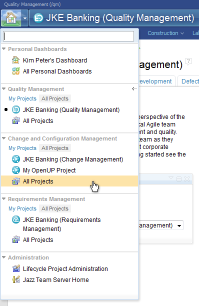
All applications are now using an All Projects page as their main application landing page, containing the list of projects the current user has access to. You can get to the All Projects pages from the Home menu in the banner or by entering the now-standard URL syntax for each application: “…/app/web”. For example: https://clm.jkebanking.net/qm/web, https://clm.jkebanking.net/ccm/web and https://clm.jkebanking.net/rm/web.
Figure 6. Accessing All Projects pages from the Home menu
Within the All Projects page, each project entry provides access to the project dashboard by clicking on the title or on Explore Dashboard link. Additionally, you can also access the Project Area editor via the Manage Project link, and the associated project areas under the Associations lists.
Figure 7. All Projects page example
3b. Project Dashboards
All of the CLM applications are now using Project Dashboards as their main project landing page. These dashboards are accessible from the Home menu in the banner and within the project from the navigation bar.
Figure 8. Project Dashboard(s) accessible from the project navigation bar
3c. Project Details area
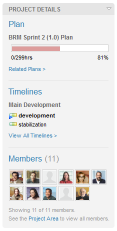
When you arrive at the project dashboard, take note of the Project Details area on the right side of the page. It includes an overview of the Plan progress, Timelines and Members. Each of these sections allows you to drill deeper into more details. The Project Details area is available in Rational Quality Manager and Rational Team Concert.
Figure 9. Project Details area within project and team dashboards
3d. Navigation menus with Unsaved Work and Recently Viewed
The navigation menus (a.k.a. capability or component menus), which sit along the top of the UI just below the banner, and provide access to an application’s function and resources, are now used across all CLM applications.
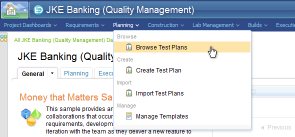
While all applications made some changes to their navigation menus toward alignment in 2012, the biggest changes to the menu system this release were for Rational Quality Manager. QM moved to using a “tabless” UI* (this is the common single-page-per-resource model that the other Rational Jazz applications use), complementing that move with their newly organized menus with static actions in the first column to Browse, Create, Import and Manage, and dynamic content in the right column(s) for Recently Viewed and Unsaved Work.
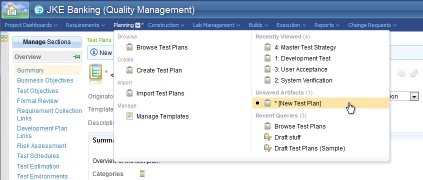
Recently Viewed history persists between browser sessions, and across browsers, so you can get to recent resources quickly without effort – powered by the new history service with storage on the JTS. You can have up to ten items in the Recently Viewed and Unsaved Work sections of the menus. This allows you to easily navigate between artifacts without giving up any real estate in the main user interface, or having to manage multiple in-page tabs (as in the previous model in Quality Manager). This change across all Jazz web applications also means that every artifact is addressable via a unique URL, therefore everything can be bookmarked or linked to directly.
Figure 10. Component menu with static and persistent actions in the first column
Figure 11. Component menu after interacting with artifacts to show the dynamic – Recently Viewed and Unsaved Work – sections in a separate column
* For Rational Quality Manager in-page tab lovers out there, you can switch back to using tabs via the User Preferences for Quality Management under your User Profile menu on the right side of the banner. However, we do encourage you to give the new menu system with tabless UI, and breadcrumbs to aid navigation, a try before making a move back to tabs.
3e. Recently Viewed dashboard widget
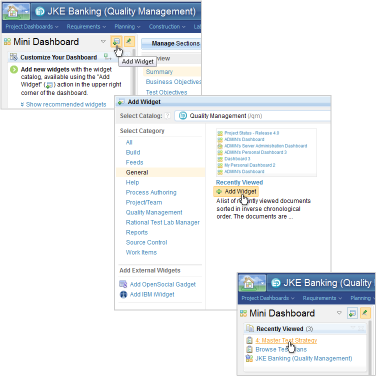
Looking beyond showing Recently Viewed only in the menus, the new Jazz history service opens up other opportunities in the UI to provide the current user access to resources they have visited. The first of these is the new Recently Viewed widget. Add this widget to your Mini Dashboard (or your other personal or project dashboards) to quickly access recent artifacts across lifecycle applications. **
Figure 12. Recently Viewed widget added to the Mini Dashboard by selecting Add Widget from the toolbar and picking the Recently Viewed widget from the Widget Catalog
** TIP: Customize the Recently Viewed widget to indicate the application source of artifacts displayed. Currently, the Recently Viewed widget will automatically be scoped to the application you are in when you add the widget. If you plan to add this widget to your Mini or Personal Dashboard for each of the applications you work with, adding a qualifier to the name of the widget can be very useful. To do this, use the widget’s Appearance settings to change the name, e.g., Recently Viewed – QM.
4. Personal dashboard templates
The new Personal Dashboard templates give you the starting point from which to build your own optimized personal view of the CLM world.
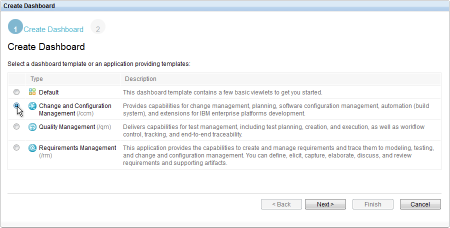
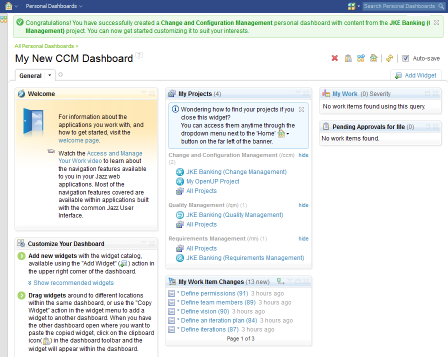
Upon successful creation of a personal dashboard with your chosen template, you have a personal dashboard tailored to the base application content, i.e., Change and Configuration Management, Quality Management or Requirements Management. From this starting point, you can customize your dashboard with content from any of the associated applications, then use your dashboard as your central cross-application view of the world.
Figure 13. Initiate Create dashboard action from the Personal Dashboards menu
Figure 14. Step through the short Create Dashboard wizard to select the source of the initial dashboard content
Figure 15. And Voila! You have a new personal dashboard template to use as your base to customize
These four featured areas of progress toward a more unified CLM experience are just part of the larger picture of user interface enhancements you will see in CLM 2012. Look for alignment and enhancements in the following areas as well:
- Reporting, including access within the navigation bar and common document output
- Table interactions, where we now offer common approaches to column re-sizing between RQM and RRC; use of column sort tooltips in RQM and RRC; common approaches to table row selection, where applicable; and use of actions column and menu across all applications
- Resource header layouts, where all editors and views now follow the same layout rules
- Required input markers are mostly aligned across editors
- Message presentation and content is now largely the same across the applications
- Create/Delete/Add/Remove interaction patterns, such as when you “Create” or “Add” an artifact, are getting closer in approach across the various contexts
Of course, the best place to see these enhancements is to use the CLM 2012 products directly. You can try them out by downloading CLM 2012 at Jazz.net Downloads (pick one of the CLM products, select the latest 4.0 build and go!), and set up your personal sandbox with the Money That Matters sample lifecycle project.
If you are attending the Innovate2012 Conference this year from June 3-7, you’ll have a number of opportunities to try out the CLM 2012 solution: One way is to check out the Open Lab workshops — there’s one dedicated to Navigating the Collaborative Lifecycle Management (CLM) Web: A Jazz 2012 Primer that I can personally recommend :-). The Technical workshops are also a great way to dive into the applications. And if you are in the Exhibition Hall, do come by the User Experience Zone to get hands-on experience with the new Rational Jazz CLM products and have the opportunity to provide your input. I hope to see you there!
Kimberley Peter
UI Design Lead, Jazz Foundation and Collaborative Lifecycle Management










 (6 votes, average: 4.33 out of 5)
You must be logged in to post a comment.