
Installing Rational Team Concert 3.x with IBM WAS, IBM DB2 and Microsoft Active Directory
The Collaborative LifeCycle Management Infocentre contains detailed information on the various deployment topologies possible with the RTC 3.x release including different Application Servers, enterprise database management systems, and user management methods. In this article we provide specific guidance on deploying the Jazz Team Server (JTS) and the Change and Configuration Management (CCM) capability to support Rational Team Concert with IBM Websphere Application Server v 7.0.0.x (WAS), IBM DB2 Enterprise v 9.7 (DB2), using Microsoft Active Directory for authentication. Note that this is not a prescriptive article; rather it is intended to be used in conjunction with the various product Infocenters, Technotes and other articles referenced here, and the various parameters used here (paths, host names, ports, JVM Heap sizes) should be configured with your specific requirements and environment in mind.
The following is a summary of the steps to be followed:
- Configure WAS with required properties
- Configure WAS with Active Directory
- Install JTS and CCM applications
- Configure the JTS and CCM applications to connect to DB2
- Deploy the JTS and CCM applications to WAS
- Run the setup wizard
Pre-requisites and assumptions
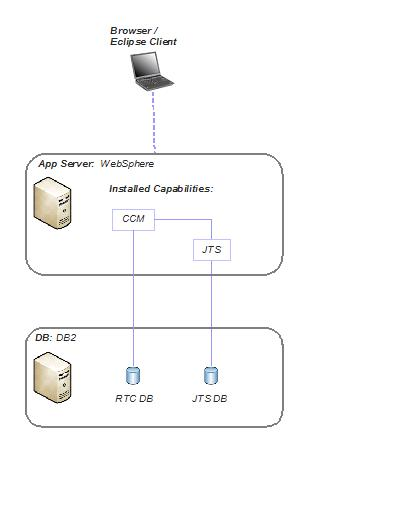
This article is based on the deployment architecture as shown below and the configuration was performed on a 64-bit Windows 2008 Enterprise R2 server. This article uses “w2k8x64.ratl.dem” as the host name. :
The following tasks have already been performed on the server:
IBM Installation Manager 1.4.1 installed
IBM Installation Manager version 1.4.1 is required to install RTC 3.x or later and can be obtained at the IBM Support Portal.
WAS v7.0.0.11 installed
The default profile has the following properties:
Profile name: AppSrv01
Node name: w2k8x64Node01
Host name: w2k8x64.ratl.dem
Enable administrative security (recommended): True
Administrative console port: 9060
Administrative console secure port: 9043
HTTP transport port: 9080
HTTPS transport port:9443
Run application server as a service: True
Create a Web server definition: False
DB2 9.7 Installed
A default DB2 9.7 64-bit instance is installed on the server at C:PROGRA~1IBMSQLLIB with DB2 Copy Name “DB2COPY1” and administrative user name as “db2admin”, using port 50000.
For Jazz Team Server, a database “JAZZ” has been created with 16K pages and UTF-8 code set:
db2 create database JAZZ on <path to storage> using codeset UTF-8 territory en PAGESIZE 16384
For Change and Configuration Management, a database “CCM” has been created with 16K pages and UTF-8 code set:
db2 create database CCM on <path to storage> using codeset UTF-8 territory en PAGESIZE 16384
Active Directory users and groups created
The server has Active Directory installed and the following groups created :
- “CN=JazzAdmins,CN=Users,DC=ratl,DC=dem”
- “CN=JazzDWAdmins,CN=Users,DC=ratl,DC=dem”
- “CN=JazzGuests,CN=Users,DC=ratl,DC=dem”
- “CN=JazzProjectAdmins,CN=Users,DC=ratl,DC=dem”
- “CN=JazzUsers,CN=Users,DC=ratl,DC=dem”
The Jazz Administrative user, belonging to the above “JazzAdmins” group, has been created in Active Directory:
- “CN=Jazz Admin,CN=Users,DC=ratl,DC=dem”
A number of additional users belonging to each of the other groups have been created, ensuring that that each group has at least one user as a member. The “mail” property (email address in the user’s Active Directory property sheet) has been set for each user which will be used as the user’s email address. One way to verify this is to use the “dsquery” command. For example:
C:>dsquery * "CN=Jazz Admin,CN=Users,DC=ratl,DC=dem" -attr mail
jazzadmin@ratl.dem
RTC Server 3.0 downloaded
The “Jazz Team Server and CCM Application” Installation Manager Repositories downloaded from the RTC downloads page have been unzipped to C:jazzrepos.
Where passwords are specified, “password” is used as a generic value for convenience.
Configure WAS with required properties
First turn off the WAS “Java 2 Security” option. Login to the WAS Administration console at https://w2k8x64.ratl.dem:9043/ibm/console/. Click Security > Global security. Under Java 2 security, clear the check box for Use Java 2 security to restrict application access to local resources.
Next , navigate to Security > Global security > Web and SIP security > General settings. Select the check box for Use available authentication data when an unprotected URI is accessed.
Now we need to set the JVM heap sizes. Note that the values used here are only examples and should be changed to suite your particular environment. Navigate to Servers > Server Types > Websphere application servers > Server1. Under Server Infrastructure, click Java and Process Management > Process definition. Under Additional Properties, click Java Virtual Machine. Add the value 100 to the Initial Heap. Add the value 4096 to the Maximum Heap Size.
Next, we need to add a set of custom properties. Under Additional Properties, click Custom properties and add the following properties:
Name:JAZZ_HOME Value: file:///C:/IBM/JazzTeamServer/server/conf
Name: java.awt.headless Value: true
Name: org.eclipse.emf.ecore.plugin.EcorePlugin.doNotLoadResourcesPlugin Value: true
Name: log4j.configuration Value: file:///C:/IBM/JazzTeamServer/server/conf/startup_log4j.properties
Click Save directly to the master configuration.
Note the value of JAZZ_HOME; we will use C:IBMJazzTeamServer as the installation root for the JTS and CCM applications.
Finally we set the logging level to severe for the org.eclipse.birt.* packages. Navigate to Servers > Server Types > WebSphere application servers > Server1. Under Server Infrastructure, click Java and Process Management > Process definition. Under Additional Properties, click Logging and tracing > Change Log Detail Levels. In the dialog box, type in
org.eclipse.birt.*=Severe
Click OK and save directly to the master configuration. Now you can logout of the WAS Administrative console and restart WAS.
Configure WAS with Active Directory
Before the JTS and CCM applications can use Active Directory for user management, we must first enable WAS to use Active Directory.
Login to the WebSphere Administration console at https://w2k8x64.ratl.dem:9043/ibm/console/, navigate to Security > Security > Global security and configure the following security settings:
Enable administrative security: on
Enable application security: on
User account repository/Available realm definitions: standalone LDAP registry
In the User account repository section, click Configure, and supply the following General Properties:
Primary administrative user name: Administrator
Server user identity: Automatically generated server identity
Host: w2k8x64.ratl.dem
Port: 389
Type of LDAP server: Microsoft Active Directory
Search timeout: 120 seconds
Base distinguished name (DN): CN=Users,DC=ratl,DC=dem
Bind Distinguished name (DN): CN=Administrator,CN=Users,DC=ratl,DC=dem
Bind password: password=
In the Configuration section, click Test connection, and make sure the connection succeeds. Click Apply, and save the changes.
In the Global Security Configuration page, make sure that the Current realm definition is set to “Standalone LDAP registry”.
Logout of the WAS Administrative console and restart WAS.
The WAS Infocenter topic Using Microsoft Active Directory for Authentication discusses setting up WAS and AD in more complex setups. For the purposes of this example the above settings assume a very simple setup and the following conditions apply:
- Since this example uses a single LDAP registry we use Port 389 to connect. In more complex scenarios that require use of a Global Catalog the port will typically change to “3268“. See http://publib.boulder.ibm.com/infocenter/wasinfo/v7r0/topic/com.ibm.websphere.base.doc/info/aes/ae/csec_was_ad_globcat.html and http://technet.microsoft.com/en-us/library/cc728188%28WS.10%29.aspx for more information.
- The Base Distinguished name used here – CN=Users,DC=ratl,DC=dem – implies that all the users and groups used by the JTS and CCM applications can be found under that container.
- We use the Administrator DN for Bind Distinguished Name assuming that the AD setup does not allow anonymous searches.
Install JTS and CCM applications
Start the IBM Installation Manager and add a new Repository with the location set to C:JazzReposimrepojts-ccm-trialoffering-reporepository.config. Click Install to start the installation process. In the Install Packages window, select the Jazz Team Server and CCM Application and click Next.
After accepting the License Agreement, select Create a new package group and set the Installation directory to C:IBMJazzTeamServer. In the Features screen, Select Jazz team Server and Change and Configuration Management, deselect Tomcat Application Server v5.5 and click Next. Accept the location to place the Jazz Team Server web applications for later deployment as C:IBMJazzTeamServerserverwebapps. In the next screen, select the Not upgrading from previous product release and click Next.
Take note of the context root values: the JTS administrative web UI can be accessed at https://w2k8x64.ratl.dem:9443/jts/admin, the CCM administrative web UI at https://w2k8x64.ratl.dem:9443/ccm/admin and the CCM Web UI at https://w2k8x64.ratl.dem:9443/ccm/web.
In the summary screen, review you selections and click Install to begin the installation process. When the installation completes, click Finish.
Configure the JTS and CCM applications to connect to DB2
The teamserver.properties configuration files for the JTS and the CCM applications are configured to connect to a Derby database by default. To change these to connect to the DB2 databases previously created, each of these files must be edited as follows.
First edit the JTS teamserver.properties file located at C:IBMJazzTeamServerserverconfjts and comment out the lines under DERBY Configuration by placing # before each line. Remove the # beside each line under DB2 configuration and modify them:
com.ibm.team.repository.db.vendor = DB2
com.ibm.team.repository.db.jdbc.location=//w2k8x64.ratl.dem:50000/JAZZ:user=db2admin;password={password};
com.ibm.team.repository.db.jdbc.password=password
com.ibm.team.repository.db.db2.content.tablespace.numpages=250000
com.ibm.team.repository.db.db2.content.tablespace.location=content_tablespace
Also edit the location of the JTS indices to be absolute paths:
com.ibm.team.fulltext.indexLocation=C:/IBM/JazzTeamServer/server/conf/jts/indices/workitemindex
com.ibm.team.jfs.jena.tdb.storage.dir = C:/IBM/JazzTeamServer/server/conf/jts/indices/jfs-rdfindex
com.ibm.team.jfs.jena.tdb.history.dir = C:/IBM/JazzTeamServer/server/conf/jts/indices/jfs-rdfhistory
com.ibm.team.jfs.lucene.history.directory = C:/IBM/JazzTeamServer/server/conf/jts/indices/jfs-texthistory
com.ibm.team.jfs.lucene.directory = C:/IBM/JazzTeamServer/server/conf/jts/indices/jfs-textindex
Next edit the CCM teamserver.properties file located at C:IBMJazzTeamServerserverconfccm and comment the lines under DERBY Configuration by placing # before each line. Remove the # beside each line under DB2 configuration and change them:
com.ibm.team.repository.db.vendor = DB2
com.ibm.team.repository.db.jdbc.location=//w2k8x64.ratl.dem:50000/CCM:user=db2admin;password={password};
com.ibm.team.repository.db.jdbc.password=password
com.ibm.team.repository.db.db2.content.tablespace.numpages=250000
com.ibm.team.repository.db.db2.content.tablespace.location=content_tablespace
Also edit the location of the CCM indices to be absolute paths:
com.ibm.team.fulltext.indexLocation=C:/IBM/JazzTeamServer/server/conf/ccm/indices/workitemindex
com.ibm.team.jfs.jena.tdb.storage.dir = C:/IBM/JazzTeamServer/server/conf/ccm/indices/jfs-rdfindex
com.ibm.team.jfs.jena.tdb.history.dir = C:/IBM/JazzTeamServer/server/conf/ccm/indices/jfs-rdfhistory
com.ibm.team.jfs.lucene.history.directory = C:/IBM/JazzTeamServer/server/conf/ccm/indices/jfs-texthistory
com.ibm.team.jfs.lucene.directory = C:/IBM/JazzTeamServer/server/conf/indices/jfs-textindex
Note: Do not change the password={password} text in the com.ibm.team.repository.db.jdbc.location property above.
Finally, open a Command Prompt window, change directory to C:IBMJazzTeamServerserver and run the following commands to create the database tables:
repotools-jts -createTables -clean
repotools-ccm -createTables -clean
Ensure that both commands run successfully, checking the output to see that the commands connect to the DB2 databases as specified above (JAZZ and CCM).
Deploy the JTS and CCM applications to WAS
Now that WAS has been configured to use Active Directory and the JTS and CCM applications have been configured to connect to the DB2 databases, we can deploy the applications to WAS and enable them to use Active Directory for User Management.
Login to the Administrative console for WAS at https://w2k8x64.ratl.dem:9043/ibm/console/. Navigate to Applications > New Application > New Enterprise Application, click Browse, and navigate to C:IBMJazzTeamServerserverwebapps and open the jts.war web application. Click Next, accepting all default options until “Step 4: Map context roots for Web modules”. On this page set the value of the Context Root to “/jts” and click Finish. Verify that the jts_war application was installed and click Save directly to the master configuration.
Repeat the above steps for the Change and Configuration Management (ccm.war) and Information Center (clmhelp.war), changing the context roots to “/ccm” and “/clmhelp” respectively.
Next we need to map the Jazz user groups already created in Active Directory to the JTS and CCM applications.
Navigate to Applications > Application Types > WebSphere enterprise applications. Make sure that the “jts_war” application is not running and click it to open it for editing. In the Detail Properties section, click Security role to user/group mapping. Individually select each of the groups listed (JazzAdmins, JazzProjectAdmins, JazzDWAdmins, JazzUsers, JazzGuests) and using the Map Groups…. button, map it to the corresponding Active Directory group. In the Map users/groups page for each group, ensure that the Active Directory host previously specified during the WAS configuration is listed in the “User realm”. then type Jazz* in the Search string field and click Search. This will run an LDAP query on the host specified in the “user realm” searching starting from the “Base DN” property and return any group beginning with “Jazz”, each of which can then be mapped to its corresponding JTS group.
Save the changes, navigate to Applications > Application Types > WebSphere enterprise applications and start the “jts_war” application, verifying that a green arrow appears indicating the application started successfully. Repeat the above procedure for the ccm_war Enterprise application.
Run the setup wizard
The final step in setting up the JTS and CCM applications is to run the setup wizard which is required to properly setup a Public URI for the JTS and CCM applications, enable Email Notification, and register the CCM application with the JTS.
First ensure that the jts_war and ccm_war Enterprise applications are running. Point your Web browser to https://w2k8x64.ratl.dem:9443/jts/setup.
At the Jazz Team Server login page enter “jazzadmin” (case-sensitive) in both the User ID and Password fields and click Login. On the Configure Public URL page, enter https://w2k8x64.ratl.dem:9443/jts for the Public URI Root. Click Test Connection, making sure that the test is successful.
Since we previously edited the teamserver.properties for the JTS and CCM applications the Configure Database page should be pre-populated with the corresponding settings. Click Test Connection to make sure the connection is configured correctly.
On the Enable E-mail Notification page, Enable or Disable email notification. If you choose to enable notifications, you will need to provide information about your email server and test the connection to the email server. Click Next after making your selections and testing the connection.
On the Setup User Registry page, provide the following information:
User Registry Type: LDAP
LDAP Registry Location: ldap://w2k8x64.ratl.dem:389
User Name: CN=Administrator,CN=Users,DC=ratl,DC=dem
Password: password
Base User DN: CN=Users,DC=ratl,DC=dem
User Property Names Mapping: userId=sAMAccountName,name=cn,emailAddress=mail
Base Group DN: CN=Users,DC=ratl,DC=dem
Jazz to LDAP Group Mapping: JazzAdmins=JazzAdmins,JazzUsers=JazzUsers,JazzDWAdmins=JazzDWAdmins,JazzProjectAdmins=JazzProjectAdmins,JazzGuests=JazzGuests
Group Name Property: cn
Group Member Property: member
Click Test Connection and ensure that the connection is successful. Note that at this point a successful connection will result in the JTS teamserver.properties being populated with the LDAP parameters entered.
Assign the administrator a Rational Team Concert – Developer CAL.
On the Register Applications page, the wizard detects the CCM application that has been installed. Verify the name and URL of the installed applications detected by the wizard and click Register Applications. Note: The wizard creates friend relationships, registers the applications, and generates a consumer key and secret for each application.
After registration is successful, click Next to configure the registered applications. For the Change and Configuration Management application configure the public URI (https://w2k8x64.ratl.dem:9443/ccm), similar to the procedure above.
On the Finalize Application page click Finalize Application Setup.
After all applications are finalized, the Summary page appears, indicating that setup is complete. You can review server settings on this page; then, choose Create Users or Finish to access the Jazz Team Server Administration UI, where you can manage the server, users, and licenses. See Administering the Jazz Team Server for more information.
Summary
This article has walked through setting up Rational Team Concert 3.0 to work with Websphere Application Server, DB2 and Active Directory. Although the environment used for the example is a relatively simple and controlled one, the intent has been to concisely document the steps involved in a single page. More complex scenarios can be extrapolated using this example and consulting the various Infocenters and articles referenced herein.
For more information
- IBM Rational Collaborative LifeCycle Management Infocentre
- RTC 3.0
- IBM Installation Manager version 1.4.1
- WAS v7 Infocenter
- DB2 9.7 Infocenter
- dsquery command
- What is the Global Catalog?
- Jazz.net Wiki:LDAP Configuration for Newbies
- Jazz.net Wiki: LDAP Configuration properties FAQ
- IBM Support Technote: Warning occurred: Unable to validate the user information
- IBM Support Technote: How to verify LDAP parameters for Jazz Team server configuration
- Jazz.net Library (search filters: Websphere, DB2, LDAP)
© Copyright 2010 IBM