
Developing applications for Android™ using IBM Rational Team Concert
in an agile way
IBM Rational Team Concert (RTC) is a collaborative software development environment which integrates work item tracking, source control management, continuous builds, iteration planning, and a highly configurable process support to adapt to the way you want to work, enabling developers, architects, project managers, and project owners to work together effectively. It has clients for powerful IDEs such as Eclipse and Visual Studio.
Android™ is a mobile operating system, just like Symbian, iOS, Windows Mobile, and others in its league. It was initially developed by Android Inc., a firm later purchased by Google. It is now owned by the Open Handset Alliance, and fully open sourced – which is the main cause of its growing popularity. Google released most of the Android code under the Apache License. With the Apache License, vendors can add proprietary extensions without submitting those back to the open source community. Many versions of Android have hit the market since its inception – the most recent(as of Q3 2010) and power packed one being Froyo (v2.2). Android has now moved beyond being a platform for just mobile devices. The new Google TV also runs on Android!
For developers, Android SDK provides a rich set of tools, including debugger, libraries, a handset emulator, documentation, sample code, and tutorials. Android applications can be easily developed using Eclipse (Android’s official development platform) with the help of a plugin called Android Development Tools(ADT). This can help leverage Eclipse’s rich features like content assist, Java search, open resources, and different views and perspectives for developing an Android app. Add to this the power of collaboration, process, source control that RTC has to offer – you get the ultimate product for developing and managing Android apps throughout their lifecycle easily in a team. RTC is the only product of its kind in the market when it comes to developing Android apps, and in the context of team and source control, really adds much to the already rich functionality that Eclipse offers in association with ADT.
Download and installation
- OS: Windows x86 / Linux x86.
- IBM Rational Team Concert: Download/buy from https://jazz.net/downloads/rational-team-concert/releases/2.0.0.2iFix3. Note that if you’re using an existing Eclipse installation to install RTC, make sure you have Eclipse 3.5 or lower (Eclipse 3.6 is not yet supported for Android development). RTC can also be installed directly on Eclipse 3.5.x (see https://jazz.net/library/techtip/384).
- Android SDK: Download the SDK from Android website – http://developer.android.com/sdk/index.html.
- Android Development Tools(ADT): This is an eclipse plugin- the equivalent of JDT(Java Development Tools)- for Android Development. ADT can be downloaded and installed using instructions given at http://developer.android.com/sdk/eclipse-adt.html. Please follow the detailed instructions on this page for installing the ADT plugin, and also for setting the location of Android SDK in Eclipse.
- It is a good idea to read through the following step by step guide to set up RTC and prepare it for Android Development: http://jazzpractices.wordpress.com/2010/08/10/how-to-set-up-rtc-for-android-development/.
Project setup for the article
For the purpose of this article, setup a project in RTC as follows:
Create a project area called RTC Android Demo.
Create two team areas – RTC Android Demo Dev Team, and RTC Android Demo Test Team.
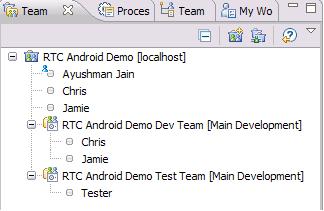
Created new process roles – developer and tester. The former has source control permissions while the latter doesn’t. Both have permissions to create/modify/close work items. Chris and Jamie have the developer role, while ‘Tester’ has tester role. Ayushman is the admin and also has the default role of product owner.
Now Ayushman, as the admin, creates a new Android project, and a Junit test project along with it, and shares the two projects with jazz source control via the RTC Android Demo Stream. The RTC Android Demo project goes into the default component and the RTC Android Demo Test goes into a separate Test suite component. While the former is owned by the developerment team, the latter is owned by the testing team. This is to ensure that the two teams deliver changes in their respective areas while still being able to access both projects.
Using RTC source control and planning to develop an Android application
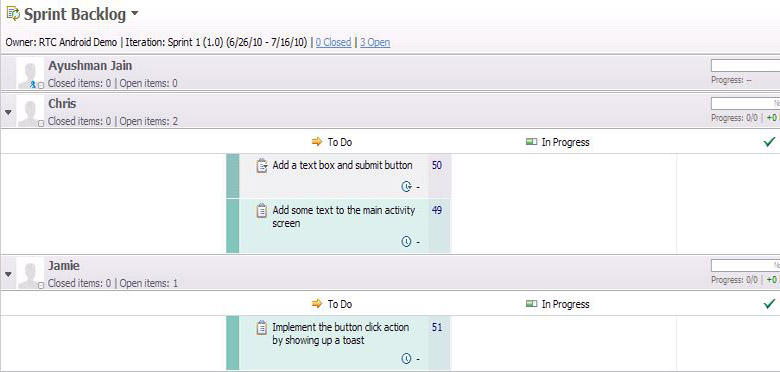
Often, while developing mobile apps like the ones for Android, a team can leverage the independence of UI and the backend implementation. With Android, the seperation of main.xml, strings.xml and the source code makes it convenient to have a few developers working on just the UI, and a few others working on the implementation. With RTC source control, it becomes a trivial task for such developers to share the changes being done on an application. Lets assume that Chris is in charge of the UI, and Jamie for the implementation. Ayushman – the team lead, has assigned both some tasks in the plan.
Building the UI elements
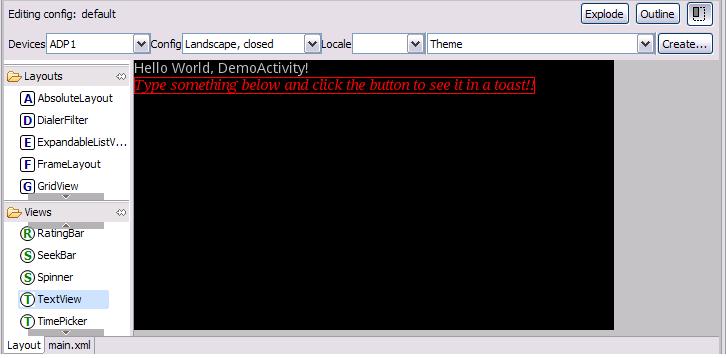
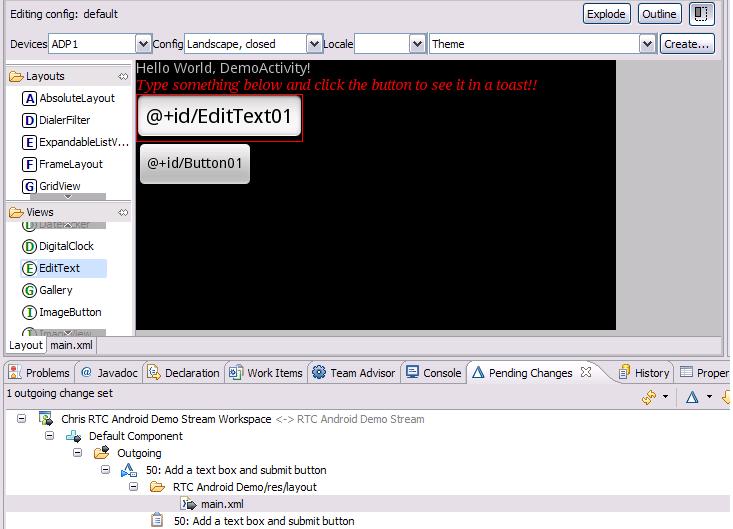
Now Chris sees the task assigned to him when he logs in next, and he gets down to the first one – adding some text to the activity screen. He changes the main.xml file to look as shown below.
In turn, he sees the Pending changes view as shown, indicating the changes he made for adding the new text.
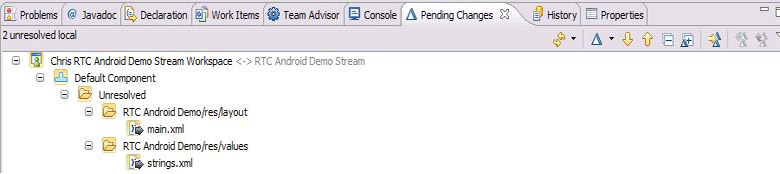
He checks in these changes to his local workspace, and then delivers them onto the RTC Android Demo Stream. As soon as he checks them in(Right click> Check in), he sees a new work item created. (Alternatively, you can create a patch with these changes and attach it to a bug being fixed by right clicking and selecting New> Patch..)

He can associate this change set to the task no. 49 that was assigned to him, and hence resolve the work item by delivering the change set. To do this, he right clicks on the new work item where it says <Enter a Comment>, and clicks associate work item... He selects the item no. 49, and then delivers the change set.
Similarly, he creates a new text box(edit text widget) and button, and associates these changes with work item no. 50, as follows:
He finally delivers this change set as well, thereby resolving both his work items.
Implementing the UI
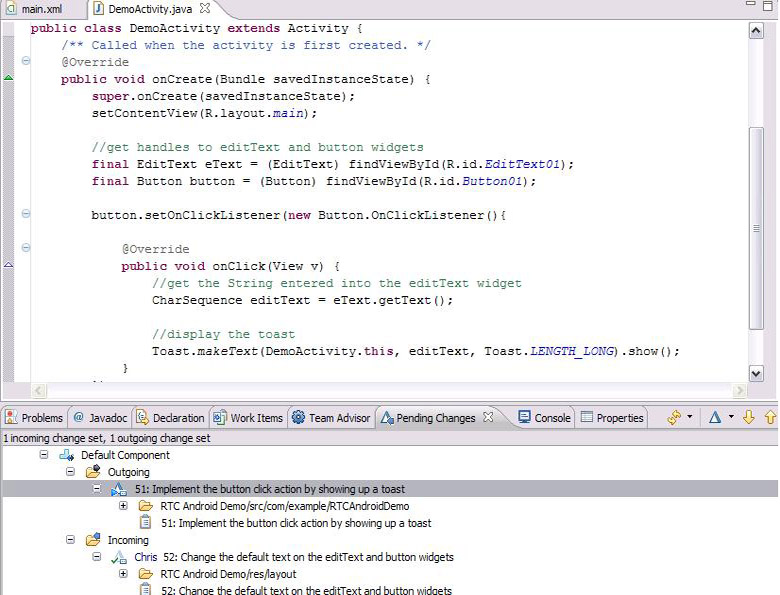
Now lets see how Jamie implements the back end. Note that Chris can continue making changes to the UI elements and Jamie will independently be able to implement the button click action. The following image shows how Jamie sees the incoming changes(done by Chris) when he logs in to his workspace.

All he needs to do is right click the change sets and click Accept. The UI elements are now available with Jamie. Jamie implements the button click action. Meanwhile, quite independently of Jamie, Chris has tweaked the UI a little by adding default text to the widgets. This is how Jamie sees the change sets when Chris has delivered his changes:
He can accept the incoming changes, test how the app works on the emulator and then deliver the change sets!
Resolving work items with attached screenshot
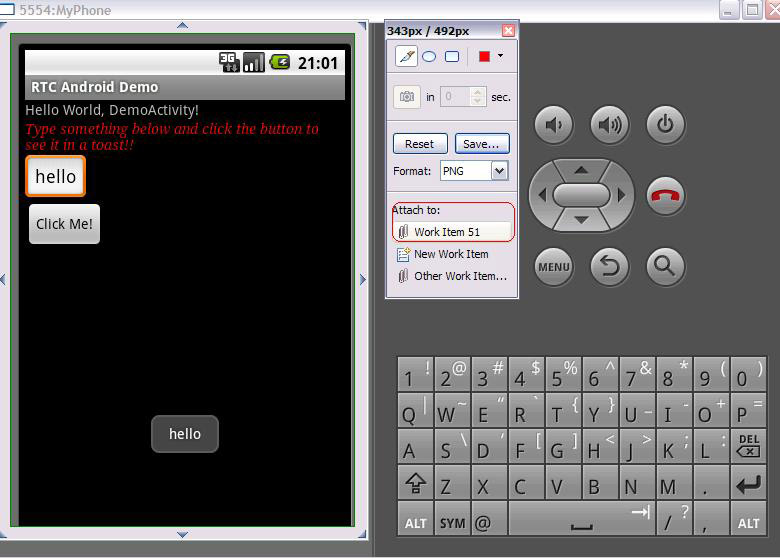
Since the implementation done has a visible UI, it’ll be really cool if you, on implementing a new feature can also attach the screenshot, to explain the way its intended to work. RTC makes it possible with screen capture tool (The small camera icon on the coolbar). Clicking it gives one a box which can be resized to capture whatever portion of screen is desired to be captured and a small set of tools beside it can be used to finally take the screenshot and attach it to a work item. So in our example, before delivering and resolving work item 51, Jamie takes a screenshot of the output as seen on the emulator and attaches it to the work item as shown:
Creating new work items pertaining to UI features using snapshot tool
The snapshot tool comes in very handy for requirements specification while creating a work item asking an engineer to develop a certain UI feature. Very often, the application needs to have different layouts for different locales, languages and even different handset configurations (viz. portrait/landscape). A snapshot image of how the layout should look in each of these different configurations can enable the developer to replicate the same in the application.
Testing Android applications using RTC’s Junit Integration
RTC integrates with Junit testing in a seamless way, which paves the way for simplified testing of Android apps by writing a Junit Test suite.
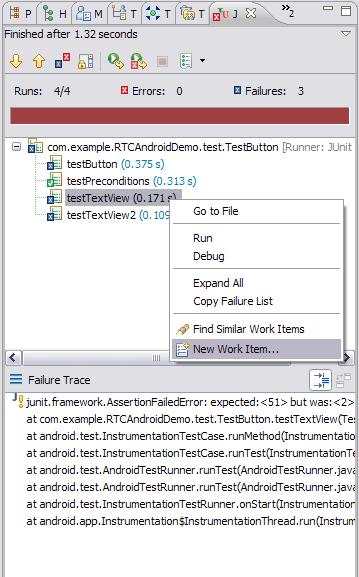
As an example, lets now shift our focus to Tester – a member of our testing team. He has a task assigned to him – task 53: Write Junits to test the app. He writes 4 tests – one each to check preconditions, test the button and two each to test the TextView. He runs the tests and observes 3 of them are failing. How can he notify the development teams to spring into action and make immediate rectifications? And how can this activity be centrally traced and recorded? Work items once again come to the rescue.
Using work items for defect reporting/ tracking
RTC’s Junit integration enables the tester to just create work items (defects) from failing tests and file them against the relevant project. To do this:
- Tester right clicks the failed test in the Junits view, and selects New Work Item.. as shown in the figure.
- He can file a new defect, and the stack trace as well as the test that failed get automatically attached to the defect report. The developers will be able to see instant notification of this defect and triage and assign it as they deem fit.
Using work items for defect reporting/ tracking
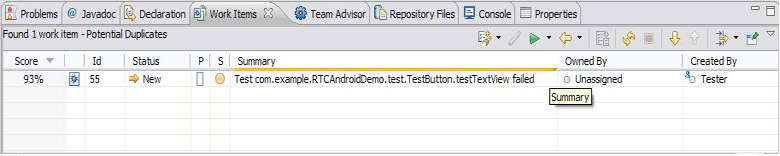
Now what if there were two or more failures because of identical problems (a scenario which is very common when UI components are being tested) ? The tester need not worry too much about this. He can exercise the option given to him by RTC as he creates a new defect – "In addition to creating a work item, would you like to search for similar existing reports?". In the above example, suppose testTextView() and testTextView2() are the tests failing because of similar stacktraces. Tester has already filed a defect against testTextView(). Now when he tries to do the same for testTextView2(), the search for similar reports correctly points him to the existing defect he filed against testTextView() as shown in the screenshot below, so that he instantly comes to know that he’s filing a duplicate bug. This saves the development team from spending some cycles to triage and mark the bug as duplicate.
Note that in case a duplicate does get filed, even the developers can use the Find potential duplicates option available from right clicking a defect.
Another way a tester can file defects is through the screenshot capture tool discussed in the previous section. This comes in handy if the tester is testing the UI as it looks on the emulator and encounters a problematic scenario such as a misplaced widget, a typo, wrong padding, etc.
Building your Android applications using Jazz Team Builds
For easy build administration and monitoring, a team working on Android applications can set up automated builds using the Jazz Team Builds – a fundamental part of RTC. Once the builds are setup, it is fairly simple to define schedules, check for changes, request a build, view results, etc. Step by step instructions to do so are available at http://publib.boulder.ibm.com/infocenter/rtc/v2r0m0/index.jsp?topic=/com.ibm.team.concert.tutorial.doc/topics/tut_rtc_build.html. Once this is done, the build engineer just needs to make sure that the build.xml file has the correct path for the Android library.
Developing Android applications with Git source control
Are you an Android developer using Git as your favoured SCM? Do you feel apprehensive about shifting to RTC thinking you’ll have to let go of Git? RTC’s got your back! Many Android developers work on git and it is also recommended by the Android community as a source control tool (i.e. if you’re a contributor to the Android community). RTC gives you the flexibility to use Git in a few easy steps through which you can integrate the two using Git hooks. Read up more at https://jazz.net/library/article/194#Integration .
Porting applications developed for other platforms to Android with RTC
Are you planning to port the application you developed for Symbian/iOS/Windows Mobile to Android? Do you want to start developing an application that can run on all of these platforms? RTC comes in handy, yet again! With RTC Visual Studio Client and Eclipse Client+ADT, you can now thread together a team that can work simultaneously on a single application for different platforms. RTC’s Visual Studio client is very useful for managing the C/C++/C# native applications written for, say, iOS. At the same time the RTC Eclipse client can be leveraged for the Android port, with JAVA and Java Native Interface(JNI). The Android Native Development Kit (NDK) is an excellent offering by Android to write and manage native code in Android. With RTC’s Visual Studio and Eclipse clients, members of a single team can easliy share work items, plans, process, build infrastructure, etc to create and/ manage a cross-platform application! Read more about heterogeneous development with RTC. If you want to start porting your C++/C# libraries, you can get some good insight from http://www.aton.com/porting-applications-using-the-android-ndk/.
Summary
Let us recap the features of RTC covered in this article, which make Android development a breeze.
- Eclipse is the favourite IDE of Android app developers. ADT – a plugin on Eclipse makes it very simple to leverage Eclipse to develop for Android. RTC can transform Eclipse + ADT into a powerful team collaboration platform for teams involved in developing Android apps, or those involved in contributing source code to the community.
- Since Android apps have a clean separated UI and implementation, and different engineers may work on each, RTC’s source control and work item management makes the development process simpler.
- RTC snapshot tool: This helps in 2 ways:
- Elegant workitem resolution: For developers working on the UI, taking a snapshot of the UI as seen on the emulator and attaching it to a workitem for developing a given UI feature is a fullproof way of workitem resolution, and makes the change instantly visible across the board.
- Filing defects or new workitems after testing: A tester may use the snapshot tool to capture some defect in the UI as seen on the emulator and attach it to a new bug report. New workitems for new UI features, etc can also be filed using a snapshot to enable the developers to get clear-cut requirement specs.
- Easy testing: Android applications can be tested using associated Junit test suites which already integrate into RTC. Furthermore, defects on test failures can be filed as work items easily using the stacktrace of a failing Junit. It is also easier to find out duplicate test failures using RTC.
- RTC’s hooks for git: For all the git fans out there, RTC’s flexibility to use git for source control is a blessing in disguise.
- Heterogenous development: RTC’s Eclipse client and Visual Studio Client can be simultaneously leveraged by a team involved in porting apps to Android, or developing a cross- platform application.
For more information
- Android developer website
- Getting started with Rational Team Concert
- Developing for Android with Eclipse
About the author
Ayushman is a committer on the Java Development Tools process in Eclipse, and Eclipse evangelist. He works at IBM India Software Labs, and is the pioneer of the Eclipse campus programme (http://eclipse.org/campus/). He is a fan of both Rational Team Concert and the Android platform.
Copyright © 2011 – IBM Corporation